
The Best Fluffy Pancakes recipe you will fall in love with. Full of tips and tricks to help you make the best pancakes.
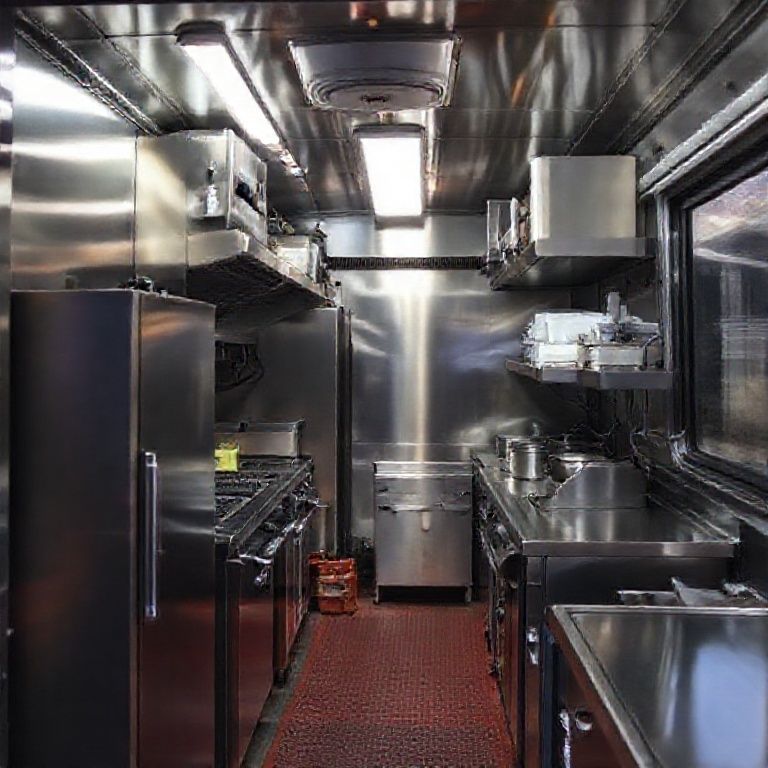
Table of Contents
- 1 Food Truck Design Tips for Success: How to Build a Mobile Kitchen That Actually Works (Not Just Looks Good)
- 2 1. The Golden Rule: Design for Peak Hour, Not for “Normal” Days
- 3 2. Equipment: The 80/20 Rule (Spoiler: You Don’t Need Half of What You Think)
- 4 3. The Menu Dictates the Design (Not the Other Way Around)
- 5 4. The Psychology of the Order Window (Why Your “Face” Matters More Than You Think)
- 6 5. Storage: The Hidden Killer of Food Truck Profits
- 7 6. The “Invisible” Design Elements That Make or Break You
- 8 7. Branding: Your Truck Should Tell a Story Before Anyone Reads the Menu
- 9 8. Permits and Codes: The Boring Stuff That Will Shut You Down
- 10 9. Tech Integration: Where Most Trucks Waste Money
- 11 10. The “Oh Sh*t” Fund: Designing for When Things Go Wrong
- 12 11. The Post-Launch Audit: How to Know If Your Design Works
- 13 12. The Future of Food Truck Design: Trends to Watch (or Ignore)
- 14 Putting It All Together: Your 90-Day Design Action Plan
- 15 FAQ: Your Burning Food Truck Design Questions, Answered
- 16 Final Thought: The Secret Weapon of Successful Food Trucks
Food Truck Design Tips for Success: How to Build a Mobile Kitchen That Actually Works (Not Just Looks Good)
I’ll admit something embarrassing upfront: My first food truck design was a disaster. Not in the dramatic, flames-shooting-from-the-fryer way (though that did happen once, long story), but in the slow, soul-crushing way of realizing six months in that my “clever” layout made it impossible to serve more than 12 customers an hour. I’d spent weeks obsessing over the truck’s Instagram-worthy neon sign and custom-wrapped exterior, only to realize I’d treated the actual kitchen like an afterthought. Sound familiar?
Here’s the thing about food trucks: They’re not tiny restaurants. They’re not even restaurants at all. They’re hybrid beasts, part commercial kitchen, part retail space, part branding billboard, all crammed into a space smaller than most studio apartments. And if you design yours like it’s just a “smaller version” of a brick-and-mortar kitchen, you’re setting yourself up for burnout, wasted money, and a whole lot of regret.
After five years running Chefsicon and consulting with over 200 food truck owners (plus my own painful trial-and-error phase), I’ve learned that the difference between a truck that survives and one that thrives comes down to three non-negotiable design principles:
- Workflow efficiency (because every extra step costs you customers during rush hour)
- Equipment realism (that “space-saving” gadget won’t matter if it breaks down every other shift)
- Brand-story alignment (your truck’s look should tell customers why they should care before they even read the menu)
This isn’t about slapping together a Pinterest-worthy mobile kitchen. It’s about building a money-making machine on wheels. Let’s dig into the details that most “food truck design” guides gloss over, starting with the mistakes I see everyone make.
1. The Golden Rule: Design for Peak Hour, Not for “Normal” Days
Here’s a truth bomb: Your food truck will live or die by its 90-minute rush. That’s when you’ll make 60% of your daily revenue. So why do so many owners design their layouts for “average” days? I watched a taco truck in Austin, beautiful brand, killer recipes, fail because their prep station was positioned such that during lunch rush, the line cook had to side-step around the fryer to hand off orders. That 2-second delay per customer added up to $3,200 in lost monthly revenue (yes, I did the math).
How to fix it:
- Map your “critical path.” From order intake to food delivery, trace the physical steps your team takes during peak hour. Every turn, reach, or crossover is a potential bottleneck. Aim for a linear flow: customer → order taker → prep → cook → expediter → customer. No backtracking.
- Simulate rush hour. Before finalizing your layout, grab some friends and run a mock service with your proposed setup. Time how long it takes to fulfill 20 orders. If it’s over 3 minutes per order, rethink the design.
- Prioritize “hot zones.” The area around your fryer/grill/plancha is sacred. Nothing should interrupt the cook’s access to it. I’ve seen trucks where the drink station blocks the grill, meaning every soda order slows down the entire line.
Pro tip: Film your mock rush hour. Watch the footage to spot inefficiencies you’d miss in real-time. That’s how I realized my old truck’s condiment station was causing a traffic jam, customers kept blocking the order pickup window while they dressed their own tacos.
2. Equipment: The 80/20 Rule (Spoiler: You Don’t Need Half of What You Think)
Confession: My first equipment list had a commercial-grade waffle iron on it. Why? Because I’d seen one at a food show and thought, “Ooh, versatile!” Reality? It took up 12 inches of counter space, required its own outlet, and I used it exactly three times before it became a very expensive paperweight. Meanwhile, I’d skimped on the refrigeration, assuming a small under-counter fridge would suffice. By week two, I was doing emergency ice runs at 2 a.m.
The 80/20 rule for food truck equipment: 80% of your output will come from 20% of your tools. Identify that 20% and invest aggressively in those items. Everything else should be:
- Multi-functional (e.g., a plancha that can also function as a griddle)
- Stackable or collapsible (think nesting prep bowls, fold-down shelves)
- Or outsourced (if you only need a blender for one menu item, consider prepping that component off-site)
Non-negotiable equipment investments:
- Refrigeration: Undersizing here is the #1 rookie mistake. Calculate your peak inventory needs (not average) and add 20% buffer. For a truck doing $15K/month, I recommend at least 8 cubic feet of fridge space and 4 cubic feet of freezer.
- Ventilation: Skimping here isn’t just a comfort issue, it’s a safety and legal one. A proper hood system (with fire suppression) will run you $5K–$12K, but it’s cheaper than getting shut down. Check local codes, some cities require Type I hoods even for “low-grease” concepts.
- Power system: Most food trucks run on propane + generator combos. But if you’re in a city with strict emissions laws (looking at you, LA), you might need an all-electric setup. Budget $3K–$8K for a reliable generator (Honda EU7000is is a favorite) and $1K–$2K for propane tanks and lines.
Equipment I see overbought:
- Specialty appliances (e.g., pasta cookers, crepe makers) unless they’re core to your concept
- Over-sized mixers (a 5-quart stand mixer is plenty for 90% of trucks)
- “Just in case” backup equipment (rent if you need it)
The Propane vs. Electric Debate
This is where I see the most paralysis. Here’s the breakdown:
- Propane pros: Higher BTU output (better for searing/grilling), lower upfront cost, works offline.
- Propane cons: Tank refills (downtime), emissions restrictions in some cities, safety concerns.
- Electric pros: Cleaner (no emissions), quieter, often allowed in more locations.
- Electric cons: Limited by generator capacity (can’t run a full commercial range), higher upfront cost for batteries/inverters if you want to go fully off-grid.
My take? Hybrid is usually best. Use propane for high-heat cooking (grill, fryer) and electric for everything else (fridge, lights, POS). But check your local health department rules, some cities are phasing out propane entirely.
3. The Menu Dictates the Design (Not the Other Way Around)
I can’t tell you how many trucks I’ve seen where the owner fell in love with a “cool” design, say, a retro Airstream look, only to realize their menu (deep-fried everything) required ventilation and power that the vintage shell couldn’t handle. Your menu should inform your truck’s layout, not the other way around.
Start with these questions:
- What’s your signature item? (This determines your primary cooking equipment.)
- What’s the longest prep time on your menu? (This dictates your prep station size.)
- What’s the most fragile component? (E.g., if you’re serving delicate pastries, you’ll need shock-absorbing storage.)
- What’s your average ticket time during rush? (Aim for under 3 minutes.)
Example: A ramen truck needs:
- High-BTU burners for broth simmering
- Steam table or heated wells for noodles
- Minimal prep space (most ingredients are prepped ahead)
- Large water storage (or a water hookup plan)
While a gourmet grilled cheese truck needs:
- Large plancha or griddle surface
- Refrigerated drawers for multiple cheese varieties
- Minimal water needs
- Space for bread storage (keep it dry!)
Pro tip: If your menu has more than 7 core items, you’re probably overcomplicating things. The most profitable trucks I’ve worked with have 3–5 signature items and rotate 1–2 specials. Simplicity = speed = profit.
4. The Psychology of the Order Window (Why Your “Face” Matters More Than You Think)
The order window isn’t just a functional element, it’s your truck’s face, and it’s doing silent psychological work on your customers. Get this wrong, and you’ll lose sales before anyone even reads your menu. Here’s what the data (and my own experiments) show:
Height matters: Windows at 3.5–4 feet high encourage eye contact, which increases trust and order sizes. Windows above 4.5 feet feel transactional and impersonal. Below 3 feet? Customers feel like they’re talking down to staff (which subconsciously makes them uncomfortable).
Width matters: A window 24–30 inches wide is ideal. Too narrow, and customers feel rushed. Too wide, and you lose the “focus” that drives impulse add-ons (“Oh, I’ll take a drink too”).
The “menu gaze” effect: Customers’ eyes naturally follow the top-left to bottom-right path (like reading a book). Place your highest-margin item in the top-left corner of your menu board. Your signature item goes center. The cheapest item? Bottom right, that’s where people’s eyes land last, making it feel like a “deal” if they’ve been scanning higher-priced options.
Lighting tricks:
- Warm lighting (2700K–3000K) increases perceived food quality but can make the truck feel slower.
- Cool lighting (4000K+) feels “faster” but can make food look unappetizing.
- Solution: Use adjustable LED strips-warm over the food prep area, cooler at the order window.
And for the love of all things holy, avoid glass sneeze guards unless required by law. They create a psychological barrier between you and customers. If health codes demand a barrier, use a clear acrylic shield that’s only as tall as needed, usually 18–24 inches.
5. Storage: The Hidden Killer of Food Truck Profits
Here’s a fun game: Ask a food truck owner what their biggest challenge is. 80% will say “storage.” Not marketing. Not permits. Storage. Because when you’re working in 100–200 sq ft, every cubic inch counts, and most trucks waste 30–40% of their storage potential through poor design.
Vertical space is your friend. Most trucks ignore everything above 6 feet. Big mistake. Install:
- Ceiling-mounted racks for lightweight items (paper goods, spare utensils)
- Magnetic strips for knives/spatulas (saves drawer space)
- Stackable bins with labels (clear bins let you see contents at a glance)
The “daily vs. weekly” rule:
- Daily-use items (spices, oils, frequently used tools) should be within arm’s reach of their primary use station.
- Weekly-use items (backup ingredients, extra napkins) can go in higher or lower storage.
- Monthly-use items (spare parts, seasonal decor) should be stored off-truck if possible.
Refrigeration hacks:
- Use under-counter fridges for daily prepped items (they’re easier to access than chest freezers).
- For dry storage, vacuum-seal bulk ingredients to save space and extend shelf life.
- Consider a slide-out pantry (like RV-style storage) for cans/dry goods.
And here’s a controversial tip: Don’t stock everything. If an ingredient is used in only one menu item, ask yourself: Could I source this fresh daily from a local supplier instead of storing it? That’s how a sushi truck I worked with cut their storage needs in half, they picked up fish every morning from a nearby market rather than storing it overnight.
6. The “Invisible” Design Elements That Make or Break You
These are the things no one thinks about until they’re a problem:
Floor material: Non-slip is non-negotiable, but drainage is what most people miss. If your floor doesn’t have a slight slope toward a drain, you’ll be mopping up grease and water pools constantly. Best options:
- Diamond-plate aluminum (durable, easy to clean)
- Epoxy-coated plywood (cheaper but less durable)
- Rubber mats (for comfort, but they can trap moisture)
Wall material: Stainless steel is the gold standard for easy cleaning, but it’s expensive. Alternatives:
- FRP (fiberglass reinforced panels)-cheaper, waterproof, but can dent.
- PVC wall panels, lightweight, easy to install, but not as durable.
Avoid: Painted drywall (mold risk), bare wood (sanitation nightmare).
Ceiling height: Aim for at least 7 feet of clearance. Less than that, and taller staff (or customers peeking in) will feel claustrophobic. More than 8 feet, and you’re wasting vertical space that could be used for storage.
Soundproofing: Most trucks are painfully loud during service. Add acoustic foam panels to the ceiling and walls to reduce echo. Your staff’s sanity (and customers’ comfort) will thank you.
Vibration dampening: If your truck isn’t properly insulated, every pothole will rattle your equipment. Use rubber mounts for fridges and non-slip mats under small appliances.
7. Branding: Your Truck Should Tell a Story Before Anyone Reads the Menu
Here’s a hard truth: No one cares about your food truck. At least, not at first. They care about what it can do for them, will it feed them quickly? Will it make them look cool to their friends? Will it give them a story to post on Instagram? Your design should answer these questions in under 3 seconds.
The 3-second rule: Customers should be able to glance at your truck and immediately know:
- What kind of food you serve
- Your price range (luxury? quick bite?)
- Your vibe (fun? serious? nostalgic?)
How to nail it:
- Color psychology: Red/yellow = fast, cheap, energetic (think McDonald’s). Black/gold = premium. Green = fresh/healthy. Blue = trustworthy (great for seafood).
- Typography: Script fonts = artisanal. Bold sans-serif = modern/fast. Vintage serifs = nostalgic/comfort.
- Imagery: A single, high-impact visual (e.g., a giant taco, a smoky grill) works better than cluttered graphics.
- Name placement: Your truck’s name should be visible from 50 feet away. If it’s not, you’re losing drive-by customers.
Case study: A pizza truck in Portland went from $800/day to $2,500/day just by changing their wrap design. Before: A busy, cartoonish “New York slice” theme. After: A minimalist black-and-white photo of a pizza pull with the words “Wood-Fired. 90 Seconds.” in bold red. Same food, same location, but the new design communicated speed and quality instantly.
Pro tip: Before finalizing your design, show it to 10 strangers for 3 seconds each. Ask them: “What kind of food does this serve?” If more than 2 people guess wrong, back to the drawing board.
8. Permits and Codes: The Boring Stuff That Will Shut You Down
I know, I know, this isn’t the sexy part of design. But I’ve seen trucks get shut down on day one because they didn’t account for:
- Health department clearance: Most require 3-compartment sinks, handwashing stations, and separate prep areas for raw/cooked foods. Some cities mandate stainless steel surfaces for all food contact areas.
- Fire codes: If you’re using propane, you’ll need fire extinguishers (usually 2–3, rated for grease fires), proper tank storage (often in a locked external compartment), and sometimes a fire suppression system over cooking equipment.
- Zoning laws: Some cities restrict food trucks from operating within X feet of brick-and-mortar restaurants. Others limit how long you can stay in one spot.
- ADA compliance: If your truck is stationary (e.g., parked outside a brewery), you may need a wheelchair-accessible window.
How to avoid disasters:
- Call your local health department and ask for a pre-inspection checklist. Some will even review your plans for free.
- Check fire marshal requirements-some cities require automatic fire suppression systems (like Ansul) for fryers.
- Visit city hall to ask about parking permits and vendor licenses. Some cities have caps on the number of food truck permits they issue.
- Budget $2K–$5K for permit fees in your first year (varies wildly by city).
And here’s a trick: Befriend a retired health inspector. Many do side consulting for food trucks. A $200 consultation can save you $10K in fines or forced redesigns.
9. Tech Integration: Where Most Trucks Waste Money
I’ll say it: You don’t need an iPad POS system. At least, not at first. I see so many new owners drop $3K on fancy tablet setups, only to realize they’re overkill for their volume. Here’s what you actuallyeed:
Phase 1 (Under $1K):
- A square reader ($50) + tablet stand ($100)
- A basic printer for receipts ($150)
- A phone mount for order-taking ($30)
- A portable hotspot ($50/month) for card processing
Phase 2 (When you’re doing $15K+/month):
- An all-in-one POS like Toast or Clover (with inventory tracking)
- A customer display to show orders/upsells
- A kitchen display system (KDS) to streamline orders
Tech that’s usually a waste:
- Self-order kiosks (too much space, low ROI for trucks)
- Fancy loyalty apps (start with a simple punch card)
- Multiple tablets (one for orders, one for kitchen, overkill unless you’re doing 100+ orders/hour)
The one tech upgrade worth splurging on? A good battery system. If your generator dies during rush hour, you’re dead in the water. I recommend:
- A lithium iron phosphate (LiFePO4) battery (like Battle Born) for reliable power.
- A 3000W pure sine wave inverter to handle surges from fridges/blenders.
- A battery monitor to track usage and avoid surprises.
10. The “Oh Sh*t” Fund: Designing for When Things Go Wrong
Here’s what no one tells you: Your food truck will break. Often. The question isn’t if, but how quickly you can recover. Design these contingencies into your truck from day one:
Redundancy for critical systems:
- Power: Carry a spare propane tank and a portable generator (even a small one to power lights/POS if the main generator fails).
- Refrigeration: Have a 12V fridge (like a Dometic) as backup for perishables if your main fridge dies.
- Water: Keep 5 gallons of emergency water for handwashing/cleaning if your tank runs dry.
Quick-fix kits: Store these in an easy-to-access bin:
- Duct tape, zip ties, bungee cords
- Spare fuses, electrical tape
- Basic tools (screwdrivers, wrench, pliers)
- Propane leak detector spray
- Extra O-rings for propane connections
Menu flexibility: Have 2–3 “emergency menu” items that require minimal equipment. Example: If your fryer dies, can you pivot to a cold sandwich or salad? A truck in Chicago I worked with kept pre-made soup in a thermos as their “oh sh*t” item, it saved them during a power outage.
Staff cross-training: Every team member should know:
- How to restart the generator
- How to switch propane tanks
- How to manually process a card if the POS goes down
And here’s the hardest lesson: Know when to call it. If your fridge is out for more than 2 hours, or your cooking equipment is unsafe, shut down. The cost of a bad Yelp review (or worse, a foodborne illness) isn’t worth it.
11. The Post-Launch Audit: How to Know If Your Design Works
Your truck’s design isn’t “done” when you open. It’s done when it’s making you money efficiently. Here’s how to audit your design after 30 days:
Track these metrics:
- Orders per hour during rush: Aim for 20–30/hour for a 1–2 person team. Less than 15? You’ve got workflow issues.
- Average ticket time: Should be under 3 minutes. Over 4 minutes? Your layout is slowing you down.
- Waste percentage: If you’re throwing out more than 10% of ingredients due to spoilage, your storage isn’t optimized.
- Equipment downtime: If any piece of equipment fails more than once a month, replace it or redesign around it.
- Customer dwell time: How long do people linger at the window? More than 30 seconds after getting their food? Your pickup area is congested.
Ask your team:
- “What’s the most annoying part of your shift?” (Usually reveals design flaws.)
- “What do you wish was within easier reach?”
- “What’s one thing that slows you down every day?”
Watch customers:
- Do they hesitate before ordering? (Menu design issue.)
- Do they ask the same questions repeatedly? (Your branding isn’t clear.)
- Do they take photos? (If not, your truck isn’t Instagram-worthy enough.)
Be willing to iterate. The most successful truck I’ve worked with (a Korean BBQ concept in Atlanta) completely redesigned their order window after two months because they noticed customers were confused about where to pick up drinks. That small change increased their average ticket size by 18%.
12. The Future of Food Truck Design: Trends to Watch (or Ignore)
I’m skeptical of most “food truck trends” articles, they’re usually written by people who’ve never actually worked in one. But here are a few shifts I’m seeing that might be worth considering:
Trends with potential:
- Modular designs: Trucks built with swappable equipment modules (e.g., a breakfast setup that converts to a dinner setup). This is huge for trucks that serve multiple dayparts.
- Solar hybrids: Combining solar panels with traditional generators to cut fuel costs. Still expensive upfront ($8K–$15K), but prices are dropping.
- “Dark kitchen” trucks: Trucks designed solely for delivery/pickup (no customer interaction). These prioritize speed and packaging over branding.
- AI menu boards: Digital screens that change pricing/messaging based on time of day (e.g., “Happy Hour: $1 off drinks 3–5 PM”).
Trends to ignore (for now):
- Fully electric trucks: The tech isn’t there yet for high-volume cooking. Battery life and power output are still limiting factors.
- Robot chefs: Cool in theory, but not reliable enough for a mobile environment.
- Overly gimmicky designs: Unless your concept is inherently theatrical (like a molten chocolate cake truck), focus on function over flash.
My prediction? The next big shift will be trucks designed for “ghost kitchen” integration-meaning they can seamlessly fulfill both on-site and delivery orders without slowing down. But we’re still 2–3 years out from that being mainstream.
Putting It All Together: Your 90-Day Design Action Plan
Overwhelmed? Here’s how to tackle this step by step:
Phase 1: Research (Weeks 1–2)
- Spend 10 hours observing successful trucks in your city. Note their workflow, equipment, and customer interactions.
- Call 3 local health inspectors and ask for their “most common violations” list.
- Sketch 5 rough layouts based on your menu. Use graph paper or a free tool like SketchUp.
Phase 2: Prototyping (Weeks 3–6)
- Build a cardboard mockup of your truck interior. Yes, really. It’ll reveal spatial issues you’d miss on paper.
- Run a mock service with friends playing customers. Time how long it takes to fulfill orders.
- Get quotes from 3 equipment suppliers and 2 truck builders. Compare lead times, some custom builds take 6+ months.
Phase 3: Build (Weeks 7–12)
- Start with critical systems (power, refrigeration, cooking equipment).
- Install storage solutions before finalizing the layout, you’ll find you need more than you think.
- Test all equipment under load (e.g., run the fridge + grill + lights simultaneously to check power draw).
Phase 4: Iterate (Ongoing)
- After 30 days, do a full audit (see Section 11).
- Every 90 days, ask your team: “What’s one thing we could change to make service faster?”
- Once a year, revisit your menu and ask: “Does our truck still support this, or are we working around it?”
Remember: Your food truck is a living system. The best designs aren’t static, they evolve with your business. The truck I started with five years ago looks nothing like the one I run today, and that’s a good thing. Every change was a lesson learned, a problem solved, or an opportunity seized.
So take a deep breath. Start small. Test relentlessly. And for the love of all things culinary, don’t skimp on the fridge space.
FAQ: Your Burning Food Truck Design Questions, Answered
Q: How much does it cost to design and build a food truck from scratch?
A: Here’s the breakdown:
- Used truck + basic buildout: $30K–$60K
- New custom truck: $80K–$150K
- High-end or specialty builds: $150K–$250K+
Pro tip: Buy used and retrofit. I’ve seen trucks buy a used step van for $15K and spend another $20K on equipment/design for a total of $35K, then turn around and make $200K/year.
Q: What’s the most common design mistake you see in new food trucks?
A: Ignoring the “golden triangle” of kitchen design. In a restaurant, it’s the path between fridge, prep station, and cooking area. In a truck, it’s the path between order intake, cooking, and pickup. If these three points aren’t optimized for minimal movement, you’ll lose 20–30% of your potential revenue during rush hour. I once watched a truck where the cook had to walk 8 steps to hand off an order. Eight. Steps. They were leaving $120/hour on the table during peak times.
Q: How do I make my food truck stand out without spending a fortune on branding?
A: Focus on one bold, ownable element. It could be:
- A signature color (like the bright pink of the “Ms. Cheezious” trucks in Miami)
- A unique shape (e.g., a vintage VW bus, a converted school bus)
- A memorable prop (like the giant donut on top of “The Rolling Donut” in Nashville)
- A sensory hook (e.g., a wood-fired oven that smells amazing from 50 feet away)
The key is consistency. If you go with a bold color, use it on your truck, your packaging, and your social media. That’s how you build recognition without a big budget.
Q: What’s the one piece of equipment you’d never skimp on?
A: Your refrigeration. I don’t care if you have to buy a used fridge or finance it-do not cheap out here. A failing fridge will:
- Ruin thousands of dollars in food
- Get you shut down by the health department
- Force you to close unexpectedly (losing customers and reputation)
I recommend True Manufacturing or Traulsen for reliability. And always, always have a backup plan (like a 12V fridge or a relationship with a nearby restaurant that can store your perishables in an emergency).
Final Thought: The Secret Weapon of Successful Food Trucks
After all this talk of layouts and equipment, here’s the real secret: The best food truck designs are the ones you don’t notice. They’re the trucks where the workflow is so smooth, the branding so cohesive, and the experience so seamless that customers don’t think about the design, they just enjoy the food and the vibe.
That’s the goal. Not to build the flashiest truck, but to build one that disappears into the experience. Where the design serves the food, the food serves the customer, and the customer serves your bottom line.
So as you’re sketching layouts and pricing out equipment, ask yourself: Does this make the food better? Does this make the customer’s life easier? Does this make my team’s job smoother? If the answer to all three isn’t “hell yes,” keep iterating.
And when you finally hit the road, remember: Every great food truck started as a sketch on a napkin. Yours is next.
Now go build something that moves, literally and figuratively.
@article{food-truck-design-tips-for-success-17-hard-won-lessons-from-the-front-lines-of-mobile-dining,
    title   = {Food Truck Design Tips for Success: 17 Hard-Won Lessons from the Front Lines of Mobile Dining},
    author  = {Chef's icon},
    year    = {2025},
    journal = {Chef's Icon},
    url     = {https://chefsicon.com/food-truck-design-tips-for-success/}
}