The Best Fluffy Pancakes recipe you will fall in love with. Full of tips and tricks to help you make the best pancakes.

Table of Contents
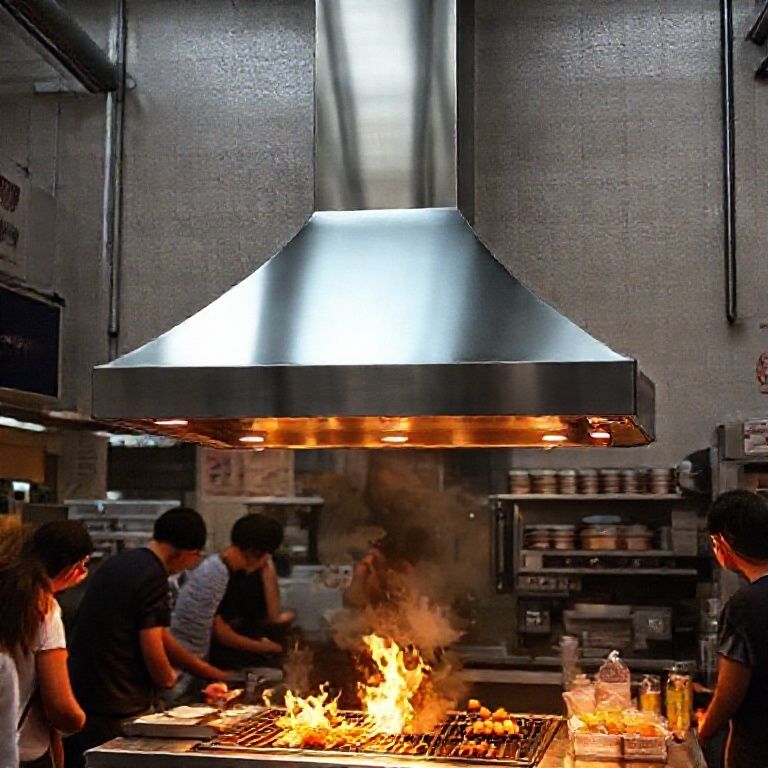
- 1 Ventilation Solutions for Compact Commercial Kitchens: How to Avoid Turning Your Kitchen Into a Sauna (or a Fire Hazard)
- 2 The Brutal Truth About Compact Kitchen Ventilation (And Why Most People Get It Wrong)
- 3 The Three Non-Negotiables of Compact Kitchen Ventilation
- 4 Compact Kitchen Ventilation Hacks: When Standard Solutions Won’t Cut It
- 5 The Hidden Costs of Compact Kitchen Ventilation (And How to Avoid Them)
- 6 Compact Kitchen Ventilation Myths (And Why They’ll Screw You Over)
- 7 Putting It All Together: A Step-by-Step Plan for Your Compact Kitchen
- 7.1 Step 1: Assess Your Current Setup (Or Your Space, If Starting from Scratch)
- 7.2 Step 2: Determine Your Ventilation Needs
- 7.3 Step 3: Choose Your Hood System
- 7.4 Step 4: Design the Ductwork
- 7.5 Step 5: Plan for Makeup Air
- 7.6 Step 6: Select Fans and Controls
- 7.7 Step 7: Hire a Pro for Installation
- 7.8 Step 8: Test and Adjust
- 7.9 Step 9: Train Your Staff
- 7.10 Step 10: Schedule Regular Maintenance
- 8 The Future of Compact Kitchen Ventilation: What’s Next?
- 9 Final Thoughts: Your Kitchen’s Lungs Deserve Better
- 10 FAQ: Your Burning (Pun Intended) Questions About Compact Kitchen Ventilation
Ventilation Solutions for Compact Commercial Kitchens: How to Avoid Turning Your Kitchen Into a Sauna (or a Fire Hazard)
Let me paint you a picture, it’s 7:45 PM on a Friday, your compact commercial kitchen is packed with tickets, the fryer’s hissing like a nest of angry snakes, and the air is so thick with grease and steam you could bottle it and sell it as a “Nashville Summer in a Jar.” The hood system you inherited from the previous tenant is wheezing like my cat Luna after she’s chased a laser pointer for too long. You’re sweating through your chef’s jacket, your line cooks are side-eyeing the fire suppression system like it’s a ticking time bomb, and you’re pretty sure the health inspector is lurking outside, licking their lips at the thought of slapping you with a violation. Sound familiar?
Here’s the thing: ventilation in compact commercial kitchens isn’t just about comfort, it’s about survival. Poor airflow leads to grease buildup, which leads to fire hazards, which leads to insurance nightmares, which leads to you crying into a bucket of expired ranch dressing at 2 AM. I’ve seen it happen. And no, cranking open the back door and praying for a cross-breeze isn’t a “solution”-it’s a Hail Mary pass in a game where the stakes are your livelihood.
I’ve spent the last three years digging into this problem, partly because Chefsicon’s readers keep asking about it, and partly because I’m obsessed with how small spaces can function like well-oiled machines (or, in this case, well-ventilated ones). I’ve talked to HVAC engineers, kitchen designers, fire marshals, and enough line cooks to know that the difference between a kitchen that hums and one that chokes often comes down to ventilation. But here’s the kicker: most of the advice out there is either overly technical (thanks, engineering white papers) or so vague it’s useless (“just get a good hood”-gee, why didn’t I think of that?).
So today, we’re fixing that. This isn’t just a list of products or a regurgitation of code requirements. It’s a battle-tested, real-world guide to ventilating compact commercial kitchens, whether you’re running a food truck, a ghost kitchen, a tiny bistro, or a café where the “kitchen” is basically a glorified closet. We’ll cover the must-haves, the nice-to-haves, the “why didn’t anyone tell me this” moments, and, because I’m a glutton for punishment, the mistakes I’ve seen people make again and again. By the end, you’ll know exactly what to prioritize, what to skip, and how to keep your kitchen from turning into a pressure cooker (literally).
The Brutal Truth About Compact Kitchen Ventilation (And Why Most People Get It Wrong)
First, let’s address the elephant in the room: compact commercial kitchens are ventilation nightmares by design. You’ve got limited square footage, high BTU output from equipment, and often a layout that was slapped together by someone who’s never worked a line in their life. The result? A space where heat, smoke, and grease particles are trapped like commuters in a subway car during rush hour.
Most people approach this problem in one of two ways:
- The “Throw Money at It” Approach: “I’ll just buy the biggest, baddest hood system I can find!” Spoiler: That’s like putting a Ferrari engine in a go-kart. Overkill doesn’t equal effectiveness, especially when space constraints mean you’re fighting physics as much as poor airflow.
- The “Minimum Viable Compliance” Approach: “I’ll just do what the health inspector says and call it a day.” Newsflash: Code minimums are the bare minimum. They’re not designed to make your kitchen pleasant to work in, they’re designed to keep you from burning the place down. Aiming for “just enough” is how you end up with a kitchen that’s technically legal but feels like a sauna crossed with a deep fryer.
Here’s what most guides won’t tell you: ventilation isn’t just about extracting air, it’s about balancing airflow, managing heat, and controlling grease. And in a compact space, those three things are in a constant tug-of-war. For example:
- Extract too much air, and your makeup air system can’t keep up, creating negative pressure that makes doors slam shut and your HVAC work overtime.
- Don’t extract enough, and you’ve got a kitchen that’s hotter than a Nashville July, with grease coating every surface like a bad spray tan.
- Focus only on heat, and you’ll ignore grease buildup, until your hood looks like it’s been through a food fight at a truck stop.
So before we dive into solutions, let’s reframe the problem. You’re not just installing a hood. You’re designing a system that:
- Removes heat, smoke, and grease efficiently (not just “enough to pass inspection”).
- Balances airflow so your kitchen doesn’t feel like a wind tunnel or a vacuum chamber.
- Fits into your space without turning it into an obstacle course.
- Doesn’t require a second mortgage to install or maintain.
Easier said than done, right? Let’s break it down.
The Three Non-Negotiables of Compact Kitchen Ventilation
Before we get into the nitty-gritty of specific solutions, there are three absolute must-haves for any compact commercial kitchen ventilation setup. Skip these, and you’re basically playing Russian roulette with a grease fire.
1. The Right Hood (And No, Bigger Isn’t Always Better)
The hood is the heart of your ventilation system, and in a compact kitchen, size and type matter more than you think. Here’s the deal:
- Type I Hoods (for grease): If you’re cooking with any kind of fat, oil, or grease (so, basically, if you’re running a kitchen), you eed a Type I hood. These are designed to capture and remove grease particles, which, fun fact, are flammable. The National Fire Protection Association (NFPA) isn’t messing around when they say grease buildup is a leading cause of kitchen fires. In a compact space, where everything is crammed together, a grease fire can spread faster than gossip in a small town.
- Type II Hoods (for heat/steam): These are for equipment that doesn’t produce grease, like steamers or dishwashers. If your kitchen is only doing light prep or baking, you might get away with a Type II. But let’s be real, most compact commercial kitchens are doing some kind of frying or sautéing, so Type I is non-negotiable.
- Canopy vs. Proximity Hoods: Canopy hoods are the standard, they sit above the cooking equipment and capture rising heat and grease. But in a really tight space, a proximity hood (which sits closer to the cooking surface) can be more efficient. They’re pricier, but they can reduce the CFM (cubic feet per minute) requirements, which might save you on ductwork and fan costs.
Now, here’s where people mess up: they assume a bigger hood = better ventilation. Not true. A hood that’s too large for your space can create dead zones where air isn’t moving properly, leading to grease buildup in corners. Conversely, a hood that’s too small won’t capture everything, and you’ll end up with a kitchen that feels like a smokehouse.
Rule of thumb: The hood should extend at least 6 inches beyond the cooking equipment on all sides. In a compact kitchen, this might mean rearranging your layout to ensure proper coverage. And yes, that might mean sacrificing a little prep space, but trust me, it’s better than sacrificing your insurance premiums after a fire.
2. CFM: The Goldilocks Principle (Not Too Much, Not Too Little)
CFM (cubic feet per minute) is the measure of how much air your hood system moves. In a compact kitchen, getting this number right is critical. Too little, and your kitchen turns into a sauna. Too much, and you’re wasting energy, creating negative pressure, and possibly violating local codes (many areas have limits on how much air you can exhaust).
Here’s how to calculate it (don’t worry, I’ll keep the math simple):
- Start with the total BTU output of all your cooking equipment. (If you don’t know this, check the manuals or spec sheets, it’s usually listed.)
- Divide the total BTU by 100 to get a rough CFM estimate. For example, if your equipment totals 80,000 BTU, you’d need around 800 CFM.
- Adjust for hood type and kitchen layout. Proximity hoods can often get away with lower CFM than canopy hoods. If your kitchen is extremely tight, you might need to bump up the CFM slightly to compensate for poor airflow.
But here’s the catch: local codes often dictate minimum CFM requirements, and they’re usually higher than the bare minimum you’d calculate. For example, many jurisdictions require at least 100 CFM per linear foot of hood. So if you’ve got a 6-foot hood, you’re looking at 600 CFM minimum, regardless of your BTU calculation.
I’m torn on this one. On one hand, I get why codes err on the side of caution. On the other, I’ve seen kitchens where overzealous CFM requirements led to systems that were so powerful they made the space unusable. My advice? Start with the code minimum, then adjust based on real-world performance. If your kitchen still feels like a swamp, you might need to tweak the CFM or add supplementary ventilation (more on that later).
3. Makeup Air: The Unsung Hero (Or Villain) of Your System
Here’s a question no one asks enough: Where’s the air coming from to replace what you’re exhausting? In a compact kitchen, this is a huge deal. If you’re pulling 1,000 CFM out of the space but only bringing in 500 CFM of makeup air, you’ve got a problem. Negative pressure builds up, which can:
- Make doors hard to open (or slam shut unexpectedly).
- Cause backdrafting in your gas appliances (which is dangerous, carbon monoxide, anyone?).
- Overwork your HVAC system, leading to higher energy bills and premature wear.
Most codes require that makeup air be at least 80% of the exhausted air volume. So if your hood is pulling 1,000 CFM, you need at least 800 CFM of makeup air. But in a compact space, where that air comes from matters just as much as how much.
Options for makeup air:
- Dedicated makeup air unit (MUA): This is the gold standard, a separate system that brings in fresh, tempered air. It’s also the most expensive. In a compact kitchen, space for the unit and ductwork can be a challenge, but if you can swing it, do it.
- Passive makeup air: This relies on gaps under doors or open windows to let air in. It’s cheap, but it’s also unpredictable and can lead to hot/cold spots. I’ve seen kitchens where passive makeup air turned the space into a wind tunnel in winter. Not fun.
- HVAC integration: Some systems tie the makeup air into the existing HVAC. This can work, but it requires careful balancing to avoid overloading the HVAC or creating pressure imbalances.
My hot take? If you’re in a climate with extreme temperatures (hello, Nashville summers and winters), a dedicated MUA is worth the investment. Yes, it’s pricey upfront, but the energy savings and comfort levels pay off. If you’re in a more temperate area or on a tight budget, you might get away with passive or HVAC-integrated makeup air, but be prepared to tweak it constantly.
Compact Kitchen Ventilation Hacks: When Standard Solutions Won’t Cut It
Alright, let’s get tactical. If you’re working with a kitchen that’s tighter than a drum, you might need to get creative. Here are some real-world solutions I’ve seen work (and a few that backfired spectacularly).
1. The “Stacked Equipment” Strategy (And Why It’s Risky)
In a compact kitchen, vertical space is your friend. Stacking equipment, like putting a steamer above an oven, can save floor space, but it complicates ventilation. Here’s why:
- Heat rises, so the upper equipment gets hit with extra heat from the lower equipment. This can overwhelm your hood’s capacity.
- Grease and steam from lower equipment can get trapped under the upper equipment, leading to buildup in hard-to-clean spots.
- If the hood isn’t sized correctly for the stacked setup, you’ll have dead zones where air isn’t moving.
If you’re going to stack equipment, here’s how to do it without turning your kitchen into a science experiment gone wrong:
- Use low-profile, high-efficiency hoods designed for stacked setups. Some manufacturers make hoods with adjustable baffles to direct airflow more precisely.
- Increase CFM by 20-30% to account for the extra heat rise. Yes, it’s more expensive, but it’s cheaper than a fire.
- Install grease filters with higher MERV ratings (Minimum Efficiency Reporting Value) to capture more particles before they settle on surfaces.
- Avoid stacking high-grease equipment (like fryers) under other equipment. If you must, add a secondary grease filter or trap.
I’ll be honest, I’ve seen this work beautifully in some kitchens and fail miserably in others. The difference usually comes down to how well the hood system is matched to the equipment layout. If you’re not sure, consult a ventilation specialist before you commit to the layout.
2. Ductless Ventilation: The Holy Grail or a False Promise?
Ductless hoods (also called “recirculating” or “self-contained” hoods) are often touted as the perfect solution for compact kitchens. They don’t require ductwork, which saves space and installation costs. Instead, they filter the air and recirculate it back into the kitchen. Sounds great, right?
Here’s the catch: ductless hoods are only effective for certain types of cooking. They work well for:
- Light-duty electric equipment (like induction cooktops or electric griddles).
- Steamers or combi ovens that produce mostly moisture, not grease.
- Low-volume operations where heat and grease output are minimal.
They do not work well for:
- Gas cooking (the combustion byproducts need to be exhausted, not recirculated).
- High-volume frying or charbroiling (the grease and smoke will overwhelm the filters).
- Kitchens with poor general ventilation (recirculating hot, greasy air just makes the problem worse).
I’ve seen food trucks and tiny cafés make ductless hoods work, but I’ve also seen them fail spectacularly. One ghost kitchen I visited had installed ductless hoods over their gas ranges, thinking they’d save space. Within a month, the filters were clogged, the kitchen smelled like a campfire, and the fire marshal shut them down until they installed a proper duct system.
Bottom line: Ductless can be a great supplement to a traditional system, but it’s rarely a complete solution for a busy compact kitchen. If you’re considering it, test it with your specific equipment and volume before committing. And for the love of all that’s holy, don’t use it with gas appliances unless the hood is specifically rated for it.
3. The “Zone Ventilation” Approach: Divide and Conquer
In a compact kitchen, not all areas need the same level of ventilation. For example, your prep station might not need the same airflow as your fryer station. Zone ventilation involves treating different areas of the kitchen separately, which can save space and energy.
How to implement it:
- Identify high-heat/high-grease zones: These (like fryers, grills, or ranges) need the most ventilation. Place them under the main hood.
- Low-heat zones: Prep stations, dishwashing areas, or baking stations might only need spot ventilation (like a small exhaust fan or a ductless hood).
- Use variable-speed fans: These allow you to ramp up ventilation in specific zones when needed. For example, if you’re only using the fryer during lunch rush, you can increase airflow to that area and reduce it elsewhere.
- Consider modular hoods: Some manufacturers offer hoods that can be linked together or expanded as your kitchen grows. This is great for compact spaces where you might rearrange equipment frequently.
I visited a pizza shop in East Nashville that used this approach brilliantly. They had a main hood over their oven and fryer, but their prep station (which was mostly cold prep) had a small ductless hood just for steam and odors. The result? Their main ventilation system wasn’t overworked, and they saved on energy costs. Plus, the kitchen felt more comfortable because the airflow was tailored to each area.
Is this more complex to set up? Yes. But in a compact kitchen, efficiency isn’t a luxury, it’s a necessity.
4. The “Upgrade Your Filters” Trick (Cheap and Effective)
Here’s a secret: most compact kitchens underestimate the power of high-quality filters. Swapping out cheap, low-grade grease filters for higher-efficiency ones can make a <em:huge difference in airflow and grease capture.
What to look for:
- Baffle filters: These are the standard, but not all are created equal. Look for ones with tighter baffle spacing, they capture more grease but may require more frequent cleaning.
- Mesh filters: These have a finer weave and can capture smaller particles, but they clog faster. Best for low-volume kitchens.
- Electrostatic precipitators: These use an electric charge to trap grease particles. They’re more expensive but can reduce filter maintenance. However, they require regular cleaning to stay effective.
- HEPA or carbon filters: These are usually used in ductless systems to handle odors and fine particles. Not a replacement for grease filters, but a good supplement.
Pro tip: Clean your filters religiously. In a compact kitchen, grease buildup happens faster because everything is crammed together. I’ve seen kitchens where clogged filters reduced airflow by 50%, turning the hood into little more than a decorative metal box. Set a cleaning schedule (daily for high-volume kitchens, weekly for lower volume) and stick to it like your business depends on it, because it does.
5. The “Supplemental Ventilation” Lifesaver
Sometimes, your main hood system just isn’t enough, especially in a compact space where heat and steam have nowhere to go. That’s where supplemental ventilation comes in. These are smaller, targeted solutions that help manage airflow in problem areas.
Options to consider:
- Ceiling-mounted exhaust fans: These can help pull hot air up and out, especially in kitchens with high ceilings. They’re not a replacement for a hood, but they can help with general ventilation.
- Wall-mounted fans: If you’ve got a wall that opens to the outside, a high-CFM fan can help move air. Just make sure it’s not creating a wind tunnel that blows out your pilot lights.
- Portable air purifiers: These won’t handle grease, but they can help with smoke and odors in a pinch. Look for ones with activated carbon filters.
- Downdraft systems: These are built into the cooking surface and pull air downward. They’re great for islands or areas where a traditional hood isn’t feasible. However, they require careful installation to avoid pulling grease into the ductwork.
I’ll admit, I was skeptical about supplemental ventilation at first. It felt like putting a Band-Aid on a bullet wound. But after seeing a few compact kitchens where a well-placed exhaust fan made the difference between “barely functional” and “actually pleasant to work in,” I’m a convert. The key is to use it as a supplement, not a replacement for your main system.
The Hidden Costs of Compact Kitchen Ventilation (And How to Avoid Them)
Let’s talk about money, because no discussion about commercial kitchen ventilation is complete without addressing the hidden costs that can turn a “simple” hood installation into a financial black hole.
1. Ductwork: The Invisible Budget Killer
In a compact kitchen, ductwork is often the most expensive and complicated part of the ventilation system. Why? Because:
- Space constraints mean ducts have to twist and turn like a pretzel, which increases labor costs.
- Longer duct runs require more powerful fans to maintain airflow, which increases energy costs.
- If the ducts aren’t properly insulated, you’ll lose heat in winter and gain heat in summer, making your HVAC work harder.
- Improperly sized ducts can create airflow resistance, reducing the effectiveness of your hood.
How to save money (and headaches):
- Keep duct runs as short and straight as possible. Every bend adds resistance and requires more CFM to overcome.
- Use smooth, rigid ductwork instead of flexible duct. Flex duct creates more friction and is harder to clean.
- Insulate your ducts. This is especially important if they run through unconditioned spaces (like attics or crawl spaces). Uninsulated ducts can sweat, leading to water damage or mold.
- Consider a “grease duct” system. These are specifically designed for commercial kitchens and have smoother interiors to reduce grease buildup. They’re more expensive upfront but save on cleaning and maintenance costs.
I once consulted on a kitchen where the owner tried to save money by using flex duct for the entire run. Within six months, the ducts were so clogged with grease that the hood’s CFM dropped by 40%. They had to replace the entire system, costing three times what they “saved” initially. Don’t be that person.
2. Energy Costs: The Silent Profit Eater
Ventilation systems are energy hogs. A typical commercial kitchen hood can use as much energy as 10 residential HVAC systems. In a compact kitchen, where every square inch is working overtime, those costs add up fast.
How to keep energy costs in check:
- Use demand-controlled ventilation (DCV). These systems adjust fan speed based on temperature or smoke sensors. If the kitchen is idle, the fans slow down, saving energy. They’re more expensive upfront but can cut energy costs by 30-50%.
- Invest in high-efficiency fans. Look for fans with EC (electronically commutated) motors, they’re more efficient than traditional belt-driven fans and can save hundreds per year in energy costs.
- Recapture heat. Some systems use heat exchangers to recapture warmth from the exhausted air and use it to preheat incoming makeup air. This is more common in larger kitchens, but some compact systems can benefit too.
- Schedule regular maintenance. A dirty hood or clogged filters make the system work harder, increasing energy use. A clean system is an efficient system.
I’ll be honest, energy-efficient ventilation is one of those things that feels like a luxury until you see the utility bills. One café owner I know in Berkeley (where energy costs are sky-high) installed a DCV system and cut his monthly ventilation energy costs from $800 to $300. It paid for itself in less than a year.
3. Maintenance: The Cost You Can’t Ignore
Here’s a truth bomb: The most expensive ventilation system is the one you don’t maintain. In a compact kitchen, where everything is packed together, neglecting maintenance isn’t just gross, it’s dangerous.
Common maintenance mistakes (and how to avoid them):
- Skipping filter cleaning: Grease-laden filters are a fire hazard. Clean them daily (or at least weekly) and replace them as needed. Pro tip: Keep spare filters on hand so you’re never caught without.
- Ignoring duct cleaning: NFPA 96 requires commercial kitchen ducts to be cleaned at least annually (more often for high-volume kitchens). In a compact space, ducts clog faster. Budget for professional cleaning every 6-12 months.
- Neglecting fan maintenance: Fans can wear out or get unbalanced, reducing airflow. Have them checked annually.
- Forgetting about makeup air filters: If your MUA has filters, they need to be cleaned or replaced regularly. Clogged intake filters reduce airflow and make the system work harder.
A kitchen I worked with in Austin had a fire that started in the ductwork because the owner “didn’t have time” for regular cleanings. The repair costs? $25,000. The insurance premium increase? Priceless (in the worst way). Don’t let this be you.
Compact Kitchen Ventilation Myths (And Why They’ll Screw You Over)
Before we wrap up, let’s debunk some dangerous myths I hear all the time about compact kitchen ventilation. Believing these can cost you time, money, and, worst case, your business.
Myth 1: “If It Passes Inspection, It’s Good Enough”
Health inspectors and fire marshals are looking for minimum compliance, not optimal performance. Just because your system passes inspection doesn’t mean it’s the best (or even a good) solution for your kitchen. I’ve seen kitchens that “passed” but were so poorly ventilated that staff quit over the working conditions.
Reality: Aim for a system that not only meets code but also creates a functional, comfortable, and safe workspace. Your staff (and your utility bills) will thank you.
Myth 2: “Bigger Hood = Better Ventilation”
As we’ve discussed, oversizing your hood can create dead zones, increase energy costs, and even reduce airflow efficiency. A properly sized hood that’s matched to your equipment and layout will outperform an oversized one every time.
Reality: Work with a ventilation specialist to right-size your hood based on your equipment, layout, and cooking volume. Bigger isn’t better-smart is better.
Myth 3: “Ductless Hoods Are Just as Good as Ducted”
Ductless hoods have their place, but they’re not a one-size-fits-all solution. They’re great for low-volume, electric-only kitchens but terrible for high-heat or gas cooking. I’ve seen too many compact kitchens try to cut corners with ductless systems, only to end up with grease-coated walls and angry fire inspectors.
Reality: If you’re doing any kind of high-volume or gas cooking, ductless is not a substitute for a proper duct system. Use it as a supplement, not a replacement.
Myth 4: “I Can DIY the Installation to Save Money”
Unless you’re a licensed HVAC technician with experience in commercial kitchen ventilation, do not attempt to install this yourself. Improper installation can lead to:
- Poor airflow (rendering your expensive system useless).
- Fire hazards (from improper duct sealing or grease buildup).
- Void warranties (most manufacturers require professional installation).
- Failed inspections (which mean costly rework).
Reality: Hire a pro. Yes, it’s expensive, but it’s cheaper than fixing a botched installation, or worse, dealing with a fire.
Myth 5: “Once It’s Installed, I Don’t Have to Think About It”
Ventilation systems are like cars: they need regular maintenance to keep running smoothly. Skipping cleanings, ignoring strange noises, or putting off filter changes will cost you in the long run, whether through higher energy bills, failed inspections, or (worst case) a fire.
Reality: Treat your ventilation system like the critical infrastructure it is. Schedule regular maintenance, train your staff on basic upkeep, and address issues before they become emergencies.
Putting It All Together: A Step-by-Step Plan for Your Compact Kitchen
Alright, let’s get practical. Here’s a step-by-step plan to design or upgrade your compact kitchen’s ventilation system without losing your mind (or your shirt).
Step 1: Assess Your Current Setup (Or Your Space, If Starting from Scratch)
- List all cooking equipment, including BTU ratings and dimensions.
- Measure your kitchen’s square footage and ceiling height.
- Note any existing ventilation (hoods, fans, ducts) and their CFM ratings.
- Identify problem areas (e.g., spots where heat or smoke lingers).
Step 2: Determine Your Ventilation Needs
- Calculate the total BTU output of your equipment.
- Estimate required CFM (total BTU ÷ 100, then adjust for hood type and layout).
- Check local codes for minimum CFM and makeup air requirements.
- Decide if you need Type I (grease) or Type II (heat/steam) hoods.
Step 3: Choose Your Hood System
- Canopy vs. proximity hood? (Proximity may save space but costs more.)
- Ductless vs. ducted? (Ductless only works for low-volume, electric cooking.)
- Modular or fixed? (Modular offers flexibility for future changes.)
- What filter type? (Baffle, mesh, electrostatic?)
Step 4: Design the Ductwork
- Keep runs as short and straight as possible.
- Use rigid, insulated ductwork.
- Ensure proper slope for grease drainage (minimum ¼ inch per foot).
- Plan for access panels for cleaning.
Step 5: Plan for Makeup Air
- Calculate required makeup air (at least 80% of exhausted air).
- Decide on dedicated MUA, passive, or HVAC-integrated.
- Ensure makeup air is tempered (heated/cooled) for comfort.
Step 6: Select Fans and Controls
- Choose high-efficiency fans with EC motors if possible.
- Consider variable-speed or demand-controlled ventilation for energy savings.
- Install fire suppression system tied to the hood (required by code in most areas).
Step 7: Hire a Pro for Installation
- Get at least three quotes from licensed HVAC contractors with commercial kitchen experience.
- Ask for references and examples of similar projects.
- Ensure the installation includes proper sealing, balancing, and testing.
Step 8: Test and Adjust
- After installation, test the system under real-world conditions (i.e., during a busy service).
- Use a smoke pencil or anemometer to check airflow in problem areas.
- Adjust fan speeds or baffles as needed.
Step 9: Train Your Staff
- Teach them how to clean filters and recognize warning signs (like reduced airflow).
- Establish a cleaning schedule and log for maintenance.
- Show them how to operate any controls (like variable-speed fans).
Step 10: Schedule Regular Maintenance
- Set up a contract with a hood cleaning service (quarterly or biannually, depending on volume).
- Inspect ducts and fans annually.
- Replace filters and belts as recommended by the manufacturer.
Is this a lot of work? Yes. Is it worth it? Absolutely. A well-designed ventilation system will pay for itself in energy savings, staff retention, and avoided disasters.
The Future of Compact Kitchen Ventilation: What’s Next?
I’d be remiss if I didn’t touch on where this is all headed. Compact commercial kitchens aren’t going away, in fact, they’re becoming more common as real estate costs rise and ghost kitchens, food halls, and small-format restaurants proliferate. So what’s on the horizon for ventilation?
1. Smarter, Connected Systems
Expect to see more IoT-enabled ventilation systems that adjust in real-time based on temperature, humidity, and even cooking activity. Imagine a hood that ramps up when the fryer is on and dials back during prep. Some high-end systems already do this, but the tech is trickling down to smaller kitchens.
2. Modular and Scalable Designs
As compact kitchens evolve, so will ventilation systems that can grow or shrink with the space. Think hoods that can be easily expanded, or ductwork that’s designed for reconfiguration. This is especially relevant for ghost kitchens, where menus (and equipment) might change frequently.
3. Energy Recovery Ventilation (ERV)
ERV systems, which recapture energy from exhausted air to temper incoming makeup air, are becoming more common in commercial kitchens. They’re still pricey, but as energy costs rise, they’ll become a smarter investment, especially for compact kitchens where every BTU counts.
4. Grease Management Innovations
New filter technologies, like self-cleaning electrostatic precipitators or UV-C light systems that break down grease particles, could reduce maintenance burdens. Some systems even use enzymatic cleaners to dissolve grease in ducts automatically. These are still emerging, but they’re worth watching.
5. Integration with Fire Suppression
Future systems may tie ventilation more closely to fire suppression, with sensors that can detect grease buildup or abnormal heat patterns and adjust airflow (or even shut down equipment) automatically. This could be a game-changer for compact kitchens, where fires spread fast.
Will all of these become standard? Maybe. But for now, the best approach is to focus on the fundamentals: proper hood sizing, balanced airflow, and regular maintenance. The fancy tech is icing on the cake, assuming your cake isn’t on fire.
Final Thoughts: Your Kitchen’s Lungs Deserve Better
Look, I get it. Ventilation isn’t sexy. It’s not the shiny new combi oven or the Instagram-worthy open kitchen design. It’s the unsung hero of your compact commercial kitchen, the thing that keeps your staff from quitting, your insurance premiums from skyrocketing, and your health inspector from becoming your new pen pal.
But here’s the thing: a well-ventilated kitchen isn’t just functional, it’s profitable. It reduces energy costs, improves staff productivity, and minimizes the risk of costly disasters. And in a compact space, where every square inch and every dollar counts, those benefits add up fast.
So do the math. Invest in the right system. Maintain it like your business depends on it (because it does). And for the love of all that’s holy, don’t let your kitchen turn into a sauna because you tried to cut corners on ventilation.
Now, if you’ll excuse me, I need to go check on Luna. She’s been eyeing my lunch like it’s her next conquest, and I’ve learned the hard way that ignoring her leads to “accidental” keyboard walks and deleted drafts. Priorities, right?
Got a compact kitchen ventilation horror story (or success story)? Drop it in the comments. I live for these tales of triumph and woe, especially the ones that end with “and that’s why we always…”
FAQ: Your Burning (Pun Intended) Questions About Compact Kitchen Ventilation
Q: I’ve got a tiny food truck. Do I really need a full ventilation system, or can I get away with a roof vent?
A: Oh, friend. I wish I could tell you that a roof vent is enough, but unless you’re only selling salads or pre-packaged snacks, you’re playing with fire (literally). Most food trucks need at least a compact Type I hood (for grease) or a ductless system if you’re electric-only and low-volume. Check your local health codes, many jurisdictions require food trucks to have ventilation systems equivalent to brick-and-mortar kitchens. And trust me, you don’t want to be the truck that gets shut down because your “ventilation” is a fan blowing smoke into the face of the person in line. Not a good look.
Q: My landlord says I can’t modify the building’s ductwork. What are my options?
A: Ugh, landlords. The bane of every tenant’s existence. If you can’t modify existing ductwork, you’ve got a few workarounds:
- Ductless hoods (if your cooking is low-volume and electric).
- Portable exhaust fans (for supplemental ventilation, won’t replace a hood but can help with heat).
- Negotiate with the landlord-sometimes they’ll allow modifications if you cover the cost and get proper permits. Frame it as a safety issue (because it is).
- Look for “ventless” equipment (like certain electric griddles or induction cooktops) that don’t require hoods. This is a last resort, as it limits your menu.
If none of these work, it might be time to find a new space, or at least a landlord who understands that “no ductwork modifications” is a fire hazard waiting to happen.
Q: How often do I reallyeed to clean my hood and ducts? The cleaning service wants to come every 3 months, but that seems excessive.
A: I feel you, cleaning services aren’t cheap. But here’s the thing: the frequency depends on your volume and cooking style.
- High-volume frying or charbroiling? Every 3 months (or more). Grease buildup happens fast, and fires don’t care about your budget.
- Moderate volume, mixed cooking? Every 6 months is usually fine.
- Low-volume, mostly baking or steaming? Annually might suffice.
But here’s the kicker: you should be checking your filters and hood weekly. If you see grease dripping or airflow dropping, it’s time for a cleaning, regardless of the schedule. Think of it like changing your oil: you can ignore it for a while, but eventually, your engine (or in this case, your kitchen) will seize up.
Q: My kitchen is in a basement with no outside walls. How am I supposed to ventilate this?
A: Basement kitchens are the ventilation equivalent of a Rubik’s Cube, tricky, but not impossible. Here’s how to tackle it:
- Ductwork to the outside: You’ll need to run ducts up through the building to a roof or exterior wall. This is expensive and may require structural modifications, but it’s the most effective solution.
- Upward ducting with a roof vent: If you can’t go sideways, go up. Some systems use powerful fans to push air vertically through the building.
- Ductless hoods with heavy-duty filters: If ducting is truly impossible, you’ll need to invest in high-quality ductless hoods and accept that you’ll be cleaning filters constantly. This is a last resort for low-volume operations.
- Supplemental ventilation: Use ceiling fans or portable exhaust fans to help move air, but know that these won’t replace a proper hood system.
Before you commit to a basement kitchen, consult a ventilation specialist and your local fire marshal. Some jurisdictions have strict rules about basement commercial kitchens, and you don’t want to find out the hard way that your setup is illegal.
@article{ventilation-solutions-for-compact-commercial-kitchens-a-no-nonsense-guide-to-keeping-your-space-and-sanity-intact,
    title   = {Ventilation Solutions for Compact Commercial Kitchens: A No-Nonsense Guide to Keeping Your Space (and Sanity) Intact},
    author  = {Chef's icon},
    year    = {2025},
    journal = {Chef's Icon},
    url     = {https://chefsicon.com/ventilation-solutions-for-compact-commercial-kitchens/}
}