
Table of Contents
- 1 Unlocking Crispy Salmon Skin: The Full Breakdown
- 1.1 1. Choosing Your Champion: Selecting the Right Salmon Fillet
- 1.2 2. The Dry Spell: Why Moisture is the Enemy of Crispiness
- 1.3 3. Seasoning Strategy: Keep It Simple (Mostly)
- 1.4 4. Pan Selection: Your Searing Vessel Matters
- 1.5 5. Fat Chance: Choosing the Right Cooking Oil
- 1.6 6. Heat Management: Finding the Sweet Spot
- 1.7 7. The Sear: Skin-Side Down is Key
- 1.8 8. The Flip and Finish: Cooking the Flesh Side
- 1.9 9. Doneness Check: Avoiding the Overcooked Tragedy
- 1.10 10. Rest Is Best: Letting the Flavors Settle
- 2 Bringing It All Together (Hopefully!)
- 3 FAQ
Okay, let’s talk salmon. Specifically, that elusive, glorious goal: perfect pan-seared salmon with crispy skin. You know what I mean – that shatteringly crisp exterior giving way to moist, flaky fish inside. It sounds simple, right? Sear fish in a pan. But man, the number of times I ended up with soggy skin, stuck fish, or an overcooked fillet in my early cooking days… let’s just say Luna, my cat, probably ate better salmon scraps than I did actual meals back then. Moving from the Bay Area to Nashville didn’t magically grant me fish-searing powers, either. It took practice, a bit of frustration, and finally understanding the *why* behind the technique.
It’s one of those dishes that seems like restaurant magic, but it’s totally achievable at home. Seriously. The difference between meh salmon and *amazing* salmon often comes down to a few key details, particularly getting that skin right. It’s not just about texture; rendering that fat properly adds incredible flavor. Forget those complex recipes for a minute. Mastering this basic technique is fundamental, a building block for so many great meals. It’s become a weeknight staple in my house, partly because it’s quick, partly because it feels a little fancy, and mostly because it’s just darn delicious when done right.
So, stick with me here. I’m gonna walk you through everything I’ve learned – the trials, the errors, the breakthroughs. We’ll cover picking the right fillet, prepping it properly (spoiler: it involves paper towels, lots of them), choosing your weapon (aka the pan), managing heat, and the actual searing process. No weird gadgets, no impossible-to-find ingredients. Just you, some salmon, a pan, and a little bit of know-how. By the end of this, you should feel way more confident tackling pan-seared salmon and getting that coveted crispy skin. Let’s get into it.
Unlocking Crispy Salmon Skin: The Full Breakdown
1. Choosing Your Champion: Selecting the Right Salmon Fillet
First things first, not all salmon fillets are created equal, especially when crispy skin is the goal. You absolutely need skin-on salmon. Sounds obvious, but hey, gotta cover the basics. Look for fillets that are relatively uniform in thickness. This helps ensure even cooking – you don’t want the thin tail end drying out while the thicker belly part is still undercooked. I generally prefer center-cut fillets for this reason, they tend to be more consistent. Wild-caught varieties like Sockeye or Coho tend to be leaner and have thinner skin, which can crisp up nicely but also cook faster, requiring more attention. Farmed Atlantic salmon is often fattier with thicker skin, which can be glorious when rendered properly but takes a bit longer to get crispy. There’s no right or wrong answer here, just different characteristics to be aware of. I often go for King salmon when I feel like splurging – it’s rich, fatty, and the skin gets incredibly crisp. But honestly, good quality farmed Atlantic works great most of the time. Check for vibrant color, a fresh (not fishy) smell, and firm flesh that springs back when gently pressed. Avoid fillets that look dull, bruised, or have gaps in the flesh (a sign of mishandling or age).
2. The Dry Spell: Why Moisture is the Enemy of Crispiness
Okay, this is probably THE most crucial step, and the one people often rush. You need to get that salmon skin bone dry. Like, Sahara Desert dry. Why? Moisture is the mortal enemy of crispiness. When wet skin hits a hot pan, the water instantly turns to steam. Steam cooks, yes, but it *doesn’t* crisp. Instead of searing and rendering, you end up steaming the skin, making it rubbery and sad. So, grab some paper towels. Lots of them. Pat the entire fillet dry, flesh side too, but pay extra special attention to the skin. Press down firmly. Let it sit on a paper towel-lined plate for a few minutes, skin-side up, maybe even uncovered in the fridge for 30 minutes if you have time (this really helps!). Then pat it dry AGAIN right before seasoning and putting it in the pan. I know it seems excessive, but trust me on this. It makes a world of difference. You want that skin to feel almost tacky to the touch. This meticulous drying is non-negotiable for achieving that perfect crispy skin texture.
3. Seasoning Strategy: Keep It Simple (Mostly)
With the skin super dry, it’s time to season. For classic pan-seared salmon, simple is often best. Generous amounts of kosher salt and freshly cracked black pepper on both sides. Season *just* before cooking. Why? Salt draws out moisture. If you salt the skin too early, you’ll undo all that hard work you did drying it! The salt will pull water to the surface, creating the very moisture you tried to eliminate. So, dry, season, pan – in quick succession. Some people like adding garlic powder, onion powder, or paprika. That’s totally fine, but apply those mainly to the flesh side. Spices on the skin side can burn easily during the high-heat sear needed for crisping. I usually stick to salt and pepper, maybe a little garlic powder on the flesh, and add other flavors later with a sauce or sides. This approach lets the salmon flavor shine and prioritizes getting that perfect sear.
4. Pan Selection: Your Searing Vessel Matters
What pan should you use? This is where things get interesting, and honestly, personal preference plays a role. My go-to is a well-seasoned cast iron skillet. Cast iron retains heat incredibly well, providing the consistent, high temperature needed for a great sear and rendering the fat effectively. A heavy-bottomed stainless steel pan is another excellent choice. It heats evenly and allows you to build a nice fond (those tasty brown bits) in the pan, great for making a quick pan sauce afterwards. What about non-stick? Okay, controversial opinion time: I generally avoid non-stick pans for searing salmon skin. Why? To get truly crispy skin, you need relatively high heat, and many non-stick coatings aren’t designed for that sustained high temperature. They can degrade, and frankly, you often don’t get the same deep, golden-brown crust. Plus, the fish skin is less likely to stick in a properly preheated cast iron or stainless steel pan with enough oil than you might think. The key, regardless of pan choice, is proper preheating. You want that pan hot *before* the fish goes in.
5. Fat Chance: Choosing the Right Cooking Oil
You need some fat in the pan, both to prevent sticking and to help conduct heat for even crisping. But which one? The key is to use an oil with a relatively high smoke point, because you’ll be using medium-high heat. Good options include avocado oil, grapeseed oil, canola oil, or even a light (not extra virgin) olive oil. Extra virgin olive oil has a lower smoke point and distinct flavor that might burn or overpower the salmon. Butter has amazing flavor, but it also burns easily on its own. Sometimes I’ll start with a high-smoke-point oil and add a knob of butter towards the *end* of cooking (after flipping) for flavor and basting. How much oil? You don’t need to deep-fry it. A tablespoon or two, just enough to coat the bottom of the pan thinly, is usually sufficient. You want enough fat to facilitate searing, not so much that it splatters everywhere or makes the fish greasy. Remember, the salmon itself will render some of its own fat too, especially fattier cuts.
6. Heat Management: Finding the Sweet Spot
Getting the temperature right is crucial and can feel like a bit of a balancing act. You need the heat high enough to crisp the skin quickly but not so high that it burns before the fish cooks through. I typically aim for medium-high heat. How do you know when the pan is ready? Add the oil. It should shimmer slightly. If you flick a tiny drop of water into the pan (carefully!), it should sizzle and evaporate almost instantly. If the oil is smoking aggressively before you even add the fish, it’s too hot – turn it down, let it cool slightly. If you add the salmon and hear a gentle sizzle rather than a confident sear, it’s too low – nudge the heat up. You’re looking for that immediate, satisfying sizzle the moment the fish hits the pan. This initial high heat is essential for the Maillard reaction, the chemical process responsible for that delicious browning and complex flavor development on the skin.
7. The Sear: Skin-Side Down is Key
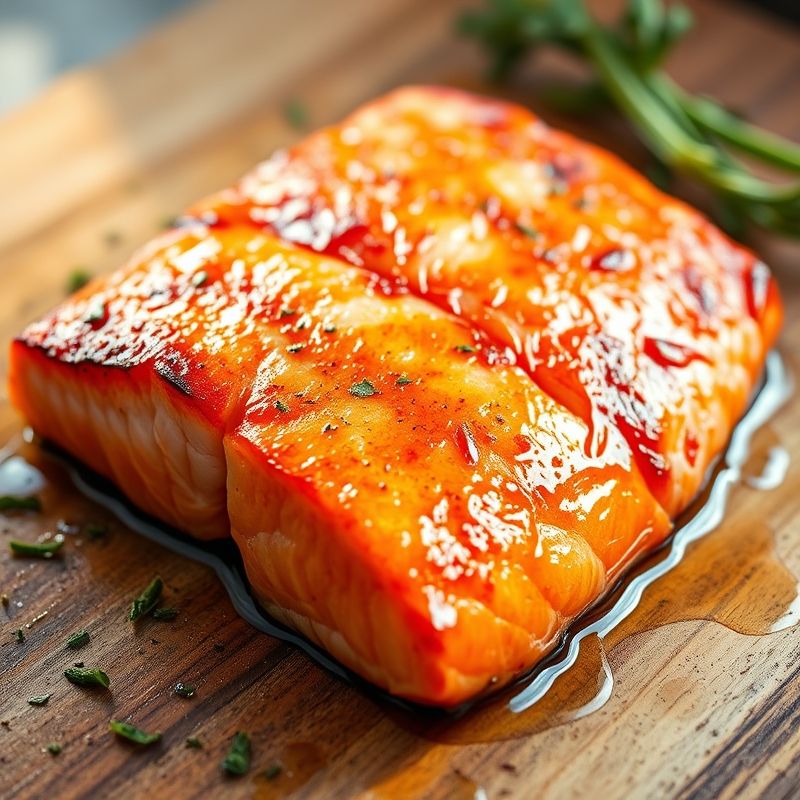
Alright, the moment of truth. Your pan is hot, oil shimmering, salmon is dry and seasoned. Place the salmon fillet(s) in the pan, skin-side down. Lay it down *away* from you to avoid oil splatters. Now, here’s a little trick: as soon as the fillet hits the hot pan, the skin tends to contract and buckle slightly, pulling the center up away from the pan surface. To ensure even contact and maximum crispiness, gently press down on the top of each fillet with a fish spatula (or a regular flexible spatula) for about 15-20 seconds. Don’t press super hard, just enough to maintain contact across the entire surface of the skin. You should hear a consistent, vigorous sizzle. Now, the hard part: leave it alone! Resist the urge to peek or move it constantly. Let it sear undisturbed. How long? This depends on the thickness of the fillet and your stove, but typically it takes 4-6 minutes for the skin to get deeply golden brown and crispy. You’ll often see the flesh cooking opaque about halfway up the side of the fillet. That’s your visual cue that it’s likely ready to flip.
8. The Flip and Finish: Cooking the Flesh Side
Once the skin is beautifully crisp and releases easily from the pan (if it sticks, it might need another minute), it’s time to flip. Use your fish spatula to gently lift and turn the fillet over. The flesh side needs much less time. We’re aiming for moist, flaky salmon, not dry and chalky. Cook on the flesh side for just 1-3 minutes, depending on thickness and desired doneness. For thicker fillets, some people like to transfer the pan to a preheated oven (around 400°F or 200°C) to finish cooking gently after flipping, which can help prevent the exterior from overcooking while the center comes up to temperature. I often just finish it on the stovetop, sometimes reducing the heat slightly after flipping. You can also add that knob of butter now, along with some aromatics like garlic cloves (smashed) or fresh thyme sprigs, and baste the fish for the last minute. This adds flavor and helps keep the flesh moist. But be careful not to let the butter or garlic burn.
9. Doneness Check: Avoiding the Overcooked Tragedy
How do you know when salmon is perfectly cooked? This is subjective to some extent, but generally, you want it cooked through but still moist and slightly translucent in the very center. Overcooked salmon is a culinary crime! The most accurate way is using an instant-read thermometer inserted into the thickest part of the fillet. Aim for around 125-130°F (52-54°C) for medium-rare, or 135-140°F (57-60°C) for medium to medium-well. Remember, the fish will continue to cook slightly from residual heat after you remove it from the pan (carryover cooking). If you don’t have a thermometer, you can gently flake the thickest part with a fork. It should separate easily, but still look moist inside. If it looks dry or uniformly opaque and chalky, it’s gone too far. Err on the side of slightly undercooking it in the pan; the residual heat will do the rest. It takes practice to nail this by eye, so a thermometer is a really worthwhile investment for consistent results.
10. Rest Is Best: Letting the Flavors Settle
Just like a good steak, salmon benefits from a brief resting period after cooking. Remove the fillets from the pan and place them on a clean plate or cutting board, skin-side up (to keep it crispy!). Let them rest for 3-5 minutes before serving. Why? This allows the juices inside the fish, which migrated towards the center during cooking, to redistribute throughout the fillet. Cutting into it immediately will cause those juices to spill out, resulting in drier fish. Resting ensures every bite is moist and flavorful. It also allows the internal temperature to stabilize. It might seem like a small step, but it makes a noticeable difference in the final texture and juiciness. Don’t skip the rest! While it’s resting, you can quickly make a pan sauce if you like, using the fond left in the pan (deglaze with a splash of white wine or lemon juice, maybe add some herbs or capers). Then, serve immediately and enjoy that perfectly crispy skin you worked so hard for!
Bringing It All Together (Hopefully!)
So there you have it. My deep dive into the world of pan-seared salmon with crispy skin. It seems like a lot of steps when you break it down like this, doesn’t it? But really, it boils down to: get it dry, get the pan hot, use the right fat, skin-side down first, press gently, don’t move it too much, cook the flesh side briefly, and let it rest. Simple… yet complex. It’s funny how something so seemingly straightforward involves understanding heat transfer, moisture evaporation, the Maillard reaction – all this science happening right there in your skillet. Maybe I overthink it sometimes? Nah, understanding the ‘why’ helps replicate the ‘what’ consistently. At least, that’s what I tell myself when I’m meticulously patting salmon dry for the third time.
Is this the *only* way to cook salmon? Absolutely not. But for that specific, glorious combination of crispy skin and moist flesh, this pan-searing method is my tried-and-true technique. Will it work perfectly the very first time? Maybe! Or maybe it’ll take a couple of tries to get the heat just right on *your* stove with *your* pan. Don’t get discouraged. Every attempt teaches you something. The real challenge, I think, isn’t just following the steps, but developing that cook’s intuition – knowing the sound of the right sizzle, seeing the color change, feeling when the fish is ready to release. So, my challenge to you is this: grab a nice piece of skin-on salmon this week and give it a shot. Really focus on that drying step. Be patient with the sear. See if you can achieve that perfect crisp. Let me know how it goes!
FAQ
Q: My salmon skin always sticks to the pan! What am I doing wrong?
A: Sticking usually happens for a few reasons: the pan wasn’t hot enough when you added the fish, you didn’t use enough oil, or you tried to move the fish too soon before the skin properly crisped and released. Make sure your pan (especially cast iron or stainless steel) is thoroughly preheated over medium-high heat, add enough oil to coat the bottom, and be patient! Let the skin sear undisturbed for several minutes until it forms a crust and naturally releases.
Q: Can I use frozen salmon fillets?
A: Yes, you can, but you MUST thaw them completely first. Thaw them safely overnight in the refrigerator. Crucially, after thawing, you need to be extra diligent about drying the skin with paper towels, as thawed fish often retains more moisture. Ensure it’s bone dry before seasoning and searing for the best chance at crispy skin.
Q: How do I stop the salmon from cooking unevenly?
A: Uneven cooking often stems from fillets with varying thickness or uneven heat distribution in your pan. Try to select fillets that are relatively uniform. Using a heavy-bottomed pan like cast iron or quality stainless steel helps maintain even heat. Also, pressing the fillet down gently with a spatula when you first place it skin-down helps ensure even contact with the hot surface.
Q: What’s the best internal temperature for perfectly cooked salmon?
A: It depends on your preference, but a good target for moist, flaky salmon is an internal temperature of 125-130°F (52-54°C) for medium-rare, measured in the thickest part with an instant-read thermometer. Remember it will rise a few degrees while resting. For medium, aim for 135°F (57°C). Cooking much beyond 140-145°F (60-63°C) often results in drier salmon.
You might also like
- Essential Knives Every Commercial Kitchen Needs
- Cast Iron vs Stainless Steel Pans: Which is Better for Searing?
- Understanding Smoke Points: Choosing the Right Cooking Oil
@article{getting-perfect-pan-seared-salmon-with-crispy-skin-every-time,
    title   = {Getting Perfect Pan-Seared Salmon with Crispy Skin Every Time},
    author  = {Chef's icon},
    year    = {2025},
    journal = {Chef's Icon},
    url     = {https://chefsicon.com/perfect-pan-seared-salmon-crispy-skin/}
} 

