
The Best Fluffy Pancakes recipe you will fall in love with. Full of tips and tricks to help you make the best pancakes.
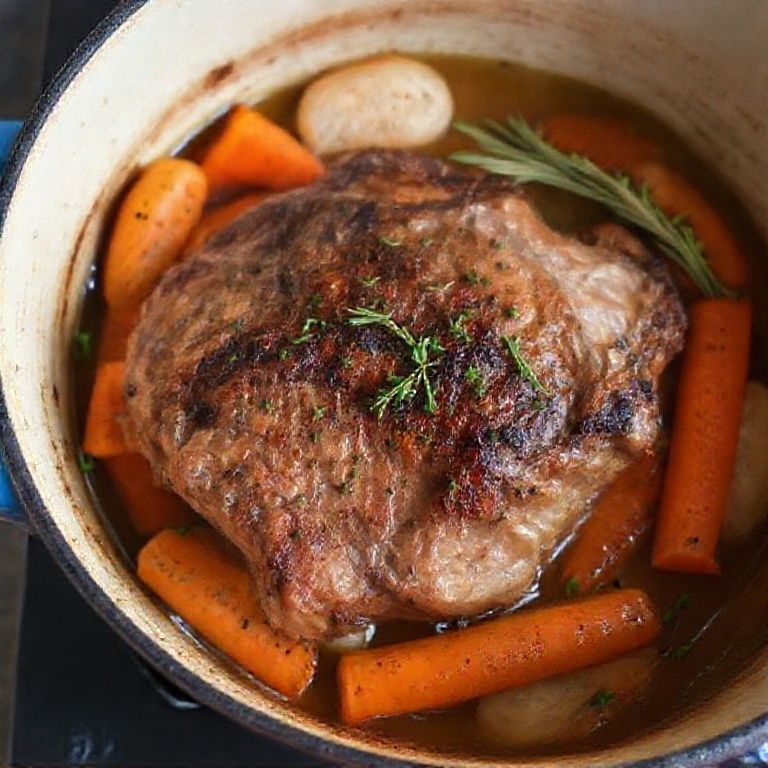
Table of Contents
- 1 The Nitty-Gritty of Braising: Your Path to Meat Perfection
- 1.1 Section 1: So, What Exactly IS Braising? More Than Just Stewing, Folks!
- 1.2 Section 2: Choosing Your Champion: The Best Meats for Braising
- 1.3 Section 3: The Searing Truth: Don’t Skip This Step!
- 1.4 Section 4: Aromatics: The Flavor Orchestra Conductors
- 1.5 Section 5: Liquid Gold: Choosing Your Braising Liquid
- 1.6 Section 6: The Right Tool for the Job: Pots, Pans, and Patience
- 1.7 Section 7: Low and Slow: The Underrated Virtue of Patience
- 1.8 Section 8: The Lid Debate: To Cover or Slightly Ajar?
- 1.9 Section 9: The Grand Finale: Finishing Your Braise Like a Pro
- 1.10 Section 10: Braising Blunders and How to Fix Them (Or Avoid Them!)
- 2 Wrapping It All Up: Your Braising Journey Begins
- 3 FAQ: Your Braising Questions Answered
Hey y’all, Sammy here, coming at you from my cozy home office in Nashville – Luna’s currently curled up on the chair beside me, probably dreaming of tuna, while I’m dreaming of perfectly tender, fall-apart meat. And that, my friends, brings us to today’s topic: essential braising techniques for tender meats. It’s one of those culinary methods that sounds fancy, maybe even a little intimidating, but trust me, it’s simpler than you think and the rewards? Oh, the rewards are absolutely worth it. We’re talking melt-in-your-mouth goodness that’ll make you wonder why you ever cooked tough cuts of meat any other way. I remember when I first moved here from the Bay Area, I was all about the fast-paced, quick-sear kind of cooking. But Nashville, with its slower rhythm and appreciation for comfort food, really taught me the beauty of taking your time, especially in the kitchen.
Braising, at its heart, is about transformation. It’s about taking those less expensive, often tougher cuts of meat – the ones that might make you scratch your head at the butcher counter – and turning them into something truly spectacular. It’s a bit like a good marketing campaign, actually; you take a product that might be overlooked and, with the right strategy (or in this case, technique), you reveal its hidden value and make it irresistible. I’ve had my share of braising mishaps, believe me. There was this one time, shortly after I got my first proper Dutch oven, I tried to rush a beef short rib situation. Let’s just say Luna wouldn’t even touch the leftovers, and she eats *everything*. That taught me a valuable lesson: patience isn’t just a virtue in braising, it’s a non-negotiable ingredient.
So, what are we going to dive into today? Well, I want to break down the whole process, from picking the right cut of meat to achieving that luscious, deeply flavored sauce that’s practically a hug in a bowl. We’ll talk about the importance of a good sear (hello, Maillard reaction!), the role of aromatics and liquids, and why the right pot can make all the difference. Think of this as your friendly guide, not a rigid set of rules. Cooking should be fun, experimental, and ultimately, delicious. By the end of this, you’ll not only understand the mechanics of braising but also, I hope, feel inspired to get in your kitchen and create some magic. Forget those quick weeknight dinners for a moment; let’s embrace the slow art of coaxing out incredible flavor and texture. This is where the real kitchen alchemy happens!
The Nitty-Gritty of Braising: Your Path to Meat Perfection
Section 1: So, What Exactly IS Braising? More Than Just Stewing, Folks!
Alright, let’s get down to brass tacks. What is braising? You hear the term thrown around, often interchangeably with stewing, but there are some subtle, yet important, distinctions. At its core, braising is a combination cooking method that involves first searing the meat at a high temperature, then partially submerging it in liquid (not too much, that’s key!) and simmering it gently in a covered pot over low heat for an extended period. Think of it as a two-act play: Act One is the dramatic, high-heat sear for color and flavor, and Act Two is the long, slow, gentle simmer that tenderizes and melds everything together. The ‘partially submerged’ part is crucial; unlike stewing where the ingredients are usually fully swimming, braising allows the top part of the meat to get a bit of a different texture, almost like a gentle roast, while the bottom part is becoming incredibly tender in the liquid. It’s this duality that I find so fascinating. It’s not just about making meat soft; it’s about building layers upon layers of flavor. The liquid itself becomes a concentrated sauce by the end, packed with all the goodness from the meat and aromatics. It’s a technique that truly respects the ingredient, coaxing out its best qualities rather than overpowering them. I often think about how systems work, and braising is a perfect example of a culinary system where each step synergistically contributes to the final, amazing outcome. It’s not just a random set of actions; it’s a purposeful process.
Section 2: Choosing Your Champion: The Best Meats for Braising
Now, this is where braising truly shines – it’s the superhero technique for those tougher, often more economical, cuts of meat. You know the ones I’m talking about: beef chuck, short ribs, pork shoulder (Boston butt), lamb shanks, even oxtail. These cuts are typically rich in connective tissue, specifically collagen. If you try to cook these quickly, like grilling a chuck steak, you’re gonna have a bad time – it’ll be tough and chewy. But, introduce that collagen to a moist, low-heat environment for a few hours, and something magical happens. The collagen breaks down and transforms into gelatin, which gives the meat that incredibly succulent, fall-apart texture and enriches the braising liquid, making it unctuous and glossy. It’s a beautiful transformation. So, don’t shy away from these hardworking muscles! They are packed with flavor that leaner, more tender cuts often lack. When I’m at the butcher, I’m specifically looking for pieces with good marbling and visible connective tissue if I’m planning a braise. Chicken thighs and drumsticks are also fantastic for braising; they stay moist and absorb flavors beautifully, unlike chicken breasts which can dry out easily. It’s about understanding the nature of the ingredient and matching it with the right technique. Is this the only way to cook these cuts? No, but for achieving that ultimate tenderness, braising is king.
Section 3: The Searing Truth: Don’t Skip This Step!
If there’s one piece of advice I could tattoo on every aspiring braiser’s arm (not really, but you get the intensity), it would be: DO NOT SKIP THE SEAR. Seriously. This is not just about browning the meat for looks; it’s about developing deep, complex flavor through the Maillard reaction. This magical chemical process happens when amino acids and reducing sugars in the meat react at high temperatures, creating a symphony of new flavor compounds and that beautiful, deeply browned crust. That crust isn’t just pretty; it’s flavor incarnate. To get a good sear, make sure your meat is dry (pat it down with paper towels – moisture is the enemy of browning), your pan is hot (but not smoking like crazy), and don’t overcrowd the pan. If you cram too much meat in at once, the temperature will drop, and you’ll end up steaming the meat instead of searing it. Work in batches if you have to; it’s worth the extra few minutes. I usually use a bit of neutral oil with a high smoke point, like grapeseed or canola. And be patient! Let the meat develop that deep, dark brown color before you flip it. It might feel like it’s taking forever, but those fond – the browned bits left in the bottom of the pan after searing – are pure gold. They’ll deglaze and dissolve into your braising liquid, adding another incredible layer of flavor. This step, more than any other, sets the foundation for a truly memorable braise. It’s like the opening scene of a great movie; it needs to grab you.
Section 4: Aromatics: The Flavor Orchestra Conductors
Once your meat is beautifully seared and set aside, it’s time to build your flavor base with aromatics. This is where you can really start to customize your braise and give it a distinct personality. The classic starting point, the mirepoix (a fancy French term for a mix of diced onions, carrots, and celery), is a fantastic foundation. These vegetables, when slowly sautéed in the pan drippings after searing the meat, release their sugars and deepen in flavor, contributing a subtle sweetness and earthy complexity to the overall dish. But don’t feel limited to just that! Garlic, of course, is almost always a welcome addition. Leeks, shallots, fennel – they all bring their own unique notes. Then you have your herbs and spices. For a hearty beef braise, I love using robust herbs like thyme and rosemary, a bay leaf or two, and maybe some black peppercorns. For something like pork, perhaps sage, or even star anise for an Asian-inspired twist. Paprika, cumin, coriander… the possibilities are endless. The key is to sauté your aromatics until they’re softened and fragrant. If you’re using dried spices, adding them with the vegetables helps to toast them a bit, waking up their flavors. Fresh herbs are often best added in two stages: some hardy ones at the beginning with the aromatics, and more delicate ones like parsley or cilantro stirred in at the end for brightness. Think of yourself as a conductor, bringing together all these different flavor instruments to create a harmonious symphony. This stage is so critical – it’s not just about throwing things in a pot; it’s about layering those base notes that will carry through the entire dish. Sometimes I wonder if I’m overthinking the aromatics, but then I taste the difference a well-built base makes, and I know it’s worth it.
Section 5: Liquid Gold: Choosing Your Braising Liquid
The braising liquid is more than just moisture; it’s a key flavor component and, eventually, the base of your sauce. What you choose here will significantly impact the final taste of your dish. Beef or chicken stock (homemade is amazing, but good quality store-bought works too) is a common and excellent choice, providing a savory backbone. Wine – red for beef and lamb, white for chicken or pork – adds acidity and complexity. The alcohol cooks off, leaving behind concentrated fruit and earthy notes. Beer is another fantastic option, especially darker beers like stouts or porters for beef, or even a good ale for pork. It can add a malty depth that’s truly unique. Don’t have stock or wine? Even water can work in a pinch, especially if you’ve built a strong flavor base with your searing and aromatics, though you might want to add a bit more seasoning. Some people use tomato products, like diced tomatoes or tomato paste, which add acidity and umami. I often use a combination – maybe some wine to deglaze the pan, followed by stock. The amount of liquid is also important. You want the meat to be about two-thirds submerged. Too little liquid, and your meat might dry out or scorch; too much, and you’re essentially boiling or stewing it, which will dilute the flavors rather than concentrate them. The goal is a gentle simmer, not a rolling boil. This liquid will mingle with the meat juices and aromatics over the long cooking time, reducing and transforming into that rich, flavorful sauce we all crave. It’s a slow infusion process, and so satisfying.
Section 6: The Right Tool for the Job: Pots, Pans, and Patience
Let’s talk about your braising vessel. While you *can* braise in various pots, the ideal choice is a heavy-bottomed pot with a tight-fitting lid. A classic enameled cast-iron Dutch oven is pretty much the gold standard, and for good reason. Cast iron excels at retaining and distributing heat evenly, which is crucial for that long, slow cooking process. The heavy lid traps steam and moisture, ensuring your meat stays tender and the liquid doesn’t evaporate too quickly. The enamel coating makes it non-reactive (so you can use acidic ingredients like wine or tomatoes without worry) and easier to clean. If you don’t have a Dutch oven, a sturdy oven-safe stockpot or a deep, lidded casserole dish can also work. The key is ‘oven-safe’ if you plan to braise in the oven (which I often prefer for its consistent, all-around heat). You can also braise on the stovetop, but you need to be more mindful of maintaining a very low, even simmer, and you might need to rotate the meat occasionally if your burner has hot spots. And yes, you can even use a slow cooker for braising, though you’ll definitely want to sear your meat and sauté your aromatics on the stovetop first to build that essential flavor foundation before transferring everything to the slow cooker. The slow cooker won’t give you the same depth of sauce concentration as a Dutch oven, but it’s a convenient option for sure. I’m a bit of a traditionalist here; I love my Dutch oven. It feels like a proper commitment to the process. Luna doesn’t care what I cook in, as long as something savory eventually hits the floor, but I care!
Section 7: Low and Slow: The Underrated Virtue of Patience
This is where the magic truly happens, but it requires one key ingredient that many of us are short on: patience. Braising is all about low temperature and long cooking time. We’re talking temperatures typically between 275°F to 325°F (135°C to 160°C) if you’re using an oven, or a very gentle simmer on the stovetop where you see just a few lazy bubbles rising to the surface. Why so low and slow? Because this gentle heat allows the tough connective tissues (collagen) in the meat to break down gradually into luscious gelatin without causing the muscle fibers to seize up and become tough. If you try to rush it with higher heat, the outside of the meat might get overcooked and dry before the inside has a chance to become tender. The exact cooking time will depend on the type and cut of meat, its size, and even your specific oven or stovetop. It could be anywhere from 1.5 hours for chicken thighs to 3-4 hours, or even longer, for large cuts of beef or pork. How do you know when it’s done? The meat should be fork-tender, meaning you can easily shred it with a fork. It should practically melt in your mouth. There’s no precise timer; it’s about feel and observation. This isn’t a set-it-and-forget-it completely kind of deal for the first time, you need to check. But once you get the hang of it, it’s wonderfully hands-off for most of the cooking time. I often start a braise on a lazy weekend afternoon, and the aroma filling the house is just incredible. It’s a reminder that some of the best things in life, and in cooking, can’t be rushed.
Section 8: The Lid Debate: To Cover or Slightly Ajar?
Ah, the lid. Such a simple component, yet it plays a big role in braising. Generally, you want a tight-fitting lid on your pot for the majority of the cooking time. This serves a few crucial purposes. First, it traps steam, which helps keep the meat moist and tender, especially the part that’s not submerged in the liquid. Second, it maintains a consistent temperature inside the pot. Third, it prevents the braising liquid from evaporating too quickly. If your liquid reduces too much too soon, your meat could scorch, and your sauce could become overly concentrated or even salty. However, there’s a little nuance here. Some chefs like to cook with the lid slightly ajar, or even remove it entirely, for the last 30 minutes to an hour of cooking. Why? This can help the sauce reduce and thicken a bit more, and it can also allow the top surface of the meat to develop a slightly more browned, roasted character. Is this always necessary? Not really. If your sauce is already looking good and your meat is tender, keeping the lid on tight is perfectly fine. I tend to play this by ear. If I peek in and the sauce looks a bit thin towards the end, I might crack the lid. If everything looks perfect, I leave it be. Sometimes, if I’m braising something like short ribs and I want a bit of a glaze on top, I’ll remove the lid, maybe even spoon some of the braising liquid over the meat, and let it go for that last stretch. It’s one of those things where you develop a feel for it over time. There’s no single “right” answer that applies to every single braise. It’s about observing and adjusting, like any good system analysis.
Section 9: The Grand Finale: Finishing Your Braise Like a Pro
So, your meat is fork-tender, the house smells amazing – you’re almost there! But a few finishing touches can elevate your braise from great to truly outstanding. First, carefully remove the meat from the pot and set it aside, tented with foil to keep it warm. Now, look at that braising liquid. It’s probably packed with flavor, but it might be a bit thin, or perhaps it contains a lot of rendered fat. If there’s a thick layer of fat on top, now is a good time to skim it off. You can use a spoon, or a fat separator if you have one. Then, you’ll likely want to reduce and thicken the sauce. You can do this by simply simmering the liquid on the stovetop over medium heat until it reduces to your desired consistency. This concentrates the flavors even further. How thick should it be? You want it to coat the back of a spoon. If you want it thicker still, or if you’re short on time, you can make a slurry with a little cornstarch or flour mixed with cold water and whisk that into the simmering sauce. Be careful not to add too much at once. Another option for richness and a glossy sheen is to whisk in a knob of cold butter at the very end – this is called ‘monter au beurre’ in French cooking. Finally, taste your sauce and adjust the seasoning if needed. It might need a pinch more salt, a grind of black pepper, or even a splash of acidity like lemon juice or vinegar to brighten things up. This last step is crucial; a well-seasoned, perfectly balanced sauce makes all the difference. Sometimes I’ll also strain the sauce through a fine-mesh sieve for an extra-smooth, restaurant-quality finish, especially if my aromatics have broken down a lot. It’s an extra step, but for special occasions, why not?
Section 10: Braising Blunders and How to Fix Them (Or Avoid Them!)
Even seasoned cooks can run into a few hiccups when braising. It happens! Let’s talk about some common issues and how to troubleshoot them. Perhaps the most dreaded one: tough meat. If your braised meat is still tough, the most likely culprit is simply that it hasn’t cooked long enough. Remember, low and slow is the key. Give it more time. If the liquid is evaporating too quickly, add a bit more stock or water and continue cooking. Another issue can be a bland sauce. This often goes back to the earlier steps. Did you get a good sear on the meat? Did you build enough flavor with your aromatics? Did you use a flavorful braising liquid? If your sauce is lacking punch at the end, try simmering it down further to concentrate the flavors. A squeeze of lemon juice, a dash of Worcestershire sauce, or even a bit of tomato paste can also help boost umami and complexity. What if your sauce is too greasy? As mentioned before, skim off the excess fat. Chilling the braise overnight makes this super easy, as the fat will solidify on top and can be lifted right off. What if the meat is falling apart *too* much, becoming mushy? This means it was likely overcooked, or perhaps the cut was too delicate for a very long braise. There’s not much you can do to reverse this, but it’ll still taste good! Just handle it gently. One mistake I made early on was not seasoning adequately at each stage. Season the meat before searing, season the aromatics, and then taste and adjust the sauce at the end. Layering seasoning is just as important as layering flavors. Don’t be afraid to experiment and learn from each braise. Even a ‘mistake’ can teach you something for next time. It’s all part of the process, a little like debugging code – you find the error, figure out why, and improve the system.
Wrapping It All Up: Your Braising Journey Begins
So there you have it – a deep dive into the wonderful world of braising. It’s more than just a cooking method; it’s a testament to how time, patience, and a little bit of know-how can transform humble ingredients into something truly extraordinary. From understanding the importance of that initial sear to patiently waiting for the magic of low-and-slow cooking to happen, every step plays a crucial part in building those layers of flavor and achieving that coveted melt-in-your-mouth texture. I really believe that mastering braising can fundamentally change the way you approach cooking tougher cuts of meat, opening up a whole new repertoire of delicious and often budget-friendly meals. It’s certainly changed mine, and it’s become one of my favorite ways to spend a chilly Nashville afternoon, with the aroma filling the house and Luna purring contentedly nearby (probably anticipating the outcome).
My challenge to you, if you’re new to braising or looking to refine your technique, is to pick a classic braising cut – maybe some beef short ribs or a pork shoulder – and just go for it this weekend. Don’t be intimidated. Think about the steps we’ve discussed, trust the process, and most importantly, enjoy it. What’s the worst that can happen? Even a less-than-perfect braise is usually still pretty darn tasty. And who knows, you might just discover your new favorite comfort food. What will be your first (or next) braising adventure? I’d love to hear how it turns out. For me, I think a red wine braised lamb shank might be on the menu soon. The possibilities are endless, and that, my friends, is the beauty of cooking.
FAQ: Your Braising Questions Answered
Q: Can I really mess up a braise? What’s the most common mistake?
A: While braising is forgiving, the most common mistake is probably undercooking, leading to tough meat. Patience is key! Another is not searing the meat properly, which means missing out on a huge layer of flavor. Also, ensure your liquid level is right – not too much, not too little.
Q: What if I don’t have a Dutch oven? Can I still braise effectively?
A: Yes, you can! A heavy-bottomed stockpot with a tight-fitting lid that’s oven-safe is a good alternative. If it’s not oven-safe, you can braise on the stovetop over very low heat, but you’ll need to monitor it more closely to prevent scorching and ensure even cooking. Even a slow cooker can be used, though searing beforehand on the stovetop is highly recommended for best flavor.
Q: My braising liquid didn’t turn into a thick sauce. What went wrong?
A: This is common! After removing the meat, if the liquid is too thin, simply simmer it uncovered on the stovetop until it reduces and thickens to your liking. You can also use a cornstarch slurry (cornstarch mixed with a little cold water) to thicken it more quickly, or enrich it with a knob of cold butter whisked in at the end.
Q: Can I prepare a braise ahead of time? How do I store and reheat it?
A: Absolutely! Braises are fantastic for making ahead as their flavor often improves overnight. Cool the braise completely, then store it in an airtight container in the refrigerator for up to 3-4 days, or freeze for longer storage. To reheat, gently warm it on the stovetop over low heat or in a moderate oven until heated through. You might need to add a splash of stock or water if the sauce has thickened too much.
You might also like
- Demystifying Sous Vide for Home Cooks
- Perfecting Your Roast Chicken: A Step-by-Step Guide
- Understanding Different Cuts of Beef and How to Cook Them
@article{sammys-take-on-essential-braising-techniques-for-tender-meats,
    title   = {Sammy’s Take on Essential Braising Techniques for Tender Meats},
    author  = {Chef's icon},
    year    = {2025},
    journal = {Chef's Icon},
    url     = {https://chefsicon.com/essential-braising-techniques-for-tender-meats/}
}