The Best Fluffy Pancakes recipe you will fall in love with. Full of tips and tricks to help you make the best pancakes.
Table of Contents
- 1 Understanding Chicken: Types and Cuts
- 2 Prepping Your Chicken: The Essentials
- 3 Cooking Techniques: From Roasting to Grilling
- 4 Achieving the Perfect Internal Temperature
- 5 Resting: The often Forgotten Step
- 6 Carving: Making the Most of Your Chicken
- 7 Troubleshooting Common Issues
- 8 Putting It All Together: Your Challenge
- 9 FAQ
Let’s dive into the world of perfectly cooked chicken. It’s a staple in so many dishes, yet getting it just right can be a bit tricky. I’ve had my fair share of hits and misses, from the perfectly juicy roast chicken to the slightly overcooked grilled breast. But fear not, because I’ve gathered some tried-and-true tips and tricks to help you nail that perfectly cooked chicken every time.
Living in Nashville, I’ve been spoiled with some of the best fried chicken in the country. But let’s face it, not all of us can whip up a perfect batch of hot chicken at home. So, whether you’re roasting, grilling, or pan-frying, these techniques will have you cooking chicken like a pro in no time.
By the end of this guide, you’ll have a solid understanding of how to choose the right chicken, prep it like a master, and cook it to juicy perfection. So, let’s get started!
Understanding Chicken: Types and Cuts
First things first, let’s talk chicken. Not all chicken is created equal, and understanding the different types and cuts is crucial for cooking it perfectly. You’ve got your whole chicken, breasts, thighs, wings, and more. Each cut has its own unique characteristics and requires different cooking methods.
Whole Chicken
Cooking a whole chicken can be intimidating, but it’s actually quite simple. The key is to cook it evenly so that the breast meat doesn’t dry out while the dark meat cooks through. My go-to method? Spatchcocking. It sounds fancy, but it’s just a way of butterflying the chicken so it cooks more evenly. Trust me, it’s a game-changer.
Chicken Breasts
Chicken breasts are a lean, versatile cut, but they can dry out quickly if not cooked properly. The trick here is to cook them gently and not overcook them. More on that later.
Chicken Thighs and Drumsticks
These are my favorite cuts for flavor. They’re more forgiving than breasts because of their higher fat content, which means they stay juicy even if you cook them a bit longer. Perfect for grilling or slow-cooking.
Chicken Wings
Who doesn’t love a good chicken wing? Whether you’re frying, baking, or grilling, the key to perfect wings is getting that crispy skin while keeping the meat tender. It’s all about the technique.
Prepping Your Chicken: The Essentials
Preparation is key when it comes to cooking chicken. From brining to marinating, there are several steps you can take to ensure your chicken is flavorful and juicy. Let’s break it down.
Brining
Brining involves soaking the chicken in a saltwater solution. This helps to keep the chicken moist and adds flavor. It’s especially useful for lean cuts like chicken breasts. A basic brine is just water and salt, but you can add herbs, spices, and even sugar for extra flavor. Is this the best approach? Let’s consider the science behind it.
The salt in the brine breaks down the proteins in the chicken, allowing it to absorb more moisture. This means that when you cook the chicken, it retains more of its juices. I usually brine for about 30 minutes to an hour, but you can go longer if you prefer a stronger flavor.
Marinating
Marinating is another great way to add flavor to your chicken. Unlike brining, marinating involves using an acidic liquid like lemon juice, vinegar, or yogurt to tenderize the meat. You can also add herbs, spices, and oils for extra flavor. I’m torn between brining and marinating, but ultimately, it depends on the recipe and the cut of chicken.
For example, if I’m grilling chicken breasts, I might opt for a quick marinade with olive oil, lemon juice, garlic, and herbs. But if I’m roasting a whole chicken, I might brine it first for extra juiciness.
Seasoning
Don’t forget the power of a good seasoning. Whether you’re using a dry rub or a wet rub, make sure to season your chicken generously. Salt and pepper are a must, but don’t be afraid to experiment with different spices and herbs. Maybe I should clarify that seasoning is not just about flavor; it also helps to create a crispy exterior, especially when grilling or roasting.
Cooking Techniques: From Roasting to Grilling
Now that we’ve prepped our chicken, it’s time to cook. There are countless ways to cook chicken, but let’s focus on some of the most popular methods: roasting, grilling, pan-frying, and slow-cooking.
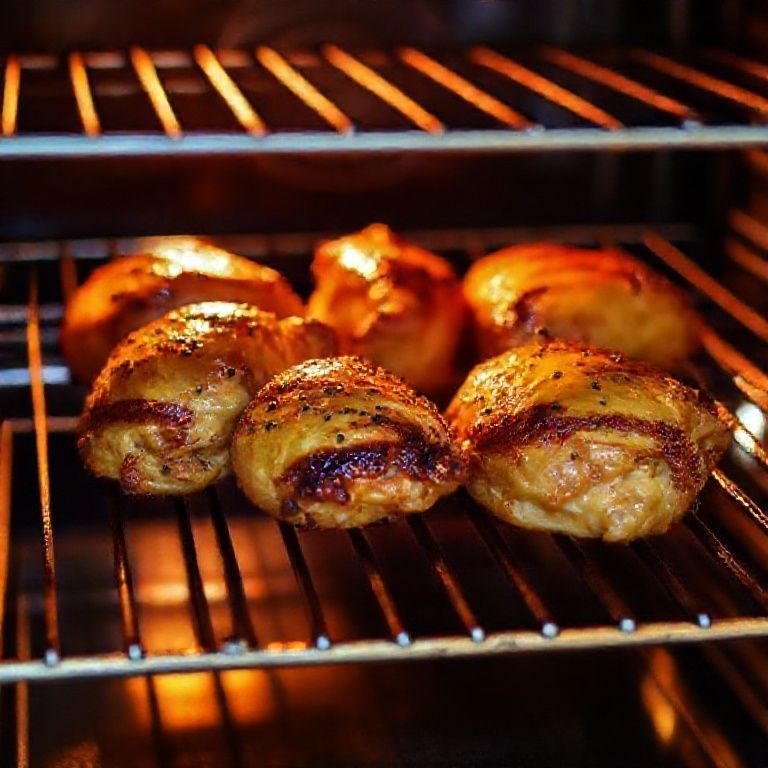
Roasting
Roasting is a classic method that’s perfect for whole chickens or larger cuts. The key to a perfectly roasted chicken is even cooking. As I mentioned earlier, spatchcocking is a great technique for this. simply cut out the backbone and flatten the chicken. This allows it to cook more evenly and quickly.
Another tip for roasting is to start with a high heat to get that crispy skin, then reduce the temperature to cook the chicken through. And don’t forget to let it rest before carving! This allows the juices to redistribute throughout the meat.
Grilling
Grilling is ideal for chicken breasts, thighs, and wings. The high heat creates a nice char while keeping the inside juicy. But be careful not to overcook it, especially with breasts. I recommend using a thermometer to ensure it reaches the safe internal temperature of 165°F (74°C).
For chicken breasts, consider grilling them over indirect heat to prevent them from drying out. For thighs and drumsticks, you can go direct and even add some wood chips for a smoky flavor.
Pan-Frying
Pan-frying is a quick and easy method that’s great for chicken breasts and tenders. The key here is to not overcrowd the pan, so the chicken cooks evenly. I like to use a combination of oil and butter for added flavor. And don’t forget to let the chicken rest before serving to lock in those juices.
Slow-Cooking
Slow-cooking is perfect for those busy days when you want a warm meal ready when you get home. It’s great for chicken thighs, drumsticks, and even whole chickens. The low and slow method ensures the chicken stays juicy and tender. Plus, you can add all sorts of flavors with sauces and spices.
One of my favorite slow-cooker recipes is chicken fajitas. Just toss in some chicken breasts, peppers, onions, and a packet of fajita seasoning. Set it and forget it!
Achieving the Perfect Internal Temperature
Cooking chicken to the right internal temperature is crucial for both safety and taste. Undercooked chicken can be dangerous, while overcooked chicken can be dry and tough. So, how do you strike the perfect balance?
The USDA recommends cooking chicken to an internal temperature of 165°F (74°C). But here’s a little secret: you can actually pull the chicken off the heat a few degrees shy of that, around 160°F (71°C), and let carryover cooking do the rest. This helps prevent overcooking while still ensuring the chicken is safe to eat.
Investing in a good meat thermometer is a game-changer. It takes the guesswork out of cooking and ensures your chicken is perfectly cooked every time. I prefer digital thermometers with a probe that can stay in the chicken while it cooks. Some even have alarms that go off when the chicken reaches the desired temperature.
Resting: The often Forgotten Step
Resting your chicken after cooking is an often-overlooked step, but it’s crucial for locking in those juices. When you cook chicken, the proteins contract and push the juices to the center of the meat. Resting allows those juices to redistribute throughout the chicken, resulting in a moister, more flavorful final product.
But how long should you rest your chicken? A good rule of thumb is to rest it for about 10-20% of the cooking time. So, if you cooked your chicken for 30 minutes, let it rest for about 3-6 minutes. For a whole chicken, you might need to rest it for 20-30 minutes.
Carving: Making the Most of Your Chicken
Carving a chicken can seem daunting, but with the right technique, it’s a breeze. The key is to use a sharp knife and take your time. Here’s a basic guide to carving a whole chicken:
- Place the chicken breast-side up on a cutting board.
- Remove the legs and thighs by pulling them away from the body and cutting through the joint.
- Separate the drumsticks and thighs by cutting through the joint that connects them.
- Remove the wings by pulling them away from the body and cutting through the joint.
- Separate the wings into drumettes and flats by cutting through the joint.
- Remove the wishbone by pulling it away from the breast meat.
- Carve the breast meat by slicing it against the grain.
Remember, practice makes perfect. The more you carve, the better you’ll get at it. And don’t forget to save the carcass for making stock!
Troubleshooting Common Issues
Even with the best tips and tricks, things can still go wrong when cooking chicken. Here are some common issues and how to fix them:
Dry Chicken
If your chicken turns out dry, it’s likely overcooked. Make sure to use a thermometer and pull the chicken off the heat a few degrees before it reaches 165°F (74°C). You can also try brining the chicken before cooking to help it retain moisture.
Uneven Cooking
Uneven cooking can be a result of hot spots in your pan or grill. To combat this, make sure to preheat your cooking surface evenly and consider moving the chicken around during cooking. For whole chickens, spatchcocking can help with even cooking.
Burnt Skin
Burnt skin can happen if the heat is too high or if the chicken is cooked for too long. To prevent this, keep an eye on the chicken and adjust the heat as needed. You can also tent the chicken with foil if the skin is browning too quickly.
Undercooked Chicken
Undercooked chicken is a safety hazard. Always use a thermometer to ensure the chicken reaches a safe internal temperature. If you find that the chicken is undercooked, simply put it back on the heat until it’s done.
Putting It All Together: Your Challenge
Alright, folks, it’s time to put all these tips and tricks to the test. Your challenge is to cook a perfectly juicy, flavorful chicken using one of the methods we’ve discussed. Whether you’re roasting a whole chicken, grilling some thighs, or pan-frying breasts, I want to see your creations!
Share your perfectly cooked chicken with us using #ChefsiconPerfectChicken on social media. Let’s build a community of chicken connoisseurs and celebrate our culinary victories together. And remember, every failed attempt is just a step closer to mastery. So don’t be discouraged if your first try isn’t perfect. Keep cooking, keep learning, and keep enjoying the process.
FAQ
Q: What’s the best way to store leftover chicken?
A: Store leftover chicken in an airtight container in the refrigerator for up to 4 days. You can also freeze cooked chicken for up to 4 months.
Q: Can I cook chicken from frozen?
A: Yes, you can cook chicken from frozen, but it will take about 50% longer to cook. Make sure to use a thermometer to ensure it reaches a safe internal temperature.
Q: How can I add flavor to chicken without adding calories?
A: Herbs, spices, and aromatics like garlic and onions are a great way to add flavor to chicken without adding calories. You can also use citrus juices, vinegar, or hot sauces for a kick of flavor.
Q: Is it safe to wash raw chicken?
A: No, it’s not recommended to wash raw chicken as it can spread bacteria around your kitchen. The heat from cooking will kill any bacteria present.
@article{perfectly-cooked-chicken-tips-tricks-and-techniques,
    title   = {Perfectly Cooked Chicken: Tips, Tricks, and Techniques},
    author  = {Chef's icon},
    year    = {2025},
    journal = {Chef's Icon},
    url     = {https://chefsicon.com/perfectly-cooked-chicken-tips-tricks/}
}