
Table of Contents
- 1 Making the Most of Your Kitchen Space
- 1.1 The Island Layout: A Central Hub
- 1.2 The Zone Layout: Designated Areas for Specific Tasks
- 1.3 The Assembly Line Layout: High-Volume Efficiency
- 1.4 The Galley Layout: Perfect for Small Spaces
- 1.5 Hybrid Layouts: Combining the Best of Different Approaches
- 1.6 Ergonomics and Workflow: The Human Factor
- 1.7 Equipment Placement: The Tools of the Trade
- 1.8 Storage Solutions: A Place for Everything
- 1.9 Ventilation and Lighting: Setting the Stage
- 1.10 Technology Integration: The Smart Kitchen
- 2 Restaurant Kitchen Layouts: Final Thoughts
- 3 FAQ
Running a restaurant is, let’s be honest, controlled chaos. You’re juggling orders, managing staff, and trying to keep everything from going up in flames (literally and figuratively!). And at the heart of it all? The kitchen. It’s the engine room, and if it’s not running efficiently, your whole operation suffers. I’ve seen it firsthand, moving from the relatively spacious kitchens of the Bay Area to some of the cozier (ahem, *cramped*) spots here in Nashville. That’s why I got obsessed with restaurant kitchen layouts and maximizing space efficiency. It’s not just about fitting everything in; it’s about creating a flow that lets your team work their magic without tripping over each other.
This isn’t some dry, theoretical guide. We’re going to dive into the nitty-gritty of designing a kitchen that *works*. We’ll look at different layouts, talk about equipment placement, and even touch on the psychology of how a well-designed space can boost morale and productivity. I’ll share some of the ‘aha!’ moments I’ve had, and, yeah, probably a few of the mistakes I’ve learned from along the way. My rescue cat, Luna, often watches me rearrange my own (much smaller!) kitchen, probably wondering what I’m up to – it’s all about flow, Luna, flow!
By the end of this, you’ll have a solid understanding of how to analyze your kitchen space, identify bottlenecks, and create a layout that’s not just efficient, but also a pleasure to work in. Because let’s face it, a happy kitchen crew equals happy customers. And isn’t that what we’re all aiming for?
So, whether you’re starting from scratch with a brand-new restaurant or looking to revamp your existing kitchen, stick around. We’re about to get into the weeds of restaurant kitchen layouts and how to make the most of every square inch.
Making the Most of Your Kitchen Space
The Island Layout: A Central Hub
The island layout is a classic for a reason. It features a central ‘island’ that usually houses the primary cooking equipment – ranges, ovens, griddles. This creates a focal point for the kitchen and allows for 360-degree access. Think of it like the sun in a solar system, with other stations orbiting around it. The benefits? It promotes efficient workflow, as cooks can easily move around the island and access different areas. It also encourages teamwork and communication, as staff are naturally positioned closer to each other.
However, the island layout isn’t without its challenges. It requires a decent amount of space to begin with. If your kitchen is too small, an island can become an obstacle rather than an asset. You also need to carefully consider the placement of other stations – prep areas, refrigeration, dishwashing – to avoid creating traffic jams. I always recommend doing a ‘walk-through’ simulation with your team before finalizing the layout. Pretend you’re prepping, cooking, and plating dishes. Where are the potential collisions? Where do people have to walk too far?
One thing I learned the hard way is the importance of ventilation with an island layout. Because all your cooking is concentrated in one area, you need a powerful hood system to effectively remove smoke, grease, and heat. Don’t skimp on this – it’s crucial for both safety and comfort. Also, think about the height of the island. It should be comfortable for your tallest and shortest cooks to work at. Adjustable-height workstations can be a great investment.
Finally, consider the ‘flow’ around the island. How will servers access the finished dishes? Where will dirty dishes be returned? These pathways need to be clear and unobstructed. It’s like designing a city – you need to think about the main arteries and the smaller side streets. The goal is to minimize unnecessary movement and maximize efficiency. I’m increasingly fascinated by how urban planning principles apply to kitchen design!
The Zone Layout: Designated Areas for Specific Tasks
The zone layout is all about creating distinct areas for different tasks: a cold prep zone, a hot cooking zone, a baking zone, a dishwashing zone, and so on. This approach is particularly effective in larger kitchens or those with specialized menus. The key is to group related tasks together to minimize cross-contamination and streamline workflow. For instance, you wouldn’t want your raw meat prep area next to your salad station. That’s just asking for trouble.
The benefits of a zone layout include improved food safety, reduced cross-contamination risk, and increased specialization. Cooks can become experts in their specific zone, leading to greater efficiency and consistency. It also makes it easier to train new staff, as they can focus on learning one area at a time. However, a zone layout can also lead to silos if not managed properly. Communication between zones is crucial to ensure smooth order fulfillment. You might need to implement systems like kitchen display systems (KDS) or good old-fashioned verbal communication protocols to keep everyone on the same page.
When designing a zone layout, think carefully about the proximity of different zones. You want to minimize the distance that food and staff have to travel. For example, the cold prep zone should be close to the walk-in refrigerator, and the hot cooking zone should be close to the plating area. Also, consider the size of each zone. It should be proportionate to the volume of work that will be done there. A busy salad station will need more space than a rarely-used pastry area. Am I overthinking this? Maybe, but I find that these details make a huge difference.
One often-overlooked aspect is the lighting in each zone. Different tasks require different levels of illumination. Prep areas need bright, focused lighting, while the dining area might benefit from softer, more ambient light. It’s not just about aesthetics; it’s about creating a safe and comfortable working environment. And don’t forget about storage within each zone. Having the right tools and ingredients readily available is key to efficiency.
The Assembly Line Layout: High-Volume Efficiency
The assembly line layout is the go-to choice for high-volume operations like fast-food restaurants, cafeterias, and banquet halls. It’s designed for speed and efficiency, with food moving in a linear fashion from one station to the next. Think of a car factory, but with burgers instead of Buicks. Each station performs a specific task, and the food is passed along until it’s complete. This layout excels at producing large quantities of standardized dishes quickly.
The key to a successful assembly line is precise timing and coordination. Each station needs to be perfectly calibrated to the others to avoid bottlenecks. If one station is too slow, the whole line backs up. If one station is too fast, food can pile up and get cold. This requires careful planning and ongoing monitoring. You might need to adjust staffing levels or equipment settings to optimize the flow. It’s a constant balancing act.
One of the challenges of an assembly line layout is that it can be inflexible. It’s not well-suited for restaurants with diverse menus or frequent menu changes. It also requires a significant amount of space, as the line needs to be long enough to accommodate all the necessary stations. And, frankly, it can be a bit monotonous for the staff. There’s not a lot of room for creativity or variation. However, for high-volume operations, the efficiency gains can be significant. It’s all about finding the right balance between speed and flexibility.
Consider the ergonomics of each station as well. Repetitive motions can lead to injuries, so it’s important to design workstations that are comfortable and safe. Adjustable-height counters, anti-fatigue mats, and proper tool placement can all make a difference. I sometimes wonder if there’s a way to incorporate more movement and variety into an assembly line, to keep things interesting for the staff. It’s a challenge I’m still pondering.
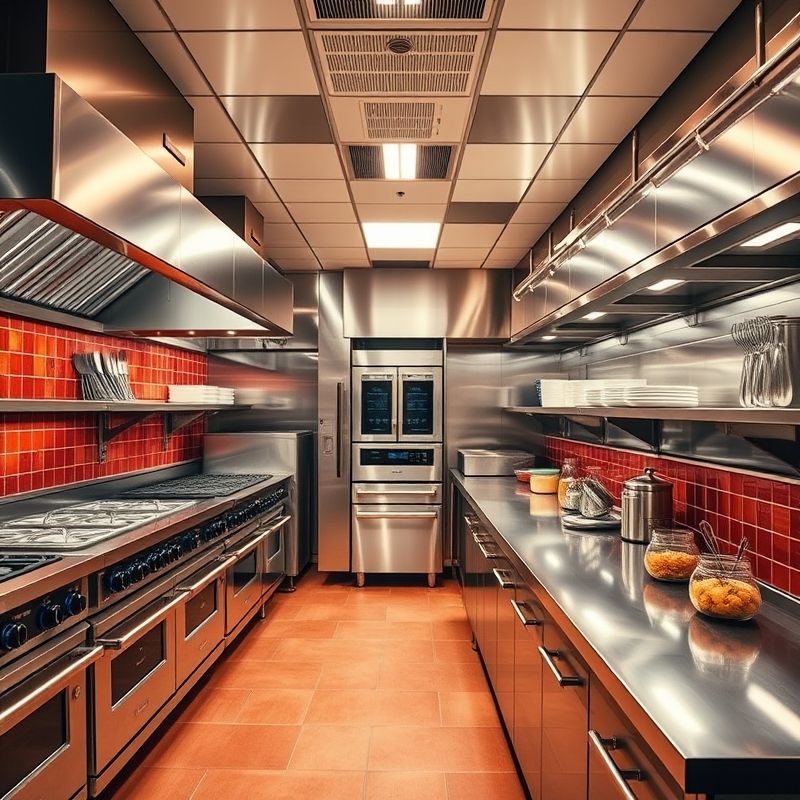
The Galley Layout: Perfect for Small Spaces
The galley layout is a common choice for food trucks, small cafes, and other space-constrained kitchens. It features two parallel counters with a walkway in between. One side typically houses the cooking equipment, while the other is used for prep and storage. It’s a simple, efficient layout that maximizes space utilization. Think of a ship’s galley – every inch is accounted for.
The main advantage of a galley layout is its compactness. It can fit into very tight spaces, making it ideal for small restaurants or mobile operations. It also promotes a linear workflow, with food moving from one end of the galley to the other. However, a galley layout can feel cramped, especially during peak hours. It’s crucial to have good organization and storage solutions to avoid clutter. Every utensil, pot, and pan needs to have its designated place.
One of the challenges of a galley layout is that it can be difficult for multiple cooks to work simultaneously. There’s limited space to move around, so communication and coordination are essential. You might need to establish clear protocols for who has the right of way in the aisle. Also, consider the placement of doors and windows. They can affect the flow of traffic and ventilation. I’ve seen some ingenious galley layouts that use vertical space to maximize storage – shelves, hanging racks, and even ceiling-mounted pot racks.
Ventilation is also a key consideration in a galley layout. Because the space is enclosed, you need a good exhaust system to remove heat and smoke. And don’t forget about lighting. A well-lit galley will feel less cramped and more inviting. Consider using under-cabinet lighting to illuminate the work surfaces. It’s all about making the most of the available space and creating a functional and efficient kitchen, even in the smallest of footprints. I’m always impressed by how much can be accomplished in a well-designed galley kitchen.
Hybrid Layouts: Combining the Best of Different Approaches
Often, the best solution isn’t one specific layout, but a hybrid approach that combines elements of different layouts. For example, you might have a main kitchen with an island layout, plus a separate zone for pastry or a dedicated area for takeout orders. This allows you to tailor the layout to your specific menu and operational needs. It’s about finding the right balance between efficiency, flexibility, and space utilization.
The key to a successful hybrid layout is careful planning and integration. You need to think about how the different areas will interact with each other. How will food flow between them? How will staff move between them? Will there be any potential conflicts or bottlenecks? It’s like designing a mini-city, with different neighborhoods that need to be connected effectively.
One of the benefits of a hybrid layout is that it can adapt to changing needs. As your restaurant evolves, you can adjust the layout to accommodate new menu items or service styles. It also allows you to create specialized areas for specific tasks, while still maintaining an overall efficient workflow. For instance, you might have an open kitchen area with an island for showmanship, combined with a more traditional galley layout in the back for prep and dishwashing. It’s about creating a kitchen that’s both functional and visually appealing.
Don’t be afraid to experiment and think outside the box. There’s no one-size-fits-all solution when it comes to kitchen design. The best layout is the one that works best for *your* restaurant, *your* menu, and *your* team. And it’s an ongoing process. You should always be looking for ways to improve and optimize your kitchen’s layout, even after it’s up and running. I find it’s a bit like a puzzle – always trying to find the perfect arrangement of pieces.
Ergonomics and Workflow: The Human Factor
Beyond the specific layout, it’s crucial to consider the human factor – how your staff will move and work within the space. This is where ergonomics comes into play. Ergonomics is the science of designing workspaces that are comfortable, safe, and efficient for the people who use them. In a kitchen, this means thinking about things like counter heights, reach distances, and the placement of equipment and tools.
The goal is to minimize strain and fatigue, and to prevent injuries. Repetitive motions, awkward postures, and heavy lifting can all take a toll on the body. By designing an ergonomic kitchen, you can create a healthier and more productive work environment. This can lead to reduced staff turnover, improved morale, and even better food quality. It’s a win-win situation.
Some key ergonomic considerations include: Adjustable-height workstations, Anti-fatigue mats, Proper tool placement, Adequate lighting, Easy-to-reach storage, and Clear pathways. It’s also important to involve your staff in the design process. They’re the ones who will be working in the kitchen day in and day out, so they have valuable insights into what works and what doesn’t. I always recommend doing a ‘walk-through’ with your team and getting their feedback before finalizing the layout.
Workflow is closely related to ergonomics. It’s about the flow of movement within the kitchen – how staff move from one task to another, how food is prepped and cooked, and how orders are fulfilled. A well-designed workflow minimizes unnecessary steps, reduces congestion, and streamlines the entire process. It’s like choreographing a dance – every movement should be purposeful and efficient.
Equipment Placement: The Tools of the Trade
The placement of your equipment is a critical element of kitchen design. It’s not just about fitting everything in; it’s about placing each piece of equipment in a location that maximizes efficiency and workflow. This requires careful consideration of your menu, your cooking processes, and the overall layout of your kitchen.
Some general principles of equipment placement include: Grouping related equipment together. Placing frequently used equipment in easily accessible locations. Minimizing travel distances between stations. Ensuring adequate space for operation and maintenance. Considering ventilation and utility requirements. It’s also important to think about the size and capacity of your equipment. You need to choose equipment that’s appropriate for your volume of business. Over-sized equipment can waste space and energy, while under-sized equipment can create bottlenecks.
Specific equipment placement will depend on the type of layout you choose. In an island layout, the cooking equipment will be concentrated in the central island. In a zone layout, equipment will be grouped according to function. In an assembly line layout, equipment will be arranged in a linear fashion. No matter what layout you choose, it’s crucial to create a logical flow that minimizes unnecessary movement and maximizes efficiency.
Don’t forget about the ‘little things’ – things like prep tables, sinks, and storage racks. These items are just as important as the major pieces of equipment. They need to be placed in convenient locations to support the workflow. I’ve seen kitchens where the prep tables are too far from the refrigerators, or the sinks are too small for the volume of dishes. These seemingly minor details can have a major impact on efficiency.
Storage Solutions: A Place for Everything
Storage is often an afterthought in kitchen design, but it’s absolutely crucial for efficiency and organization. A well-organized kitchen is a happy kitchen. Every item needs to have its designated place, and staff need to be able to find what they need quickly and easily. This requires a combination of shelving, racks, drawers, and cabinets.
Some key principles of kitchen storage include: Storing frequently used items in easily accessible locations. Grouping similar items together. Using vertical space to maximize storage capacity. Labeling everything clearly. Implementing a first-in, first-out (FIFO) system for perishable items. It’s also important to consider the type of storage that’s best suited for different items. Dry goods need to be stored in airtight containers. Perishable items need to be stored in refrigerators or freezers. Utensils and smallwares need to be stored in drawers or on racks.
Don’t underestimate the importance of mobile storage solutions. Carts, rolling racks, and portable shelving units can be incredibly useful for moving ingredients and equipment around the kitchen. They can also be used to create temporary workstations or to expand storage capacity during peak periods. I’m a big fan of modular storage systems that can be easily reconfigured to adapt to changing needs.
Regularly decluttering and organizing your storage areas is essential. Get rid of anything that’s broken, outdated, or no longer needed. This will free up valuable space and make it easier to find what you’re looking for. It’s like spring cleaning for your kitchen – a constant process of refinement and optimization. I’m starting to think I need to apply this to my own apartment…
Ventilation and Lighting: Setting the Stage
Ventilation and lighting are often overlooked, but they’re essential for creating a safe, comfortable, and efficient kitchen environment. Proper ventilation removes smoke, grease, heat, and odors, while good lighting ensures that staff can see what they’re doing and work safely.
Ventilation systems typically consist of a hood above the cooking equipment, an exhaust fan, and a makeup air system. The hood captures the contaminants, the exhaust fan removes them from the kitchen, and the makeup air system replaces the exhausted air with fresh air. The size and capacity of your ventilation system will depend on the type and amount of cooking equipment you have. It’s crucial to have a system that’s powerful enough to handle the load.
Lighting should be bright and even, with no dark spots or shadows. Different areas of the kitchen may require different types of lighting. Prep areas need bright, focused lighting, while storage areas may need less intense illumination. Consider using a combination of overhead lighting, task lighting, and under-cabinet lighting to create a well-lit workspace. LED lighting is a good choice for kitchens because it’s energy-efficient and long-lasting.
Both ventilation and lighting should be designed to meet local building codes and safety regulations. It’s a good idea to consult with a professional kitchen designer or engineer to ensure that your systems are properly installed and maintained. These are not areas where you want to cut corners. A well-ventilated and well-lit kitchen is a safer, more pleasant, and more productive kitchen.
Technology Integration: The Smart Kitchen
Technology is rapidly transforming the restaurant industry, and the kitchen is no exception. From kitchen display systems (KDS) to automated cooking equipment, technology can help streamline operations, improve efficiency, and reduce waste. Integrating technology into your kitchen layout requires careful planning and consideration.
A KDS replaces paper tickets with digital displays, showing orders to the kitchen staff in real-time. This can improve order accuracy, reduce wait times, and streamline communication between the front of house and the back of house. KDS can also track order times, identify bottlenecks, and provide valuable data for optimizing workflow.
Automated cooking equipment, such as combi ovens and self-stirring pots, can automate certain cooking tasks, freeing up staff to focus on other things. This can improve consistency, reduce labor costs, and increase throughput. However, automated equipment can be expensive, and it’s important to choose equipment that’s appropriate for your menu and volume.
Other technologies that can be integrated into the kitchen include: Inventory management systems, Recipe management software, Temperature monitoring systems, and Online ordering platforms. The key is to choose technologies that address your specific needs and challenges. Don’t adopt technology for technology’s sake; make sure it’s actually solving a problem or improving your operations. I’m always wary of chasing the latest shiny object – it has to make sense for the business.
When integrating technology, it’s important to consider the infrastructure requirements. Do you have adequate electrical capacity? Do you have a reliable internet connection? Do you have the space to accommodate the new equipment? It’s also crucial to train your staff on how to use the new technology effectively. Technology is only as good as the people who use it.
Restaurant Kitchen Layouts: Final Thoughts
Designing a restaurant kitchen is a complex undertaking, but it’s also an incredibly rewarding one. A well-designed kitchen can transform your restaurant, making it more efficient, more productive, and more enjoyable to work in. It’s about creating a space that supports your team, enhances your menu, and ultimately delights your customers. And it’s not a one-time thing; it’s a continuous process of refinement and optimization.
So, take the time to analyze your needs, consider your options, and create a kitchen layout that’s truly tailored to your restaurant. Don’t be afraid to experiment, to seek feedback, and to make adjustments along the way. The perfect kitchen is a moving target, always evolving to meet the changing demands of the business. And who knows, maybe I’ll even figure out how to apply all this to my tiny apartment kitchen someday! Wish me luck (and Luna sends her regards).
Will this approach truly revolutionize the way kitchens are designed? I’m not sure, but I believe that by constantly questioning, analyzing, and adapting, we can create spaces that are not just functional, but inspiring. The kitchen is the heart of the restaurant, and it deserves our utmost attention and care.
FAQ
Q: What is the most important factor to consider when designing a restaurant kitchen layout?
A: The most important factor is workflow. The layout should minimize unnecessary movement, reduce congestion, and streamline the process of prepping, cooking, and plating food. A well-designed workflow will improve efficiency, reduce errors, and create a more pleasant work environment.
Q: How can I make the most of a small kitchen space?
A: In a small kitchen, organization is key. Use vertical space for storage, choose compact equipment, and consider a galley layout. Every item should have its designated place, and staff should be able to find what they need quickly and easily.
Q: What are some common mistakes to avoid when designing a restaurant kitchen?
A: Some common mistakes include: Not considering workflow, Ignoring ergonomics, Underestimating storage needs, Skimping on ventilation, and Failing to involve staff in the design process.
Q: How often should I re-evaluate my kitchen layout?
A: It’s a good idea to re-evaluate your kitchen layout regularly, especially if you make significant changes to your menu or operations. Even small adjustments can make a big difference in efficiency and workflow. It’s an ongoing process of optimization.
You might also like
- Commercial Kitchen Ventilation Systems Guide
- Small Kitchen Space-Saving Solutions
- Restaurant Ergonomics: Design Tips for Comfort
@article{restaurant-kitchen-layouts-maximize-space-like-a-pro,
    title   = {Restaurant Kitchen Layouts: Maximize Space Like a Pro},
    author  = {Chef's icon},
    year    = {2025},
    journal = {Chef's Icon},
    url     = {https://chefsicon.com/restaurant-kitchen-layouts-maximizing-space-efficiency/}
}