
Table of Contents
- 1 Conquering the Cold: A Deep Dive into Refrigerator Organization
- 1.1 1. The Great Purge: Facing Your Fridge Fears
- 1.2 2. Zone Defense: Strategically Assigning Shelf Space
- 1.3 3. Container Confidential: Choosing the Right Storage Solutions
- 1.4 4. First In, First Out (FIFO): Mastering the Rotation Game
- 1.5 5. The Art of Labeling: Making Sense of the Chaos
- 1.6 6. Inventory Management: Knowing What You Have
- 1.7 7. Regular Maintenance: Keeping Things Fresh
- 1.8 8. Dealing with Leftovers: The Smart Way
- 1.9 9. Embracing the Imperfect: It’s a Journey, Not a Destination
- 1.10 10. Beyond the Basics: Advanced Refrigerator Organization Tips
- 2 The Fridge Whisperer’s Closing Thoughts: Embrace the Chill
- 3 FAQ
Okay, let’s talk about refrigerators. Specifically, the inside of your refrigerator. Mine, until recently, was… a situation. You know, the kind where you open the door and hold your breath, hoping nothing mysterious tumbles out? Yeah, that was me. I’m Sammy, by the way, and I write about food and, well, life, here at Chefsicon.com. Living in Nashville, after a stint in the Bay Area, has definitely changed my food game – more fresh produce, more farmers’ markets, more… chaos in my fridge.
I’m a pretty analytical person – I like to dig into *why* things work (or don’t). And my fridge? It wasn’t working. It was a black hole of forgotten leftovers and questionable science experiments. I finally had enough. I needed a system. Not just a quick tidy-up, but a real, sustainable, maximum efficiency refrigerator organization overhaul. And since I love sharing my discoveries (and occasional missteps), I figured I’d document the whole process. Maybe my fridge’s redemption arc can help you with yours. I am a bit of a pro in systems and organization, having a background in marketing, so this was, in a way, a new kind of marketing challenge: marketing freshness to myself!
This isn’t just about making things look pretty (though that’s a nice bonus). It’s about reducing food waste, saving money, and making your life *easier*. We’re going to delve into the *why* behind the strategies, not just the *how*. Because, honestly, if you don’t understand the ‘why’, you’re way less likely to stick with it. Trust me, I’ve been there. So, buckle up, because we’re about to transform your refrigerator from a source of stress into a well-oiled, food-preserving machine. It is possible, I promise, or at least, I’m mostly sure, lets see.
Conquering the Cold: A Deep Dive into Refrigerator Organization
1. The Great Purge: Facing Your Fridge Fears
This is the hardest part, I won’t lie. It’s like confronting your past culinary sins. You need to take *everything* out. Yes, everything. And I mean *everything*. Be brave. Lay it all out on your counters. This is where you assess the damage. Check expiration dates, sniff suspiciously, and be honest with yourself: are you *really* going to eat that half-used jar of something-or-other? Probably not. Toss it. This is about being realistic, not aspirational. Wasted food is wasted money, and we’re aiming for efficiency here, remember?
As you’re emptying, take the opportunity to wipe down the shelves and drawers. A clean slate is essential for a fresh start (pun intended!). Use a mild solution of soap and water, or a mixture of baking soda and water for tougher stains. I even found some old, sticky residue that I’m pretty sure predated my cat, Luna (she’s a rescue, and a surprisingly discerning eater, by the way). This step might seem tedious, but it makes a huge difference, both practically and psychologically. You’re not just cleaning; you’re resetting.
While everything is out, also take a look at the containers you’re using. Are they mismatched and taking up unnecessary space? Are they airtight? This is a good time to invest in a set of uniform, stackable containers. I opted for clear ones so I could easily see what’s inside. It’s a game-changer, trust me. More on containers later, but seriously, start thinking about them now. I even considered those fancy vacuum-sealed ones, but then realized my budget, and my commitment level, might not be quite there yet. Baby steps, right?
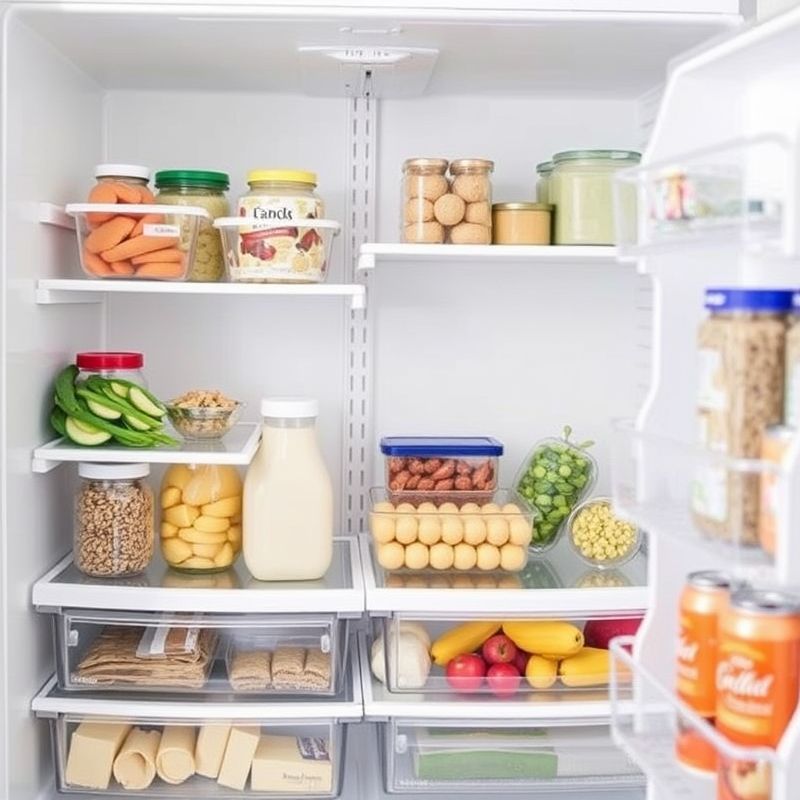
2. Zone Defense: Strategically Assigning Shelf Space
Think of your refrigerator like a city, with different zones for different purposes. This isn’t just about shoving things wherever they fit; it’s about creating a logical flow that minimizes cross-contamination and maximizes freshness. Temperature varies within your fridge, so understanding this is key. The top shelf is generally the warmest, while the bottom shelf is the coldest. The door is the warmest spot of all, subject to constant temperature fluctuations.
So, here’s a basic zoning plan, based on my research and, well, trial and error:
- Top Shelf: Leftovers, ready-to-eat foods, drinks. Things that don’t need to be super cold and are easily accessible.
- Middle Shelves: Dairy (milk, yogurt, cheese), eggs (despite what the door might suggest!).
- Bottom Shelf: Raw meat, poultry, fish. This is the coldest part of the fridge and the safest place to store these items to prevent cross-contamination. Always keep them in sealed containers or on plates to catch any drips.
- Drawers:
- Crisper Drawer (High Humidity): Vegetables that wilt easily (leafy greens, herbs).
- Crisper Drawer (Low Humidity): Fruits and vegetables that rot easily (berries, apples, peppers).
- Door: Condiments, juices, sauces. Things that are less perishable and can withstand temperature changes.
This is a general guideline, of course. You might need to adjust it based on your specific refrigerator model and your own eating habits. But the principle remains the same: strategic placement based on temperature and food safety. I initially messed this up by putting my berries on the top shelf, thinking they’d be easier to grab. Big mistake. They turned into a mushy mess within days. Lesson learned.
3. Container Confidential: Choosing the Right Storage Solutions
Remember those mismatched containers I mentioned earlier? Time to ditch them. Investing in a good set of containers is a game-changer. I’m talking about clear, stackable, airtight containers. Clear, so you can see what’s inside without opening them (reducing cold air loss and preventing that “what’s *that*?” moment). Stackable, to maximize vertical space. Airtight, to keep food fresher for longer and prevent odors from permeating your fridge.
There are tons of options out there, from basic plastic to fancy glass. I went with a mix of both. Glass is great for leftovers, as it’s non-reactive and doesn’t stain. Plastic is lighter and more practical for everyday use. Just make sure it’s BPA-free. And don’t forget about labels! Even with clear containers, labels are helpful for quickly identifying contents and dates. I use a simple masking tape and marker system, but you can get fancy with reusable labels if you’re feeling ambitious.
Beyond containers, think about other storage solutions. Lazy Susans are amazing for maximizing space in corners. Shelf risers can create extra levels within shelves. Drawer dividers can keep things organized within the crisper drawers. There’s a whole world of refrigerator organization gadgets out there, and it’s easy to get overwhelmed. Start with the basics – containers and labels – and then add on as needed. I’m still eyeing those egg holders that automatically rotate the oldest eggs to the front, but I’m holding off for now. One step at a time, right?
4. First In, First Out (FIFO): Mastering the Rotation Game
This is a principle borrowed from the restaurant industry, and it’s crucial for minimizing food waste. First In, First Out (FIFO) means using the oldest items first. It’s simple in theory, but it requires a bit of discipline. When you bring home new groceries, don’t just shove them in front of the old stuff. Take a few extra minutes to rotate items, placing the newer items behind the older ones.
This applies to everything, from leftovers to produce to condiments. It’s especially important for perishable items. Make it a habit to check dates regularly and move older items to the front. This might seem like a small thing, but it makes a huge difference in the long run. You’ll be amazed at how much less food you throw away. I used to be terrible at this, constantly finding ancient leftovers lurking in the back of the fridge. Now, I’m much more mindful, and my food waste has decreased significantly. It’s a win-win.
To help with FIFO, consider using a “Eat Me First” bin or shelf. This is a designated area for items that are nearing their expiration date or need to be used up quickly. It’s a visual reminder to prioritize those foods. I’ve found this to be incredibly helpful, especially for leftovers. It’s like a little challenge to myself to get creative with those ingredients before they go bad. Sometimes it leads to surprisingly delicious meals!
5. The Art of Labeling: Making Sense of the Chaos
Even with clear containers, labeling is essential. It’s not just about identifying the contents; it’s about tracking dates and preventing that “mystery food” situation. I use a simple system of masking tape and a permanent marker. I write the contents and the date it was stored. For leftovers, I also add a “use by” date, usually 2-3 days out.
You can get fancier with labels, of course. There are reusable labels, chalkboard labels, even labels you can print from your computer. But the key is to find a system that works for *you* and stick with it. Consistency is key. The point is to make it easy to identify what’s in your fridge and when it needs to be eaten. This eliminates guesswork and reduces the chances of finding something unidentifiable and… unpleasant… lurking in the back.
Labeling also helps with meal planning. When you can easily see what you have on hand, it’s easier to plan meals and avoid impulse purchases at the grocery store. It’s a small investment of time that pays off in big ways, both in terms of reduced food waste and increased efficiency. I’ve even started labeling my condiments, which might seem a bit excessive, but it helps me keep track of how long they’ve been open. (Seriously, how long *does* that jar of mustard last?)
6. Inventory Management: Knowing What You Have
Taking the labeling concept a step further, consider keeping a running inventory of your refrigerator’s contents. This might sound a bit extreme, but it can be incredibly helpful, especially if you tend to buy a lot of groceries at once or have a large family. It doesn’t have to be a complicated spreadsheet; a simple list on a whiteboard or a notepad attached to the fridge will do.
The idea is to track what you have, what you need to use up, and what you’re running low on. This helps with meal planning, grocery shopping, and preventing those “oh no, I’m out of milk!” moments. I haven’t fully committed to this yet, I admit. It’s on my to-do list. But I can see the potential benefits, especially for someone like me who tends to overbuy at the farmers’ market. (Those heirloom tomatoes are just so tempting!)
There are even apps that can help you manage your refrigerator inventory. Some of them allow you to scan barcodes, track expiration dates, and even create shopping lists. I’m a bit skeptical of relying too much on technology for something like this – I prefer the old-fashioned pen-and-paper method – but it’s an option worth exploring if you’re tech-savvy. The main goal, regardless of the method, is to be aware of what you have and avoid unnecessary purchases.
7. Regular Maintenance: Keeping Things Fresh
Refrigerator organization isn’t a one-time event; it’s an ongoing process. Regular maintenance is key to keeping things clean, organized, and efficient. Schedule a quick clean-out every week or two. Toss any expired items, wipe down spills, and rotate items according to the FIFO principle. This prevents small messes from turning into big problems.
At least once a month, do a deeper clean. Take everything out, wipe down the shelves and drawers, and check for any lingering odors. If you notice any unpleasant smells, place a box of baking soda in the fridge to absorb them. You can also use activated charcoal or a bowl of coffee grounds. I’ve found that a small bowl of dried lavender also works wonders, and it adds a pleasant, subtle scent. (Luna approves, too.)
Don’t forget about the exterior of your fridge. Wipe down the door handles and the top of the fridge regularly. These areas tend to collect dust and grime. A clean fridge, both inside and out, is a happy fridge. And a happy fridge makes for a happier cook (that’s me!). It’s a small thing, but it makes a difference in my overall kitchen experience. It feels… more professional, somehow. Like I’m running a well-oiled machine, even if it’s just my little Nashville kitchen.
8. Dealing with Leftovers: The Smart Way
Leftovers are a fact of life, and they can be a major source of refrigerator clutter. The key is to store them properly and use them up quickly. As mentioned earlier, use airtight containers to keep them fresh. Label them with the contents and the date. And designate an “Eat Me First” area to prioritize them.
Get creative with leftovers! Don’t just reheat them; transform them into new meals. Leftover roasted chicken can become chicken salad, tacos, or soup. Leftover vegetables can be added to omelets, frittatas, or stir-fries. There are countless ways to repurpose leftovers and avoid food waste. It’s a challenge, but it can also be a lot of fun. I’ve discovered some of my favorite recipes by experimenting with leftovers.
If you know you’re not going to eat leftovers within a few days, freeze them. Most leftovers freeze well, especially soups, stews, and casseroles. Just make sure to cool them completely before freezing, and use freezer-safe containers or bags. Label them with the contents and the date, just like you would for the fridge. Freezing leftovers is a great way to extend their shelf life and have quick, easy meals on hand for busy weeknights. It’s like a gift to your future self.
9. Embracing the Imperfect: It’s a Journey, Not a Destination
Here’s the thing: refrigerator organization is not about perfection. It’s about finding a system that works for *you* and your lifestyle. There will be times when your fridge gets messy. There will be times when you forget to rotate items or label containers. That’s okay. Don’t beat yourself up about it. Just get back on track as soon as you can.
It’s a journey, not a destination. It’s about continuous improvement, not instant perfection. I’m still learning and refining my system. I’m constantly tweaking things, trying new ideas, and occasionally making mistakes. But that’s part of the process. The important thing is to be mindful of your habits, strive for efficiency, and enjoy the benefits of a well-organized fridge. It’s a small thing, but it can make a big difference in your daily life.
And honestly, sometimes a little bit of chaos is okay. It’s a sign of a life being lived, of meals being cooked and shared. My fridge might not always be perfectly organized, but it’s full of good food and good memories. And that’s what really matters. Well, that and minimizing food waste. And saving money. Okay, maybe it’s a lot of things. But you get the point.
10. Beyond the Basics: Advanced Refrigerator Organization Tips
Once you’ve mastered the basics, you can explore some more advanced techniques. Consider using a refrigerator temperature monitor to ensure that your fridge is maintaining the correct temperature. This is especially important for food safety. You can also invest in specialized storage containers for specific items, like berries, herbs, or deli meats.
Think about vertical space. Use stackable containers, shelf risers, and even hanging organizers to maximize every inch of your fridge. Consider using magnetic containers on the inside of the door or the side of the fridge. Get creative with your storage solutions. There are tons of innovative products out there designed to help you maximize refrigerator space.
And finally, don’t be afraid to experiment. Try different zoning arrangements, different containers, different labeling systems. Find what works best for you. Refrigerator organization is a personal thing. What works for one person might not work for another. The key is to be adaptable, flexible, and willing to try new things. And to remember that it’s an ongoing process, not a one-time fix. It’s a journey, and a worthwhile one, at least in my opinion.
The Fridge Whisperer’s Closing Thoughts: Embrace the Chill
So, there you have it. My deep dive into the world of refrigerator organization. It’s been a journey, a learning experience, and, dare I say, a bit of a therapeutic process. Transforming my fridge from a chaotic mess into a (relatively) organized space has had a surprisingly positive impact on my life. It’s reduced stress, saved money, and made me a more mindful cook. And it’s all about those small wins, right?
I challenge you to take on your own refrigerator organization project. Start small, be patient, and don’t be afraid to experiment. Find what works for you and your lifestyle. And remember, it’s not about perfection; it’s about progress. Embrace the chill, conquer the chaos, and enjoy the benefits of a well-organized fridge. It’s a surprisingly rewarding experience. Will it solve all your problems? Probably not. But it’s a good start. And sometimes, that’s all you need.
Now, if you’ll excuse me, I have some leftovers to transform into a culinary masterpiece… or at least a decent lunch. Wish me luck! (And maybe send some good vibes Luna’s way – she’s a tough critic.)
FAQ
Q: What’s the best way to clean a really smelly refrigerator?
A: First, remove everything and toss anything expired or questionable. Then, wash the shelves and drawers with a solution of warm water and baking soda. For stubborn odors, place an open box of baking soda, activated charcoal, or a bowl of coffee grounds in the fridge. You can also try wiping down the interior with a solution of vinegar and water.
Q: How often should I defrost my freezer?
A: It depends on your freezer model. Some newer freezers are frost-free and don’t require manual defrosting. For older models, defrost when the ice buildup is about ¼ inch thick. This usually means defrosting every 6-12 months.
Q: Is it safe to store eggs in the refrigerator door?
A: While many refrigerators have egg compartments in the door, it’s actually not the best place to store them. The door is the warmest part of the fridge and subject to temperature fluctuations. It’s better to store eggs on a middle shelf, where the temperature is more consistent.
Q: What’s the best way to store leafy greens?
A: Leafy greens, like lettuce and spinach, stay fresh longest when stored in a high-humidity environment. Wash them, dry them thoroughly (a salad spinner is helpful!), and then store them in an airtight container or a plastic bag lined with paper towels. The paper towels will absorb excess moisture and prevent wilting.
You might also like
- Pantry Organization Ideas for Small Spaces
- Kitchen Cabinet Organization Hacks
- Best Food Storage Containers: A Review
@article{refrigerator-organization-tips-for-maximum-efficiency-no-more-lost-leftovers,
    title   = {Refrigerator Organization Tips for Maximum Efficiency: No More Lost Leftovers!},
    author  = {Chef's icon},
    year    = {2025},
    journal = {Chef's Icon},
    url     = {https://chefsicon.com/refrigerator-organization-tips-for-maximum-efficiency/}
} 
