
Table of Contents
- 1 Optimizing Your Kitchen Space: Flow and Safety Deep Dive
- 1.1 1. The Classic Kitchen Work Triangle: Still Relevant?
- 1.2 2. Moving Beyond the Triangle: Embracing Work Zones
- 1.3 3. Mapping Traffic Flow: Avoiding Kitchen Congestion
- 1.4 4. Ergonomics in the Kitchen: Designing for Your Body
- 1.5 5. Strategic Appliance Placement: Beyond the Basics
- 1.6 6. Smart Storage Solutions: A Place for Everything
- 1.7 7. Illuminating Your Workspace: The Importance of Lighting
- 1.8 8. Clearing the Air: Ventilation Matters More Than You Think
- 1.9 9. Safety First: Flooring, Fire Prevention, and Electrical
- 1.10 10. Material World: Choosing Surfaces for Durability and Cleanliness
- 2 Bringing It All Together: Your Kitchen’s Flow
- 3 FAQ
Okay, let’s talk kitchens. Not just the pretty ones you see pinned everywhere, but the ones that *work*. You know, the kind where you’re not constantly bumping into things, tripping over the cat (sorry, Luna!), or searching desperately for that one specific spice jar while something’s about to burn on the stove. I’ve spent a good chunk of my career thinking about how systems work – mostly in marketing, yeah, but the principles translate surprisingly well. A kitchen? It’s a system. Probably the most used, most critical system in any home, wouldn’t you agree? Here in Nashville, I’ve seen my fair share of gorgeous kitchens that are, frankly, a nightmare to actually cook in. All style, zero substance when it comes to flow. So, I got thinking about designing a kitchen for optimal workflow and safety, not just for looks.
It’s funny, moving from the Bay Area, I thought I’d miss the food scene the most. And I do, sometimes. But Nashville’s got this incredible energy, this blend of creativity and practicality that I really vibe with. It’s made me appreciate spaces that are both beautiful *and* functional. My own little kitchen here isn’t huge, but I’ve tweaked it over time to make sense for how *I* cook. It’s a constant process, really. You learn what annoys you, what slows you down. Maybe the trash can is too far from the prep area, or the lighting over the stove is just abysmal. These little friction points add up, turning cooking from a joy into a chore, or worse, making it unsafe.
So, what’s the secret sauce? It’s about thinking like a designer, even if you’re just rearranging things in your current space or planning a full renovation. It involves understanding movement, efficiency, and potential hazards. We’re going to dive into how to map out your kitchen, place your appliances strategically, think about storage smartly, and ensure everything is set up to minimize risks. Forget just aesthetics for a moment; let’s focus on creating a space that supports your culinary adventures, keeps you safe, and maybe, just maybe, makes cooking feel less like a frantic scramble and more like a graceful dance. Or, well, at least a slightly less clumsy shuffle. It’s about making the space serve *you*, not the other way around. Let’s get into it.
Optimizing Your Kitchen Space: Flow and Safety Deep Dive
1. The Classic Kitchen Work Triangle: Still Relevant?
Ah, the kitchen work triangle. You’ve probably heard of it – this idea connecting the sink, the refrigerator, and the stove/cooktop. It’s been a cornerstone of kitchen design since, like, the 1940s? The goal was efficiency, minimizing steps between the main tasks: prepping/cleaning (sink), storing cold food (fridge), and cooking (stove). For decades, this was *the* rule. Keep the triangle clear, don’t make the legs too long (typically between 4 and 9 feet each) or too short, and ensure the total distance isn’t excessive (usually suggested between 13 and 26 feet). Sounds logical, right? And for many traditional kitchen layouts – galley, L-shape, U-shape – it often works pretty well. It provides a basic framework for thinking about core function placement.
But here’s where I start questioning things, you know? Kitchens have changed. We have more appliances now – microwaves, dishwashers, maybe an air fryer, a stand mixer permanently on the counter. Cooking isn’t always a solo activity anymore; often families cook together, or friends gather in the kitchen. Does a simple triangle really capture the complexity of modern kitchen use? Sometimes I feel like rigidly sticking to the triangle can actually *create* problems in larger kitchens or open-plan spaces. You might end up with vast, inefficient distances or awkward traffic patterns if you force a triangle where it doesn’t naturally fit. Plus, it primarily focuses on one cook. What happens when two people are trying to make dinner? Chaos, often. So, while the triangle is a useful starting point, a good historical concept, maybe we shouldn’t treat it as gospel? Perhaps it’s more of a guideline, a foundational idea to build upon rather than a strict rule. We need to consider workflow patterns beyond just those three points. It’s a piece of the puzzle, definitely, but maybe not the whole picture anymore. Especially considering how much time we spend *not* just moving between those three points.
2. Moving Beyond the Triangle: Embracing Work Zones
So, if the triangle isn’t the be-all and end-all, what is? I’ve found thinking in terms of work zones much more useful, especially for contemporary kitchens. Instead of just three points, you design specific areas dedicated to particular tasks. Think about it: you need a Prep Zone (ideally near the sink and trash, with ample counter space), a Cooking Zone (stove, oven, microwave, nearby storage for pots/pans/spices), a Cleaning Zone (sink, dishwasher, trash/recycling), and a Storage Zone (pantry, fridge, cabinets for dishes/glassware). You might even have specialized zones like a Baking Zone or a Coffee Station, depending on your habits.
The beauty of the zone approach is its flexibility. It adapts better to different kitchen shapes and sizes, and acknowledges that multiple activities might happen simultaneously. For instance, someone can be washing vegetables in the Cleaning Zone while another person is sautéing in the Cooking Zone, without necessarily crossing paths constantly. The key is to equip each zone appropriately. Your Prep Zone needs knives, cutting boards, mixing bowls. Your Cooking Zone needs utensils, potholders, oils, and spices within easy reach. Your Cleaning Zone needs soap, sponges, towels, and easy access to the dishwasher. It’s about logical grouping of tools and tasks.
This approach inherently considers ergonomics and workflow. By placing items where they are used, you reduce unnecessary movement, searching, and bending. It makes the whole process feel more intuitive. Is this the best approach for every single kitchen? Maybe not tiny galley kitchens where zones naturally overlap heavily, but for most spaces, I think it offers a more realistic and efficient model than the simple triangle. It encourages you to think deeply about *how* you use your kitchen day-to-day, not just plotting three points on a floor plan. It’s about creating dedicated, well-equipped stations for the actual work involved in making a meal, from start to finish.
3. Mapping Traffic Flow: Avoiding Kitchen Congestion
Okay, this one is huge, especially if you have kids, pets (Luna is surprisingly good at being underfoot), or entertain often. Kitchen traffic flow is all about how people move through the space. A poorly designed kitchen creates bottlenecks, usually right where you need to be working. Ever tried to open the oven door while someone is trying to get to the fridge behind you? Or navigated a narrow passage between an island and the counter while carrying a hot pan? It’s frustrating and potentially dangerous. Good design anticipates movement and provides clear pathways.
Ideally, the main work areas (the zones we just talked about) shouldn’t be thoroughfares. If your kitchen connects two other parts of the house, try to route the main foot traffic *around* the core work zones, not directly through them. This often means carefully considering the placement of islands, peninsulas, and doorways. Islands are popular, and I get why – extra counter space, storage, seating. But a poorly placed island can absolutely kill workflow. You need adequate clearance around it. Experts usually recommend at least 42 inches for walkways for one person, and 48 inches in multi-cook kitchens or where appliance doors open into the path (like ovens or dishwashers). Don’t guess this; measure it out.
Think about the sequence of actions too. Unloading groceries: is there counter space near the fridge and pantry? Moving hot food from stove to counter/table: is the path clear? Taking dirty dishes to the sink: can you do it without navigating an obstacle course? Visualizing these common tasks helps identify potential pinch points. Sometimes, simply relocating a trash can or ensuring stools can be tucked fully under an island overhang makes a surprising difference. It’s about designing for movement, preventing collisions, and ensuring that the primary cook(s) can work without constant interruption or needing to squeeze past others. Safety and efficiency often go hand-in-hand here.
4. Ergonomics in the Kitchen: Designing for Your Body
Let’s talk about comfort and strain. Kitchen ergonomics is about designing the space to fit the human body, reducing physical stress and fatigue. This often gets overlooked in favor of aesthetics, but it’s crucial for both workflow and long-term well-being. Think about counter height. The standard is typically 36 inches, but is that actually comfortable for *you*? If you’re particularly tall or short, that standard height might lead to back strain from hunching over or reaching up uncomfortably. While changing counter heights drastically can be complex in a standard renovation, you can incorporate sections at different heights – maybe a lower section for baking/kneading (around 30-33 inches) or a slightly higher section for chopping if you’re tall. Even using thicker cutting boards can make a small but noticeable difference.
Consider reach as well. Wall cabinets are often too high for many people to comfortably access anything beyond the front row of the bottom shelf. Pull-down shelves or storing frequently used items on lower, more accessible shelves or in drawers can help immensely. Speaking of drawers, deep drawers for pots, pans, and even dishes are often far more ergonomic than base cabinets with fixed shelves. Why? Because you pull the contents out *to you*, rather than bending down and rummaging in the dark depths. Full-extension drawer slides are key here, allowing you to see and reach everything easily. Accessibility is a major factor in workflow – if things are hard to get to, you’re less likely to use them or put them away properly.
Also think about repetitive motions. Where do you do most of your chopping? Ensure good lighting and comfortable standing room there. Is the sink at a good height to avoid stooping? Are heavy appliances like stand mixers stored where you can easily slide them out rather than lifting them from awkward positions? Little things, like choosing cabinet hardware that’s easy to grip (levers vs small knobs, perhaps) or ensuring flooring isn’t too hard (anti-fatigue mats can be lifesavers), contribute to overall ergonomic comfort. It’s about minimizing strain during common kitchen tasks, making the time spent cooking more pleasant and sustainable.
5. Strategic Appliance Placement: Beyond the Basics
Where you put your appliances has a massive impact on both workflow and safety. We talked about the work triangle/zones, which gives a general idea (fridge near storage/prep, stove in cooking zone, dishwasher near sink). But let’s get more granular. Think about door swings. Your refrigerator door shouldn’t block a major walkway or bang into another appliance or counter when opened. Can you open the fridge and easily place items on a nearby counter (a crucial ‘landing zone’)? French door refrigerators often work well in tighter spaces compared to single-door models. Similarly, consider the dishwasher door – when open for loading/unloading, does it block access to the sink or trash? Ideally, you want to be able to stand at the sink and pivot easily to load the dishwasher.
The oven and cooktop placement need careful thought too. Avoid placing cooktops directly under an operable window (wind can extinguish gas flames or affect heating) or in a major traffic path where someone might bump into handles or hot pans. Ensure adequate landing space next to or across from the oven and cooktop for hot dishes – at least 15 inches is recommended. For wall ovens and microwaves, consider the height. The middle of the oven should ideally be around counter height for easy access without too much bending or reaching up with heavy items. Microwaves placed too high (like above the range without proper clearance) can be dangerous when removing hot liquids. An under-counter microwave drawer can be a great ergonomic and safe alternative, though maybe I’m just biased because I find them neat.
Don’t forget ventilation! A range hood is critical, especially for gas cooktops, to remove heat, grease, smoke, and combustion byproducts. It needs to be the correct size (ideally wider than the cooktop) and mounted at the manufacturer-recommended height for effectiveness and safety. We’ll touch more on ventilation later, but its placement is tied directly to your cooking appliances. Thinking through the functional relationships between appliances and adjacent counter space is key to a kitchen that flows well and minimizes hazards like burns or spills.
6. Smart Storage Solutions: A Place for Everything
Clutter is the enemy of workflow and, sometimes, safety. If your counters are covered in stuff because you lack adequate storage, your prep space shrinks, things get knocked over, and finding what you need becomes a treasure hunt. Effective kitchen storage isn’t just about having *enough* space; it’s about having *well-organized, accessible* space. We already mentioned deep drawers for base cabinets – seriously, they’re a game-changer for pots, pans, small appliances, even dishes. Compare that to digging around on your knees in a dark cabinet!
Think vertically too. Are you using the full height of your cabinets? Shelf dividers, tiered organizers for spices or cans, and undershelf baskets can double or triple the usable space. Pantry design is crucial. Pull-out shelves or drawers in a pantry cabinet make items at the back easy to reach. For walk-in pantries, shallow shelves (around 12 inches deep) are often better than deep ones, as items don’t get lost in the back. Use clear containers for dry goods so you can see contents at a glance. It sounds simple, but decanting grains, pastas, etc., into uniform, stackable containers saves space and makes inventory easier.
Consider specialized storage solutions based on your needs. Pull-out spice racks next to the stove, vertical dividers for baking sheets and cutting boards, corner cabinet solutions (like Lazy Susans or pull-out corner systems – though I have mixed feelings about some Lazy Susans, stuff always seems to fall off mine), knife blocks or magnetic strips (safer than loose in a drawer), utensil organizers… the options are endless. The goal is point-of-use storage: store items close to where you actually use them. Baking supplies near the mixing area, cooking utensils near the stove, cleaning supplies under the sink (safely secured if you have kids or pets, obviously). Good storage reduces clutter, speeds up tasks, and makes the kitchen feel much more manageable and less chaotic.
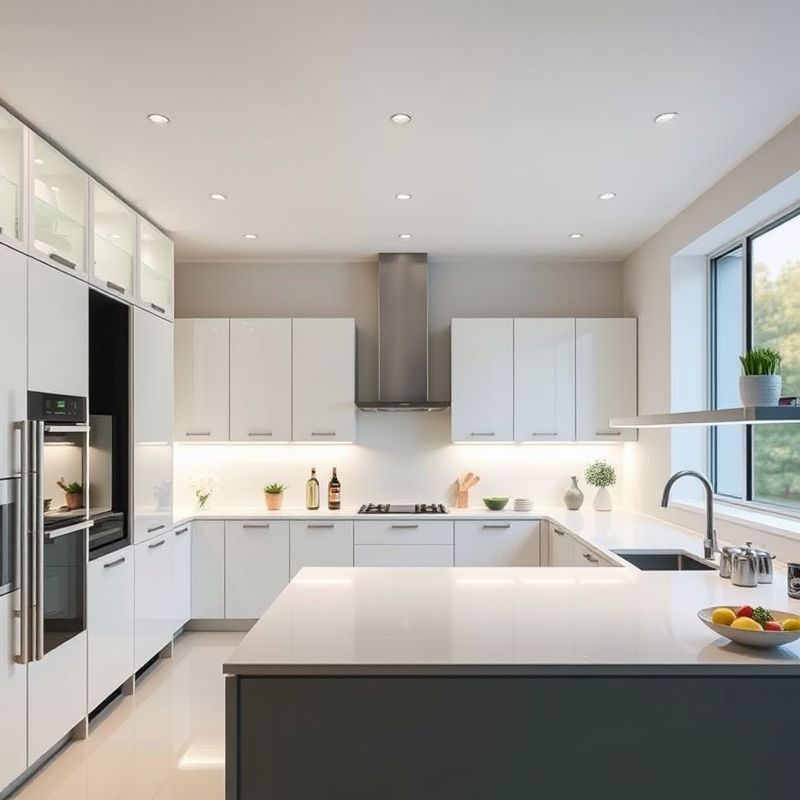
7. Illuminating Your Workspace: The Importance of Lighting
Never underestimate the power of good lighting in a kitchen! It impacts safety, efficiency, and even the ambiance of the space. Poor lighting can lead to accidents – misjudging when chopping, not seeing a spill on the floor. It also makes tasks harder and more tiring on the eyes. You really need a layered lighting approach, incorporating different types of light for different purposes. There are three main types to consider: ambient lighting, task lighting, and accent lighting.
Ambient lighting provides the general, overall illumination for the room. This is usually achieved with ceiling fixtures – recessed lights, flush mounts, or pendants. It should provide comfortable brightness for navigating the space. But ambient light alone often isn’t enough for detailed work, as it can create shadows, especially when you’re standing at a counter with your back to the main light source. That’s where task lighting comes in. Task lighting is focused light directed at specific work areas. Undercabinet lighting is probably the most crucial type of task lighting in a kitchen. It illuminates the countertops directly, eliminating shadows cast by the upper cabinets (and your own body). You need this over your main prep areas, near the stove, and by the sink. Pendants over an island can also serve as task lighting.
Accent lighting is more about aesthetics – highlighting architectural features, display cabinets, or artwork. Think puck lights inside glass-front cabinets or directional spotlights. While less critical for workflow, it adds depth and personality. For safety and workflow, though, ambient and especially task lighting are paramount. Consider dimmer switches for flexibility – bright light for cooking and cleaning, softer light for dining or relaxing. Also think about the color temperature of the bulbs (measured in Kelvin). Cooler, brighter light (3000K-4000K) is generally better for task areas, while warmer light (2700K-3000K) can be nice for ambient or accent lighting. A well-lit kitchen is simply safer, more functional, and more pleasant to be in.
8. Clearing the Air: Ventilation Matters More Than You Think
Let’s be honest, kitchen ventilation isn’t the sexiest topic, but it’s incredibly important for both health and safety. Cooking, especially on a gas range or doing high-heat searing, releases grease, smoke, moisture, odors, and potentially harmful pollutants like carbon monoxide and nitrogen dioxide. A good range hood or ventilation system is essential to capture and exhaust these contaminants, improving indoor air quality and preventing grease buildup on surfaces (which is also a fire hazard).
There are two main types of range hoods: ducted (or vented) and ductless (or recirculating). Ducted hoods vent the air completely outside the home and are far more effective. They physically remove the pollutants. Ductless hoods use filters (usually charcoal) to trap some grease and odors before recirculating the air back into the kitchen. They don’t remove heat, moisture, or all pollutants. If you have the option, always go for a ducted hood. The power of a hood is measured in CFM (cubic feet per minute) – the volume of air it can move. You need enough CFM for your type of cooktop (gas usually requires more than electric) and cooking style. A rough guideline is 100 CFM for every 10,000 BTUs of gas burner output, or 100 CFM per 10 inches of electric cooktop width. But check manufacturer recommendations and local codes.
Proper installation is key. The hood must be the correct size (covering the entire cooktop, ideally extending 3 inches beyond on each side) and mounted at the right height (typically 24-30 inches above the cooktop, but check specs). Ensure the ductwork is appropriately sized, as short as possible, with minimal bends, to maintain efficiency. And remember to clean the grease filters regularly! Clogged filters reduce airflow and become a fire risk. Good ventilation makes the kitchen more comfortable by removing excess heat and steam, protects your health by removing pollutants, and keeps your kitchen cleaner. It’s a non-negotiable for a safe and functional cooking space, in my opinion.
9. Safety First: Flooring, Fire Prevention, and Electrical
Workflow optimization is great, but safety is paramount. Several design choices directly impact kitchen safety. Let’s start with the floor. Kitchen floors need to withstand spills, dropped items, and heavy foot traffic. But crucially, they should also be slip-resistant. Highly polished tile or stone might look sleek, but can become treacherous when wet. Materials like matte-finish porcelain tile, luxury vinyl plank (LVP), linoleum, or cork tend to offer better traction. Avoid small, busy patterns that might visually hide spills or dropped hazards. And whatever material you choose, clean up spills immediately!
Fire prevention is another critical area. Keep flammable materials (towels, paper towels, curtains, recipe books) away from the cooktop. Have a fire extinguisher rated for kitchen fires (Class K) readily accessible and know how to use it – not hidden in the back of a pantry. Never leave cooking unattended. Ensure your range hood filters are clean to prevent grease fires. Smoke detectors and carbon monoxide detectors should be installed near the kitchen (but not so close that normal cooking fumes trigger false alarms) and tested regularly.
Electrical safety is also vital. Kitchens have a high concentration of outlets, often near water sources. All outlets near sinks or other wet areas must be Ground Fault Circuit Interrupter (GFCI) protected. These outlets quickly shut off power if they detect an imbalance, preventing dangerous shocks. Ensure you have enough circuits to handle your appliances without overloading them – major appliances like refrigerators, dishwashers, ovens, and microwaves should ideally be on dedicated circuits. Avoid using extension cords for permanent appliances. Check cords regularly for damage. Simple precautions in flooring, fire awareness, and electrical setup can prevent many common kitchen accidents.
10. Material World: Choosing Surfaces for Durability and Cleanliness
The materials you choose for countertops, backsplashes, cabinets, and even sinks impact workflow and safety, mainly through durability and ease of cleaning. Surfaces that are hard to clean can harbor bacteria, and materials that stain or scratch easily can look worn out quickly and potentially become less hygienic if cracks develop. Countertop materials vary widely. Quartz is popular because it’s non-porous (resists staining and bacteria), durable, and low-maintenance. Granite is also durable but needs sealing periodically as it’s porous. Solid surface materials are seamless and can be repaired if scratched. Laminate is budget-friendly but less resistant to heat and scratches. Butcher block looks warm but requires maintenance (oiling) and careful cleaning to prevent bacteria growth, especially near sinks.
Backsplashes protect the wall behind the sink and stove from splashes and splatters. Tile is common, but grout lines can be tricky to keep clean (using larger format tiles or materials like glass or a solid slab matching the counter can minimize grout). Stainless steel is durable and easy to clean but shows fingerprints. Choose a material that’s non-porous and easily wipeable, especially behind the cooktop where grease can accumulate.
For cabinets, look for durable finishes that can withstand occasional bumps and are easy to wipe down. Sink materials also matter. Stainless steel is durable, hygienic, and relatively inexpensive, though it can scratch and show water spots. Composite granite sinks are tough and resist scratches and stains. Porcelain or fireclay sinks look classic but can chip if heavy pots are dropped. Ultimately, selecting durable, non-porous, and easy-to-clean materials for the main surfaces makes kitchen maintenance easier, promotes better hygiene (a key safety aspect), and contributes to a kitchen that functions well and looks good for longer. It’s about balancing aesthetics with the practical demands of a hardworking space.
Bringing It All Together: Your Kitchen’s Flow
So, we’ve walked through quite a bit, huh? From rethinking the classic work triangle to zoning, traffic flow, ergonomics, lighting, ventilation, safety basics, and materials. It seems like a lot, I know. Designing a kitchen, or even just tweaking your existing one for better workflow and safety, is definitely a process of balancing competing priorities – space, budget, habits, aesthetics, function. There’s rarely one single “perfect” solution, because every kitchen and every cook is different. My ideal setup here in Nashville, with Luna weaving around my ankles, might be totally wrong for a busy family of five.
What I hope you take away is the importance of thinking critically about *how* the space is used, or how you *want* to use it. Don’t just accept the default layout or place appliances randomly. Visualize yourself cooking a typical meal. Where do the bottlenecks occur? What frustrates you? What feels awkward or unsafe? Use the concepts of zones, flow, ergonomics, and safety as lenses to examine your space. Even small changes – reorganizing a cabinet, adding undercabinet lights, getting an anti-fatigue mat – can make a noticeable difference in your daily routine. It’s about making conscious choices that prioritize efficiency and well-being.
Maybe the real challenge isn’t just designing the *kitchen*, but designing it to support the *life* you live in it? It’s a space for nourishment, creativity, sometimes chaos, often connection. Making it work better, making it safer, just enhances all of that. So, perhaps the next time you’re in your kitchen, just pause and observe. What one small change could you make this week to improve its flow or safety? I wonder what that might be for you…
FAQ
Q: What is the ‘kitchen work triangle’ and is it still important?
A: The kitchen work triangle connects the three main work areas: the refrigerator (storage), sink (cleaning/prep), and stove (cooking). The idea is to keep these points relatively close but unobstructed for efficiency. While it’s a useful starting concept, especially for smaller kitchens, modern kitchen design often favors a ‘work zone’ approach (prep, cooking, cleaning, storage zones) which can be more flexible, accommodate multiple cooks, and better suit larger or open-plan layouts and contemporary cooking habits. It’s a guideline, not a rigid rule.
Q: How much space should I leave around a kitchen island?
A: Proper clearance around an island is crucial for traffic flow and safety. Generally, you need at least 42 inches of clear floor space for a comfortable walkway for one person. If it’s a main traffic path or in a kitchen where multiple people cook simultaneously, 48 inches is recommended. Also, ensure there’s enough space when appliance doors (oven, dishwasher, refrigerator) are open.
Q: What’s the most important type of lighting for kitchen workflow?
A: While overall ambient lighting is necessary, task lighting is arguably the most critical for workflow and safety. This is focused light directed at specific work surfaces like countertops, the sink, and the stove. Undercabinet lighting is particularly effective for illuminating prep areas and eliminating shadows cast by upper cabinets and your body, making tasks like chopping safer and easier.
Q: What type of flooring is best for kitchen safety?
A: The best kitchen flooring balances durability, ease of cleaning, and importantly, slip resistance. Highly polished surfaces can be hazardous when wet. Good options often include materials with more inherent grip or matte finishes, such as textured or matte porcelain tile, luxury vinyl plank (LVP), linoleum, cork, or even rubber flooring. Avoid materials that become very slippery when wet and clean up spills immediately regardless of the flooring type.
You might also like
- Small Kitchen Organization Ideas to Maximize Space
- Choosing the Right Kitchen Countertop Material: Pros & Cons
- Essential Kitchen Safety Tips for Preventing Accidents
@article{smart-kitchen-layouts-for-better-workflow-and-safety,
    title   = {Smart Kitchen Layouts for Better Workflow and Safety},
    author  = {Chef's icon},
    year    = {2025},
    journal = {Chef's Icon},
    url     = {https://chefsicon.com/designing-a-kitchen-for-optimal-workflow-and-safety/}
} 

