
Table of Contents
- 1 Tackling the Tiny: Smart Strategies for Small Pantries
- 1.1 1. Go Vertical: Reaching New Heights in Storage
- 1.2 2. Don’t Forget the Door: Prime Real Estate
- 1.3 3. The Great Decanting Debate: To Pour or Not to Pour?
- 1.4 4. Zone Defense: Grouping Like Items Together
- 1.5 5. Embrace Baskets and Bins: Containing the Chaos
- 1.6 6. Conquer Corners with Lazy Susans
- 1.7 7. The Power of Transparency: See What You’ve Got
- 1.8 8. Look Underneath: Tapping into Under-Shelf Space
- 1.9 9. Label Like Your Sanity Depends On It (Because It Might)
- 1.10 10. The Necessary Evil: Regular Purging and Editing
- 2 Keeping the Calm: Final Thoughts on Small Pantry Zen
- 3 FAQ
Okay, let’s talk about the elephant in the room, or rather, the chaos in the closet – the small pantry. When I first moved to Nashville from the Bay Area, I downsized significantly. My charming little apartment came with many perks, but a sprawling, walk-in pantry was definitely not one of them. It was more like a tall, narrow cupboard pretending to be a pantry. For the first few months, it was pure anarchy in there. Bags of chips crushed under cans, spices lost to the void, duplicate purchases because I couldn’t see what I already had… it was a mess. Sound familiar? If you’re grappling with a tiny pantry, you know the frustration. It feels like a Tetris game you can never win. But here’s the thing I learned: size doesn’t always dictate function. With some smart thinking and a willingness to rethink the space, even the smallest pantry can become surprisingly efficient and, dare I say, enjoyable to use. It’s not about magic; it’s about strategy.
As someone who spends a lot of time thinking about systems (thanks, marketing background!) and loves food (hello, Chefsicon!), tackling my pantry became a sort of personal project. It wasn’t just about tidiness; it was about reducing food waste, saving money, and making the whole process of cooking less stressful. When you can actually find the paprika without excavating three layers of mystery bags, cooking becomes instantly more pleasant. My cat Luna, who seems to think the pantry door opening is a dinner bell, probably appreciates the quicker access too, though mostly she’s just hoping something drops.
So, I dove deep. I researched, experimented, made some mistakes (like buying bins that didn’t quite fit – measure twice, folks!), and eventually landed on a system that works for my small space. And that’s what I want to share with you today. These aren’t just generic tips; they’re battle-tested clever pantry organization ideas for small spaces that focus on maximizing every single inch, improving visibility, and creating a sustainable system. We’ll cover everything from vertical space hacks to the great decanting debate, and hopefully, by the end, you’ll feel empowered to conquer your own pantry chaos. It’s totally doable, I promise.
Tackling the Tiny: Smart Strategies for Small Pantries
1. Go Vertical: Reaching New Heights in Storage
The first rule of small spaces? Look up! Most pantries, even small ones, have a surprising amount of unused vertical space between shelves. Leaving tall gaps might seem necessary for the occasional cereal box, but often, it’s just wasted air. This is where shelf risers or stackable shelves become your absolute best friends. Think of them as creating mini-levels within your existing shelves. Suddenly, that pile of cans isn’t a precarious tower waiting to topple; it’s two neat rows, one above the other, both easily accessible. I found some simple wire ones online, and they instantly doubled the storage capacity for canned goods, jars, and spices. It felt like discovering hidden real estate. You can also find adjustable ones, which are great if your shelf heights aren’t standard. Consider using risers for mugs, small bowls, or even short spice jars if you don’t have a dedicated spice system yet. The key is to measure your shelf height and the items you want to store to ensure a good fit. Don’t forget the floor space either – if there’s a gap under your bottom shelf, a low, rolling bin could slide in there, perfect for bulk items like potatoes or onions (if your pantry is cool and dark enough).
Another vertical trick is using stackable containers whenever possible. Instead of having bags of rice, pasta, and beans lolling about, transferring them to uniform, stackable containers allows you to build upwards safely and efficiently. We’ll talk more about decanting later, but the stacking aspect is crucial for vertical gains. It also just looks way tidier, which, let’s be honest, has a psychological benefit too. It makes the space *feel* less cluttered, even if it holds the same amount of stuff. It’s about maximizing the usable volume, not just the square footage of the shelf. Look for containers designed to stack securely; flimsy ones will just lead to frustration. It’s a small investment that pays off big time in space efficiency.
2. Don’t Forget the Door: Prime Real Estate
Seriously, the back of the pantry door is probably the most underutilized space in most kitchens. If you have a standard swinging door (not a sliding or bifold one, unfortunately), you’ve hit the organization jackpot. An over-the-door organizer is a game-changer. There are tons of options, from wire racks designed for spices and cans to fabric ones with clear pockets perfect for snacks, seasoning packets, or even small kitchen gadgets. Measure your door width and the clearance between the door and your shelves when closed before buying one. You don’t want it banging into your shelves every time you close the door. I opted for a sturdy wire rack system, and it now holds all my spices, oils, vinegars, and various small jars that used to clutter up valuable shelf space. It put everything I reach for frequently right at eye level.
Think about what makes sense to store on the door. Items you use often are ideal candidates. Spices are a classic choice, as are small bottles, packets, and even things like aluminum foil or plastic wrap if the organizer has wider baskets. Some people even hang small cutting boards or oven mitts using command hooks on the inside of the door. Just be mindful of the weight – don’t overload it to the point where it strains the door hinges. Also consider the depth; items stored on the door need to fit within the gap when the door is closed. It might take a bit of trial and error to figure out the best configuration, but reclaiming that door space is a huge win for small pantry storage. It’s like adding an extra, super-accessible shelf out of thin air.
3. The Great Decanting Debate: To Pour or Not to Pour?
Ah, decanting. You see it all over Instagram and Pinterest – perfectly lined-up clear containers filled with aesthetically pleasing grains and pasta. Is it just for looks, or is there real value, especially in a small pantry? I was skeptical at first. It seemed like a lot of effort. But, I have to admit, I’m mostly converted. Decanting, which is simply transferring food from its original packaging into dedicated containers, offers several advantages for small spaces. Firstly, uniform containers stack much more efficiently than bulky, half-empty bags and boxes. They eliminate wasted space around awkward packaging. Secondly, using clear containers means you can see exactly how much you have left at a glance, reducing the chance of buying duplicates or running out unexpectedly. Thirdly, airtight containers keep food fresher for longer, potentially reducing food waste. Think about things like flour, sugar, pasta, rice, beans, cereal, nuts, and seeds.
However, let’s be real. Decanting takes time upfront. You have to buy the containers, wash them, transfer the food, and label them (more on labels later). It’s an initial investment of time and money. Is it always necessary? Probably not for everything. Items you use up quickly or things in sturdy, resealable packaging might be fine as they are. I didn’t decant *everything*. My rule of thumb became: if it’s bulky, prone to spilling, doesn’t stack well, or needs an airtight seal for freshness, it gets decanted. Things like sealed bags of chips or crackers? They usually stay in their original packaging inside a designated bin. It’s about finding a balance that works for you. Maybe start with a few key items like flour and sugar and see how you like it. But the space-saving and visibility benefits of using clear, stackable containers are undeniable in a tight pantry. Just make sure they have good airtight seals!
4. Zone Defense: Grouping Like Items Together
Imagine trying to find socks in a drawer that also contains t-shirts, underwear, and belts all jumbled together. Frustrating, right? The same principle applies to your pantry. One of the most effective ways to organize, regardless of size, is to implement **pantry zoning**. This means designating specific areas or shelves for particular categories of food. Instead of having pasta sauce next to the peanut butter and cereal next to the canned beans, create logical groupings. For example, you could have a baking zone (flour, sugar, sprinkles, chocolate chips), a breakfast zone (cereal, oatmeal, pancake mix), a snack zone (crackers, chips, granola bars), a canned goods zone, a pasta/grains zone, and so on. You might need to adjust based on your specific pantry layout and the types of food you store most.
This system makes it infinitely easier and faster to find what you need. Need to bake cookies? Everything’s in one spot. Packing lunches? Head straight to the snack zone. It also helps you see what you’re running low on within a specific category. How you define your zones is up to you. You can dedicate entire shelves to broad categories or use bins and baskets (we’ll get to those!) to create smaller zones within a shelf. For instance, on my ‘dinner helpers’ shelf, I have one bin for pasta and grains, another for sauces and canned tomatoes, and another for broths and stocks. It keeps things contained and visually separated. This category-based storage approach reduces search time and mental clutter. It sounds simple, maybe even obvious, but consciously creating and maintaining these zones makes a huge difference in daily usability, especially when space is limited and things can get hidden easily.
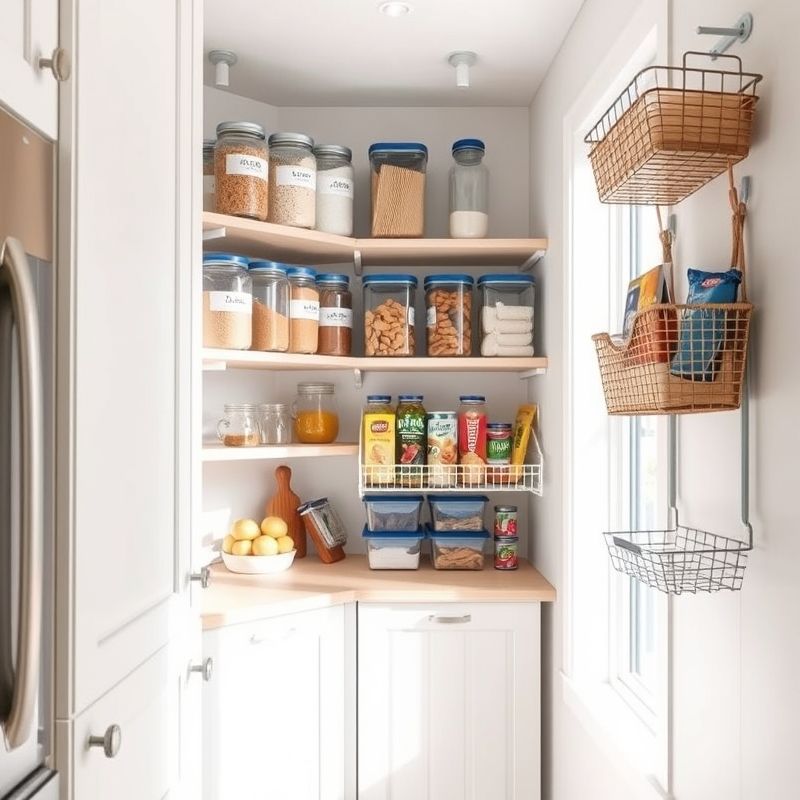
5. Embrace Baskets and Bins: Containing the Chaos
If zones are the strategy, then baskets and bins are your tactical units. They are absolutely essential for corralling loose items, grouping categories, and preventing things from getting lost in the back of shelves. Instead of having bags of snacks or seasoning packets floating around, tuck them into a designated bin. This instantly makes shelves look neater and prevents smaller items from getting buried. More importantly, bins act like drawers. You can easily pull out an entire bin to see everything inside, rather than rummaging blindly on the shelf. This is particularly helpful for deeper shelves where things tend to disappear into the abyss. Look for storage bins with straight sides to maximize space (tapered ones waste corner space) and consider clear bins so you can see the contents without pulling them out every time, although opaque ones can hide visual clutter if that’s your preference.
There’s a huge variety available: wire baskets, woven baskets, plastic bins, fabric bins… choose what fits your aesthetic and budget. I use a mix. Wire baskets are great for potatoes and onions (if stored in the pantry) as they allow air circulation. Clear plastic bins work well for snacks and packets. I even use some nicer woven baskets for things like bread or breakfast items to add a bit of warmth. Consider bins with handles for easier grabbing. For lower shelves or floor storage, **rolling bins** can be fantastic for heavier items like drinks or bulk bags. The key is to measure your shelf depth, width, and height accurately before buying. Nothing is more frustrating than getting home with a set of beautiful bins only to find they don’t quite fit. Bins help enforce your zoning system and are fundamental to maintaining **organized pantry shelves**.
6. Conquer Corners with Lazy Susans
Ah, the dreaded pantry corner. It’s like the Bermuda Triangle of the kitchen, where jars and cans go to be forgotten. If you have corner shelves, you know the pain of trying to reach that lone can of water chestnuts hiding way in the back. Enter the Lazy Susan, or turntable. These rotating platforms are absolute lifesavers for corner cabinets and deep pantry shelves. Placing items on a turntable allows you to simply spin it around to bring whatever you need to the front. No more unloading half the shelf to reach something! They are perfect for storing jars, cans, spices, oils, vinegars, condiments – anything that tends to get lost in deep spaces.
Measure the depth and width of your corner space to get the largest possible turntable that will fit comfortably. They come in various sizes and materials, like plastic, wood, or wire. Some even have raised edges to prevent items from flying off during enthusiastic spinning (guilty!). I use one for oils, vinegars, and sauces, and another smaller one for less-frequently used spices and extracts. It’s made those awkward corner spots some of the most accessible areas in my pantry. You can also use smaller turntables on regular shelves for groups of small items, like vitamins or baking extracts. It’s a simple mechanism, but the impact on accessibility and visibility in tight or awkward spaces is significant. Don’t let those corners defeat you; make them work for you with a spin.
7. The Power of Transparency: See What You’ve Got
We touched on this with decanting, but the principle of transparency extends beyond that. Whenever possible, opt for clear storage containers. Whether it’s bins, baskets, or decanting jars, being able to see the contents without opening or removing them saves time and prevents frustration. It helps you take a quick visual inventory before heading to the grocery store, reducing accidental duplicate purchases – a common issue when you can’t easily see what’s hiding in the back of a crowded shelf. If you can’t see it, you might as well not have it, right? Out of sight, out of mind often leads to out of date.
If clear containers aren’t feasible or desirable for everything (sometimes opaque bins *are* better for hiding visual clutter like crinkly snack bags), make sure your labeling game is strong (next section!). But for things like grains, pasta, nuts, seeds, and even collections of smaller items within a larger bin, clear is often the way to go. Think about clear plastic shoe boxes – they’re inexpensive, stackable, and great for containing categories like baking supplies or specific types of snacks. Using see-through bins and jars transforms your pantry from a guessing game into an easily readable inventory system. This visual clarity is especially crucial in small pantries where items are packed more densely. It reduces the ‘digging’ factor significantly.
8. Look Underneath: Tapping into Under-Shelf Space
Just like looking up for vertical space, don’t forget to look *under* your existing shelves. There’s often a few inches of unused space right below the shelf surface. This is where under-shelf baskets come in handy. These wire baskets typically slide directly onto the shelf above, creating a small ‘drawer’ or storage nook underneath. They are perfect for holding flat items like packets of sauce mixes, seasoning envelopes, boxes of tea, granola bars, or even small bags of chips or crackers. They essentially add a mini-shelf without any installation required.
These baskets are incredibly easy to use and move around as your needs change. Make sure the ‘arms’ that slide onto the shelf are thin enough to allow your pantry door to close if the shelf is near the front, and check the depth to ensure they fit your shelves. They add an extra layer of storage in space that would otherwise be completely wasted air. It’s one of those small tweaks that can surprisingly free up a decent amount of primary shelf space for larger items. Think about items that tend to get lost or create clutter on the main shelf surface – under-shelf baskets provide a dedicated, easily accessible spot for them, contributing to overall pantry space maximization.
9. Label Like Your Sanity Depends On It (Because It Might)
Okay, maybe that’s a slight exaggeration, but seriously, labeling is non-negotiable for a truly organized and maintainable pantry, especially a small one. Even if you use clear containers, labels provide crucial information quickly. What *kind* of flour is that? When did I open this bag of nuts? Labels eliminate the guesswork. For opaque bins, they are absolutely essential – you need to know what’s inside without pulling it down. Consistent labeling transforms a collection of containers into a searchable system. It also helps other members of your household find things and, perhaps more importantly, put them back in the right place. Luna, my cat, unfortunately, hasn’t learned to read labels yet, so she’s excused.
You don’t need a fancy label maker, though they are nice! Simple handwritten labels on masking tape or chalkboard labels work just fine. The key is consistency and clarity. Decide on a system: Will you label the bin itself or the containers inside? Will you include expiration dates or just the contents? I like to label the shelf edge for broad categories (using simple binder clips with labels) and then label individual containers or bins with specifics. For decanted items, I often tape the expiration date or cooking instructions from the original packaging to the bottom or back of the container. Whatever method you choose, stick with it. Clear labeling is the backbone of a functional organization system. It reinforces your zones and makes maintaining order significantly easier over the long term. Don’t skip this step; it’s the glue that holds your organized pantry together.
10. The Necessary Evil: Regular Purging and Editing
You can implement all the clever organization ideas in the world, but if you don’t maintain the system, chaos will eventually creep back in. A small pantry, in particular, has very little tolerance for clutter or expired goods. That’s why a regular pantry purge or edit is crucial. This doesn’t have to be a massive undertaking every time. Aim for a quick scan every month or two, and a more thorough clean-out perhaps twice a year. Pull things out, check expiration dates, and be honest about what you’re actually going to use. That jar of artisanal chutney you bought on vacation three years ago? If you haven’t used it yet, maybe it’s time to let it go. Same for the five half-empty bags of slightly stale crackers.
Use this time to wipe down shelves, adjust your zones if needed (maybe you’re baking less and need more snack space?), and put everything back neatly according to your system. It’s also a good time to take inventory and update your grocery list. Think of it as preventative maintenance for your pantry. It keeps things from getting out of control and ensures your space continues to function efficiently. Is it the most exciting task? Probably not. But spending 15-30 minutes on a regular edit saves you from facing a daunting, hours-long overhaul later. This ongoing maintenance is key to keeping your small pantry organized and preventing it from reverting to its former cluttered state. It’s about building sustainable habits, not just a one-time fix.
Keeping the Calm: Final Thoughts on Small Pantry Zen
Whew, okay. We’ve covered a lot of ground, from reaching for the sky with vertical storage to the nitty-gritty of labels and bins. Organizing a small pantry isn’t about having less stuff; it’s about being smarter with the space you *do* have. It requires a bit of planning, maybe some initial investment in containers or organizers, and definitely a commitment to maintaining the system. But the payoff – less stress, less food waste, easier meal prep – is totally worth it. My own little Nashville pantry isn’t perfect, sometimes things get shoved in the wrong spot when I’m in a hurry, but the underlying system makes it easy to reset.
The core principles really boil down to maximizing every inch (vertical, door, under-shelf), containing items logically using zones and bins, ensuring you can see or easily identify what you have (clear containers, labels), and regularly editing out what doesn’t belong. Maybe the ultimate challenge isn’t just organizing it once, but integrating these habits into our routine? I wonder if the state of our pantry reflects the state of our minds sometimes – a little bit of order can bring a surprising amount of calm to the daily hustle. What do you think?
So, my challenge to you (and myself, honestly, because maintenance is key) is to pick just one or two of these ideas and try implementing them this week. Don’t feel like you have to do a complete overhaul overnight unless you’re really feeling ambitious! Start small – maybe tackle the spice situation or get some shelf risers for those wobbly cans. See how it feels. I have a feeling you’ll be surprised at the difference even a small change can make in your tiny but mighty pantry.
FAQ
Q: Organizing sounds expensive. How can I do this on a budget?
A: You absolutely don’t need to spend a fortune! Start by decluttering and using what you already have. Repurpose shoe boxes, mason jars, or other containers. Use masking tape for labels. Focus on free strategies like zoning and regular purging. Dollar stores often have basic bins and baskets. Prioritize – maybe start with just shelf risers or an over-the-door rack, which offer big impact for relatively low cost, rather than buying all new matching containers at once.
Q: What’s the best way to store bulky or awkwardly shaped items in a small pantry?
A: This is tricky! For bulky bags (like large bags of rice or flour), consider decanting at least a portion into a smaller, accessible container for daily use and storing the larger bag on a lower shelf or even outside the pantry if necessary (like in a nearby closet or garage, properly sealed). For awkward shapes (like food processors or stand mixers if stored in the pantry), dedicate a specific, accessible shelf space, perhaps the floor or the lowest shelf, so you don’t have to move too many things to get them out. Avoid putting heavy, awkward items on high shelves.
Q: How do I keep my small pantry organized when I live with others (family, roommates)?
A: Communication and clear systems are key! Involve everyone in the initial organization process if possible, so they understand the ‘why’ behind the zones and labels. Make the system intuitive – clear labels and designated bins help immensely. Keep frequently used items (especially snacks!) in easily accessible spots. Some gentle reminders might be needed initially, but if the system makes it *easier* for everyone to find things, they’re more likely to stick with it. Maybe assign ‘zone ownership’ if appropriate?
Q: What type of labels work best and last the longest?
A: It depends on your preference and containers! For durability, especially on containers that might get handled often or wiped down, vinyl labels (either pre-printed or made with a label maker using vinyl tape) are great as they’re often water-resistant. Chalkboard labels offer flexibility as you can rewrite them, but the chalk can rub off. Simple masking tape with a permanent marker is budget-friendly but might peel over time or look less polished. For jars, consider erasable food labels or even just taping the expiration date/cooking instructions from the original package onto the bottom.
You might also like
- Small Kitchen Layout Ideas: Maximizing Efficiency
- Kitchen Storage Solutions: Creative Ideas for Every Nook
- Apartment Kitchen Organization Tips & Tricks
@article{clever-pantry-organization-ideas-for-really-small-spaces,
    title   = {Clever Pantry Organization Ideas for Really Small Spaces},
    author  = {Chef's icon},
    year    = {2025},
    journal = {Chef's Icon},
    url     = {https://chefsicon.com/clever-pantry-organization-ideas-small-spaces/}
} 

