
Table of Contents
- 1 Decoding Your Kitchen’s Rhythm: The Core of Workflow
- 1.1 It’s More Than Just Cooking; It’s About Living
- 1.2 The Sacred Geometry: Deconstructing the Work Triangle (and Beyond)
- 1.3 Mapping Your Moves: The Art of Traffic Flow
- 1.4 Prep Space: The Unsung Hero of Kitchen Efficiency
- 1.5 Strategic Storage: A Place for Everything, and Everything in Its Place
- 1.6 Appliance Placement: More Than Just Plugging It In
- 1.7 The Sink Station: Not Just for Washing Dishes
- 1.8 Lighting the Way: Illumination for Function and Ambiance
- 1.9 Vertical Thinking: Maximizing Wall and Tall Spaces
- 1.10 Personalization and Future-Proofing Your Workflow
- 2 Wrapping It Up: Your Kitchen’s Next Chapter
- 3 FAQ
Hey everyone, Sammy here, tuning in from my cozy little corner in Nashville. Luna, my ever-present feline supervisor, is currently napping on a stack of (what she considers) important papers, so I’ve got a moment to dive into something that’s been on my mind a lot lately: optimizing kitchen workflow. It sounds a bit… corporate, doesn’t it? Like something out of a manufacturing plant efficiency manual. But honestly, after years of navigating kitchens both glorious and, well, less than glorious (my old Bay Area apartment kitchen still gives me mild shivers), I’ve come to see that a well-thought-out kitchen flow isn’t just about saving a few steps. It’s about transforming a chore into a joy, a frantic scramble into a graceful dance. It’s about making the heart of your home actually *work* for you, not against you.
I remember this one time, years ago, trying to cook a Thanksgiving dinner in a kitchen that felt like it was actively trying to sabotage me. The fridge door blocked the main walkway when open, the sink was miles from the stove, and the only decent counter space was somehow always occupied by someone else’s… stuff. It was chaos. Pure, unadulterated, gravy-splattered chaos. That experience, among others, really solidified for me how crucial good kitchen design tips are, not just for professional chefs, but for everyday folks like us who just want to make a decent meal without pulling our hair out. It’s not about having the most expensive gadgets; it’s about the intelligence of the layout, the thoughtfulness of the placement. It’s kinda like a good marketing campaign, actually – every piece needs to be in the right place, working together seamlessly to achieve the goal. Whether that goal is a Michelin star or just getting dinner on the table before everyone gets hangry.
So, what are we going to unpack today? We’re going to look at how to make your kitchen a more intuitive, efficient, and ultimately, a more pleasant place to be. We’ll touch on some classic principles, sure, but also explore how modern life and cooking styles are changing the game. Think of this as a friendly chat, me sharing some of the things I’ve learned, observed, and frankly, obsessed over. Because let’s be real, a kitchen that flows well just makes life better. And who doesn’t want that? We’ll cover everything from the big picture layout down to the nitty-gritty details that can make a surprising difference. My hope is that you’ll walk away with some concrete ideas you can apply, whether you’re planning a full reno or just looking to make your current space a little more user-friendly. Right, Luna? (She just twitched an ear. I’ll take that as a yes.)
Decoding Your Kitchen’s Rhythm: The Core of Workflow
It’s More Than Just Cooking; It’s About Living
Okay, so let’s get into the meat of it. When we talk about kitchen workflow, what are we really saying? For me, it’s about the natural sequence of tasks you perform, from bringing groceries in, to prepping ingredients, cooking, serving, and then cleaning up. It’s the path your body takes, the reach of your arms, the ease (or difficulty) of accessing what you need. A poorly designed workflow leads to wasted steps, frustration, and sometimes, minor kitchen collisions – especially if you have a furry friend like Luna who enjoys being an unexpected obstacle. But a good workflow? That’s where the magic happens. It feels intuitive, almost effortless. You’re not fighting the space; you’re working in harmony with it. This isn’t just about shaving seconds off your cooking time, though that’s a nice perk. It’s about reducing the mental load, the background stress that comes from constantly having to navigate an inefficient environment. Think about it – how much calmer do you feel in a space where everything is logically placed and easy to find?
The kitchen, more than ever, is the hub of the home. It’s not just a utilitarian zone for food production anymore. It’s where homework gets done, where friends gather, where deep conversations happen over a cup of coffee. So, optimizing its workflow directly impacts the overall user experience (UX) in the kitchen. We spend a significant chunk of our lives in this space, so making it work efficiently contributes directly to our daily emotional well-being. I’ve noticed in Nashville, so many homes, even older ones, are being renovated with open-concept kitchens, emphasizing this communal aspect. This makes flow even more critical because the kitchen is visually and physically connected to living areas. You want that connection to be seamless, not a source of visible chaos. It’s a fundamental aspect of kitchen ergonomics – designing the space around the human body and its movements to enhance comfort and efficiency.
I sometimes wonder, is a ‘perfect’ workflow even achievable, or is it a constant evolution? I lean towards the latter, honestly. Our needs change, our cooking styles evolve, families grow or shrink. But starting with a solid foundation of good workflow principles gives you the flexibility to adapt. It’s like having good bones in a house. You can change the paint and furniture, but the underlying structure supports it all. And that’s what we’re aiming for here – a kitchen structure that supports *your* life, in all its beautifully messy glory. It’s less about rigid rules and more about thoughtful consideration of how *you* use the space. This analytical side of me loves digging into these patterns, seeing how small adjustments can yield big results. It’s surprisingly similar to optimizing a website for user engagement – it’s all about understanding behavior and removing friction.
The Sacred Geometry: Deconstructing the Work Triangle (and Beyond)
Ah, the classic work triangle. If you’ve ever looked into kitchen design, you’ve probably heard of it. It’s the conceptual triangle formed by the three main work areas: the refrigerator (storage), the sink (cleaning/prep), and the stove (cooking). The idea, developed in the early to mid-20th century, was to make kitchens more efficient for the sole cook, minimizing steps between these key points. And for a long time, it was the gold standard. Each leg of the triangle should ideally be between 4 and 9 feet, and the total sum of the three legs shouldn’t be less than 13 feet or more than 26 feet. Sounds pretty specific, right? And for many standard-sized kitchens with a single cook, it still holds a lot of water. It’s a great starting point for thinking about basic relationships between your main appliances.
But here’s where my analytical brain starts to question things. Is the work triangle the be-all and end-all in today’s kitchens? I’m not so sure. Kitchens have gotten bigger. We often have multiple people cooking or helping out. We have more specialized appliances – the microwave, the stand mixer, the espresso machine that’s practically a member of the family. This is where the concept of kitchen zones or activity centers comes into play, and I find it much more adaptable to modern living. Instead of just one triangle, you might have a baking zone with a mixer, oven, and nearby storage for baking supplies. A coffee station with the machine, mugs, and sugar. A dedicated prep zone with ample counter space, a secondary sink perhaps, and easy access to knives and cutting boards. This approach allows for multi-functional spaces and accommodates multiple users without everyone tripping over each other. It’s about creating mini-workflows within the larger kitchen ecosystem.
So, while the spirit of the work triangle – efficiency and minimizing travel – is still incredibly valid, its literal application might need some tweaking. Think of it more as a guiding principle for each primary task. Your main cooking triangle (fridge-sink-stove) is still important, but then you can layer in these other zones. For instance, if you entertain a lot, maybe your beverage fridge and glassware are located closer to the dining area or living space, creating a separate mini-zone for guests. It’s about analyzing your specific needs and patterns. I’ve been in some amazing Nashville kitchens that have really nailed this zoned approach, especially in homes designed for big family gatherings. It just makes sense. The key is to ensure these zones have logical adjacencies and don’t create new traffic jams. It’s a bit like city planning, but for your Cuisinart.
Mapping Your Moves: The Art of Traffic Flow
If workflow is the sequence of tasks, then traffic flow is how you physically move through the space to perform them. Poor traffic flow is what leads to those awkward kitchen dances where you’re constantly bumping into people or having to squeeze past an open dishwasher. It’s incredibly frustrating and can genuinely suck the joy out of cooking. One of the first things I look at in any kitchen layout is the primary traffic paths. Where do people naturally walk? From the entry to the fridge? From the sink to the dining table? From the cooktop to the pantry? These paths need to be clear and unobstructed. It sounds obvious, but you’d be surprised how often it’s overlooked, especially when an appealing aesthetic choice, like a massive island, takes precedence over practicality.
A crucial element here is aisle width. For a single-cook kitchen, a minimum of 36 inches for a walkway is often cited, but honestly, I find that a bit tight if you’re carrying things or bending down to open an oven. I’d aim for 42 inches if possible. If you typically have two or more people working in the kitchen simultaneously, you’ll want at least 48 inches, particularly between opposing counters or an island and a counter. This allows people to pass each other without contorting themselves. Think about appliance door swings too! The refrigerator door, oven door, dishwasher door – they all need space to open fully without blocking a major thoroughfare. It’s these little details that contribute to barrier-free movement and a sense of spaciousness, even in a smaller kitchen. My cat, Luna, is an excellent judge of this; if she can execute a full-speed zoomie through the kitchen without incident, the traffic flow is probably decent.
Then there’s the great island debate. Kitchen islands can be fantastic – they offer extra storage, seating, and prep space. But a poorly placed or oversized island can be a major workflow killer, creating bottlenecks and awkward detours. An island design needs to complement the flow, not fight it. Sometimes a peninsula is a better option, offering similar benefits without completely bisecting the space. The key is to ensure there’s adequate clearance all around it, maintaining those crucial traffic paths. I’ve seen some Nashville homes with beautiful, sprawling islands that are perfect for entertaining, but I always check the working side – is there enough room for the cook to maneuver efficiently? It’s a balance. Functionality and aesthetics can coexist, but one shouldn’t completely sacrifice the other. It’s like a well-designed website navigation – clear paths make for happy users.
Prep Space: The Unsung Hero of Kitchen Efficiency
Let me tell you, if there’s one thing that can make or break a kitchen’s functionality for me, it’s counter space. Specifically, dedicated prep space. This is where the real work of cooking happens – the chopping, mixing, assembling. And yet, it’s often an afterthought. I’ve seen stunning kitchens with top-of-the-line appliances that have about a square foot of usable prep area. It’s maddening! Ideally, you want a generous, continuous stretch of counter, especially between the sink and the cooktop. This is your primary prep zone. Think about the journey of an ingredient: it comes out of the fridge, gets washed at the sink, prepped on the counter, and then moves to the stove. If that counter link is missing or too small, your workflow is instantly clunky.
Beyond just quantity, the quality and ergonomics of this space matter. An ergonomic counter height is typically 36 inches, but if you’re particularly tall or short, or if you have specific tasks in mind (like a lower section for kneading dough), you might consider varying heights. Depth is also important; standard is 24-25 inches, but a little extra depth can be a luxury if you have the space, allowing you to keep small appliances at the back without sacrificing your working area. And don’t forget landing zones! These are crucial spots next to the fridge (for unloading groceries), the oven (for hot dishes), and the microwave. You need a place to put things down quickly and safely. Even a small 15-inch landing zone can make a world of difference.
The material of your prep surfaces is another consideration. You want something durable, easy to clean, and hygienic. Quartz, granite, stainless steel, and even some modern laminates are popular choices. Here in Nashville, there’s a real love for reclaimed wood and butcher block, which can be beautiful and warm. Butcher block is great for a dedicated chopping area, but for general prep, especially near a sink, you need to be mindful of maintenance and water resistance. I personally love a large, uninterrupted expanse of quartz for my main prep zone. It’s tough, non-porous, and looks clean. Ultimately, the goal is to create a prep area that invites you to cook, rather than making you feel cramped and disorganized. It’s the stage for your culinary creations, so give it the spotlight it deserves!
Strategic Storage: A Place for Everything, and Everything in Its Place
Oh, storage. The eternal kitchen quest. It’s not just about having *enough* storage; it’s about having *smart* storage. The golden rule here is point-of-use storage. This means storing items as close as possible to where they are first or most frequently used. Think spices and cooking oils near the stove, knives and cutting boards in the prep zone, dishes and flatware near the dishwasher and dining area, cleaning supplies under the sink. It sounds like common sense, and it is, but it requires conscious planning. When you don’t have to trek across the kitchen for every little thing, your workflow becomes incredibly streamlined. This reduces so much wasted movement and mental effort – you just reach, and it’s there.
When it comes to the types of storage, the options are vast. For lower cabinets, I’m a huge proponent of deep drawer systems instead of traditional cabinets with shelves. With drawers, you can pull them out and see everything at once, from top to bottom. No more getting on your hands and knees to excavate that one pot from the back of a dark cabinet! For upper cabinets, consider adjustable shelving to accommodate items of different heights. Pull-out pantries are fantastic for maximizing narrow spaces, and a well-organized walk-in or reach-in pantry organization system is a game-changer for bulk items and less frequently used appliances. Don’t forget vertical space utilization – things like tiered shelves within cabinets, or stacking bins, can dramatically increase your storage capacity.
Now, let’s talk about open shelving. Aesthetically, it can be beautiful, creating a light, airy feel and allowing you to display attractive dishware or ingredients. It’s quite popular in the modern farmhouse style I see a lot around Nashville. However, from a purely practical standpoint, it requires discipline. Open shelves can quickly become dust magnets and look cluttered if not carefully curated and maintained. My Nashville place has a bit of open shelving, and let me tell you, it DEMANDS tidiness. Luna seems to judge my spice jar alignment daily. So, it’s a trade-off. Perhaps a mix is best – some open shelving for display and frequently used items, and plenty of closed storage for the more utilitarian stuff. The key is to be honest with yourself about your tolerance for visual order and your willingness to keep things neat. For me, the less visual clutter, the calmer my mind, and the smoother my cooking.
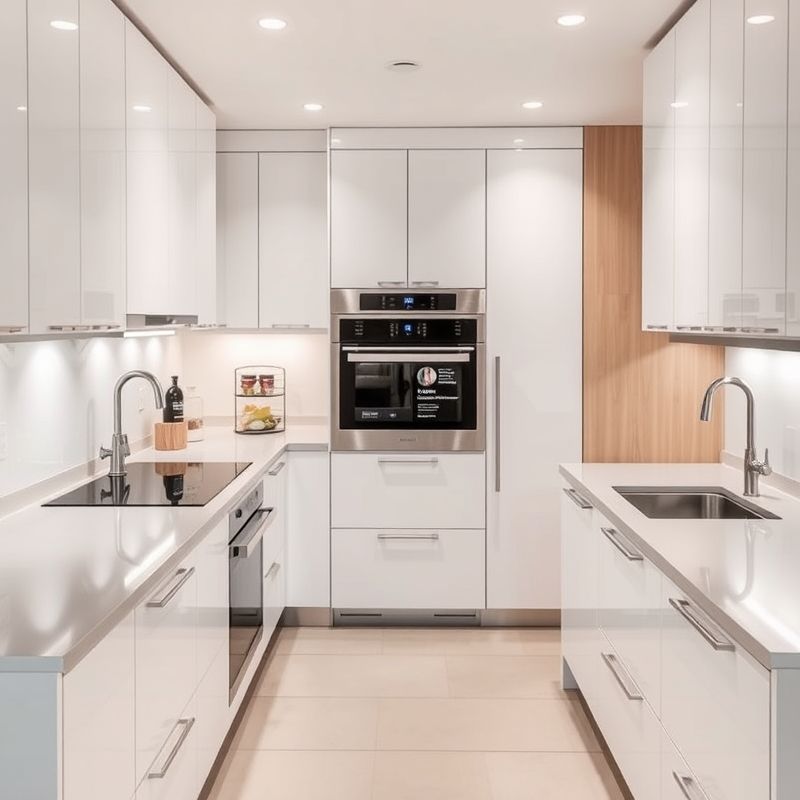
Appliance Placement: More Than Just Plugging It In
Choosing appliances is often the fun part of a kitchen design or refresh, but where you put them is just as critical for workflow as what they do. Let’s start with the refrigerator. It’s usually the most frequently accessed appliance. Ideally, it should be placed at an edge of the main work area so that family members can grab a drink or snack without wandering through the cook’s primary zone. Also, consider the door swing – will it bang into an island or block a major walkway? Many fridges offer reversible doors, or you might opt for a French door model to minimize swing space. And, as mentioned before, ensure there’s a landing area nearby for setting down groceries or items you’re taking out.
Next up, the cooking appliances – the cooktop and oven. If you have a separate cooktop and wall oven(s), you have more flexibility. Wall ovens can be installed at a more appliance ergonomic height, reducing bending and lifting. A landing space next to or below wall ovens is crucial for hot, heavy dishes. For a range (cooktop and oven combined), ensure there’s counter space on both sides for setting down ingredients, tools, and hot pans. Adequate ventilation needs are paramount for any cooktop – a good range hood that vents to the outside is essential for removing smoke, grease, and odors. Don’t skimp on this; it impacts air quality and cleanliness significantly. I’ve seen some kitchens where the fancy stove clearly outspent the ventilation, and that’s a recipe for a greasy, smelly house.
The dishwasher often gets tucked away without much thought, but its placement is key for cleanup efficiency. Ideally, it should be right next to the sink – this minimizes drips and makes rinsing and loading much easier. Think about whether you’re right-handed or left-handed when it comes to loading; some people have a strong preference for which side of the sink it’s on, though I suspect for many it’s more habit than strict necessity. Also, consider proximity to your dish and glassware storage. Unloading should be a simple process of turning and putting things away, not a cross-kitchen relay race. These might seem like small details, but they add up to a workflow that either supports you or subtly frustrates you every single day. It’s worth puzzling out the optimal spots before anything gets permanently installed.
The Sink Station: Not Just for Washing Dishes
The humble kitchen sink. It used to be just a basin for washing up, but its role has evolved significantly. It’s now a major workhorse in the prep process too. When thinking about sink functionality, consider size and configuration. Large, single-bowl sinks are increasingly popular because they can easily accommodate big pots, pans, and baking sheets. Double-bowl sinks still have their fans, allowing one side for washing and the other for rinsing or a disposal. Some modern sinks even come with integrated accessories like cutting boards, colanders, and drying racks that slide across the top, effectively extending your counter space and streamlining prep tasks. This is where design really meets utility.
Then there’s the faucet. Oh, the choices! A high-arc faucet makes it easier to fill tall pots. A pull-down or pull-out sprayer is almost essential for rinsing produce and cleaning the sink itself. And faucet technology like touchless activation? A total game-changer when your hands are covered in flour or raw chicken. I was skeptical at first, thought it was a bit gimmicky, but now I wouldn’t want to be without it. It’s both hygienic and incredibly convenient. Investing in a good quality sink and faucet combination can significantly enhance your kitchen experience. It’s one of those things you use constantly, so any improvement in its functionality pays off big time.
Finally, let’s talk about what goes *under* the sink, or at least nearby. Efficient waste management integration is crucial. This means planning for trash and recycling bins. Pull-out bins concealed within a cabinet next to the sink are a fantastic solution. They keep unsightly waste hidden but easily accessible during prep and cleanup. Some systems even offer separate compartments for trash, recycling, and compost. This is often an overlooked detail in the planning stages, leading to a freestanding trash can awkwardly placed in a corner, potentially obstructing traffic or just looking messy. Thinking about the entire lifecycle of food in your kitchen, from prep to cleanup to disposal, is key to a truly optimized workflow.
Lighting the Way: Illumination for Function and Ambiance
I have a real thing about kitchen lighting. Bad lighting is not just depressing; it’s a safety hazard when you’re working with sharp knives and hot surfaces. A well-lit kitchen uses a layered lighting design approach, combining three main types: ambient, task, and accent lighting. Ambient lighting provides overall illumination – think ceiling fixtures, recessed lights, or pendants. It sets the general mood of the room. But for workflow, task lighting is the real MVP. This is focused light directed at specific work surfaces where you need to see clearly.
The most critical areas for task lighting are over the countertops (especially prep zones), above the sink, and over the cooktop. Under-cabinet lighting is, in my opinion, non-negotiable for illuminating countertops. It eliminates shadows cast by upper cabinets and your own body, making chopping, measuring, and reading recipes so much easier. You can use LED strips, puck lights, or linear fixtures. Over the sink, a recessed downlight or a small pendant works well. Many range hoods have built-in lights for the cooktop, but ensure they’re bright enough. Don’t underestimate how much good task lighting can improve your precision and reduce eye strain. It just makes working in the kitchen more pleasant and safer.
Accent lighting is the third layer, used to highlight architectural features or decorative elements – like lighting inside glass-front cabinets or spotlighting artwork. While not strictly for workflow, it adds depth and personality. And don’t forget dimmer switches! Installing dimmers on ambient and even some task lighting allows you to adjust the light levels for different activities – bright for cooking, softer for dining or relaxing. Also, maximize natural light integration wherever possible. Large windows or skylights not only reduce the need for artificial light during the day but also connect the kitchen to the outdoors, which is always a mood booster. Here in Nashville, the sunlight can be gorgeous, and bringing that into the kitchen makes a huge difference. Seriously, don’t treat lighting as an afterthought; it’s fundamental to both the function and feel of your kitchen.
Vertical Thinking: Maximizing Wall and Tall Spaces
When you’re trying to optimize a kitchen, especially a smaller one, it’s crucial to think vertically. So much usable storage space is often wasted above standard cabinet height or in awkward narrow spots. Taking your ceiling-height cabinets all the way up is a great way to gain extra storage for less frequently used items – holiday platters, specialty appliances, that bread maker you swear you’ll use again someday. Yes, you might need a small step stool to reach the top shelves, but it’s far better than cluttering up prime real estate lower down. If full cabinets to the ceiling feel too heavy, you could opt for shorter upper cabinets with open shelving above them for display.
Look for opportunities to incorporate narrow storage solutions. Those awkward 6-inch or 9-inch gaps next to an appliance or at the end of a cabinet run? They’re perfect for tall pull-out racks for spices, oils, baking sheets, or even a slim broom closet. These clever inserts can transform otherwise wasted space into highly functional storage. It’s about being creative and looking at every nook and cranny as a potential asset. I’ve seen some ingenious solutions in compact Nashville condos where every inch counts. It always impresses me how much you can fit into a small footprint with smart vertical planning.
Another aspect of vertical thinking is utilizing wall space. Wall-mounted storage options like pot racks can free up a significant amount of cabinet and drawer space, though, like open shelving, they require a certain level of tidiness to look good. Magnetic knife strips are another excellent way to get knives off the counter or out of a drawer, keeping them safely stored and easily accessible. Shelves or ledges for cookbooks, small spice jars, or even a bit of greenery can also add functionality and personality without taking up valuable counter surface. Is a pot rack for everyone? Maybe not. Some find it looks cluttered. But for others, it’s a practical and even stylish solution. The point is to consider all your surfaces – floors, counters, and walls, right up to the ceiling – as part of your storage and workflow strategy.
Personalization and Future-Proofing Your Workflow
Ultimately, the most optimized kitchen workflow is one that’s tailored to *your* specific needs, habits, and lifestyle. A generic, one-size-fits-all approach rarely works perfectly. So, before you make any big decisions, really think about how *you* use your kitchen. Do you bake frequently? Then a dedicated baking zone with easy access to your mixer and ingredients makes sense. Do you entertain often? Perhaps a beverage station or an island with seating is a priority. Are you a solo cook, or is it a family affair? This will influence aisle widths and the need for multiple prep areas. User-specific design is paramount. Don’t design a kitchen for a magazine spread; design it for your real life. What makes you sigh with frustration in your current kitchen? What would make your daily routines smoother and more enjoyable?
It’s also wise to think about the future. Are you planning to stay in this home long-term? If so, incorporating elements of universal design principles can make the kitchen more accessible and comfortable for everyone, regardless of age or ability. This might include things like varied counter heights (a lower section for seated work, for example), wider doorways and aisles, lever-style handles instead of knobs, and drawers instead of deep base cabinets. These are features that can enhance usability for everyone and allow you to comfortably age in place. It’s something I find myself thinking about more these days – how can a space be both beautiful and inclusively functional? It’s a worthwhile consideration, even if those needs seem far off.
Finally, try to build in some kitchen adaptability. Life changes. Your cooking habits might evolve. Technology will certainly continue to advance. While you can’t predict everything, choosing some modular elements, or ensuring your electrical and plumbing can accommodate future appliance upgrades, can be beneficial. Maybe that empty corner could one day house a built-in coffee system, or perhaps you’ll want to add a small under-counter wine fridge. Leaving a little flexibility in your design can save you headaches down the road. The goal is to create a kitchen that not only works beautifully for you today but can also adapt, at least to some extent, to what tomorrow might bring. It’s an ongoing dialogue between you and your space, a continuous refinement. And isn’t that part of the fun?
Wrapping It Up: Your Kitchen’s Next Chapter
So, we’ve journeyed through the ins and outs of kitchen workflow, from the grand geometry of work triangles and zones to the subtle nuances of lighting and storage. It’s a lot to take in, I know. But if there’s one thing I hope you take away, it’s that optimizing your kitchen isn’t just about chasing some elusive ideal of ‘perfection.’ It’s about creating a space that genuinely supports and enhances your daily life. A kitchen that flows well is a kitchen that feels good to be in, plain and simple. It reduces stress, encourages creativity, and maybe, just maybe, makes doing the dishes a little less of a drag. Luna is now awake and giving me that look that means ‘is it dinner time yet?’, a perfect reminder of the kitchen’s central role.
My challenge to you, then, is this: take a fresh, analytical look at your own kitchen this week. Don’t think about major renovations just yet, unless that’s already on your radar. Just observe. How do you *really* move in the space when you’re making coffee, preparing a meal, or unloading the dishwasher? What are the little friction points? What’s one small change you could implement right now – maybe reorganizing a single drawer for point-of-use efficiency, clearing off that cluttered section of counter, or even just moving the trash can to a more logical spot? You might be surprised by how a tiny adjustment can ripple outwards, making your daily rhythm just a little bit smoother. It’s these small victories that build momentum.
Designing a kitchen, or even just tweaking its existing layout, is a bit like crafting a good story, isn’t it? Every element, from the placement of the fridge to the height of the counters, should serve a purpose, contributing to the overall narrative of your home and how you live within it. What story is your kitchen telling right now? And more importantly, what story do you *want* it to tell? Food for thought, as they say. Thanks for hanging out with me today on Chefsicon.com. Now, if you’ll excuse me, I think a certain feline is demanding her dinner service.
FAQ
Q: What’s the biggest mistake people make in kitchen design regarding workflow?
A: Often it’s prioritizing aesthetics over pure functionality, like choosing an island that’s visually stunning but way too big for the space, thereby obstructing key traffic paths. Another common one is not planning for enough dedicated prep counter space, especially between the sink and stove. Underestimating total storage needs or failing to plan for point-of-use storage (keeping items where you use them) also creates a lot of unnecessary movement and frustration down the line.
Q: Is the work triangle outdated for modern kitchens?
A: I wouldn’t say it’s completely outdated, but it definitely needs to be adapted and expanded upon for many modern kitchens. For larger spaces, or households where multiple people are cooking or using the kitchen simultaneously, thinking in terms of “work zones” (like a baking zone, a coffee station, a separate cleanup zone) is often more effective. The core principle of the work triangle – which is to minimize unnecessary steps between key task areas (fridge, sink, cooktop) – is still very valid and should be a consideration within each zone.
Q: How much counter space do I really need for good workflow?
A: It can vary based on your cooking style and how many people use the kitchen, but some general guidelines are helpful. Aim for at least 15-24 inches of clear landing space on at least one side of the cooktop and sink (both sides is even better if possible). For a dedicated prep area, a continuous stretch of at least 36 inches wide and 24-25 inches deep is a good minimum. If you frequently cook complex meals or bake a lot, you’ll likely appreciate even more. More is usually better when it comes to functional counter space!
Q: Can I improve my kitchen workflow without a major renovation?
A: Absolutely! You don’t always need to tear down walls or replace cabinets to make a big difference. Simple changes like thoroughly decluttering your countertops, reorganizing your cabinets and drawers to implement point-of-use storage, adding drawer dividers or cabinet organizers, installing some inexpensive under-cabinet LED lighting, or even using a rolling cart to create a flexible extra prep surface can significantly improve your kitchen’s flow and efficiency. Sometimes, just observing your current habits and identifying the bottlenecks can reveal easy, low-cost fixes.
@article{smart-kitchen-workflow-design-practical-tips-for-efficiency,
    title   = {Smart Kitchen Workflow Design: Practical Tips for Efficiency},
    author  = {Chef's icon},
    year    = {2025},
    journal = {Chef's Icon},
    url     = {https://chefsicon.com/optimizing-kitchen-workflow-design-tips/}
} 
