
Table of Contents
- 1 Your Starter Kitchen Arsenal: The Real Essentials
- 1.1 1. The Mighty Chef’s Knife: Your Culinary Best Friend
- 1.2 2. The Unsung Hero: A Sturdy Cutting Board
- 1.3 3. Precision is Key: Measuring Cups and Spoons
- 1.4 4. The Humble Mixing Bowl: More Important Than You Think
- 1.5 5. Scrape, Fold, Flip: The Versatile Spatula
- 1.6 6. Whisk It Good: The Simple Power of a Whisk
- 1.7 7. The Forgiving Friend: A Non-Stick Skillet
- 1.8 8. Simmer and Boil: The Essential Saucepan
- 1.9 9. Beyond Cookies: The Versatile Baking Sheet
- 1.10 10. Drain and Rinse: The Indispensable Colander
- 2 Starting Your Culinary Journey: Less is More
- 3 FAQ
Alright, let’s talk kitchens. Specifically, let’s talk about that slightly terrifying moment when you decide, ‘Right, I’m going to cook more,’ and then you walk into a kitchen supply store, or worse, browse online, and are immediately assaulted by a million shiny gadgets. Peelers for things you didn’t know needed peeling, slicers for vegetables you’ve never bought, and machines that promise to do one very specific task that you’ll probably do twice a year. It’s enough to send anyone scurrying back to takeout menus. I’ve been there. When I first moved to Nashville from the Bay Area, setting up my kitchen felt like a monumental task. I had my trusty rescue cat, Luna, for company, but she wasn’t much help with deciding between a Santoku or a Western chef’s knife. What I’ve learned over years of cooking, and honestly, a fair bit of marketing analysis applied to my own culinary journey, is that you don’t need all that stuff. Especially not when you’re starting out. What you need are a few beginner-friendly kitchen tools that are versatile, reliable, and won’t make you feel like you need a culinary degree just to boil an egg.
This isn’t about buying the fanciest, most expensive gear. Trust me, as someone who appreciates good design and quality, I get the temptation. But for beginners, it’s about building a foundation. It’s about acquiring tools that will help you learn techniques, tools that are forgiving, and tools that will actually get used, not just gather dust in a drawer. Think of it like learning an instrument; you don’t start with a rare vintage guitar, you start with something solid that stays in tune and lets you focus on the chords. So, we’re going to cut through the noise. I’m going to share my insights, maybe a few confessions about my own early kitchen mishaps, and guide you towards a set of essential tools that will empower you to explore the wonderful world of cooking without feeling overwhelmed. We’ll look at why each tool is important, what to look for when buying, and how to get the most out of it. Sound good? Let’s dive in.
My goal here on Chefsicon.com has always been to demystify food and cooking, to make it approachable and enjoyable. And that starts with the very basics – the tools you hold in your hand. It’s kind of profound, isn’t it? How these inanimate objects become extensions of our creativity and our desire to nourish ourselves and others. Or maybe that’s just me getting philosophical on a Tuesday morning. Either way, by the end of this, you’ll have a clear idea of what you truly need to get started on your culinary adventures, and hopefully, you’ll feel a lot more confident stepping into your kitchen. Luna, for one, will appreciate the delicious smells, even if she still prefers her kibble.
Your Starter Kitchen Arsenal: The Real Essentials
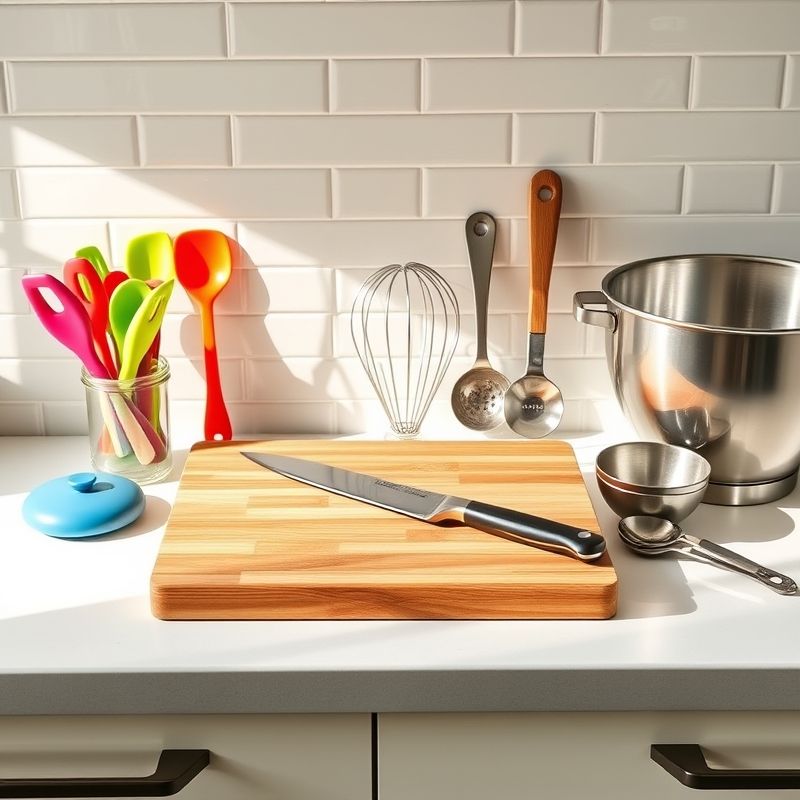
1. The Mighty Chef’s Knife: Your Culinary Best Friend
If there’s one tool that I’d say is non-negotiable, it’s a good chef’s knife. Seriously, this is the workhorse of your kitchen. It’s what you’ll use for 90% of your cutting tasks, from chopping vegetables to dicing meat. Now, when I say ‘good,’ I don’t mean you need to spend a fortune. An 8-inch chef’s knife is generally the sweet spot for beginners – it’s substantial enough for most tasks but not so large that it feels unwieldy. Look for one made from high-carbon stainless steel; it holds an edge well, resists rust, and is relatively easy to sharpen. The handle should feel comfortable and secure in your hand. Don’t get too bogged down in German versus Japanese styles at this stage; a solid, well-balanced Western-style chef’s knife will serve you incredibly well.
I remember my first ‘real’ chef’s knife. It felt like a revelation after years of struggling with those flimsy, dull knives from a cheap block set. Suddenly, cutting an onion wasn’t a tear-filled battle against a slippery foe; it was… almost graceful. The key, and I can’t stress this enough, is to keep it sharp. A dull knife is far more dangerous than a sharp one because you have to apply more pressure, increasing the risk of slipping. A simple honing steel will help maintain the edge between sharpenings, and learning basic knife skills (the claw grip, the rock chop) will make you safer and more efficient. Is this the most glamorous tool? Maybe not to some, but the connection you feel when a good knife glides through ingredients is something special. It’s the foundation of almost every meal.
2. The Unsung Hero: A Sturdy Cutting Board
What good is a great knife without a great stage for it to perform on? That’s where the cutting board comes in. It might seem like a simple item, but the right cutting board protects your countertops, keeps your knives sharp for longer, and provides a stable, safe surface for all your chopping endeavors. For beginners, I usually recommend having at least two: one for produce and bread, and another strictly for raw meat, poultry, and fish to prevent cross-contamination. This is a biggie for food safety, folks.
Material-wise, you’ve got a few common choices. Wood (like maple or bamboo) is kind to your knives and has some natural antimicrobial properties, but it requires a bit more care (handwashing, occasional oiling). Plastic boards are dishwasher-safe and often more affordable, but they can scar more easily, and those scars can harbor bacteria if not cleaned thoroughly. I personally use both. I have a nice, hefty wooden board for most of my veggie prep – it just feels good under the knife – and a set of thinner, color-coded plastic boards for meats. Size matters too; you want something large enough that you’re not constantly chasing ingredients off the edge. Look for boards with non-slip feet or place a damp paper towel underneath to keep them from sliding around. It’s a small detail that makes a huge difference in safety and comfort.
3. Precision is Key: Measuring Cups and Spoons
Okay, I’ll confess: for some savory dishes, I’m a ‘bit of this, dash of that’ kind of cook. Years of practice have given me a certain intuition. But when you’re starting out, and especially with baking, precision is your friend. That’s where a good set of measuring cups and spoons becomes indispensable. Trying to eyeball a teaspoon of baking powder can be the difference between a fluffy cake and a dense hockey puck. And trust me, I’ve baked my share of hockey pucks in my early days.
You’ll need two types of measuring cups: one set for dry ingredients (flour, sugar, etc.) and at least one liquid measuring cup (usually glass or clear plastic with a spout and markings on the side). Dry ingredients should be leveled off for accuracy. Liquid measuring cups are designed to be read at eye level on a flat surface. For spoons, a standard set (1/4 tsp, 1/2 tsp, 1 tsp, 1 tbsp) made of stainless steel is durable and easy to clean. I prefer stainless steel for both cups and spoons because they don’t absorb odors or stains like some plastics can, and they last practically forever. It might seem like a minor detail, but having accurate measurements takes a lot of guesswork out of following recipes, which is crucial when you’re learning the fundamentals.
4. The Humble Mixing Bowl: More Important Than You Think
You’re going to need things to mix ingredients in, obviously. And while any old bowl might technically work, having a good set of mixing bowls will make your life in the kitchen so much easier. I recommend getting a nested set of at least three different sizes. A small one for whisking eggs or dressings, a medium one for combining ingredients, and a large one for big batches of dough, salad, or marinating.
Material choices are typically stainless steel, glass, or plastic. Stainless steel bowls are lightweight, durable, and won’t react with acidic ingredients. Glass bowls are great because you can see what’s happening inside, and many are microwave and oven-safe (check the manufacturer’s instructions!), but they can be heavy and breakable. Plastic is lightweight and inexpensive, but can stain or absorb odors over time. My personal preference for general use is stainless steel – they’re practically indestructible. Look for bowls with a good lip for gripping and pouring. Some even come with lids, which is super handy for storage. It seems so basic, but trying to mix a large batch of cookie dough in a bowl that’s too small is an exercise in frustration and countertop cleanup I wouldn’t wish on anyone.
5. Scrape, Fold, Flip: The Versatile Spatula
The term ‘spatula’ can actually refer to a few different tools, and honestly, you’ll probably want a couple of types. First, there’s the silicone spatula or rubber scraper. These are invaluable for scraping down the sides of mixing bowls (waste not, want not!), folding ingredients together gently, and even scrambling eggs. Look for one that’s heat-resistant so you can use it for stovetop cooking as well. A good silicone spatula should have a bit of flex but also be sturdy enough to handle thicker batters.
Then there’s the turner or offset spatula, often made of metal or sturdy nylon, which you’ll use for flipping burgers, pancakes, or fish. An offset design, where the handle is angled up from the blade, can be particularly useful for getting under food in a pan. For non-stick pans, make sure you use a non-metal spatula (nylon or silicone) to avoid scratching the surface. I remember ruining my first non-stick pan by using a metal flipper – a rookie mistake I hope you can avoid! Having the right spatula for the job just makes things smoother, cleaner, and more efficient. It’s one of those tools you don’t think much about until you *don’t* have the right one.
6. Whisk It Good: The Simple Power of a Whisk
Sure, you can use a fork for some tasks, but a good whisk is far more effective for incorporating air, emulsifying dressings, or smoothing out lumps in sauces and batters. A medium-sized balloon whisk is a great all-rounder for beginners. The ‘balloon’ shape with its many fine wires is designed to whip air into egg whites for meringues or cream for whipped cream. It’s also perfect for making lump-free pancake batter or a smooth vinaigrette.
Stainless steel is the way to go for durability and ease of cleaning. Make sure the handle is comfortable to grip, as you might be whisking for a few minutes at a time. There are other types of whisks, like French whisks (narrower, for sauces) or flat whisks (great for deglazing), but a balloon whisk will cover most of your initial needs. There’s something oddly satisfying about transforming simple ingredients with just a bit of wrist action and a well-designed whisk. It feels like culinary magic, even if it’s just science in action. And honestly, sometimes when I’m whisking, I find myself thinking about how such a simple tool can create such complex textures. It’s a small reminder of the elegance in simplicity.
7. The Forgiving Friend: A Non-Stick Skillet
Ah, the non-stick skillet. This is often a beginner cook’s best friend, especially for delicate items like eggs, fish, or pancakes that have a tendency to stick. A 10 or 12-inch skillet is a versatile size to start with. The non-stick coating allows food to release easily, meaning you can often use less fat, and cleanup is generally a breeze. This forgiveness factor is huge when you’re learning temperature control and how different foods behave in a pan.
However, non-stick pans require a bit of special care. Avoid using metal utensils, as they can scratch and damage the coating. High heat can also degrade the non-stick surface over time, so they’re not ideal for searing steaks where you need a super hot pan. Handwashing is usually recommended. While stainless steel or cast iron pans are fantastic for many things (and you’ll likely want to add them to your collection later), a quality non-stick pan is an excellent starting point for building confidence. Is it the be-all and end-all of skillets? No. But it’s a fantastic tool for learning. I still keep one around for my morning scrambled eggs, even with a kitchen full of other options. Luna appreciates the lack of burnt egg smell, I’m sure.
8. Simmer and Boil: The Essential Saucepan
A good saucepan is another kitchen staple you’ll find yourself reaching for constantly. It’s perfect for making sauces (obviously!), cooking grains like rice or quinoa, boiling vegetables, or reheating leftovers. A 2 or 3-quart saucepan with a tight-fitting lid is a great starting size. You want something with a heavy bottom or an aluminum core sandwiched in stainless steel. This helps with even heat distribution and prevents scorching, which is a common pitfall when you’re learning to make delicate sauces or cook things that can easily burn on the bottom.
Stainless steel is a popular and durable choice. A comfortable handle that stays relatively cool is also important. The lid is key for trapping heat and moisture, essential for tasks like steaming rice or simmering sauces to the perfect consistency. I’ve learned the hard way that a flimsy saucepan with a poor-fitting lid can lead to unevenly cooked food and a lot of frustration. Investing in a decent saucepan, even if it’s just one to start, will pay dividends in the quality of your cooking and your overall enjoyment in the kitchen. It’s a workhorse, plain and simple, and a good one makes all the difference.
9. Beyond Cookies: The Versatile Baking Sheet
Don’t let the name fool you; a baking sheet (often called a sheet pan) is for so much more than just cookies. It’s one of the most versatile tools in my kitchen. I use mine for roasting vegetables, baking chicken or fish, making sheet pan dinners (a lifesaver on busy weeknights!), toasting nuts, and yes, occasionally, baking cookies. Look for a sturdy, rimmed baking sheet. The rim is important to prevent juices or small items from sliding off.
Heavy-gauge aluminum baking sheets are generally preferred because they conduct heat evenly and are resistant to warping. A standard half-sheet pan (around 18×13 inches) is a great all-purpose size that fits in most home ovens. I actually own several because they’re so useful. You can line them with parchment paper or a silicone baking mat for easy cleanup. The sheer utility of a good baking sheet is something I don’t think many beginner cooks realize at first. It opens up a whole world of roasting and one-pan meals that are both delicious and easy to manage. It’s one of those ‘how did I live without this?’ tools once you start using it regularly.
10. Drain and Rinse: The Indispensable Colander
Last but certainly not least, you need a colander or a good-sized strainer. This is essential for draining pasta, washing fruits and vegetables, and rinsing canned beans. It might seem like a minor tool, but try draining a pound of hot pasta without one, and you’ll quickly appreciate its value (and avoid a steamy, dangerous mess). I’ve definitely tried the ‘lid slightly ajar’ method in a pinch, and it rarely ends well.
Look for a colander with a stable base so it won’t tip over in the sink. Stainless steel is a great option as it’s durable, easy to clean, and won’t rust. Plastic colanders are lighter and often cheaper but can sometimes retain odors or stains. Ensure the holes are small enough to prevent things like rice or angel hair pasta from slipping through, but large enough for efficient draining. Some colanders have handles for easy lifting, which is a nice feature. Whether it’s a traditional bowl-shaped colander or an over-the-sink expandable model, having a reliable way to drain and rinse is a fundamental part of kitchen prep. It’s one of those practical, unglamorous tools that just makes everything work smoothly.
Starting Your Culinary Journey: Less is More
So there you have it – my top ten beginner-friendly kitchen tools. Is this an exhaustive list of everything you could possibly own? Absolutely not. But it’s a solid, practical foundation. The truth is, so much of cooking is about technique and understanding ingredients, and these tools are the ones that will best support you as you learn and grow. You don’t need that fancy avocado slicer or the strawberry huller, not yet anyway (and maybe never, if I’m being honest). Start with these essentials, get comfortable with them, and master how they can transform simple ingredients into delicious meals. It’s a journey, not a race to accumulate the most gadgets.
My challenge to you, if you’re just starting out or feeling overwhelmed by your current kitchen setup, is this: pick one or two tools from this list that you don’t have or want to upgrade. Focus on acquiring a quality version, learn its nuances, and see how it changes your approach to cooking. Maybe it’s finally getting that chef’s knife that feels right in your hand, or a sturdy baking sheet that inspires you to try roasting. What really matters is the confidence and joy you find in creating food. And who knows, maybe you’ll discover a hidden passion, just like I did. Or perhaps, a deeper question to ponder is this: how do the tools we choose reflect not just our practical needs, but also our aspirations in the kitchen and, dare I say, in life? Food for thought, eh?
FAQ
Q: What’s the absolute first kitchen tool a beginner should buy if they can only get one or two things?
A: Hands down, a good chef’s knife (around 8 inches) and a sturdy cutting board. These two items are fundamental to almost all food preparation and will make the biggest immediate impact on your ability to cook effectively and safely.
Q: Do I need to buy expensive, high-end kitchen tools to cook well as a beginner?
A: Not at all! While high-end tools can be lovely, the most important thing for a beginner is to choose tools that are functional, durable, and comfortable to use. Focus on good quality for the essentials, like a knife that holds an edge and a saucepan with a heavy bottom. You can find excellent beginner-friendly options at reasonable price points. It’s more about the cook than the cookware, especially when you’re learning.
Q: How should I care for my new kitchen tools to make them last longer?
A: General care goes a long way. Handwash your knives and dry them immediately to maintain their edge and prevent rust. Oil wooden cutting boards periodically. Avoid using metal utensils on non-stick surfaces. Read any specific care instructions that come with your tools. A little bit of care can significantly extend the life of your kitchen equipment.
Q: What’s a common kitchen tool that beginners often buy but don’t really need?
A: Oh, this is a fun one! I’d say highly specialized, single-task gadgets are often unnecessary for beginners. Things like garlic presses (a knife minces garlic just fine, and they’re a pain to clean), egg separators (you can use the shell or your hands), or those intricate vegetable choppers that promise perfect dice but end up being more trouble than they’re worth. Stick to versatile tools first; you can always acquire specialty items later if you find a genuine, recurring need for them.
@article{essential-kitchen-tools-for-beginners-sammys-top-picks,
    title   = {Essential Kitchen Tools for Beginners: Sammy’s Top Picks},
    author  = {Chef's icon},
    year    = {2025},
    journal = {Chef's Icon},
    url     = {https://chefsicon.com/beginner-friendly-kitchen-tools/}
} 
