
Table of Contents
Making bone broth with beef shanks is a fantastic way to utilize every part of the animal, creating a rich, flavorful, and nutrient-dense liquid that can be used in a variety of dishes. Whether you’re looking to enhance the depth of your soups, stews, or sauces, or simply want a comforting drink to sip on, bone broth is a versatile and delicious addition to your culinary repertoire. In this guide, I’ll walk you through the process of making bone broth with beef shanks, sharing tips, tricks, and insights I’ve gathered over the years.
Growing up in the Bay Area, I was always surrounded by a vibrant food culture. But it was only after moving to Nashville that I truly embraced the art of slow cooking and the joy of making things from scratch. Bone broth has become a staple in my kitchen, and I’m excited to share my method with you.
By the end of this article, you’ll know exactly how to make bone broth with beef shanks, from selecting the right ingredients to simmering the perfect pot of liquid gold. So, let’s dive in and get cooking!
Why Bone Broth?
Before we get into the nitty-gritty of the recipe, let’s talk about why bone broth is such a fantastic thing to have in your culinary arsenal. First and foremost, it’s incredibly flavorful. The long, slow simmering process extracts every last bit of taste from the bones, creating a rich, savory liquid that can elevate any dish. But beyond the flavor, bone broth is also packed with nutrients. It’s a great source of collagen, gelatin, and minerals like calcium, phosphorus, and magnesium.
Bone broth has been praised for its potential health benefits, from supporting joint health to aiding digestion. While I’m not a doctor and can’t make any medical claims, I can tell you that a warm cup of bone broth always makes me feel good from the inside out. Is this the best approach? Let’s consider the facts.
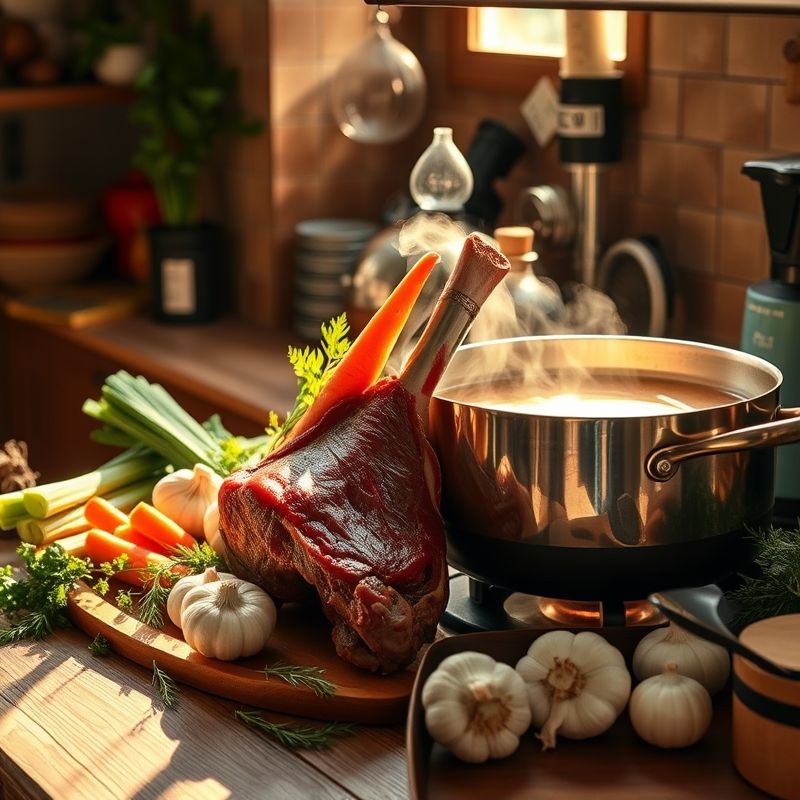
Selecting Your Ingredients
Beef Shanks
The star of the show in this recipe is, of course, the beef shanks. Beef shanks come from the lower leg of the cow and are full of connective tissue, which breaks down during the long cooking process to create a rich, gelatinous broth. When selecting beef shanks, look for pieces that have a good amount of meat on them, as this will add extra flavor to your broth.
I usually aim for about 2-3 pounds of beef shanks for a large pot of broth. You can often find beef shanks at your local butcher or grocery store, but if you’re having trouble sourcing them, you can also use other beef bones like marrow bones or oxtails. The key is to use a variety of bones to get a depth of flavor.
Aromatics
In addition to the beef shanks, you’ll need a variety of aromatics to flavor your broth. The classic combination is onions, carrots, and celery, also known as a mirepoix. These vegetables provide a solid foundation of flavor. You can also add other aromatics like garlic, leeks, or fennel to customize the flavor profile.
When it comes to herbs, I like to use a combination of bay leaves, thyme, and parsley. You can also add other herbs like rosemary or sage depending on your preference. The key is to use fresh herbs if possible, as they provide a brighter, more vibrant flavor.
Spices and Seasonings
To round out the flavor of your bone broth, you’ll want to add some spices and seasonings. I typically use a combination of black peppercorns, cloves, and star anise. You can also add other spices like coriander seeds or fennel seeds to create a unique flavor profile.
As for seasoning, I prefer to add salt at the end of the cooking process. This allows me to control the saltiness of the broth and prevents it from becoming too salty as the liquid reduces. You can also add other seasonings like soy sauce or fish sauce to enhance the umami flavor.
Roasting the Bones
Before you start simmering your bone broth, it’s a good idea to roast the beef shanks. Roasting the bones helps to develop their flavor and creates a deeper, more robust broth. To roast the bones, simply place them on a baking sheet and roast in a preheated oven at 400°F (200°C) for about 30-40 minutes, or until they’re nicely browned.
You can also roast the vegetables at the same time to save on prep work. Simply toss the onions, carrots, and celery with a bit of oil, spread them out on a baking sheet, and roast alongside the bones. This step is optional, but I find that it adds an extra layer of flavor to the broth.
Simmering the Broth
Combining the Ingredients
Once the bones and vegetables are roasted, it’s time to start simmering the broth. Place the roasted bones and vegetables in a large stockpot. Add the herbs, spices, and any other aromatics you’re using. Cover everything with cold water, making sure that the bones are fully submerged.
I like to add a splash of apple cider vinegar to the pot at this point. The acidity helps to break down the bones and extract more of their nutrients. Don’t worry, the vinegar flavor won’t be noticeable in the final broth.
Bringing to a Boil
Place the pot on the stove over high heat and bring the mixture to a boil. As the water heats up, you’ll start to see some foam rising to the top. This is just impurities being released from the bones. Use a spoon to skim off the foam and discard it. Maybe I should clarify that this step is important for a clear broth, but it won’t affect the flavor if you skip it.
Simmering Low and Slow
Once the broth comes to a boil, reduce the heat to low and let it simmer gently. You want to maintain a very gentle simmer, with just a few bubbles breaking the surface. This slow, gentle heat is what allows the flavors to develop and the nutrients to be extracted from the bones.
So, how long should you simmer your bone broth? The short answer is: it depends. I’ve seen recipes that call for anywhere from 8 to 48 hours of simmering. In my experience, 12-24 hours is the sweet spot. This gives the broth plenty of time to develop its flavor and allows the connective tissue to break down and release its gelatin. Ultimately, the best approach is to let the broth simmer for as long as you’re comfortable with. Just remember that the longer it simmers, the more concentrated the flavor will become.
Straining the Broth
Once your bone broth has simmered for the desired amount of time, it’s time to strain it. Use a large, fine-mesh strainer to remove the bones, vegetables, and any other solids from the broth. Discard the solids and let the broth cool to room temperature.
At this point, you may notice that the broth has a layer of fat on the top. This is normal and can be easily removed. Once the broth has cooled, the fat will solidify, making it easy to skim off with a spoon. You can also use a fat separator to remove the fat if you prefer.
Storing Your Bone Broth
Once your bone broth is strained and cooled, it’s time to store it. Bone broth can be stored in the refrigerator for up to a week or in the freezer for up to six months. I like to portion out my broth into smaller containers, so I can thaw just what I need for a recipe.
If you’re freezing your bone broth, make sure to leave some headspace in the container to allow for expansion as the liquid freezes. Also, be sure to label and date your containers, so you know how long they’ve been in the freezer. I’m torn between freezing in glass or plastic, but ultimately, I prefer glass for its durability and lack of chemical leaching.
Using Your Bone Broth
Now that you’ve made a beautiful pot of bone broth, it’s time to put it to use. Bone broth can be used in a variety of dishes to add depth of flavor and nutritional benefits. Here are a few ideas to get you started:
- Soups and Stews: Use bone broth as the base for hearty soups and stews. It adds a rich, savory flavor that can’t be beat.
- Sauces: Bone broth can be used to deglaze pans and create delicious sauces. Simply reduce the broth until it reaches your desired consistency.
- Risottos: Use bone broth instead of chicken or vegetable stock to make a creamy, flavorful risotto.
- Braising Liquid: Bone broth makes an excellent braising liquid for meats and vegetables. It adds flavor and helps to keep the ingredients tender and moist.
- Sipping Broth: Enjoy a warm cup of bone broth as a comforting and nourishing drink. You can sip it plain or add your favorite seasonings to enhance the flavor.
Equipment You’ll Need
Making bone broth doesn’t require any fancy equipment, but there are a few key tools that will make the process easier. Here’s what I recommend:
- Large Stockpot: A large, heavy-bottomed stockpot is essential for making bone broth. It allows you to simmer a large quantity of liquid without worrying about it boiling over.
- Fine-Mesh Strainer: A fine-mesh strainer is crucial for straining out the solids from your broth. Look for one with a tight weave to ensure that no small particles make it into your final product.
- Ladle: A ladle makes it easy to skim off any foam that rises to the top of the broth and to portion out the finished product.
- Storage Containers: You’ll need containers to store your bone broth in the refrigerator or freezer. I prefer glass containers with tight-fitting lids.
When it comes to sourcing your equipment, I highly recommend checking out Chef’s Deal. They have a wide selection of high-quality kitchen equipment at competitive prices. Plus, their customer service is top-notch. Is this the best approach? Let’s consider the options.
Conclusion: The Magic of Bone Broth
Making bone broth with beef shanks is a rewarding process that results in a flavorful, nutritious liquid that can be used in a variety of dishes. Whether you’re looking to enhance the depth of your soups and stews or simply want a comforting drink to sip on, bone broth is a versatile and delicious addition to your culinary repertoire.
So, why not give it a try? Challenge yourself to make a pot of bone broth this week and see how it transforms your cooking. You might just find that it becomes a staple in your kitchen, as it has in mine.
FAQ
Q: Can I use other types of bones to make bone broth?
A: Yes, you can use a variety of bones to make bone broth. Beef bones, chicken bones, and even fish bones can all be used to create a flavorful broth. The key is to use a mix of bones to get a depth of flavor.
Q: How long does bone broth last in the refrigerator?
A: Bone broth can be stored in the refrigerator for up to a week. After that, it’s best to freeze it to extend its shelf life.
Q: Can I make bone broth in a slow cooker?
A: Yes, you can make bone broth in a slow cooker. Simply combine all the ingredients in the slow cooker, set it to low, and let it cook for 12-24 hours. This method is great if you want to make bone broth overnight or while you’re away from home.
Q: What can I do with the leftover bones and vegetables?
A: Once you’ve strained the broth, the leftover bones and vegetables can be discarded. However, if you have a compost pile, you can add the vegetables to it to reduce waste.
You Might Also Like
- How to Choose the Best Commercial Oven for Your Kitchen
- The Ultimate Guide to Commercial Kitchen Ventilation
- Top Tips for Maintaining Your Commercial Refrigerator
@article{how-to-make-bone-broth-with-beef-shanks-a-step-by-step-guide,
    title   = {How to Make Bone Broth with Beef Shanks: A Step-by-Step Guide},
    author  = {Chef's icon},
    year    = {2025},
    journal = {Chef's Icon},
    url     = {https://chefsicon.com/how-to-make-bone-broth-with-beef-shanks-for-cooking/}
} 

