The Best Fluffy Pancakes recipe you will fall in love with. Full of tips and tricks to help you make the best pancakes.
Table of Contents
- 1 Prepping Your Sea Bream for the Commercial Oven
- 2 Scaling and Gutting: Efficiency and Precision
- 3 Marinating and Seasoning: Balancing Flavor Profiles
- 4 Commercial Oven Settings: Convection vs. Standard
- 5 Optimal Cooking Times for Sea Bream
- 6 Plating and Presentation: Enhancing the Dining Experience
- 7 Troubleshooting Common Issues: Dryness, Overcooking, Unevenness
- 8 Scaling Up: Batch Cooking for High Volume
- 9 Pairing with Sides and Sauces: Complementary Flavors
- 10 Sustainability and Sourcing: Responsible Seafood Choices
- 11 Closing Thoughts: Mastering Sea Bream in Your Commercial Kitchen
- 12 FAQ
Alright, let’s talk sea bream. Specifically, how to nail that perfect oven-baked sea bream in a commercial kitchen setting. It’s something I’ve wrestled with – moving from smaller, home-style cooking to the high-volume, high-pressure environment of a professional kitchen. And honestly, sea bream, while seemingly simple, can be a bit of a diva. Get it right, and it’s flaky, flavorful, and a real crowd-pleaser. Get it wrong… well, you’ve got a rubbery, overcooked (or worse, undercooked) mess that’s going straight back to the kitchen. This article is all about avoiding that scenario. We’ll cover everything from selecting the right fish to precise cooking times and temperatures, all tailored for the demands of a busy commercial kitchen. I’m Sammy, by the way, an editor here at Chefsicon.com. I’m coming at this with years of marketing experience and a deep, abiding love for all things food. This isn’t just about following a recipe; it’s about understanding the *why* behind each step.
My journey with commercial cooking started when I relocated from the Bay Area to Nashville. The food scene here is incredible, a real melting pot of flavors and styles. It forced me to up my game, to think about consistency and efficiency in ways I never had to before. And one of the first things I learned? Precision is key. With fish, especially delicate ones like sea bream, there’s little room for error. You can’t just ‘eyeball’ it like you might at home. You need to know your ovens, your fish, and your timings. Luna, my rescue cat, might appreciate a slightly overcooked piece of fish, but restaurant patrons? Not so much.
This guide is designed to give you that precision. We’re going to dive deep into the specifics of cooking sea bream in a commercial oven, covering everything from selecting the best quality fish to troubleshooting common problems. Think of it as your go-to resource for consistently delivering perfectly cooked sea bream, every single time. Whether you’re running a bustling seafood restaurant, a high-end hotel kitchen, or even a busy catering operation, the principles we’ll discuss here will apply. We’ll focus on practical, actionable advice that you can implement immediately, helping you improve your efficiency, reduce waste, and, most importantly, delight your customers. Let’s get started! We’re not just cooking fish; we’re crafting an experience.
Prepping Your Sea Bream for the Commercial Oven
Sourcing and Selecting the Right Fish
Before we even get to the oven, the success of your sea bream dish hinges on the quality of the fish itself. In a commercial setting, this means establishing a reliable relationship with a reputable seafood supplier. You need someone who understands your needs – consistent size, freshness, and sustainable sourcing. Look for sea bream with bright, clear eyes, firm flesh that springs back when touched, and a fresh, sea-like smell (not fishy!). If you’re buying whole fish, check the gills – they should be bright red, not dull or brown. I always ask my supplier about the origin of the fish, how it was caught, and when it was delivered. This information not only helps you ensure quality but also allows you to tell a story to your customers, adding value to the dish. It’s something I’ve learned from observing Nashville’s farm-to-table scene – transparency matters.
Consider the size and cut of the sea bream you’ll be using. Are you serving whole fish, fillets, or portions? This will directly impact your cooking time and method. For whole fish, consistency in size is crucial for even cooking across multiple orders. If you’re using fillets, ensure they’re uniformly thick. In a busy kitchen, pre-portioned fillets can save valuable prep time, but make sure your supplier is handling them with care to avoid damage. Also, think about the volume you’ll need. Are you running a sea bream special, or is it a regular menu item? Accurate forecasting will help you minimize waste and ensure you always have enough on hand to meet demand. This is where good inventory management systems really come into play.
Another crucial aspect is proper storage. Once the sea bream arrives, it needs to be stored correctly to maintain its freshness. Ideally, you should use it within a day or two of delivery. If you need to store it longer, use a dedicated seafood refrigerator, maintaining a temperature between 30°F and 38°F (-1°C and 3°C). Place the fish on a bed of ice, and make sure it’s not in direct contact with the ice, as this can damage the flesh. Properly draining the ice melt is also critical. Sloppy storage can quickly ruin even the highest quality fish, leading to waste and potential food safety issues.
Finally, consider the seasonality of sea bream. While it’s often available year-round, there may be times when the quality is better or the price is more favorable. Knowing these peak seasons can help you plan your menu and offer the best possible product to your customers. Talk to your supplier; they should be able to provide this information. It’s all about building that relationship and leveraging their expertise.
Scaling and Gutting: Efficiency and Precision
Mastering the Technique
Scaling and gutting a sea bream might seem basic, but in a commercial kitchen, speed and precision are paramount. You need a system that’s efficient, minimizes waste, and ensures a clean, presentable fish. First, make sure you have the right tools: a sharp scaling knife or a dedicated fish scaler, a good quality boning knife, and a clean, sanitized work surface. I prefer a stainless steel table for easy cleaning and to prevent cross-contamination. Start by scaling the fish under cold, running water. This helps to remove the scales more easily and prevents them from flying everywhere. Hold the fish firmly by the tail and use short, sharp strokes with the scaler, working from tail to head. Be thorough, but gentle – you don’t want to tear the skin.
Next, gutting. Make a shallow incision along the belly of the fish, from the vent to the gills. Be careful not to cut too deep, or you’ll puncture the intestines. Use your fingers or the back of your knife to gently scoop out the guts. Remove the gills by cutting them away at the base. Rinse the cavity thoroughly under cold water to remove any remaining blood or debris. Some chefs prefer to leave the head and tail on for presentation, while others remove them. This is a matter of preference and menu style, but consistency is key. If you’re removing the head, make a clean cut just behind the gills. If you’re removing the tail, cut it straight across.
The Importance of a Clean Cavity
A clean cavity is not just about aesthetics; it’s crucial for flavor and food safety. Any remaining blood or viscera can impart a bitter taste and accelerate spoilage. After gutting, double-check the cavity for any lingering bits. Use a small brush or your fingers to remove any stubborn pieces. Rinse the cavity thoroughly, and pat it dry with paper towels. This step is often overlooked, but it makes a significant difference in the final product. A dry cavity will cook more evenly and help to prevent the fish from becoming soggy.
In a high-volume kitchen, efficiency is everything. Develop a system for scaling and gutting that minimizes wasted movement. Some kitchens have a dedicated prep station for this task, with one person responsible for scaling and another for gutting. This assembly-line approach can significantly speed up the process. Also, consider the timing. Ideally, you should scale and gut the fish as close to cooking time as possible. If you need to prep in advance, store the cleaned fish properly, as we discussed earlier. Proper scaling and gutting are the foundation of a well-prepared sea bream. It’s a skill that requires practice, but mastering it is essential for any commercial kitchen.
Marinating and Seasoning: Balancing Flavor Profiles
Choosing the Right Marinade
Marinating sea bream can elevate its flavor, but it’s a delicate balance. You want to enhance the natural taste of the fish, not overpower it. In a commercial kitchen, you also need to consider consistency and efficiency. A simple marinade of olive oil, lemon juice, garlic, and herbs is a classic choice. The acidity of the lemon juice helps to tenderize the fish, while the olive oil adds moisture and richness. Fresh herbs like thyme, rosemary, or oregano complement the sea bream’s flavor beautifully. However, be mindful of the marinating time. Sea bream is a delicate fish, and over-marinating can make it mushy. For fillets, 30 minutes to an hour is usually sufficient. For whole fish, you can marinate for up to two hours, but I wouldn’t recommend going much longer. Am I being too cautious? Maybe, but I’d rather err on the side of under-marinating than risk ruining a batch of expensive fish.
Dry Rubs and Seasoning Blends
Another option is to use a dry rub or seasoning blend. This can be a quicker and more efficient method for a busy kitchen. A simple blend of salt, pepper, paprika, and garlic powder works well. You can also add other spices like cumin, coriander, or fennel seeds for a more complex flavor profile. The key is to use a light hand. You want to season the fish, not coat it. Apply the rub evenly to both sides of the fish, and gently press it into the flesh. For whole fish, make sure to season the cavity as well. One advantage of dry rubs is that they can help to create a crispier skin when the fish is cooked. This is because the dry spices absorb moisture from the surface of the fish.
Consistency and Flavor Control
In a commercial kitchen, consistency is paramount. Whatever marinade or seasoning you choose, make sure you have a standardized recipe and procedure. This ensures that every dish tastes the same, regardless of who prepares it. Use precise measurements, and document the recipe clearly. Train your staff thoroughly on the proper techniques. This might seem obvious, but it’s easy for inconsistencies to creep in, especially during a busy service. Also, consider the flavor profile of your overall menu. Does the sea bream dish complement your other offerings? Are the flavors balanced? It’s important to think about the dish in the context of the entire dining experience.
Taste-testing is essential. Before you add a new sea bream dish to the menu, do multiple test runs. Get feedback from your chefs, servers, and even some regular customers. Be open to making adjustments based on the feedback. It’s a collaborative process. The goal is to create a dish that is both delicious and consistently reproducible. And remember, the best seasoning enhances the natural flavor of the sea bream, it doesn’t mask it.
Commercial Oven Settings: Convection vs. Standard
Understanding Convection Ovens
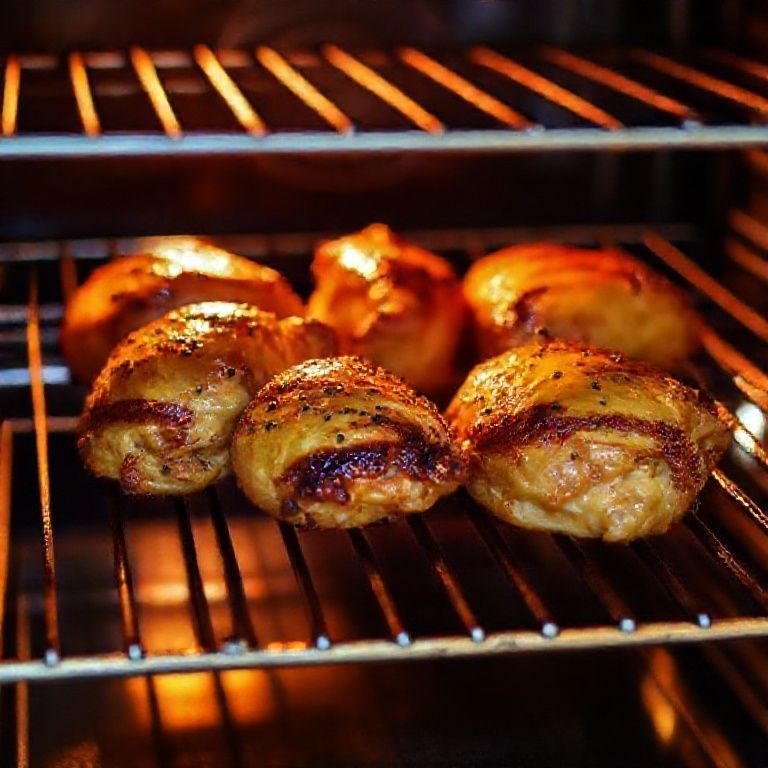
Convection ovens are a staple in many commercial kitchens, and for good reason. They cook food faster and more evenly than standard ovens, thanks to a fan that circulates hot air. This is particularly beneficial for fish like sea bream, which can easily dry out if overcooked. The circulating air helps to create a consistent temperature throughout the oven, reducing hot spots and ensuring even cooking. When using a convection oven for sea bream, you’ll typically need to reduce the cooking temperature by about 25°F (14°C) compared to a standard oven. You’ll also need to reduce the cooking time. The exact amount will depend on your specific oven and the size of the fish, but a good starting point is to reduce the time by about 25%. Keep a close eye on the fish, and use a thermometer to check for doneness.
Standard Ovens: Adjusting for Even Cooking
If you’re using a standard oven, you’ll need to make some adjustments to ensure even cooking. Standard ovens rely on radiant heat, which can create hot spots and uneven temperatures. To compensate for this, you may need to rotate the fish halfway through cooking. This helps to ensure that all sides of the fish are exposed to the heat evenly. You may also want to place a pan of water in the oven to create steam. This helps to keep the fish moist and prevent it from drying out. The cooking time will likely be longer than in a convection oven, so be patient and use a thermometer to check for doneness. I’ve found that preheating the oven thoroughly is even *more* crucial with standard ovens. Give it ample time to reach the desired temperature before putting the fish in.
Temperature and Time Considerations
Regardless of the type of oven you’re using, the key to perfectly cooked sea bream is controlling the temperature and time. For whole sea bream, a good starting point is 400°F (200°C) in a convection oven or 425°F (220°C) in a standard oven. The cooking time will vary depending on the size of the fish, but a general guideline is 10-12 minutes per pound (450g) in a convection oven and 12-15 minutes per pound in a standard oven. For fillets, the cooking time will be shorter, typically 6-8 minutes in a convection oven and 8-10 minutes in a standard oven. These are just starting points, though. The best way to determine doneness is to use a reliable meat thermometer. Insert the thermometer into the thickest part of the fish, avoiding the bone. The internal temperature should reach 145°F (63°C) for safe consumption. However, some chefs prefer to cook sea bream to a slightly lower temperature, around 135°F (57°C), for a moister texture. This is a matter of preference, but be aware of the food safety guidelines in your area. It’s that constant tension between perfect texture and absolute safety – a tightrope walk, really.
It’s also a good idea to keep a detailed log of your cooking times and temperatures. Every commercial oven is slightly different, and these logs will help you dial in the perfect settings for your specific equipment. Note the type of oven, the temperature, the cooking time, the size of the fish, and the final internal temperature. Over time, this data will become invaluable, allowing you to consistently produce perfectly cooked sea bream.
Optimal Cooking Times for Sea Bream
Whole Fish Cooking Times
As we’ve touched upon, cooking times for whole sea bream depend heavily on the size of the fish and the type of oven. But let’s get more specific. A 1-pound whole sea bream will typically take around 10-12 minutes in a convection oven at 400°F (200°C) and 12-15 minutes in a standard oven at 425°F (220°C). For a 2-pound fish, increase the time to about 18-20 minutes in a convection oven and 20-25 minutes in a standard oven. These are estimates, and using a thermometer is always the most accurate way to determine doneness. Remember, you’re aiming for an internal temperature of 145°F (63°C) for safety, or slightly lower if you prefer a moister texture. It’s also important to consider the ‘carryover cooking’ effect. The fish will continue to cook for a few minutes after you remove it from the oven, so you can pull it out when it’s a few degrees below your target temperature.
Fillet Cooking Times
Sea bream fillets cook much faster than whole fish, making them a popular choice in busy commercial kitchens. A 6-8 ounce fillet will typically take only 6-8 minutes in a convection oven at 400°F (200°C) and 8-10 minutes in a standard oven at 425°F (220°C). Again, these are guidelines, and the thickness of the fillet will affect the cooking time. Thicker fillets will take slightly longer, while thinner fillets may cook even faster. Be especially vigilant with fillets, as they can easily overcook and become dry. Use a thermometer, and check for flakiness with a fork. The flesh should be opaque and flake easily, but still retain its moisture. I find that with fillets, visual cues are almost as important as the thermometer reading. You get a feel for it after a while.
Adjusting for Different Sizes and Thicknesses
In a commercial kitchen, you’ll likely be dealing with sea bream of varying sizes and thicknesses. It’s crucial to have a system for adjusting your cooking times accordingly. One approach is to group similar-sized fish together. This allows you to cook them at the same time and achieve consistent results. Another approach is to use a staggered cooking method. Start with the larger fish, and then add the smaller fish to the oven later. This requires careful timing and organization, but it can be very efficient. Always use a thermometer to check for doneness, and keep detailed records of your cooking times and temperatures. This will help you refine your process and develop a consistent approach for different sizes of fish.
The Importance of Resting Time
Resting time is often overlooked, but it’s an essential step in cooking any type of meat or fish. After you remove the sea bream from the oven, let it rest for 5-10 minutes before serving. This allows the juices to redistribute throughout the fish, resulting in a moister and more flavorful product. During resting, the internal temperature of the fish will continue to rise slightly (carryover cooking). Cover the fish loosely with foil to keep it warm. Resting time also gives you a buffer, allowing you to finish other components of the dish without worrying about the fish overcooking. It’s a small step that makes a big difference in the final quality of the sea bream.
Plating and Presentation: Enhancing the Dining Experience
Choosing the Right Plate
The presentation of your sea bream is just as important as the taste. In a commercial setting, plating needs to be both visually appealing and efficient. Start by choosing the right plate. A white or light-colored plate will make the fish stand out. Consider the size and shape of the plate in relation to the portion size. You want the plate to look full, but not overcrowded. Avoid plates with busy patterns that might distract from the fish. I’m a big fan of simple, elegant plating. Let the food speak for itself.
Garnishing and Sauce Techniques
Garnishes should complement the flavor of the sea bream and add visual interest. Fresh herbs like parsley, chives, or dill are a classic choice. A wedge of lemon or lime adds a pop of color and a burst of acidity. You can also use edible flowers, microgreens, or colorful vegetables to create a more elaborate presentation. But remember, less is often more. Don’t overdo the garnishes, or they’ll detract from the main attraction. The sauce should enhance the flavor of the fish, not overpower it. A simple beurre blanc, a lemon-butter sauce, or a light herb vinaigrette are all good options. Apply the sauce sparingly, either under the fish or drizzled around it. Avoid covering the fish completely, as you want the crispy skin to be visible. I think it’s helpful to have a ‘plating guide’ for your kitchen staff, a visual example of how the finished dish should look. This ensures consistency, even during a busy service.
Creating Visual Appeal
Think about the overall composition of the plate. Use height and texture to create visual interest. You can stack the fish on top of a bed of vegetables, or use a sauce to create a swirl pattern. Consider the colors and shapes of the different elements. A vibrant green vegetable, a bright red sauce, and the white flesh of the sea bream can create a striking contrast. Use odd numbers of elements – three sprigs of herbs, five dots of sauce – as this is generally more pleasing to the eye. Step back and look at the plate from the diner’s perspective. Does it look appealing? Is it balanced? Is it something you’d be excited to eat? These are the questions I ask myself every time I plate a dish.
Practice makes perfect. The more you plate sea bream, the better you’ll become at creating visually appealing dishes. Experiment with different techniques, and don’t be afraid to try new things. But always keep in mind the principles of good plating: balance, color, texture, and simplicity. And remember, the goal is to enhance the dining experience, not just to make the food look pretty.
Troubleshooting Common Issues: Dryness, Overcooking, Unevenness
Dealing with Dryness
Dry sea bream is a common problem, especially in a commercial kitchen where ovens can be unforgiving. The key to preventing dryness is to retain moisture throughout the cooking process. Make sure you’re not overcooking the fish – use a thermometer! Marinating the fish before cooking can also help to add moisture. If you’re using a standard oven, placing a pan of water in the oven to create steam can make a big difference. Basting the fish with butter or oil during cooking can also help to keep it moist. And don’t forget the resting time, which allows the juices to redistribute. If you do end up with slightly dry fish, a flavorful sauce can help to compensate.
Preventing Overcooking
Overcooked sea bream is rubbery and unappetizing. The best way to prevent overcooking is to use a reliable thermometer and monitor the internal temperature closely. Remember, the fish will continue to cook after you remove it from the oven, so pull it out a few degrees below your target temperature. Pay attention to the cooking times, and adjust them based on the size and thickness of the fish. If you’re using a convection oven, remember to reduce the temperature and cooking time compared to a standard oven. And keep detailed records of your cooking times and temperatures to help you fine-tune your process. It’s a constant learning process, really. Even after years, I’m still tweaking and adjusting.
Addressing Uneven Cooking
Uneven cooking can be caused by hot spots in the oven, inconsistent fish size, or improper placement in the oven. If you’re using a standard oven, rotate the fish halfway through cooking to ensure even exposure to the heat. Make sure you’re not overcrowding the oven, as this can restrict airflow and lead to uneven cooking. Use a baking sheet or pan that’s appropriate for the size of the fish. If you’re cooking multiple fish at once, make sure they’re evenly spaced. And if you’re dealing with fish of different sizes, group them accordingly or use a staggered cooking method.
If you’re consistently experiencing uneven cooking, it might be a problem with your oven. Have it checked by a qualified technician to make sure it’s functioning properly. Sometimes, it’s not you, it’s the equipment!
Scaling Up: Batch Cooking for High Volume
Organizing Your Workflow
Batch cooking sea bream in a commercial kitchen requires careful planning and organization. Start by assessing your demand. How many orders of sea bream do you typically sell per service? This will determine the size of your batches. Break down the cooking process into stages: prepping, seasoning, cooking, and resting. Assign specific tasks to different members of your kitchen staff. This assembly-line approach can significantly increase efficiency. Use timers and checklists to keep track of each batch. This helps to prevent overcooking and ensures consistency. I find it’s helpful to have a designated ‘sea bream station’ in the kitchen, with all the necessary equipment and ingredients readily available.
Maintaining Consistency Across Batches
Consistency is crucial when batch cooking. Use standardized recipes and procedures for every step of the process. Make sure your staff is thoroughly trained on the proper techniques. Use the same type of oven, the same temperature, and the same cooking times for each batch. Monitor the internal temperature of the fish regularly to ensure it’s cooked to perfection. And keep detailed records of your cooking times and temperatures. This data will help you identify any inconsistencies and make adjustments as needed. Taste-test each batch to ensure the flavor and texture are consistent. It’s a bit like conducting an orchestra – every instrument needs to be in tune.
Utilizing Holding Equipment
Holding equipment, such as warming ovens or heat lamps, can be useful for keeping cooked sea bream warm until service. However, it’s important to use this equipment carefully, as it can dry out the fish if not used correctly. Set the holding equipment to a low temperature, typically around 140°F (60°C). Don’t hold the fish for too long, ideally no more than 30 minutes. If you need to hold it for longer, consider undercooking the fish slightly and finishing it to order. This will ensure the best possible quality. Another option is to use a sous vide technique to hold the fish at a precise temperature. This can be particularly effective for maintaining moisture and preventing overcooking.
Batch cooking is a balancing act. You need to be efficient enough to meet demand, but you also need to maintain the quality and consistency of your product. With careful planning, organization, and attention to detail, you can successfully batch cook sea bream and deliver a delicious, perfectly cooked dish to every customer.
Pairing with Sides and Sauces: Complementary Flavors
Classic Pairings
Sea bream has a delicate, slightly sweet flavor that pairs well with a variety of sides and sauces. Classic pairings include roasted vegetables, such as asparagus, zucchini, or bell peppers. The slight char from roasting complements the flavor of the fish. Simple salads with a light vinaigrette are another good option. The acidity of the vinaigrette cuts through the richness of the fish. Rice pilaf or couscous can add a hearty element to the dish. And of course, potatoes – roasted, mashed, or in a gratin – are always a crowd-pleaser. Think Mediterranean flavors – lemon, garlic, herbs, olive oil. These ingredients enhance the natural taste of the sea bream without overpowering it.
Creative Combinations
If you want to get more creative, consider pairing sea bream with unexpected flavors. A fruit salsa, such as mango or pineapple, can add a tropical twist. A spicy chutney or relish can provide a contrasting kick. A creamy risotto or polenta can offer a comforting counterpoint to the flaky fish. Experiment with different herbs and spices, such as fennel, coriander, or saffron. The key is to find flavors that complement the sea bream without overwhelming it. Think about texture as well. A crunchy element, such as toasted nuts or seeds, can add a nice contrast to the soft flesh of the fish. I’m always on the lookout for new and interesting flavor combinations. It’s one of the things I love most about the Nashville food scene – there’s always something new to discover.
Sauce Considerations
The sauce can make or break a sea bream dish. A simple beurre blanc, made with butter, white wine, and shallots, is a classic choice. A lemon-butter sauce, with a touch of garlic and herbs, is another winner. A light herb vinaigrette, made with olive oil, lemon juice, and fresh herbs, can add a bright, refreshing note. For a richer sauce, consider a hollandaise or a béarnaise. But use these sparingly, as they can easily overpower the delicate flavor of the fish. Avoid heavy, creamy sauces, as they can make the dish feel too heavy. The sauce should complement the fish, not compete with it.
In a commercial kitchen, it’s important to have a few versatile sauces that can be used with multiple dishes. This can help to streamline your prep and reduce waste. But make sure you have at least one sauce that is specifically designed to pair with sea bream. And always taste-test your sauces to ensure they’re balanced and flavorful.
Sustainability and Sourcing: Responsible Seafood Choices
Understanding Seafood Sustainability
Sustainability is a growing concern in the food industry, and for good reason. Overfishing and unsustainable fishing practices are threatening our oceans and the future of seafood. As chefs and restaurant operators, we have a responsibility to make informed choices about the seafood we serve. Look for sea bream that is certified sustainable by a reputable organization, such as the Marine Stewardship Council (MSC) or the Aquaculture Stewardship Council (ASC). These certifications ensure that the fish has been sourced from a well-managed fishery or farm that meets certain environmental standards. Ask your supplier about the origin of the fish and the fishing methods used. Wild-caught sea bream can be a sustainable choice if it’s sourced from a well-managed fishery. Farmed sea bream can also be sustainable, but it’s important to choose farms that use responsible practices.
Supporting Local and Regional Fisheries
Whenever possible, try to source sea bream from local or regional fisheries. This supports local economies and reduces the carbon footprint associated with transportation. It also allows you to build relationships with your suppliers and learn more about the fishing practices in your area. Local seafood is often fresher, as it hasn’t traveled as far. This can make a big difference in the quality and flavor of the fish. I’ve found that customers appreciate knowing where their food comes from. It adds value to the dish and creates a connection to the local community. It’s part of that ‘story’ I mentioned earlier.
Communicating Sustainability to Customers
If you’re making an effort to source sustainable sea bream, let your customers know! Include information on your menu about the origin of the fish and any certifications it has. Train your servers to answer questions about your sourcing practices. You can also use signage or table tents to highlight your commitment to sustainability. Customers are increasingly interested in sustainable food choices, and they’re often willing to pay a premium for it. Communicating your efforts can build trust with your customers and enhance your restaurant’s reputation. It shows that you care about more than just profit – you care about the planet. Am I getting preachy? Maybe a little, but I genuinely believe this is important.
Sustainability is an ongoing journey, not a destination. There’s always more to learn and more to do. Stay informed about the latest developments in sustainable seafood, and be willing to adapt your sourcing practices as needed. It’s a complex issue, but it’s one that we all need to address. By making responsible choices, we can help to ensure that sea bream and other seafood are available for generations to come.
Closing Thoughts: Mastering Sea Bream in Your Commercial Kitchen
So, there you have it – a deep dive into the art and science of cooking sea bream in a commercial kitchen. We’ve covered everything from sourcing and prepping to plating and presentation, with a healthy dose of troubleshooting and sustainability thrown in. I hope you’ve found this guide helpful, and that it’s given you some new insights and techniques to try in your own kitchen. Remember, cooking sea bream, like any culinary skill, is a journey of continuous learning and improvement. Don’t be afraid to experiment, to make mistakes, and to learn from them. The key is to be meticulous, to pay attention to detail, and to strive for consistency. And most importantly, to have fun! Cooking should be a joy, not a chore. Embrace the challenge, and enjoy the process of creating delicious, perfectly cooked sea bream for your customers.
My challenge to you is this: take one thing from this guide – a new technique, a new seasoning idea, a new sourcing practice – and implement it in your kitchen this week. See what difference it makes. Then, come back and tell me about it! I’m always learning, too, and I’d love to hear your experiences. The culinary world is a collaborative one, and we all benefit from sharing our knowledge and insights. And who knows, maybe your feedback will inspire my next article! The possibilities are endless, and that’s what makes this profession so exciting.
Ultimately, the question isn’t just about *how* to cook sea bream, but *why* we cook it the way we do. What are we trying to achieve? What experience are we trying to create for our customers? It’s about more than just following a recipe; it’s about understanding the principles behind it, and about connecting with the food on a deeper level. It’s about the craft, the passion, and the constant pursuit of perfection… even if perfection is, ultimately, unattainable. But we can sure try, right?
FAQ
Q: What’s the biggest mistake people make when cooking sea bream in a commercial oven?
A: Overcooking! Sea bream is a delicate fish, and it’s easy to dry it out. The biggest mistake is not using a thermometer and relying solely on visual cues or estimated cooking times. Invest in a good quality thermometer, and monitor the internal temperature closely.
Q: Can I use frozen sea bream in a commercial kitchen?
A: Yes, you can, but fresh is always preferred for the best flavor and texture. If you must use frozen, make sure it’s properly thawed before cooking. Thaw it slowly in the refrigerator overnight, never at room temperature. And be aware that frozen sea bream may release more moisture during cooking, so you may need to adjust your cooking times and techniques accordingly.
Q: How do I prevent the sea bream skin from sticking to the pan?
A: Make sure the pan is hot before you add the fish. Use enough oil or butter to coat the bottom of the pan. If you’re cooking fillets skin-side down, don’t move the fish until the skin has had a chance to crisp up. This will help to prevent sticking. You can also use a non-stick pan or parchment paper.
Q: What’s the best way to tell if sea bream is cooked through?
A: The most reliable way is to use a thermometer. Insert it into the thickest part of the fish, avoiding the bone. The internal temperature should reach 145°F (63°C) for safe consumption. You can also check for flakiness with a fork. The flesh should be opaque and flake easily, but still retain its moisture.
@article{sea-bream-oven-time-commercial-kitchen-cooking-tips,
    title   = {Sea Bream Oven Time: Commercial Kitchen Cooking Tips},
    author  = {Chef's icon},
    year    = {2025},
    journal = {Chef's Icon},
    url     = {https://chefsicon.com/commercial-kitchen-guide-sea-bream-oven-time-cooking-tips/}
}