The Best Fluffy Pancakes recipe you will fall in love with. Full of tips and tricks to help you make the best pancakes.
Table of Contents
- 1 Decoding the Chill: Your Guide to Walk-In Systems
- 1.1 First Things First: Cooler vs. Freezer – What’s the Difference?
- 1.2 Built to Spec or Off the Shelf? Modular vs. Custom Walk-Ins
- 1.3 The Heart of the Cold: Refrigeration Systems Explained
- 1.4 Panel Power: Insulation and Finishes Matter
- 1.5 Floors: To Build In or Not To Build In?
- 1.6 Size Matters: Don’t Get Boxed In (or Out)
- 1.7 Getting it Installed: Not a Weekend DIY Project
- 1.8 Bells and Whistles: Essential Features and Accessories
- 1.9 Keep Your Cool: The Importance of Regular Maintenance
- 1.10 Saving Energy (and Money): Efficiency Considerations
- 2 Wrapping Up the Cold Facts
- 3 FAQ
Alright, let’s talk about something that’s literally the backbone of any serious food operation, yet often gets overlooked until it breaks down: walk-in coolers and freezers. I’m Sammy, by the way, writing for Chefsicon.com. Since moving to Nashville from the Bay Area, I’ve been diving deep into the food scene here – not just the amazing restaurants, but the nuts and bolts of how they operate. And trust me, behind every great dish, there’s usually some serious cold storage infrastructure working tirelessly. It’s funny, as someone who spent years in marketing, I’m wired to see the systems behind things, and the flow of food from supplier to storage to prep to plate is a fascinating logistical dance.
Before I really got into the commercial side of things, my idea of bulk refrigeration was stuffing my apartment fridge after a big grocery run, maybe using a chest freezer in the garage back in Cali. Cute, right? But scaling that up for a restaurant, hotel, or even a busy cafe? It’s a whole different universe. These aren’t just big refrigerators; they’re precisely engineered environments crucial for food safety, inventory management, and ultimately, profitability. Ignoring the details of your walk-in setup is like trying to build a house on a shaky foundation. It might stand for a bit, but problems are inevitable. Luna, my rescue cat, seems to understand the importance of a well-stocked (and appropriately chilled) food supply, though her demands are slightly less complex.
So, what’s the deal with these giant cold boxes? Why are they so important, and what do you actually need to know if you’re planning a kitchen, upgrading existing equipment, or just trying to understand why the chef keeps muttering about temperature logs? We’re going to break it down. Think of this as your essential guide – we’ll cover the types, the construction, the critical refrigeration bits, sizing, installation, maintenance, efficiency… the works. Maybe I should clarify… this isn’t just for chefs or owners; understanding this stuff gives you a real appreciation for the cold chain that brings food to your table. Let’s get into the chilly details.
Decoding the Chill: Your Guide to Walk-In Systems
First Things First: Cooler vs. Freezer – What’s the Difference?
Okay, this might seem basic, but it’s fundamental. A walk-in cooler (often called a walk-in refrigerator) is designed to keep perishable food items cold, typically holding temperatures between 35°F and 41°F (around 2°C to 5°C). Think fresh produce, dairy, meats intended for use within a few days, prepared sauces, etc. The goal is to slow down bacterial growth and maintain freshness. A walk-in freezer, on the other hand, operates at much lower temperatures, usually 0°F (-18°C) or even colder, down to -10°F or -20°F (-23°C to -29°C) for certain applications like ice cream or rapid freezing. This is for long-term storage of frozen goods – meats, seafood, vegetables, pre-made meals. The key difference lies in the refrigeration system’s capacity and the insulation’s thickness required to maintain these distinct temperature ranges efficiently. You can also find combination units, with separate cooler and freezer compartments sharing a dividing wall, which can be a space-saver.
Built to Spec or Off the Shelf? Modular vs. Custom Walk-Ins
When you decide you need a walk-in, you generally have two main construction paths: modular or custom-built. Modular walk-ins are constructed from prefabricated panels that lock together. Think of them like industrial-strength Lego blocks. They come in standard sizes and configurations, making them generally faster to install and often more cost-effective upfront. The panels typically consist of insulation sandwiched between metal skins. This is great for straightforward spaces and predictable needs. However, what if you have an awkward space, like under a staircase or around existing structural columns? That’s where custom-built walk-ins shine. These are designed and constructed on-site to fit your exact spatial constraints and specific requirements. You get maximum space utilization, but it usually comes with a higher price tag and longer installation time. I’m torn between which is ‘better’… but ultimately, the best choice depends entirely on your space, budget, and operational needs. Modular offers speed and standardisation, while custom provides tailored perfection.
The Heart of the Cold: Refrigeration Systems Explained
Here’s where it gets a bit technical, but stick with me. The magic of cooling happens via the refrigeration system. The two main setups are self-contained systems and remote systems. A self-contained system has all the refrigeration components (condenser, compressor, evaporator coil) integrated directly into the walk-in unit, often mounted on the ceiling or a wall panel. It’s simpler to install – basically plug-and-play after assembly. The downside? It vents heat and noise directly into the surrounding area (usually the kitchen), which can make the workspace hotter and louder. Plus, maintenance access might be trickier. Is this the best approach? For smaller operations or simpler setups, maybe. But larger kitchens often prefer remote systems. Here, the noisy, heat-producing condensing unit and compressor are located outside the building (like on the roof or behind the kitchen) or in a dedicated mechanical room. Refrigerant lines run between this remote unit and the evaporator coil(s) inside the walk-in. This keeps the kitchen cooler, quieter, and often allows for larger, more efficient, and more easily serviceable units. It’s a more complex installation requiring specialized technicians but often pays off in the long run for busy environments. You also need to consider the refrigerant type – regulations are pushing away from older HFCs towards more environmentally friendly options like CO2 or propane, which impacts system design and cost.
Panel Power: Insulation and Finishes Matter
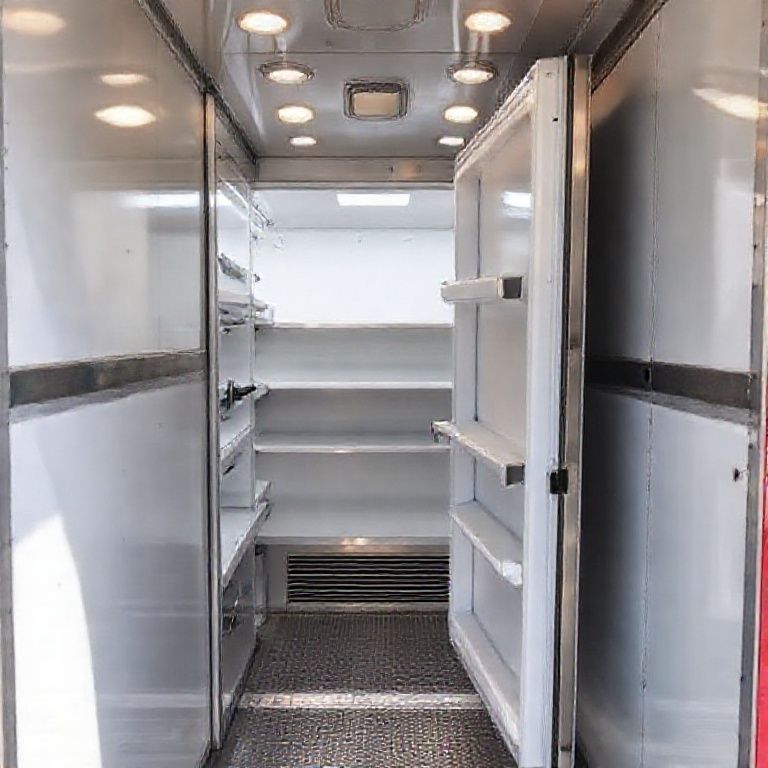
The walls, ceiling, and floor of a walk-in aren’t just simple panels; they’re sophisticated insulators. The effectiveness of a walk-in hinges on its ability to keep the cold in and the heat out. This is achieved through thick insulation sandwiched between metal skins. The most common insulation material nowadays is polyurethane foam, known for its high R-value (a measure of thermal resistance) per inch. Older or cheaper units might use expanded polystyrene (EPS), which generally offers a lower R-value for the same thickness. Higher R-value means better insulation, less work for the refrigeration system, and lower energy bills. Panel thickness typically ranges from 4 inches for coolers to 5 or even 6 inches for freezers to handle the more extreme temperature difference. The metal skins come in various finishes: galvanized steel (G90) is a common standard, offering good corrosion resistance. Aluminum is lighter and resists corrosion well, often used for ceilings or in specific environments. Stainless steel is the premium choice, especially for interiors, offering maximum durability, sanitation, and corrosion resistance, but it comes at a higher cost. The choice often depends on budget, the type of product stored, and local health codes.
Floors: To Build In or Not To Build In?
Walk-in floors are another critical component often requiring careful consideration. Many modular walk-ins come with an integrated insulated floor made of the same panel type as the walls. This ensures a continuous insulated envelope and is common for units installed on non-concrete surfaces or upper floors. They often feature reinforced materials like aluminum or stainless steel tread plate for durability under foot traffic and carts. However, in many ground-level installations, especially on existing concrete slabs, you might opt for a ‘floorless’ walk-in. In this case, the walk-in walls are installed directly onto the existing concrete floor, often using vinyl or metal screeds to create a seal at the base. The concrete slab itself provides the structural floor. Sometimes, insulation is laid down *before* the concrete slab is poured specifically for the walk-in area, or rigid insulation boards are placed over the existing slab inside the walk-in footprint before adding a finished floor surface. This requires careful site preparation to ensure the slab is level and properly insulated (or that the lack of floor insulation is acceptable for the intended temperature and energy goals). Freezer applications almost always require an insulated floor to prevent the ground underneath from freezing and potentially causing structural damage (frost heave).
Size Matters: Don’t Get Boxed In (or Out)
Choosing the right size for your walk-in is absolutely critical, and frankly, it’s where I see people make costly mistakes. Go too small, and you’ll constantly struggle with overcrowding, poor air circulation (leading to inconsistent temperatures and spoilage), and inefficient inventory management. It becomes a frustrating game of Tetris every time a delivery arrives. Go too big, and you’re paying to cool empty space, wasting significant energy and capital on an oversized unit and refrigeration system. So how do you find the Goldilocks zone? Key factors include: your maximum anticipated inventory volume (think pallets, boxes, shelves), the frequency of deliveries, the types of products being stored (bulk vs. individual items), required aisle space for movement and carts, and even future growth plans. Don’t just think about today; think about your peak season needs and where your business might be in 3-5 years. It’s wise to consult with suppliers or designers who can help calculate required cubic footage based on your menu, service volume, and operational flow. Remember to account for shelving space – the usable space is always less than the total internal volume.
Getting it Installed: Not a Weekend DIY Project
Let’s be crystal clear: installing a walk-in cooler or freezer is a job for professionals. Seriously. While modular units might seem straightforward, proper assembly, sealing panels correctly to prevent air leaks, and integrating the door are crucial for performance and efficiency. Then there’s the refrigeration system – especially remote systems involve handling refrigerants, running lines, and complex electrical wiring, all of which require licensed technicians. Site preparation is key: ensuring a level surface, adequate clearance around the unit (especially for airflow to condensing units), and providing the correct electrical service (voltage, phase, amperage all matter!) and potentially plumbing for condensate drains. Indoor self-contained units need good ventilation around them; remote units need proper placement outdoors or in a mechanical room. Oh, and don’t forget permits – building and sometimes health department permits are often required for walk-in installations. Trying to cut corners here will almost certainly lead to problems, void warranties, and could even create safety hazards.
Bells and Whistles: Essential Features and Accessories
Beyond the basic box and cooling system, several features and accessories significantly impact a walk-in’s functionality and efficiency. Shelving is paramount for organization and airflow; options range from epoxy-coated wire shelves (good airflow, rust-resistant) to solid polymer or stainless steel shelves (durable, easy to clean). Ensure the shelving is rated for the weight it needs to hold. Proper lighting is essential for visibility and safety – energy-efficient LED fixtures designed for cold, damp environments are the standard now. The door itself is critical: ensure it has a good seal, self-closing mechanisms (to prevent being left ajar), and perhaps a kick plate for durability. Strip curtains (clear vinyl strips hanging in the doorway) are a cost-effective way to reduce air exchange when the door is open, saving energy. Temperature monitoring is non-negotiable for food safety – digital thermometers with external displays are standard, and alarm systems that notify you of temperature deviations are highly recommended (and often required by health codes). For units without built-in floors on concrete, ramps can ease access for carts.
Keep Your Cool: The Importance of Regular Maintenance
A walk-in cooler or freezer is a significant investment, and like any hard-working equipment, it needs regular TLC to perform optimally and last longer. Neglecting maintenance is asking for trouble – inefficient operation, higher energy bills, potential breakdowns (often at the worst possible time), and compromised food safety. What does regular maintenance involve? It’s a mix of in-house tasks and professional servicing. Staff should regularly clean interior surfaces, check door seals for damage or gaps (the dollar bill test works – close the door on a bill, if you can pull it out easily, the seal is weak), ensure the door closes properly, and keep the area around the walk-in clear. Critically, the evaporator and condenser coils need to be kept clean; dust and grease buildup act as insulators, forcing the system to work harder. Condensate drain lines must be kept clear to prevent water backup and potential icing. Beyond that, scheduling periodic professional maintenance (say, quarterly or semi-annually) is crucial. Technicians will perform deeper cleaning of coils, check refrigerant levels, inspect electrical components, test safety controls, and look for potential issues before they become major failures. Think of it as preventative healthcare for your cold storage.
Saving Energy (and Money): Efficiency Considerations
In today’s world, energy efficiency isn’t just nice to have; it’s a business imperative. Walk-in coolers and freezers are among the biggest energy consumers in a commercial kitchen, running 24/7. Thankfully, manufacturers have made significant strides in efficiency. Key areas to look at include: high-quality insulation panels (higher R-value), energy-efficient doors with tight seals and auto-closers, LED lighting (uses less energy, produces less heat), and advanced refrigeration components. Look for systems with Electronically Commutated (EC) motors for evaporator and condenser fans, which are much more efficient than traditional shaded-pole motors. Variable Frequency Drives (VFDs) can further optimize fan and compressor performance. For remote systems, consider designs that reclaim heat from the condenser for water heating. While high-efficiency units might have a slightly higher upfront cost, the payback period through reduced energy consumption can be surprisingly short. Plus, some utility companies offer rebates for purchasing energy-efficient commercial refrigeration equipment, definitely something worth investigating. It’s not just about being green; it’s about improving your bottom line.
Wrapping Up the Cold Facts
So, there you have it – a whirlwind tour of the world of walk-in coolers and freezers. It’s way more than just a big cold box, right? From the type of construction (modular vs. custom) and the intricacies of refrigeration systems (self-contained vs. remote) to the crucial details of insulation, flooring, sizing, and essential accessories, every element plays a vital role. Getting these choices right from the start can save you headaches, money, and potentially your inventory down the line. It’s one of those foundational pieces of equipment that enables everything else in the kitchen to function smoothly and safely.
Thinking about it now, the sheer reliance we have on consistent, reliable cold storage in our food system is pretty staggering. These units are the silent guardians against spoilage and foodborne illness, the enablers of diverse menus and efficient operations. Maybe I should clarify… it’s easy to take them for granted until something goes wrong. Regular maintenance isn’t just a suggestion; it’s essential insurance for your investment and your business. And focusing on energy efficiency isn’t just trendy; it’s smart business that pays dividends every single day.
My challenge to you? If you’re in the industry, take a fresh look at your cold storage. Is it sized right? Is it maintained properly? Are there efficiency upgrades you could consider? If you’re just a curious food lover like me (and Sammy!), maybe next time you’re dining out, spare a thought for the complex systems working behind the kitchen doors to keep that food fresh and safe. It adds a whole new layer of appreciation, doesn’t it?
FAQ
Q: What’s the average lifespan of a walk-in cooler or freezer?
A: With proper installation and consistent maintenance, a good quality walk-in unit can last 15-20 years or even longer. However, the refrigeration system components (like compressors and fan motors) might need replacement sooner, perhaps around the 7-10 year mark depending on usage and maintenance.
Q: How much does a typical walk-in cooler cost?
A: This varies hugely based on size, type (cooler vs. freezer), construction (modular vs. custom), refrigeration system (self-contained vs. remote), features, and installation complexity. A small modular cooler might start around $5,000-$8,000, while larger or custom units, especially freezers or those with remote systems, can easily run $15,000-$30,000 or much more, not including installation costs which can also be significant.
Q: What’s the biggest mistake people make when buying a walk-in?
A: Improper sizing is probably the most common and costly mistake. Undersizing leads to operational nightmares and potential food safety issues, while oversizing wastes energy and capital. Taking the time to accurately assess current and future needs is critical. Another big mistake is skimping on installation or maintenance – trying to save money upfront often leads to much bigger expenses down the road.
Q: Can I use a walk-in cooler as a freezer just by turning the temperature down?
A: No, definitely not. Walk-in coolers and freezers are designed differently. Freezers require thicker insulation, more powerful refrigeration systems capable of reaching and maintaining sub-zero temperatures, and often heated elements around the door frame (anti-sweat heaters) to prevent freezing shut. A cooler’s system isn’t built for that kind of load and won’t reliably hold freezing temperatures; trying to force it will likely damage the equipment and won’t store food safely at freezer temperatures.
You might also like
- Choosing the Right Commercial Reach-In Refrigerator
- Commercial Ice Machine Buyer’s Guide
- Understanding HACCP for Commercial Kitchens
@article{walk-in-coolers-freezers-essential-restaurant-cold-storage,
    title   = {Walk-In Coolers & Freezers: Essential Restaurant Cold Storage},
    author  = {Chef's icon},
    year    = {2025},
    journal = {Chef's Icon},
    url     = {https://chefsicon.com/essential-guide-to-walk-in-coolers-and-freezers/}
}