The Best Fluffy Pancakes recipe you will fall in love with. Full of tips and tricks to help you make the best pancakes.
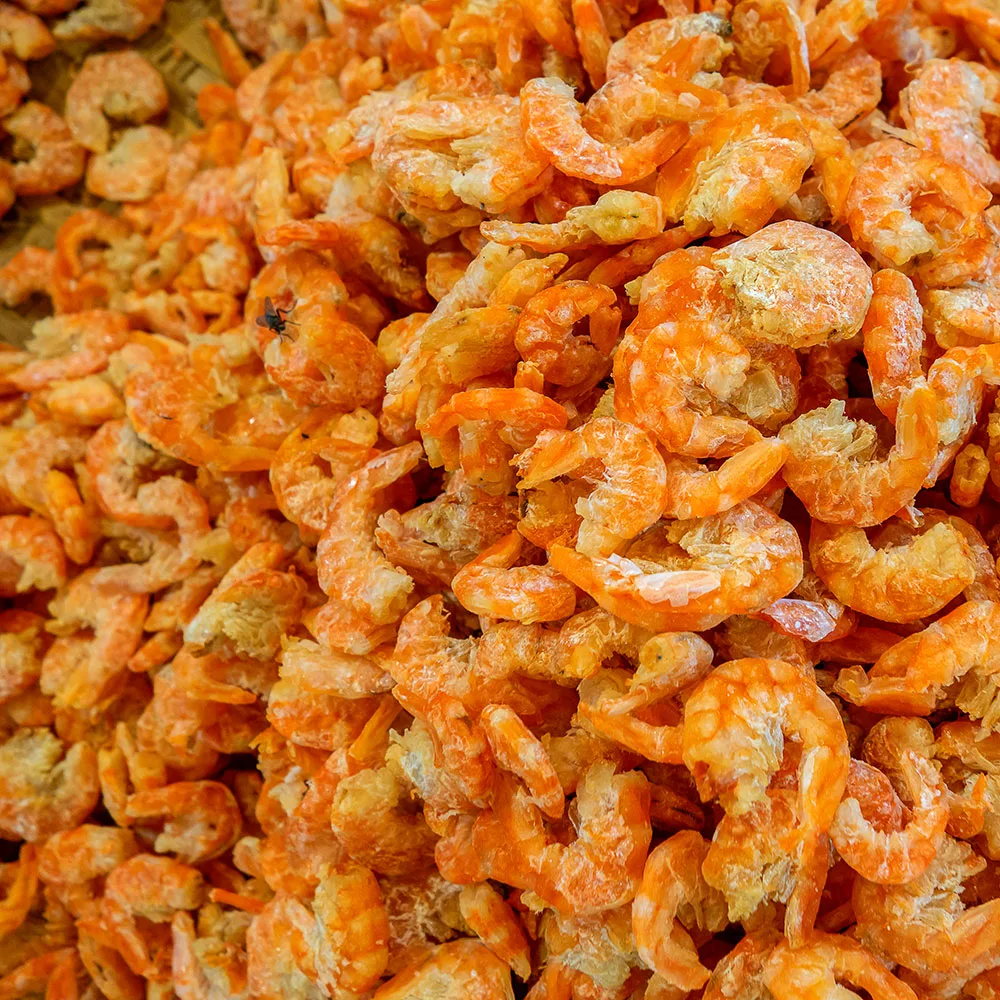
How to Store Dried Shrimp for Maximum Shelf Life in Commercial Kitchens
Let me tell you, there’s nothing worse than opening a bag of dried shrimp only to find it’s lost its punch, stale, lifeless, or worse, infested with critters. I learned this the hard way during my first week at a high-volume Southeast Asian restaurant in Nashville. The chef, a no-nonsense woman from Bangkok, took one sniff of my “freshly opened” batch and nearly threw me out of the kitchen. “You call this umami bomb?” she scoffed. “This is sad shrimp.” That was the day I realized storing dried shrimp isn’t just about tossing it in a pantry and hoping for the best. It’s a science, an art, and, if you’re not careful, a fast track to wasting money and ruining dishes.
So, why does this matter? Dried shrimp is a powerhouse ingredient in commercial kitchens. It’s the secret weapon in everything from Thai tom yum soup to Filipino kare-kare, adding a deep, briny complexity that fresh shrimp just can’t match. But here’s the catch: it’s also highly perishable if stored improperly. Moisture, heat, light, and pests can turn your prized stash into a mushy, flavorless mess, or worse, a health code violation waiting to happen. If you’re running a restaurant, catering business, or even a food truck, you can’t afford to get this wrong. A single bad batch can throw off an entire menu, disappoint customers, and eat into your profits.
In this guide, I’m going to walk you through everything I’ve learned, from the mistakes I’ve made (and trust me, there have been plenty) to the best practices used by top chefs and food scientists. We’ll cover the ideal storage conditions, the right containers, how to spot spoilage, and even how to revive dried shrimp that’s lost its mojo. By the end, you’ll know exactly how to keep your dried shrimp fresh, flavorful, and safe for as long as possible. And hey, if I can go from “sad shrimp guy” to someone who actually knows what they’re doing, so can you.
Ready? Let’s dive in.
The Science Behind Dried Shrimp: Why It Spoils and How to Stop It
What Happens When Dried Shrimp Goes Bad?
First, let’s talk about what we’re actually dealing with. Dried shrimp isn’t just shrimp that’s had the water sucked out of it, it’s a biological time bomb if you don’t treat it right. When shrimp is dried, the moisture content drops to around 10-15%, which is low enough to inhibit bacterial growth. But here’s the thing: that doesn’t mean it’s invincible. Even at low moisture levels, dried shrimp can still degrade in a few key ways:
- Oxidation: Fats in the shrimp react with oxygen, turning rancid. This is what gives old dried shrimp that off, fishy smell-like a beach at low tide, but not in a good way.
- Moisture Reabsorption: If stored in humid conditions, dried shrimp will suck up moisture like a sponge, creating the perfect environment for mold and bacteria. Ever seen dried shrimp with a white, fuzzy coating? That’s mold, and it’s a one-way ticket to the trash.
- Pest Infestation: Weevils, moths, and other pantry pests love dried shrimp. They’ll burrow in, lay eggs, and before you know it, you’ve got a full-blown infestation. (I’ve been there. It’s not pretty.)
- Flavor Degradation: Even if it’s not technically “spoiled,” dried shrimp can lose its potency over time. The glutamates and nucleotides that give it that umami punch break down, leaving you with something bland and one-dimensional.
So, how do you stop this from happening? It’s all about controlling the four horsemen of dried shrimp doom: oxygen, moisture, light, and temperature. Get those under control, and you’re golden. But if you neglect even one, you’re asking for trouble. I’ve seen kitchens where dried shrimp was stored in clear plastic bags under fluorescent lights, and let me tell you, the results were ot pretty. The shrimp looked fine at first glance, but the second you opened the bag, the smell hit you like a wall. It was like someone had taken the ocean, left it out in the sun for a week, and then bottled the stench. Not exactly the vibe you want in your kitchen.
Why Commercial Kitchens Struggle More Than Home Cooks
Now, you might be thinking, “I’ve stored dried shrimp at home for years and never had a problem.” And sure, home cooks have it easier in some ways. You’re probably buying smaller quantities, using it up faster, and storing it in a relatively stable environment. But commercial kitchens? We’re dealing with a whole different beast. Here’s why:
- Volume: You’re buying dried shrimp in bulk-5-pound bags, 10-pound bags, maybe even 25-pound drums if you’re a high-volume operation. That means more surface area for oxygen to work its magic, and more opportunities for moisture to sneak in.
- Environment: Commercial kitchens are hot, humid, and chaotic. Even if you’ve got a dedicated dry storage area, it’s probably near ovens, steamers, or dishwashers, all of which pump out heat and moisture. That’s a recipe for disaster if you’re not careful.
- Turnover: In a home kitchen, you might use dried shrimp once a month. In a restaurant, you could be going through a pound a day. That means you’re opening and closing containers constantly, exposing the shrimp to air, humidity, and potential contaminants every time.
- Pests: Commercial kitchens are a buffet for pests. Cockroaches, rodents, weevils, you name it, they’re probably lurking somewhere. And if they find your dried shrimp? Game over.
So, what’s the solution? You’ve got to be proactive. That means investing in the right storage solutions, monitoring your environment, and staying on top of inventory. It’s not rocket science, but it does require attention to detail. And honestly, that’s where a lot of kitchens fall short. They treat dried shrimp like it’s just another pantry staple, when in reality, it’s more like a high-maintenance diva that demands respect.
Choosing the Right Storage Containers: Your First Line of Defense
Why Your Container Matters More Than You Think
Let’s start with the basics: the container. This is your first line of defense against spoilage, and if you get it wrong, everything else is just damage control. I’ve seen kitchens use everything from zip-top bags to cardboard boxes to store dried shrimp, and let me tell you, most of them are doing it wrong. The right container can mean the difference between shrimp that lasts six months and shrimp that goes bad in six weeks.
So, what makes a good container for dried shrimp? Here’s what you should be looking for:
- Airtight Seal: Oxygen is the enemy. A good container should have a gasket or locking mechanism that creates a tight seal. No air in, no air out. Simple as that.
- Moisture Resistance: Even the best seal won’t help if the container itself is porous. Cardboard? No. Plastic that’s thin enough to bend? Also no. You want something sturdy and non-porous, like food-grade plastic, glass, or metal.
- Light Protection: Light, especially UV light, can accelerate oxidation. If your container is clear, you’re basically giving your shrimp a sunbath, and not in a good way. Opaque or tinted containers are the way to go.
- Pest-Proof: Weevils and moths can chew through thin plastic like it’s tissue paper. You need a container that’s thick enough to resist pests, or better yet, one that’s specifically designed to keep them out.
- Size Matters: Don’t use a 5-gallon bucket for a 1-pound bag of shrimp. The more air space in the container, the more oxygen there is to degrade your shrimp. Choose a container that’s just big enough to hold your shrimp with minimal extra space.
Now, let’s talk about the options. Here are the most common containers used in commercial kitchens, along with their pros and cons:
Option 1: Food-Grade Plastic Buckets with Gamma Seal Lids
These are the gold standard for bulk storage in commercial kitchens. You’ve probably seen them, those big white buckets with the screw-on lids that look like they could survive a nuclear apocalypse. Here’s why they’re great:
- Air-Tight: Gamma seal lids create a vacuum-like seal that keeps oxygen out. Once you screw that lid on, it’s not coming off without a fight.
- Durable: These buckets are thick, sturdy, and can handle being stacked or moved around without cracking.
- Pest-Proof: No pest is getting through a gamma seal lid. Even if they could chew through the plastic (which they can’t), the seal is too tight for them to squeeze in.
- Stackable: Space is always at a premium in a commercial kitchen. These buckets stack neatly, so you can maximize your storage real estate.
- Reusable: Unlike single-use bags, these buckets can be cleaned and reused for years.
But they’re not perfect. Here are the downsides:
- Bulky: If you’re storing small quantities, these buckets might be overkill. They take up a lot of space, even when empty.
- Not Light-Proof: Most food-grade buckets are white or clear, which means they don’t block light. You’ll need to store them in a dark place or wrap them in something opaque.
- Initial Cost: They’re not cheap. A single bucket with a gamma seal lid can run you $15-$20, and if you’re buying in bulk, that adds up. But trust me, it’s worth it in the long run.
If you’re going this route, make sure you’re buying food-grade buckets. Not all plastic is created equal, and you don’t want chemicals leaching into your shrimp. Look for buckets labeled “FDA-approved” or “USDA-approved.”
Option 2: Mylar Bags with Oxygen Absorbers
Mylar bags are another popular choice, especially for smaller quantities. They’re basically aluminum-lined plastic bags that block light, oxygen, and moisture. Here’s how they work:
- You place your dried shrimp in the bag.
- You add an oxygen absorber (more on these later).
- You seal the bag with a heat sealer or a strong zip-top closure.
The result? A near-perfect environment for long-term storage. Mylar bags are:
- Light-Proof: The aluminum lining blocks all light, which is great for preventing oxidation.
- Moisture-Proof: They’re impermeable to moisture, so humidity isn’t an issue.
- Flexible: You can store them flat or upright, which makes them great for tight spaces.
- Affordable: A pack of 10-20 Mylar bags will run you $10-$20, depending on the size.
But they’re not without their drawbacks:
- Pest Vulnerability: Mylar is tough, but it’s not indestructible. A determined pest can chew through it, especially if the bag isn’t sealed properly.
- Single-Use: Once you open a Mylar bag, it’s done. You can’t reseal it effectively, so you’ll need to transfer the shrimp to another container.
- Sealing Required: You need a heat sealer to get a proper seal. If you don’t have one, you’re relying on zip-top closures, which aren’t as reliable.
- Airtight: A properly sealed glass jar is as airtight as it gets. No oxygen, no moisture, no pests.
- Non-Porous: Glass doesn’t absorb odors or flavors, so your shrimp won’t pick up any funk from other ingredients.
- Visible: You can see what’s inside without opening the jar, which makes inventory management a breeze.
- Reusable: Glass jars last forever. Wash them, dry them, and they’re good to go.
- Fragile: Glass breaks. If you’re in a busy kitchen where things get bumped around, this might not be the best choice.
- Heavy: Glass is heavy, especially when you’re dealing with larger quantities. If you’re storing 5+ pounds of shrimp, you’ll need a lot of jars.
- Light Exposure: Clear glass doesn’t block light, so you’ll need to store them in a dark place or wrap them in something opaque.
If you’re using Mylar bags, make sure you’re also using oxygen absorbers. These little packets suck up any oxygen left in the bag, creating a nitrogen-rich environment that keeps your shrimp fresh. Without them, you’re not getting the full benefit of the Mylar.
Option 3: Glass Jars with Airtight Lids
Glass jars are a great option if you’re storing smaller quantities and want something that’s reusable, pest-proof, and easy to monitor. Mason jars with two-piece lids are a classic choice, but you can also find food-grade glass containers with clamp lids or screw-on tops. Here’s why they work:
But they’re not ideal for everyone:
If you go this route, make sure you’re using oxygen absorbers inside the jars. Even a tiny bit of oxygen can degrade your shrimp over time.
Option 4: Vacuum-Sealed Bags
Vacuum sealing is another solid option, especially if you’re dealing with smaller quantities or want something that’s space-efficient. Here’s how it works:
- You place your dried shrimp in a vacuum-seal bag.
- You use a vacuum sealer to suck out all the air.
- The machine seals the bag, creating an airtight environment.
The benefits:
- Oxygen-Free: Vacuum sealing removes nearly all the oxygen, which slows down oxidation.
- Compact: Vacuum-sealed bags can be stacked or stored flat, which saves space.
- Pest-Proof: No air means no pests. Even if they could chew through the bag (which is unlikely), there’s nothing inside for them to breathe.
The downsides:
- Single-Use: Like Mylar bags, vacuum-sealed bags are generally single-use. Once you open them, you’ll need to transfer the shrimp to another container.
- Equipment Required: You need a vacuum sealer, which is an added cost. If you’re not already using one in your kitchen, this might not be worth the investment.
- Not Light-Proof: Most vacuum-seal bags are clear, so you’ll need to store them in a dark place.
If you’re using vacuum sealing, make sure you’re also using oxygen absorbers for maximum shelf life. The vacuum sealer will remove most of the air, but the absorbers will take care of any residual oxygen.
Option 5: The “Don’t Do This” List
Now, let’s talk about what ot to use. Some containers are just asking for trouble. Here’s what to avoid:
- Zip-Top Plastic Bags: These are fine for short-term storage (a few days to a week), but they’re not airtight enough for long-term use. Oxygen and moisture will seep in, and pests will chew through them like they’re made of paper.
- Cardboard Boxes: Cardboard is porous, absorbent, and a magnet for pests. It’s basically a welcome mat for weevils and moths. Avoid at all costs.
- Clear Plastic Containers: These might look nice, but they don’t block light, which accelerates oxidation. If you’re using plastic, make sure it’s opaque or tinted.
- Metal Cans Without Seals: Some kitchens use old coffee cans or other metal containers, but if they don’t have a tight seal, they’re not doing you any favors. Oxygen and pests will find a way in.
- Open Bowls or Trays: This should go without saying, but I’ve seen it happen. Leaving dried shrimp out in the open is like rolling out the red carpet for pests and moisture. Don’t do it.
Oxygen Absorbers: The Secret Weapon for Long-Term Storage
What Are Oxygen Absorbers and Why Do You Need Them?
If you’ve ever opened a bag of dried shrimp and found it discolored, stale, or just plain off, oxygen is probably to blame. Oxygen is the silent killer of dried foods. It causes oxidation, which turns fats rancid, degrades flavors, and can even lead to mold growth. That’s where oxygen absorbers come in.
Oxygen absorbers are small packets filled with iron powder that react with oxygen to create iron oxide (aka rust). When you place one in a sealed container with your dried shrimp, it sucks up all the oxygen, leaving behind a nitrogen-rich environment that keeps your shrimp fresh. Here’s why they’re a game-changer:
- Prevents Oxidation: No oxygen means no rancidity. Your shrimp will stay fresh and flavorful for months, even years.
- Inhibits Mold and Bacteria: Most molds and bacteria need oxygen to grow. By removing it, you’re creating an environment where they can’t thrive.
- Extends Shelf Life: With oxygen absorbers, you can store dried shrimp for 1-2 years or more without significant degradation. Without them, you’re looking at 6 months, tops.
- Pest Deterrent: Pests need oxygen to survive. By removing it, you’re making your container a lot less appealing to them.
But here’s the thing: oxygen absorbers aren’t magic. They won’t fix a bad container or poor storage conditions. If your container isn’t airtight, the absorbers will suck up oxygen from the outside, rendering them useless. And if your shrimp is already spoiled, they won’t un-spoil it. They’re a preventative measure, not a cure.
How to Use Oxygen Absorbers Like a Pro
Using oxygen absorbers is simple, but there are a few key things to keep in mind to make sure they work effectively:
- Choose the Right Size: Oxygen absorbers come in different sizes, measured in cubic centimeters (cc). The size you need depends on the volume of your container and how much shrimp you’re storing. Here’s a rough guide:
- 100cc: Good for small containers (up to 1 quart).
- 300cc: Good for medium containers (1-2 gallons).
- 500cc: Good for large containers (3-5 gallons).
- 1000cc: Good for extra-large containers (5+ gallons).
If you’re not sure, it’s better to err on the side of too big than too small. A larger absorber won’t hurt, but a smaller one won’t do the job.
- Work Quickly: Oxygen absorbers start working the second they’re exposed to air. Once you open the package, you’ve got about 15-30 minutes before they’re fully activated. So, have your container ready to go, and don’t dawdle.
- Seal Tight: After adding the absorber, seal your container as quickly as possible. The longer it’s open, the more oxygen will sneak in, and the less effective the absorber will be.
- Store Properly: Oxygen absorbers are sensitive to moisture, so make sure your shrimp is completely dry before adding them. If your shrimp is damp, the absorbers will clump up and stop working.
- Monitor the Seal: After sealing, check the container to make sure it’s airtight. If the lid is bulging or the bag is puffed up, you’ve got a leak. Re-seal it or transfer the shrimp to a new container.
One thing to note: oxygen absorbers can feel warm to the touch after they’ve been activated. That’s normal, it’s just the iron reacting with oxygen. Don’t worry, they won’t heat up your shrimp or anything like that.
Where to Buy Oxygen Absorbers (And What to Look For)
You can find oxygen absorbers online or at restaurant supply stores. Here’s what to look for:
- Food-Grade: Make sure they’re labeled “food-grade” or “FDA-approved.” You don’t want any weird chemicals leaching into your shrimp.
- Freshness: Oxygen absorbers have a shelf life, so check the expiration date. If they’re old, they won’t work as effectively.
- Packaging: They should come in a vacuum-sealed bag to keep them fresh. If the bag is puffed up or damaged, don’t use them.
- Size: As mentioned earlier, choose the right size for your container. If you’re storing multiple containers, buy in bulk to save money.
Some popular brands include Oxy-Sorb, Ageless, and FreshPax. They’re all solid choices, so go with whatever’s available and fits your budget.
Oxygen Absorbers vs. Desiccants: What’s the Difference?
If you’ve ever opened a bag of beef jerky or a bottle of vitamins, you’ve probably seen those little packets labeled “silica gel” or “do not eat.” Those are desiccants, and they’re not the same as oxygen absorbers. Here’s the difference:
- Oxygen Absorbers: Remove oxygen from the environment. They’re used to prevent oxidation, mold, and pest infestations.
- Desiccants: Remove moisture from the environment. They’re used to prevent mold, clumping, and spoilage caused by humidity.
So, which one do you need for dried shrimp? The answer is both. Oxygen absorbers will handle the oxygen, while desiccants will handle any residual moisture. If you’re storing shrimp in a humid environment (like a kitchen near a dishwasher or steamer), adding a desiccant packet can give you an extra layer of protection.
Just make sure you’re using food-grade desiccants, and don’t confuse them with oxygen absorbers. They look similar, but they serve different purposes.
Temperature and Humidity: The Invisible Enemies of Dried Shrimp
Why Temperature Matters (And What Happens When It’s Too High)
Let’s talk about temperature. If you’re storing dried shrimp in a hot kitchen, you’re basically cooking it slowly. Heat accelerates chemical reactions, including the ones that cause oxidation and flavor degradation. The ideal temperature for storing dried shrimp is below 70°F (21°C), but the cooler, the better. Here’s what happens when it gets too hot:
- Faster Oxidation: The higher the temperature, the faster fats in the shrimp will turn rancid. At 90°F (32°C), oxidation happens twice as fast as it does at 70°F (21°C).
- Pest Activity: Pests like weevils and moths thrive in warm environments. If your storage area is too hot, you’re basically inviting them to a party.
- Moisture Issues: Warm air holds more moisture than cool air. If your storage area is hot, it’s also likely to be humid, which can lead to clumping and mold growth.
- Flavor Loss: Heat breaks down the compounds that give dried shrimp its flavor. Over time, your shrimp will lose its umami punch and develop a stale, cardboard-like taste.
So, what’s the solution? Keep your dried shrimp in the coolest, driest place possible. In a commercial kitchen, that usually means a dedicated dry storage room or a walk-in pantry away from ovens, steamers, and dishwashers. If you don’t have a separate storage area, at least keep it away from heat sources and out of direct sunlight.
One thing to note: don’t store dried shrimp in the fridge or freezer. While cold temperatures can slow down oxidation, they also introduce moisture, which can cause clumping and mold. Unless you’re dealing with extremely high humidity (like in a tropical climate), room temperature is fine, as long as it’s cool and dry.
Humidity: The Silent Killer of Dried Shrimp
Humidity is the other big enemy of dried shrimp. Even a little bit of moisture can cause big problems. Here’s why:
- Clumping: Dried shrimp is hygroscopic, which means it absorbs moisture from the air. If the humidity is too high, your shrimp will start to clump together, making it difficult to measure and use.
- Mold Growth: Mold needs moisture to grow. If your shrimp absorbs enough humidity, it can develop white, green, or black spots, which are a clear sign of spoilage.
- Pest Attraction: Pests are drawn to moisture. If your shrimp is damp, it’s like ringing the dinner bell for weevils and moths.
- Flavor Degradation: Moisture can cause the proteins in dried shrimp to break down, leading to a mushy texture and bland flavor.
The ideal humidity level for storing dried shrimp is below 50%. Anything above that, and you’re risking spoilage. In a commercial kitchen, humidity can be a real challenge. Dishwashers, steamers, and even the act of cooking can pump moisture into the air. If you’re in a humid climate (like the Southeast or Pacific Northwest), it’s even worse.
So, how do you control humidity? Here are a few strategies:
- Dehumidifier: If your storage area is consistently humid, a commercial-grade dehumidifier can be a lifesaver. Look for one with a built-in hygrometer so you can monitor the humidity levels.
- Desiccants: As mentioned earlier, desiccant packets can help absorb excess moisture. Place a few in your storage containers for added protection.
- Ventilation: Good airflow can help reduce humidity. If your storage area is stuffy, consider adding a small fan or vent to keep the air moving.
- Seal Tight: Make sure your containers are airtight. Even a small gap can let in moisture from the surrounding air.
One thing to avoid: don’t store dried shrimp in the fridge. While it might seem like a good way to control humidity, the fridge is actually a high-humidity environment. The constant opening and closing of the door introduces moisture, and the cold air can cause condensation to form on your shrimp. Unless you’re dealing with extreme conditions, room temperature is the way to go.
How to Monitor Temperature and Humidity Like a Pro
If you’re serious about storing dried shrimp, you need to monitor your environment. Guessing isn’t good enough, you need hard data. Here’s how to do it:
- Hygrometer: A hygrometer is a device that measures humidity. You can find digital hygrometers online for $10-$20. Place one in your storage area to keep an eye on the humidity levels. If it’s consistently above 50%, you’ve got a problem.
- Thermometer: A simple digital thermometer can help you monitor the temperature. If it’s consistently above 70°F (21°C), you’ll need to find a cooler spot.
- Data Logger: If you want to get really fancy, you can use a temperature and humidity data logger. These devices record data over time, so you can see trends and identify problem areas. They’re a bit more expensive (around $50-$100), but they’re worth it if you’re storing large quantities of shrimp.
- Visual Inspection: Even with all the gadgets, you should still visually inspect your shrimp regularly. Look for signs of moisture (clumping, mold), pests (webbing, holes), and spoilage (off smells, discoloration). If something looks off, it probably is.
One thing I’ve learned the hard way: don’t trust your instincts. I’ve worked in kitchens where the storage area felt dry, but the hygrometer told a different story. Humidity and temperature can be sneaky, so rely on the data, not your gut.
Pest Control: Keeping Weevils, Moths, and Other Critters at Bay
The Nightmare Scenario: A Pantry Infestation
Let me set the scene: It’s a busy Friday night, and you’re in the middle of service. You go to grab a bag of dried shrimp for a last-minute order of tom yum soup, and that’s when you see it. A tiny, wriggling weevil crawling out of the bag. Then another. And another. Suddenly, you realize your entire stash of dried shrimp is infested. You’ve got a full house, no backup ingredients, and a health inspector who’s due for a surprise visit any day now. This is not a drill.
Pantry pests are the stuff of nightmares for commercial kitchens. Weevils, moths, beetles, these little critters can turn your pristine dry storage area into a war zone in no time. And once they’re in, they’re hard to get rid of. I’ve seen kitchens throw out thousands of dollars’ worth of ingredients because of a single infestation. It’s not pretty.
So, how do you keep them out? It’s all about prevention, vigilance, and quick action. Here’s what you need to know.
Common Pantry Pests and How to Spot Them
First, let’s talk about the usual suspects. These are the pests you’re most likely to encounter in a commercial kitchen:
- Indian Meal Moths: These are the most common pantry pests. They’re small, with a wingspan of about 1/2 inch, and they love dried foods like shrimp, rice, and flour. You’ll usually spot them flying around your storage area or crawling on the walls. Their larvae look like tiny white worms with brown heads.
- Flour Beetles: These are small, reddish-brown beetles that infest dried foods. They’re hard to spot because they’re so small, but you might see them crawling around or find their larvae in your shrimp.
- Rice Weevils: These are tiny, dark brown beetles with a long snout. They’re notorious for infesting grains, but they’ll happily munch on dried shrimp too. You’ll usually spot them crawling around or find their larvae (tiny white grubs) inside your shrimp.
- Sawtoothed Grain Beetles: These are small, flat beetles with serrated edges on their bodies. They’re common in dried foods and can be hard to spot because they’re so small.
- Cockroaches: While not technically pantry pests, cockroaches will eat just about anything, including dried shrimp. If you’ve got roaches in your kitchen, you’ve got a much bigger problem on your hands.
So, how do you spot an infestation? Here are the telltale signs:
- Webbing: Indian meal moths spin silky webs in your food. If you see webbing in your dried shrimp, you’ve got a problem.
- Holes in Packaging: Pests can chew through plastic, cardboard, and even thin metal. If you see tiny holes in your shrimp bags, it’s a sign that pests have gotten in.
- Live or Dead Insects: This one’s obvious. If you see bugs crawling around or dead ones in your shrimp, it’s time to take action.
- Larvae or Eggs: Pests lay eggs in your food, and the larvae can be hard to spot. Look for tiny white worms or eggs in your shrimp.
- Unusual Smells: A strong, musty odor can be a sign of an infestation. Pests leave behind pheromones and waste, which can give off a distinct smell.
If you spot any of these signs, act fast. The longer you wait, the worse the infestation will get.
Prevention: How to Keep Pests Out of Your Dried Shrimp
The best way to deal with pests is to prevent them from getting in in the first place. Here’s how:
- Inspect Incoming Shipments: Pests often hitch a ride into your kitchen on incoming shipments. Before you accept a delivery, inspect the packaging for signs of pests. Look for holes, webbing, or live insects. If you spot anything suspicious, refuse the delivery.
- Store in Airtight Containers: As we’ve already discussed, airtight containers are your best defense against pests. Make sure your containers are sealed tightly and that there are no gaps where pests can sneak in.
- Keep Your Storage Area Clean: Pests are attracted to food debris. Sweep and mop your storage area regularly, and wipe down shelves to remove any crumbs or spills. Don’t leave food out in the open, and make sure trash cans are sealed tightly.
- Rotate Stock: Use the FIFO (First In, First Out) method to ensure you’re using older stock before newer stock. This reduces the chances of pests finding a long-term home in your shrimp.
- Monitor Regularly: Check your dried shrimp regularly for signs of pests. The sooner you catch an infestation, the easier it is to deal with.
- Use Pest Traps: Pheromone traps can help you monitor for pests. These traps attract pests with pheromones, trapping them before they can infest your food. Place them around your storage area to catch any stragglers.
- Seal Gaps and Cracks: Pests can squeeze through tiny gaps and cracks. Inspect your storage area for any openings and seal them with caulk or weatherstripping.
One thing I’ve learned: don’t rely on pesticides. While they might kill pests, they can also contaminate your food. If you’ve got a serious infestation, you’re better off throwing out the affected shrimp and deep-cleaning your storage area.
What to Do If You’ve Got an Infestation
So, you’ve spotted the signs. Now what? Here’s how to handle an infestation:
- Isolate the Affected Shrimp: First, remove the infested shrimp from your storage area. Seal it in a plastic bag and throw it away. Don’t compost it or leave it in your kitchen, you’ll just spread the pests.
- Inspect Nearby Containers: Pests can spread quickly. Check any containers that were stored near the infested shrimp. If you spot any signs of pests, throw those out too.
- Deep Clean Your Storage Area: Empty your storage area completely and clean it from top to bottom. Vacuum shelves, cracks, and crevices to remove any pests or eggs. Then, wipe everything down with a food-safe sanitizer.
- Freeze or Heat Treat Remaining Shrimp: If you’ve got other containers of dried shrimp that weren’t infested, you can freeze them for 4 days or heat them in the oven at 140°F (60°C) for 1 hour to kill any hidden pests or eggs. This isn’t foolproof, but it’s better than nothing.
- Set Up Traps: Place pheromone traps around your storage area to catch any remaining pests. Check them regularly and replace them as needed.
- Monitor Closely: Keep an eye on your storage area for the next few weeks. If you spot any more pests, repeat the cleaning process.
One thing to note: don’t try to salvage infested shrimp. It’s not worth the risk. Even if you kill the pests, their waste and pheromones can contaminate your food. When in doubt, throw it out.
Light Exposure: Why Your Dried Shrimp Needs a Dark Hideout
The Problem with Light (And Why It’s Worse Than You Think)
Let’s talk about light. Specifically, UV light. You know, the stuff that gives you a sunburn and fades your favorite T-shirt. Turns out, it’s also public enemy number one for dried shrimp. Here’s why:
- Accelerates Oxidation: UV light speeds up the oxidation process, which turns fats rancid. The more light your shrimp is exposed to, the faster it will degrade.
- Breaks Down Flavors: Light can break down the compounds that give dried shrimp its flavor. Over time, your shrimp will lose its umami punch and develop a stale, cardboard-like taste.
- Causes Discoloration: Ever seen dried shrimp that’s turned from a nice pinkish-red to a dull gray? That’s light damage. It doesn’t necessarily mean the shrimp is spoiled, but it’s a sign that it’s past its prime.
- Attracts Pests: Pests are drawn to light. If your storage area is well-lit, you’re basically inviting them to a buffet.
So, what’s the solution? Keep your dried shrimp in the dark. Like, literally. The less light it’s exposed to, the better. Here’s how to do it:
- Use Opaque Containers: If you’re using plastic or glass containers, make sure they’re opaque or tinted. Clear containers might look nice, but they’re basically sunbathing your shrimp.
- Store in a Dark Place: Keep your shrimp in a dark pantry, cabinet, or storage room. If you’ve got a walk-in pantry, even better. The less light, the better.
- Avoid Fluorescent Lights: Fluorescent lights emit UV radiation, which can degrade your shrimp over time. If your storage area is lit by fluorescents, consider switching to LED lights, which emit less UV.
- Wrap in Aluminum Foil: If you’re storing shrimp in a clear container, wrap it in aluminum foil to block out light. It’s not the prettiest solution, but it works.
One thing to note: don’t store dried shrimp in the fridge just to avoid light. While the fridge is dark, it’s also humid, which can cause its own set of problems. Stick to a cool, dry, dark place instead.
How to Tell If Light Has Ruined Your Dried Shrimp
So, how do you know if light has degraded your shrimp? Here are the signs to look for:
- Discoloration: Fresh dried shrimp should be a pinkish-red or orange color. If it’s turned gray or dull, it’s a sign that light (or oxidation) has damaged it.
- Off Smells: Light damage can cause dried shrimp to develop a stale, musty odor. If it smells off, it probably is.
- Bland Flavor: If your shrimp has lost its umami punch, light damage could be to blame. Try rehydrating a small piece and tasting it. If it’s bland, it’s time to toss it.
- Rancid Taste: If your shrimp tastes bitter or soapy, it’s a sign that the fats have turned rancid. This is a clear sign of light or oxidation damage.
If you spot any of these signs, it’s best to err on the side of caution. Light-damaged shrimp might not be unsafe to eat, but it won’t taste good, and it could ruin your dishes.
Inventory Management: The FIFO Method and Why It Matters
What Is FIFO (And Why Should You Care)?
Let’s talk about FIFO. No, it’s not a type of fish. It stands for First In, First Out, and it’s the golden rule of inventory management in commercial kitchens. Here’s how it works:
- When you receive a new shipment of dried shrimp, you store it behind the older stock.
- When you need to use shrimp, you grab from the front, which is the oldest stock.
- This ensures that you’re always using the oldest shrimp first, reducing the chances of spoilage.
Sounds simple, right? And yet, I’ve seen so many kitchens ignore this rule and end up with stale, expired shrimp sitting in the back of the pantry. It’s a waste of money, a waste of ingredients, and a waste of time. And in a commercial kitchen, time is money.
So, why does FIFO matter for dried shrimp? Here’s the deal:
- Prevents Spoilage: Dried shrimp has a shelf life, even when stored properly. By using the oldest stock first, you’re ensuring that nothing sits around long enough to go bad.
- Reduces Waste: The less shrimp you waste, the more money you save. It’s that simple.
- Maintains Consistency: If you’re using shrimp that’s all the same age, your dishes will taste consistent. No more guessing whether the shrimp you’re using is fresh or stale.
- Simplifies Inventory: FIFO makes it easy to keep track of what you’ve got and what you need to order. No more digging through the pantry to see what’s what.
If you’re not already using FIFO, start today. It’s one of the easiest ways to improve your kitchen’s efficiency and reduce waste.
How to Implement FIFO in Your Kitchen
Implementing FIFO is simple, but it does require a bit of organization. Here’s how to do it:
- Label Everything: When you receive a new shipment of dried shrimp, label it with the date. Use a permanent marker or a label maker to write the date on the container. This makes it easy to see which shrimp is oldest.
- Store New Shipments in the Back: When you put away a new shipment, place it behind the older stock. This ensures that the oldest shrimp is always at the front, ready to be used.
- Use the Oldest Stock First: When you need to use shrimp, grab from the front. This ensures that you’re always using the oldest stock first.
- Rotate Stock Regularly: Every few weeks, check your inventory to make sure nothing is getting overlooked. If you’ve got shrimp that’s been sitting around for a while, use it up or donate it before it goes bad.
- Train Your Staff: FIFO only works if everyone is on the same page. Train your staff on the importance of FIFO and how to implement it. Make it part of your kitchen’s culture.
One thing to note: FIFO isn’t just for dried shrimp. It’s a good practice for all your ingredients, from spices to canned goods. The more you use it, the more efficient your kitchen will become.
How to Track Shelf Life and Expiration Dates
Even with FIFO, it’s important to track shelf life and expiration dates. Here’s how to do it:
- Check Expiration Dates: When you receive a new shipment, check the expiration date on the packaging. If it’s already expired or close to expiring, refuse the delivery.
- Label Your Containers: As mentioned earlier, label your containers with the date you received the shrimp. This makes it easy to see how old it is.
- Set Reminders: Use a calendar or inventory management system to set reminders for when your shrimp is nearing the end of its shelf life. This gives you time to use it up before it goes bad.
- Conduct Regular Audits: Every few weeks, audit your inventory to see what’s nearing expiration. Use up or donate anything that’s getting old.
- Know the Signs of Spoilage: Even if your shrimp hasn’t reached its expiration date, it can still go bad. Check for signs of spoilage (off smells, discoloration, pests) before using it.
One thing I’ve learned: don’t rely solely on expiration dates. They’re a guideline, not a guarantee. If your shrimp looks or smells off, it’s better to be safe than sorry.
How to Revive Dried Shrimp That’s Lost Its Mojo
When Your Shrimp Isn’t Quite Fresh (But Isn’t Spoiled Either)
Let’s say you’ve done everything right, stored your shrimp in an airtight container, kept it in a cool, dark place, and used FIFO. But when you open the container, it doesn’t smell as fresh as it should. It’s not spoiled, but it’s lost some of its umami punch. What do you do?
First, don’t panic. Dried shrimp is resilient, and there are a few tricks you can use to revive it. Here’s what to try:
Method 1: The Dry Toast Trick
This is one of my favorite methods for reviving dried shrimp. It’s simple, effective, and doesn’t require any special equipment. Here’s how to do it:
- Preheat your oven to 300°F (150°C).
- Spread your dried shrimp in a single layer on a baking sheet.
- Toast the shrimp in the oven for 5-10 minutes, or until it’s fragrant and slightly golden.
- Let it cool completely before using or storing.
The heat from the oven helps to reactivate the flavors in the shrimp, giving it a fresher, more vibrant taste. It also helps to dry out any residual moisture, which can make the shrimp taste stale.
One thing to note: don’t over-toast the shrimp. If it starts to burn, you’ve gone too far. Keep an eye on it and pull it out as soon as it’s fragrant.
Method 2: The Oil Infusion
This method is a bit more involved, but it’s great for adding extra flavor to your shrimp. Here’s how to do it:
- Heat a eutral oil (like vegetable or canola oil) in a pan over low heat.
- Add your dried shrimp to the pan and cook for 2-3 minutes, stirring constantly.
- Remove the shrimp from the pan and drain it on a paper towel.
- Let it cool completely before using or storing.
The oil helps to carry the flavors of the shrimp, making them more pronounced. It also adds a bit of richness, which can be great for dishes like stir-fries or soups.
One thing to note: don’t use too much oil. You want just enough to coat the shrimp, not drown it. And make sure the oil isn’t too hot, you don’t want to fry the shrimp, just infuse it.
Method 3: The Quick Soak
This method is great for shrimp that’s lost a bit of its moisture and is starting to taste dry. Here’s how to do it:
- Soak your dried shrimp in warm water or broth for 10-15 minutes.
- Drain the shrimp and pat it dry with a paper towel.
- Use it immediately in your recipe.
The soak helps to rehydrate the shrimp, making it plumper and more flavorful. It’s not a long-term solution, but it can help in a pinch.
One thing to note: don’t soak the shrimp for too long. If it sits in the water for too long, it can become mushy and lose its texture.
Method 4: The Spice Boost
If your shrimp has lost its flavor, sometimes all it needs is a little spice boost. Here’s how to do it:
- Toast a mix of spices (like cumin, coriander, or chili powder) in a dry pan over low heat until fragrant.
- Add your dried shrimp to the pan and toss to coat.
- Let it cool completely before using or storing.
The spices help to mask any staleness and add extra flavor to the shrimp. It’s a great trick for dishes where the shrimp isn’t the star of the show, like soups or stews.
One thing to note: don’t overdo it with the spices. You want to enhance the shrimp’s flavor, not overpower it.
Common Mistakes (And How to Avoid Them)
Mistake 1: Storing Dried Shrimp in the Original Packaging
I get it. You buy a bag of dried shrimp, and it’s already sealed, so why bother transferring it to another container? Here’s why: most original packaging isn’t designed for long-term storage. It’s usually thin plastic or paper, which doesn’t block oxygen, moisture, or pests. If you leave your shrimp in the original bag, it’s only a matter of time before it goes bad.
How to Avoid It: Transfer your shrimp to an airtight container as soon as you get it. Don’t wait, do it the same day.
Mistake 2: Ignoring Temperature and Humidity
I’ve seen kitchens store dried shrimp in the hottest, most humid corner of the kitchen, right next to the dishwasher. It’s a recipe for disaster. Temperature and humidity are the two biggest factors in spoilage, and if you ignore them, your shrimp won’t last.
How to Avoid It: Store your shrimp in a cool, dry place, away from heat sources and moisture. Use a hygrometer and thermometer to monitor your storage area.
Mistake 3: Not Using Oxygen Absorbers
Oxygen absorbers are cheap, easy to use, and incredibly effective at extending shelf life. And yet, I’ve seen so many kitchens skip them. If you’re not using oxygen absorbers, you’re basically inviting oxidation to ruin your shrimp.
How to Avoid It: Add an oxygen absorber to every container of dried shrimp. It’s a small investment that pays off big time.
Mistake 4: Opening Containers Too Often
Every time you open a container of dried shrimp, you’re exposing it to oxygen, moisture, and potential contaminants. If you’re opening it multiple times a day, it won’t last long.
How to Avoid It: Use smaller containers for daily use, and keep the bulk of your shrimp in a sealed, airtight container. Only open the bulk container when you need to refill the smaller one.
Mistake 5: Not Checking for Pests
Pests are sneaky. They can infest your shrimp without you even noticing, and by the time you spot them, it’s often too late. If you’re not checking for pests regularly, you’re playing with fire.
How to Avoid It: Inspect your shrimp regularly for signs of pests. Use pheromone traps to monitor for infestations, and act fast if you spot anything suspicious.
Mistake 6: Storing Dried Shrimp Near Strong-Smelling Ingredients
Dried shrimp is highly absorbent. If you store it near strong-smelling ingredients (like garlic, onions, or spices), it can pick up those odors, which can ruin its flavor.
How to Avoid It: Store your shrimp in a separate container, away from strong-smelling ingredients. If possible, keep it in a dedicated storage area.
Mistake 7: Not Rotating Stock
If you’re not using FIFO, you’re basically guaranteeing that some of your shrimp will go bad. It’s a waste of money and ingredients, and it’s easily avoidable.
How to Avoid It: Implement FIFO in your kitchen. Label everything, store new shipments in the back, and use the oldest stock first.
Final Thoughts: The Art and Science of Storing Dried Shrimp
Storing dried shrimp for maximum shelf life in a commercial kitchen isn’t rocket science, but it does require attention to detail, a bit of know-how, and a willingness to invest in the right tools. It’s a balance of science (controlling oxygen, moisture, light, and temperature) and art (knowing when to use it, how to revive it, and when to toss it).
If there’s one thing I’ve learned over the years, it’s that dried shrimp is more resilient than you think. With the right storage conditions, it can last for months, even years, without losing its flavor or potency. But it’s also more delicate than you think. A single mistake, like leaving it in the original packaging or storing it in a humid environment, can ruin it in no time.
So, what’s the takeaway? Here’s your action plan:
- Invest in the Right Containers: Use airtight, opaque containers that block oxygen, moisture, and light. Food-grade plastic buckets with gamma seal lids are a great choice for bulk storage.
- Add Oxygen Absorbers: These little packets are a game-changer. Add one to every container to extend shelf life and prevent oxidation.
- Control Temperature and Humidity: Store your shrimp in a cool, dry place, away from heat sources and moisture. Use a hygrometer and thermometer to monitor your storage area.
- Keep It Dark: Light accelerates oxidation, so store your shrimp in a dark place or use opaque containers.
- Implement FIFO: Use the First In, First Out method to ensure you’re always using the oldest shrimp first. Label everything and train your staff.
- Monitor for Pests: Check your shrimp regularly for signs of pests, and act fast if you spot anything suspicious. Use pheromone traps to monitor for infestations.
- Revive When Needed: If your shrimp has lost its mojo, try toasting it, infusing it with oil, or giving it a quick soak to bring back its flavor.
- Avoid Common Mistakes: Don’t store shrimp in the original packaging, ignore temperature and humidity, or skip oxygen absorbers. These mistakes are easily avoidable with a little effort.
At the end of the day, storing dried shrimp is about respect. Respect for the ingredient, respect for your customers, and respect for your bottom line. It’s not just a pantry staple, it’s a flavor powerhouse that deserves to be treated with care. And when you get it right? The results speak for themselves. Your dishes will taste better, your customers will be happier, and your kitchen will run more smoothly.
So, go ahead. Give your dried shrimp the love it deserves. Your kitchen (and your taste buds) will thank you.
FAQ: Your Dried Shrimp Storage Questions Answered
Q: How long does dried shrimp last in a commercial kitchen?
A: When stored properly in an airtight container with oxygen absorbers, dried shrimp can last 1-2 years without significant degradation. However, for the best flavor and texture, it’s best to use it within 6-12 months. Always check for signs of spoilage (off smells, discoloration, pests) before using.
Q: Can I store dried shrimp in the fridge or freezer?
A: While cold temperatures can slow down oxidation, the fridge and freezer are ot ideal for storing dried shrimp. The constant opening and closing of the fridge introduces moisture, which can cause clumping and mold. The freezer can also introduce moisture and alter the texture of the shrimp. Unless you’re dealing with extremely high humidity, room temperature in a cool, dry place is best.
Q: What’s the best way to tell if dried shrimp has gone bad?
A: There are a few key signs to look for:
- Off Smells: Fresh dried shrimp should have a briny, seafood-like aroma. If it smells musty, rancid, or sour, it’s gone bad.
- Discoloration: Fresh dried shrimp is usually pinkish-red or orange. If it’s turned gray, dull, or has dark spots, it’s a sign of spoilage.
- Pests: Look for webbing, holes in the packaging, or live insects. If you spot any of these, toss the shrimp immediately.
- Texture: If the shrimp feels slimy or mushy, it’s a sign of moisture damage. Fresh dried shrimp should be firm and dry.
If you’re unsure, it’s always better to err on the side of caution and throw it out.
Q: Can I reuse oxygen absorbers?
A: No, oxygen absorbers are single-use. Once they’ve been exposed to air, they start reacting with oxygen and can’t be reused. If you open a container and don’t use all the shrimp, you’ll need to add a new oxygen absorber when you reseal it. Keep unused absorbers in a sealed bag to prevent them from activating prematurely.
@article{how-to-store-dried-shrimp-for-maximum-shelf-life-in-commercial-kitchens-a-chefs-guide-to-freshness-and-flavor,
    title   = {How to Store Dried Shrimp for Maximum Shelf Life in Commercial Kitchens: A Chef’s Guide to Freshness and Flavor},
    author  = {Chef's icon},
    year    = {2026},
    journal = {Chef's Icon},
    url     = {https://chefsicon.com/how-to-store-dried-shrimp-for-maximum-shelf-life-in-commercial-kitchens/}
}