The Best Fluffy Pancakes recipe you will fall in love with. Full of tips and tricks to help you make the best pancakes.
Table of Contents
- 1 Understanding Rotisserie Chicken Without a Spit
- 2 Choosing the Right Chicken
- 3 Preparing the Chicken
- 4 Setting Up Your Oven
- 5 The Secret Weapon: Basting
- 6 Checking for Doneness
- 7 Let It Rest
- 8 Carving and Serving
- 9 Recipes to Try
- 10 Troubleshooting Common Issues
- 11 Embrace the Journey and Keep Experimenting
- 12 FAQ
Ever craved that succulent, golden-brown rotisserie chicken but didn’t have a spit? You’re not alone. When I first moved to Nashville, I left behind my beloved rotisserie oven and had to get creative. Turns out, you can achieve that perfect rotisserie flavor and texture right in your oven. Let’s dive into the art of rotisserie-chicken-no-spit-needed and explore how to master this technique at home.
In this guide, we’ll cover everything from choosing the right bird to setting up your oven and even some mouthwatering recipes to try. By the end, you’ll be a pro at creating that classic rotisserie experience without any fancy equipment. So, let’s get started!
Understanding Rotisserie Chicken Without a Spit
The Science Behind Rotisserie
Rotisserie cooking is all about even heat distribution and basting in the bird’s own juices. As the chicken rotates on a spit, it cooks evenly and bastes itself, resulting in that signature tender, juicy meat and crispy skin. But how do we replicate this without a spit? The key lies in manipulating your oven’s heat and the chicken’s position.
Why Go Spit-Free?
While rotisserie ovens and spits are fantastic, they’re not always practical or affordable. Maybe you’re like me and left yours behind in a move, or perhaps you’re just looking to declutter your kitchen. Whatever the reason, learning to cook rotisserie-style chicken without a spit opens up a world of possibilities.
Plus, this method is incredibly versatile. You can use it for other types of poultry, like turkey or duck, and even apply the principles to other meats. But is this the best approach? Let’s consider the pros and cons.
Choosing the Right Chicken
Size Matters
When it comes to rotisserie-chicken-no-spit-needed, size is crucial. Too small, and the chicken will dry out; too large, and it won’t cook evenly. I’ve found the sweet spot to be around 4 to 5 pounds. This size allows for even cooking and a beautiful presentation.
Breed and Quality
Opt for free-range or organic chickens when possible. These birds tend to have a better flavor and texture due to their diet and living conditions. Additionally, consider air-chilled chickens. Unlike their water-chilled counterparts, air-chilled chickens aren’t plumped up with water, resulting in a more intense flavor and crispier skin.
Preparing the Chicken
Brining: Yes or No?
Brining is a popular method for adding moisture and flavor to chicken. But is it necessary for our spit-free rotisserie? I’m torn between the convenience of skipping this step and the added insurance of a juicy bird. Ultimately, if you have the time, a simple saltwater brine (1/4 cup salt per 4 cups water) can enhance both the flavor and tenderness of your chicken.
If you’re short on time, don’t worry. You can still achieve fantastic results without brining. Just be sure to generously season your chicken inside and out.
Seasoning and Trussing
Season your chicken liberally with your choice of herbs, spices, salt, and pepper. I like to keep it simple with a blend of paprika, garlic powder, onion powder, thyme, salt, and pepper. Don’t forget to season the cavity as well.
Trussing is an essential step in preparing your chicken for spit-free rotisserie. By tying the legs and wings close to the body, you create a compact shape that promotes even cooking. Plus, it makes for a nicer presentation.
Setting Up Your Oven
Vertical Roasting
To mimic the effect of a rotisserie spit, we’ll be roasting the chicken vertically. This allows the juices to baste the entire bird as it cooks. You can use a bundt pan or a vertical chicken roaster for this. Simply place the chicken cavity over the central tube and let it sit upright in the pan.
I’ve found that this method not only promotes even cooking but also creates beautifully crispy skin all around. Just be sure to place a drip pan beneath the chicken to catch any juices and prevent a smoky mess in your oven.
Heat and Airflow
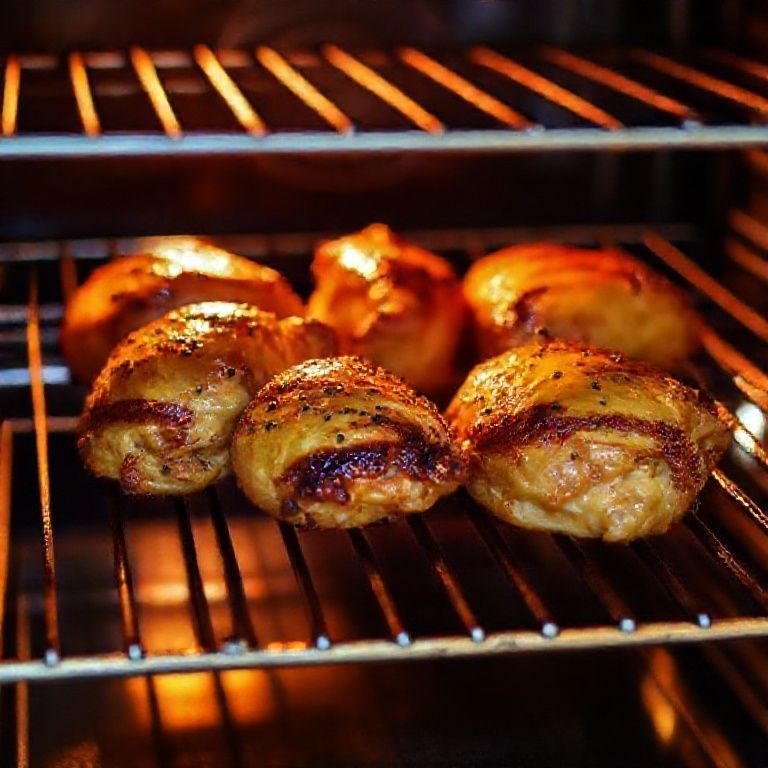
Preheat your oven to 425°F (220°C) and position a rack in the lower third. This setup allows for optimal heat distribution and airflow, mimicking the environment of a traditional rotisserie.
If your oven has a convection setting, use it. Convection ovens have a fan that circulates hot air, helping to create that coveted crispy skin. If you don’t have a convection oven, don’t fret – you can still achieve great results; it might just take a bit longer.
The Secret Weapon: Basting
Since we’re not using a spit, we’ll need to baste the chicken manually to achieve that rotisserie flavor and texture. Use a basting brush to coat the chicken with its own juices every 15-20 minutes during cooking.
Be sure to close the oven door quickly after basting to maintain an even temperature. You may need to adjust your cooking time based on your oven and the size of your chicken, but a general guideline is about 80-90 minutes for a 4-5 pound chicken.
Checking for Doneness
The last thing you want is an undercooked or overcooked chicken. To ensure your bird is cooked to perfection, invest in a good-quality meat thermometer. Insert it into the thickest part of the thigh, avoiding the bone. Once it reaches an internal temperature of 165°F (74°C), your chicken is done.
If you don’t have a meat thermometer, you can also check for doneness by cutting into the thigh and ensuring the juices run clear. However, this method is less precise and can result in drier meat.
Let It Rest
After removing your chicken from the oven, let it rest for at least 15-20 minutes before carving. This allows the juices to redistribute throughout the meat, resulting in a moister, more flavorful chicken.
You can tent the chicken loosely with foil to keep it warm, but be careful not to wrap it too tightly, as this can cause the skin to become soggy.
Carving and Serving
Once your chicken has rested, it’s time to carve. I recommend using a sharp carving knife and a stable cutting board. Start by removing the legs and wings, then carve the breast meat against the grain for maximum tenderness.
Serve your rotisserie-style chicken with your favorite sides, like roasted vegetables, mashed potatoes, or a simple salad. And don’t forget to save the carcass for making homemade stock!
Recipes to Try
Classic Rotisserie Chicken
This classic recipe focuses on the pure, unadulterated flavors of rotisserie chicken. Combine 3 tablespoons olive oil, 2 teaspoons kosher salt, 1 teaspoon black pepper, 1 teaspoon paprika, 1 teaspoon garlic powder, and 1 teaspoon onion powder. Rub the mixture all over the chicken, including the cavity. Truss the chicken and roast according to the instructions above.
Lemon Herb Rotisserie Chicken
For a zesty twist, try this lemon herb variation. Combine the zest and juice of 2 lemons, 4 cloves minced garlic, 2 tablespoons olive oil, 1 tablespoon fresh thyme leaves, 1 tablespoon fresh rosemary leaves, 2 teaspoons kosher salt, and 1 teaspoon black pepper. Rub the mixture all over the chicken and stuff the cavity with the lemon halves. Truss the chicken and roast as described above.
Spicy Rotisserie Chicken
If you like a bit of heat, this spicy version is for you. Combine 3 tablespoons olive oil, 2 tablespoons chili powder, 1 tablespoon smoked paprika, 1 tablespoon ground cumin, 1 tablespoon brown sugar, 2 teaspoons kosher salt, 1 teaspoon black pepper, and 1 teaspoon cayenne pepper. Rub the mixture all over the chicken, including the cavity. Truss the chicken and roast according to the instructions above.
Troubleshooting Common Issues
Even with the best-laid plans, things can go awry. Here are some common issues you might encounter when cooking rotisserie-style chicken without a spit and how to fix them.
Uneven Cooking
If you find that your chicken is cooking unevenly, it could be due to a few factors. First, ensure that your oven is properly preheated and that the chicken is positioned in the center of the rack. Additionally, consider rotating the chicken halfway through cooking to promote more even browning.
If the issue persists, your oven may have hot spots. In this case, try using a baking stone or inverted baking sheet on the rack above the chicken to help distribute heat more evenly.
Dry Meat
Nobody wants dry chicken. If you find that your bird is coming out less juicy than you’d like, there are a few things you can try. First, make sure you’re not overcooking the chicken. Remember, an internal temperature of 165°F (74°C) is all you need.
Additionally, consider brining the chicken before cooking, as this can help lock in moisture. Finally, ensure that you’re letting the chicken rest for at least 15-20 minutes before carving to allow the juices to redistribute.
Soggy Skin
Crispy skin is one of the hallmarks of great rotisserie chicken. If your skin is coming out soggy, it could be due to a few reasons. First, make sure you’re patting the chicken dry before seasoning and cooking. Excess moisture on the skin can prevent it from crisping up.
Additionally, ensure that you’re not tenting the chicken too tightly with foil while it rests, as this can create steam and soften the skin. Finally, consider using a convection oven or placing a fan near your oven to increase airflow and promote crispier skin.
Embrace the Journey and Keep Experimenting
Cooking rotisserie-style chicken without a spit is a journey filled with trial and error. Don’t be discouraged if your first attempt isn’t perfect. Keep experimenting with different techniques, seasonings, and recipes until you find what works best for you.
And remember, the joy of cooking lies not just in the final product but in the process itself. So, have fun, get creative, and savor the adventure of mastering rotisserie chicken without a spit.
Who knows? You might even discover a new favorite method or flavor combination along the way. Maybe I should clarify, though – there’s no one-size-fits-all approach to cooking. What works for me might not work for you, and that’s okay! The important thing is to keep learning, keep growing, and keep enjoying the ride.
FAQ
Q: Can I use this method for other types of poultry?
A: Absolutely! This vertical roasting technique works great for other types of poultry, like turkey or duck. Just be sure to adjust the cooking time based on the size of the bird.
Q: What if I don’t have a bundt pan or vertical chicken roaster?
A: No problem! You can also use an empty, clean aluminum can (like a beer can) placed in a baking dish. Just position the chicken cavity over the can and proceed with the recipe as written.
Q: Can I cook rotisserie-style chicken on a grill using this method?
A: Yes, you can! Preheat your grill to medium-high heat (around 400-450°F or 200-230°C) and set it up for indirect cooking. Place the chicken in a bundt pan or vertical roaster on the cooler side of the grill, close the lid, and cook for about 1.5 to 2 hours, or until the internal temperature reaches 165°F (74°C).
Q: How can I store leftover rotisserie chicken?
A: Once cooled, store leftover chicken in an airtight container in the refrigerator for up to 4 days. You can also freeze portions for up to 3 months. To reheat, place the chicken in an oven-safe dish, cover with foil, and warm in a 350°F (180°C) oven for about 20-25 minutes, or until heated through.
@article{mastering-rotisserie-chicken-without-a-spit-a-comprehensive-guide-for-2025,
    title   = {Mastering Rotisserie Chicken Without a Spit: A Comprehensive Guide for 2025},
    author  = {Chef's icon},
    year    = {2025},
    journal = {Chef's Icon},
    url     = {https://chefsicon.com/rotisserie-chicken-no-spit-needed/}
}