
Table of Contents
- 1 Decoding the Dough: The Path to Perfect Tortillas
- 1.1 Choosing Your Weapon: The Masa Harina Deep Dive
- 1.2 The Water Question: Temperature and Quantity
- 1.3 Mixing Matters (But Maybe Not How You Think)
- 1.4 The Crucial Rest: Why Patience Pays Off
- 1.5 Pressing Matters: Achieving Uniform Thinness
- 1.6 Comal Magic: Heat and Surface
- 1.7 The Flip, The Puff, The Glory
- 1.8 Keeping Them Soft: The Steamy Towel Trick
- 1.9 Troubleshooting Tactics: When Tortillas Go Wrong
- 1.10 Beyond the Basics: Flavor and Variations
- 2 Bringing It All Home: Your Tortilla Triumph
- 3 FAQ
Okay, let’s talk corn tortillas. Seriously. Forget those stiff, crumbly discs you sometimes get from the store. I’m talking about *real* corn tortillas – soft, pliable, fragrant, and impossibly fluffy. The kind that makes you wonder why you ever settled for less. For years, I was on a quest, maybe even an obsession, trying to replicate the magic I’d tasted in tiny taquerias or family homes. My early attempts? Let’s just say Luna, my cat, wasn’t impressed, and neither was I. They were often too dry, too thick, cracked easily, or just tasted… flat. It felt like chasing a culinary ghost.
Living here in Nashville, I’ve found some amazing spots for authentic Mexican food, which only fueled my desire to crack the code at home. It wasn’t just about saving money or convenience; it was about understanding the process, the *why* behind each step. Why does the type of masa harina matter so much? What’s the deal with water temperature? How do you get that magical puff? It turns out, like most seemingly simple things in cooking, there’s a fascinating blend of science and technique involved. It’s not just mixing flour and water; it’s about hydration, gluten development (or lack thereof, in this case), heat transfer, and steam.
So, after countless batches, endless tweaking, and maybe a few moments of wanting to throw my tortilla press out the window (kidding… mostly), I feel like I’ve finally gathered the essential secrets. And trust me, it’s achievable. You don’t need generations of ancestral knowledge, though that certainly helps! What you need is the right information, a bit of patience, and the willingness to pay attention to the details. In this post, I’m going to lay it all out – the nitty-gritty details, the science-y bits explained simply, and the practical tips that finally unlocked soft, fluffy, perfect corn tortillas for me, every single time. We’ll cover everything from choosing your flour to the final flip on the comal. Ready to transform your taco nights forever?
Decoding the Dough: The Path to Perfect Tortillas
Choosing Your Weapon: The Masa Harina Deep Dive
First things first: you can’t make great corn tortillas without the right foundation, and that foundation is masa harina. This isn’t the same as cornmeal or corn flour, please dont make that mistake. Masa harina is flour made from dried corn kernels that have been cooked and soaked in an alkaline solution, usually limewater (calcium hydroxide). This ancient process, called nixtamalization, is absolutely crucial. It chemically changes the corn, unlocking its nutritional value (like niacin), improving its aroma and flavor, and, most importantly for tortillas, allowing the proteins and starches to form a cohesive, pliable dough when mixed with water. Without nixtamalization, you’d just have gritty corn paste that falls apart.
Now, not all masa harinas are created equal. You’ll find different brands on the shelf, and they can vary in grind (fine vs. coarser), the type of corn used (white, yellow, even blue), and the intensity of the corn flavor. Maseca is probably the most ubiquitous brand, and it’s a reliable starting point. It’s generally a fine grind and produces consistent results. However, exploring other brands like Bob’s Red Mill, Gold Mine, or smaller regional producers can be really rewarding. Some have a more pronounced corn flavor or a slightly different texture. I personally lean towards finely ground white or yellow corn masa harina for the softest, most pliable tortillas. Coarser grinds can sometimes result in a slightly grittier texture, which isn’t bad, just different. Experimentation is key here! Find a brand you like and stick with it for a while to get a feel for its specific hydration needs. The quality of masa harina is probably the single biggest factor influencing your final tortilla.
The Water Question: Temperature and Quantity
Okay, you’ve got your masa harina. Next up: water. Seems simple, right? Just add water? Well, yes and no. The *temperature* of the water actually makes a noticeable difference. Most recipes call for warm or hot water, and there’s a good reason for it. Warm water helps to ‘bloom’ the masa harina, essentially kickstarting the hydration process and softening the starches more effectively. Think of it like waking up the flour. Using hot water (not boiling, but very warm to the touch – maybe around 105-115°F or 40-46°C, be careful not to burn yourself!) generally leads to a softer, more pliable dough almost immediately. Cold water *can* work, but I find the dough often feels stiffer initially and might require a slightly longer resting period to fully hydrate.
Now, let’s talk quantity. This is where things get a little less precise, and honestly, where most beginners stumble. The amount of water listed in a recipe is almost always a starting point, not a rigid rule. Why? Because factors like the specific brand of masa harina, the humidity in your kitchen (seriously!), and even how densely you packed the flour into your measuring cup can affect how much water you need. The goal is a dough that is soft and pliable, like smooth Play-Doh, but not sticky. It should hold together easily when pressed but shouldn’t cling excessively to your hands. Start with the lower amount of water recommended in your recipe, mix it in, and then add more, a tablespoon at a time, until you reach that perfect consistency. It’s always easier to add more water than to try and fix overly wet dough (though adding a sprinkle more masa harina can sometimes save it). Getting the hydration level right is critical for texture.
Mixing Matters (But Maybe Not How You Think)
Unlike bread dough, where extensive kneading develops gluten for structure, corn masa doesn’t contain gluten in the same way wheat flour does. So, the goal of mixing isn’t to knead vigorously for ages. It’s simply to ensure the masa harina is evenly hydrated and the dough comes together smoothly. Overmixing isn’t usually a huge problem, but it’s unnecessary. You want to combine the masa harina, salt (don’t forget the salt! It enhances flavor significantly), and warm water in a bowl. Use your hands – it’s the best way to feel the dough’s consistency. Mix and gently knead for just a minute or two, maybe three minutes max, until everything is incorporated, the dough feels smooth, and there are no dry, floury patches left.
The texture should be soft and slightly springy. If you press your finger into it, the indentation should mostly hold its shape. If it feels too dry and crumbly, add water teaspoon by teaspoon. If it feels too sticky or wet, add masa harina tablespoon by tablespoon, mixing just until incorporated. Some people like to use a stand mixer with a dough hook, which is fine, but I genuinely believe using your hands gives you better control and a better feel for when the dough consistency is just right. You’re looking for that perfect balance – moist enough to be pliable, but firm enough to hold its shape without sticking. Remember, gentle mixing is the key here; we’re not trying to build structure like in bread, just achieve uniform hydration.
The Crucial Rest: Why Patience Pays Off
This step seems passive, but it’s incredibly important: letting the dough rest. After mixing, cover the dough ball tightly with plastic wrap or a damp cloth and let it sit at room temperature for at least 20-30 minutes. An hour is even better if you have the time. What’s happening during this rest period? The masa harina particles are continuing to absorb the water, fully hydrating from the inside out. This allows the starches to swell and soften further, resulting in a dough that is significantly more pliable, less prone to cracking at the edges when pressed, and ultimately yields a softer tortilla. It’s like letting the ingredients really get to know each other.
Skipping the rest often leads to tortillas that feel slightly gritty or are more likely to tear or crack. Think of it like letting a steak rest after cooking – it allows everything to settle and redistribute. During the rest, the moisture equalizes throughout the dough. You’ll often notice the dough feels even smoother and more supple after resting compared to right after mixing. This improved plasticity makes it much easier to press the tortillas thin without them falling apart. So, resist the urge to skip this step! Go check your email, pet Luna, or prep your taco fillings. Let the dough hydration work its magic. It’s a simple step with a big impact on the final tortilla texture.
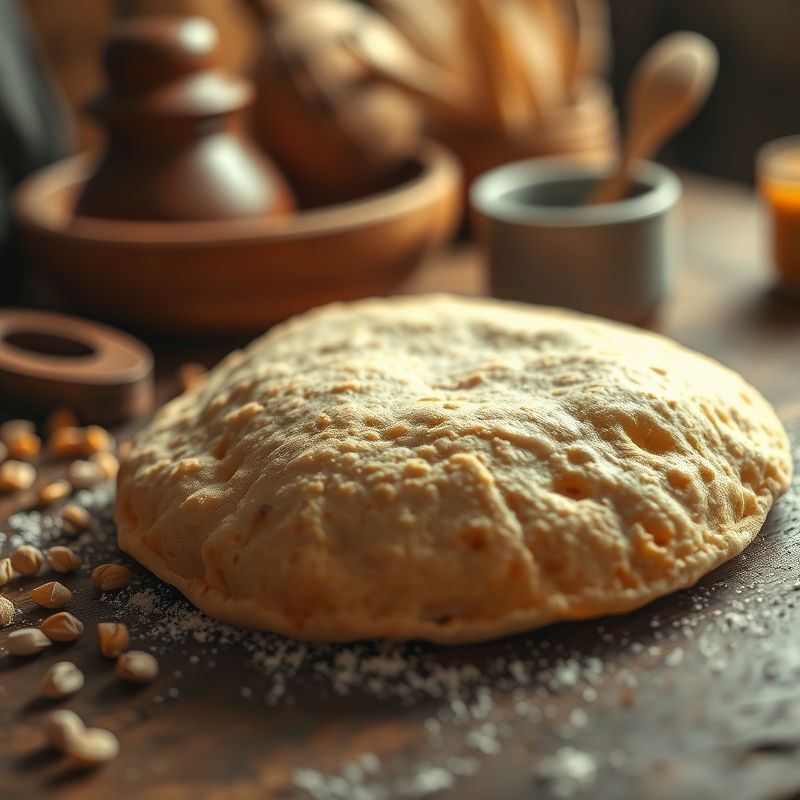
Pressing Matters: Achieving Uniform Thinness
Okay, dough rested? Time to press. You’ll need a tortilla press for consistent results. While you *can* use a rolling pin or the bottom of a heavy pan, a press makes life so much easier and ensures relatively uniform thickness, which is key for even cooking and puffing. Most presses are made of cast iron, but heavy-duty aluminum ones also exist. Before you start, line your press with plastic. Cut two circles or squares from a sturdy plastic bag (a freezer bag works great) slightly larger than the press plates. This prevents the dough from sticking – DO NOT press the masa directly onto the metal.
Divide your rested dough into small balls. The size depends on how large you want your tortillas, but something around 1.5 to 2 inches in diameter (about the size of a golf ball, maybe slightly smaller, 40-50 grams if you’re using a scale) is good for standard taco-sized tortillas. Gently roll the dough into a smooth ball between your palms. Place one plastic liner on the bottom plate of the press, put the dough ball slightly off-center towards the hinge side (this helps it press evenly), place the second plastic liner on top, close the lid, and press down firmly but evenly on the handle. Don’t Hulk-smash it! You want a thin, even disc, typically around 1/16th of an inch thick. How much pressure? It takes practice. Too little pressure, and it’s too thick. Too much, and it might get *too* thin and hard to handle. Open the press, carefully peel the top plastic off, flip the tortilla onto your hand, and peel off the bottom plastic. Voila! A perfectly round (hopefully!) uncooked tortilla. Uniform pressing is crucial for even cooking and achieving that puff later. Using plastic liners prevents sticking and makes transfer easy. Practice finding the right pressing pressure.
Comal Magic: Heat and Surface
Now for the cooking. The traditional surface is a comal – a flat, smooth griddle, often made of cast iron, clay, or carbon steel. A well-seasoned cast iron skillet or a flat electric griddle can also work beautifully. The key is even heat distribution and the right temperature. You want the surface to be hot, but not smoking hot. Medium-high heat is usually the sweet spot. How do you test it? Flick a drop of water onto the surface. It should sizzle and evaporate almost immediately, dancing across the surface before disappearing. If it evaporates instantly with a loud hiss, it might be too hot. If it just sits there and slowly steams, it’s too cool.
Getting the cooking temperature right is vital. Too low, and the tortilla will dry out before it cooks, becoming leathery. Too high, and the outside will scorch before the inside cooks through, and it likely won’t puff. Preheating your comal or skillet for a good 5-10 minutes over medium-high heat ensures it’s evenly hot. Don’t add oil! Corn tortillas are cooked on a dry surface. Carefully lay the pressed tortilla onto the hot comal. It requires a gentle touch. Let it cook on the first side – this is the initial setting stage. The cooking surface material (cast iron holds heat incredibly well) can influence the process, but consistent heat is the main goal.
The Flip, The Puff, The Glory
This is where the magic happens! The cooking process is relatively quick, typically under 2 minutes per tortilla. Here’s the general timing I follow, though you’ll need to adjust based on your specific heat and tortilla thickness:
1. Lay the tortilla on the hot comal. Cook for about 20-30 seconds. The edges might start to look slightly opaque or drier. You might see faint wisps of steam.
2. Flip the tortilla using a thin spatula (or your fingers, if you’re brave and quick!). Cook on the second side for a longer duration, maybe 45-60 seconds. This side will likely develop some light brown spots and become more cooked through.
3. Flip it back to the first side. This is often when the **puff** happens! Within another 10-20 seconds, the tortilla should hopefully inflate, either partially or fully, like a little balloon. This puff is caused by steam building up between the cooked layers of the tortilla. It’s the ultimate sign of a well-made, well-cooked tortilla and contributes to that light, fluffy texture.
Don’t be discouraged if your first few don’t puff perfectly. It takes practice to get the heat, thickness, and timing just right. Even slightly puffed or un-puffed homemade tortillas will taste leagues better than most store-bought ones. The key is the rapid heating creating internal steam. If it’s cooking too slowly, the steam escapes before it can build pressure. If it’s cooking too quickly, the surface seals before enough steam generates. That second flip is often the trigger for the puff. Gentle pressing with a spatula on the edges *after* the second flip can sometimes encourage puffing, but be careful not to deflate it.
Keeping Them Soft: The Steamy Towel Trick
You’ve cooked a beautiful, possibly puffy tortilla. Now what? Don’t just stack them on a plate! As they cool, they’ll lose moisture and stiffen. The secret to keeping them soft and pliable is steam. Immediately transfer the cooked tortilla from the comal into a tortilla warmer lined with a clean kitchen towel. If you don’t have a dedicated warmer (though they’re inexpensive and worthwhile), you can create a makeshift one by wrapping the stack of tortillas tightly in a clean, slightly damp kitchen towel and placing them in a sealed container or even a large zip-top bag.
The residual heat from the tortillas creates steam within the towel-lined enclosure, keeping them warm and, more importantly, soft and flexible. This post-cooking steaming step is absolutely essential. Let them hang out in the warmer for at least 5-10 minutes before serving. This allows the moisture to redistribute evenly, ensuring every tortilla is perfectly tender. Trying to eat them straight off the comal might seem appealing, but they’ll be slightly firmer than after they’ve had a chance to steam together. This method keeps them perfectly ready for your tacos, enchiladas, or just enjoying with a bit of butter and salt (don’t judge!). Using a clean towel prevents sogginess while trapping steam.
Troubleshooting Tactics: When Tortillas Go Wrong
Let’s be real, sometimes things don’t go perfectly. What if your tortillas are cracking, sticking, or just not puffing? Let’s troubleshoot common issues.
* Cracking Edges During Pressing: Usually means the dough is too dry. Add water, one teaspoon at a time, knead briefly, and let it rest again for 10-15 minutes before trying again. Also, ensure you’re pressing evenly.
* Sticking to the Press/Plastic: Dough might be too wet. Add a tiny bit more masa harina, mix gently. Ensure your plastic liners are robust enough and not torn.
* Sticking to the Comal: Comal might not be hot enough, or it might need better seasoning (if using cast iron). Ensure it’s properly preheated. Don’t try to flip the tortilla too early before the first side sets.
* Tortillas Are Too Thick/Tough: You might not be pressing them thin enough, or the dough could be slightly too dry. Overcooking can also make them tough – stick to the quick cooking times.
* Not Puffing: This is the trickiest one. Reasons can include: dough too dry, dough too wet, comal not hot enough, comal *too* hot, tortillas pressed too thick, tortillas pressed too thin, uneven pressing, not cooking long enough on the second side before the final flip. Yeah, I know. Start by checking your heat – it’s often the main culprit. Ensure the comal is medium-high and test with the water drop method. Make sure you’re getting a good cook on that second side (45-60 seconds) before the final flip back. Consistent dough hydration and optimal heat are the biggest factors here.
Don’t give up! Each batch is a learning experience. Pay attention to how the dough feels and how the tortillas behave on the comal. Small adjustments to water, heat, or timing can make a huge difference. Keeping notes can actually be helpful, especially when you’re starting out. Record your masa brand, water amount, rest time, and cooking temp/times to see what works best in your kitchen.
Beyond the Basics: Flavor and Variations
Once you’ve mastered the basic technique, the world of corn tortillas opens up! You can start playing with variations. Using different types of masa harina, like blue corn masa harina, adds a beautiful color and a slightly earthier, nuttier flavor. It sometimes requires slightly different hydration levels, so be prepared to adjust your water.
You can also incorporate flavors directly into the dough, although do this subtly so as not to mess with the texture too much. A pinch of chili powder or cumin can add warmth. Some people add a tiny amount of fat – like a teaspoon of lard or vegetable shortening – to the dough along with the water. This can make the tortillas extra tender and slightly richer, though purists might scoff. I’ve tried it, and while nice, I usually prefer the clean taste of just masa, water, and salt. Another idea is using vegetable broth instead of water for a subtle savory note. The key is experimentation, but always start with a solid mastery of the plain tortilla technique first. Understanding the fundamentals allows you to riff creatively without compromising the essential structure and texture. Trying flavored masa doughs can be a fun weekend project.
Bringing It All Home: Your Tortilla Triumph
Whew, okay, that was a lot of tortilla talk, wasn’t it? It might seem daunting at first, all these little details about water temperature, resting times, and puffing science. But honestly, once you get the feel for the dough and the rhythm of pressing and cooking, it becomes second nature. It’s a process that’s deeply satisfying, connecting you to a culinary tradition that spans centuries. The difference between a freshly made, warm, soft corn tortilla and a store-bought one is truly night and day. It elevates everything it touches, from the simplest taco to a complex enchilada.
Maybe the real secret isn’t just one thing, but the combination – the nixtamalized masa harina, the warm water hydration, the patient rest, the uniform press, the quick sear on a hot comal, and the final steamy embrace in a towel. Each step builds upon the last. So, my challenge to you? Give it a try. Embrace the process, don’t fear the imperfections of your first few batches (they’ll still taste great!), and pay attention to the details. Can you achieve that perfect puff? I bet you can, eventually. And even if they don’t all puff, soft, fluffy, homemade corn tortillas are absolutely within your reach.
What will you make first with your perfect tortillas? Tacos al pastor? Simple quesadillas? Or just eat one standing at the stove with a little butter and salt? There’s no wrong answer. The journey of making them is almost as rewarding as eating them. Almost. Let me know how it goes!
FAQ
Q: My tortillas keep cracking around the edges when I press them. What am I doing wrong?
A: This is almost always a sign that your dough is too dry. The masa harina needs to be fully hydrated to be pliable. Try adding a bit more warm water, just a teaspoon or two at a time, knead it in gently, and let the dough rest for another 15-20 minutes before trying to press again. Also ensure your dough balls are smooth before pressing.
Q: Do I really need a tortilla press?
A: Need? No. Highly recommended for ease and consistency? Yes. You *can* press tortillas between two plates lined with plastic or even carefully use a rolling pin, but it’s much harder to get them uniformly thin, which affects cooking and puffing. A decent cast iron press isn’t overly expensive and makes the process much faster and more reliable.
Q: Why aren’t my tortillas puffing up?
A: Ah, the elusive puff! It’s often related to heat and timing. Ensure your comal or skillet is preheated properly to medium-high heat (water drop test!). Cook the first side briefly (20-30s), the second side longer (45-60s), and then flip back. That final flip onto the initially cooked side is when the puff usually happens due to trapped steam. Dough hydration is also key – too dry or too wet can inhibit puffing. Keep practicing!
Q: How long do homemade corn tortillas last, and how should I store them?
A: Homemade corn tortillas are best eaten the day they’re made, ideally within a few hours. Keep them wrapped in a towel inside a tortilla warmer or sealed container while serving. If you have leftovers, let them cool completely, then store them in a sealed plastic bag in the refrigerator for 2-3 days. Reheat them gently on a dry comal or skillet, or by wrapping them in a damp paper towel and microwaving briefly until soft.
You might also like
- Authentic Salsa Roja Recipe From Scratch
- Mastering Guacamole: Tips for Perfect Flavor & Texture
- Slow Cooker Carnitas: Tender, Crispy Mexican Pork
@article{perfect-corn-tortilla-secrets-soft-fluffy-every-time,
    title   = {Perfect Corn Tortilla Secrets Soft Fluffy Every Time},
    author  = {Chef's icon},
    year    = {2025},
    journal = {Chef's Icon},
    url     = {https://chefsicon.com/perfect-corn-tortilla-secrets-soft-fluffy-every-time/}
} 