
Table of Contents
- 1 Mastering Your Kitchen Prep Flow: Organization Strategies
- 1.1 1. The Undeniable Power of Mise en Place
- 1.2 2. Look Up! Leveraging Vertical Space
- 1.3 3. Zone Defense: Establishing Dedicated Work Areas
- 1.4 4. Containerization: The Art of the Box
- 1.5 5. Strategic Tool Placement: Everything in Arm’s Reach
- 1.6 6. Cutting Board Systems: More Than Just Plastic
- 1.7 7. Taming the Trash: Efficient Waste Management
- 1.8 8. The Labeling Imperative: Date, Contents, Initials
- 1.9 9. Clean As You Go: Organization’s Constant Companion
- 1.10 10. Purge, Reassess, Adapt: The Ongoing Process
- 2 Bringing Order to the Creative Chaos
- 3 FAQ
Alright, let’s talk kitchens. Specifically, that whirlwind zone known as the prep area. As Sammy, your resident food and lifestyle enthusiast here at Chefsicon.com, I’ve seen my share of kitchens – from gleaming temples of gastronomy to, well, less organized spaces. And one thing holds true everywhere: a chaotic prep station breeds chaotic service. Solid prep area organization isn’t just about being tidy; it’s the absolute backbone of an efficient, safe, and frankly, sane kitchen environment. Working from my Nashville home office, with Luna supervising from her favorite sunbeam, I often find myself thinking about systems – how things work, why they break down. And kitchen prep? It’s a fascinating system under pressure.
I remember early in my career, long before I pivoted to marketing and writing about food culture, I did a brief stint helping out in a friend’s bustling cafe back in the Bay Area. The energy was electric, but the back-of-house, particularly the prep area, felt like a constant battle zone. Tools vanished, ingredients were misplaced, someone was always yelling for something. It was stressful, inefficient, and you could feel the tension radiating outwards. It wasn’t until they implemented some serious organizational changes that things truly smoothed out. It’s kinda like Nashville’s music scene – you need the underlying structure, the rhythm section holding it down, before the solos can really shine. That experience stuck with me. It drove home how crucial structure is, even in creative, high-energy environments. Maybe especially in those environments.
So, what are we diving into today? We’re moving beyond just wiping down counters. We’re talking about tangible prep-area-organization-tips-for-chefs that can transform your workflow. Think smarter storage, logical layouts, and habits that stick. Whether you’re running a high-volume restaurant kitchen, a cozy cafe, or even just trying to get your home cooking game to the next level (because let’s be honest, these principles apply there too), getting your prep area dialed in is fundamental. We’ll cover everything from the zen of mise en place to the unsung glory of vertical space. Let’s get this station sorted, shall we? It’s less about rigid rules and more about finding a flow that works *for you* and your team, reducing stress and boosting that all-important consistency.
Mastering Your Kitchen Prep Flow: Organization Strategies
1. The Undeniable Power of Mise en Place
Okay, let’s start with the absolute classic: mise en place. French for “everything in its place.” I know, I know, every culinary student hears this on day one. But how many kitchens *truly* live and breathe it consistently during the heat of service prep? It’s more than just chopping your onions before you start the sauce. It’s a philosophy. It means having every single ingredient measured, cut, peeled, grated, portioned, whatever – *and* having all the necessary tools (bowls, spoons, whisks, pans) laid out and ready *before* you even think about turning on the heat or combining elements. This isn’t just about efficiency, although it drastically cuts down on frantic searching mid-recipe. It’s about mental clarity. When everything is prepped and ready, you can focus entirely on the cooking process, the technique, the timing. It reduces errors, minimizes stress, and allows for a smoother, more controlled workflow. It’s the foundation upon which all other organization rests. Is this too basic? Maybe, but skipping it is like trying to build a house without a foundation. It’s *that* critical. You need your small containers, your portion cups, your sanitized surfaces ready to receive the prepped goods. It transforms cooking from a scavenger hunt into a composed, deliberate act. Think about pre-portioned ingredients and organized tool setup as non-negotiables.
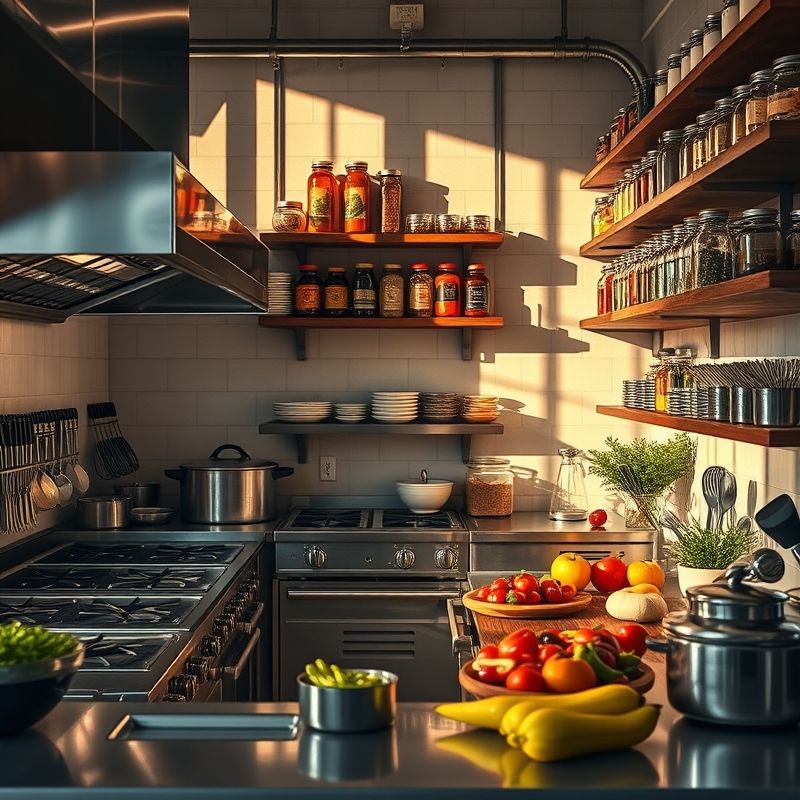
2. Look Up! Leveraging Vertical Space
Counter space in any kitchen, especially commercial ones, is prime real estate. Often, it’s incredibly limited. So, where do you look when you run out of horizontal surface? Up! Utilizing vertical storage is a game-changer for prep area organization. Think sturdy, stainless steel wall shelves installed above prep tables for frequently used dry goods, spices, or equipment. Consider wall-mounted racks for holding utensils, pans, or even cutting boards. Magnetic knife strips are fantastic – they keep sharp tools safely out of drawers but readily accessible, and they look pretty professional too, let’s be honest. Under-shelf baskets can add extra storage for smaller items without cluttering the main counter. The goal is to get things off the valuable work surface while keeping them within easy reach. This requires some planning – you don’t want shelves so high they’re inconvenient, or positioned where people might bump their heads. But thoughtful vertical integration dramatically increases your storage capacity and helps maintain a clearer, more functional primary prep zone. It’s about maximizing every square inch, a principle crucial in both tiny food trucks and sprawling hotel kitchens. Don’t forget magnetic spice racks or wall grids with hooks – simple, effective solutions.
3. Zone Defense: Establishing Dedicated Work Areas
Imagine a football field without yard lines or designated positions. Chaos, right? The same applies to a kitchen prep area. Establishing dedicated zones for specific tasks is essential for efficiency and, critically, for food safety. You absolutely need separate areas for raw meat/poultry/fish prep versus ready-to-eat foods like salads and vegetables. This is non-negotiable for preventing dangerous cross-contamination. Think about the flow: where do raw ingredients come in? Where does prep happen? Where do finished components go? Ideally, you’d have physically separate tables or clearly demarcated sections on a larger table, perhaps using color-coded cutting boards and dedicated tools for each zone. Maybe a pastry zone, a garde manger station, a hot prep area. This zoning extends to storage too – raw meats on bottom shelves in the cooler, produce above. A clear workflow analysis helps determine the most logical layout, minimizing steps and preventing staff from bumping into each other. It might seem rigid at first, but defined zones create a predictable, efficient rhythm that makes the whole operation run smoother, especially during peak hours.
Implementing zones requires clear communication and consistent reinforcement with the entire team. It’s not just about drawing lines on a diagram; it’s about building habits. Use signage if necessary. Ensure everyone understands *why* these zones exist – primarily for safety, secondarily for efficiency. When someone knows exactly where to go to break down chickens versus where to assemble salads, there’s less confusion, less wasted movement, and a significantly lower risk of making customers sick. This systematic approach, this subdivision of tasks and space, is something I really appreciate from my marketing background – understanding process flow is key everywhere. It might take some adjustment, perhaps even physically rearranging equipment or tables, but the payoff in terms of safety and speed is immense. Think task-specific stations.
4. Containerization: The Art of the Box
Walk into any highly organized professional kitchen, and you’ll see stacks upon stacks of containers. Clear, standardized, labeled containers are the unsung heroes of prep area organization. Forget using a random assortment of old takeout containers or mismatched deli cups. Investing in a good system of standardized containers – typically clear plastic or polycarbonate squares/rectangles with tight-fitting lids – is crucial. Why standardized? Because they stack neatly and efficiently in coolers, on shelves, and even on the prep table itself, maximizing space. Why clear? So you can see the contents at a glance, reducing the need to open multiple containers searching for that one specific ingredient. Different sizes are obviously needed, from small pint or quart containers for sauces and garnishes to larger Cambros or lexans for bulk prepped items like chopped vegetables or batches of dough. Metal containers (hotel pans, bain marie inserts) are essential for hot holding or specific cold prep directly on the line. Adopting the FIFO (First-In, First-Out) system is naturally supported by good containerization and labeling – newest items go to the back, oldest to the front, ensuring proper rotation and minimizing waste. Using clear labeling on every single container is part of this, which we’ll get to next.
5. Strategic Tool Placement: Everything in Arm’s Reach
A disorganized prep station often involves frantic searching for the right tool – the peeler that vanished, the whisk hiding under a pile of towels, the right size measuring spoon. This wastes precious seconds and adds unnecessary stress. Effective prep area organization means strategic placement of essential tools. Think about ergonomics and motion efficiency. What tools do you use most frequently at a specific station? Those should be *immediately* accessible without taking more than a step or two. Wall-mounted magnetic knife strips, as mentioned earlier, are excellent. Utensil holders or crocks placed directly on the prep table can keep whisks, spoons, spatulas, and tongs upright and ready. Consider drawers fitted with dividers to neatly organize smaller items like peelers, thermometers, pastry tips, and measuring spoons. Pegboards with hooks can be surprisingly effective for hanging tools like graters, sieves, or even small pans. The key is analyzing the workflow of each prep task and positioning the required tools accordingly. It’s about minimizing wasted movement – reaching, bending, searching. Every second saved adds up significantly over a busy shift. Ensure tool accessibility is prioritized based on frequency of use.
This might require some trial and error. What feels logical on paper might not work perfectly in practice during a busy service. Observe yourself and your team. Where do people naturally reach for things? Are there bottlenecks caused by poor tool placement? Maybe the shared peelers always end up at one end of the table when they’re needed at both. Perhaps investing in duplicates of inexpensive, high-use items makes sense. Don’t be afraid to rearrange things. Maybe a small rolling cart can serve as a mobile tool station for specific tasks that move around the kitchen. The goal is a fluid, intuitive setup where tools seem to appear in your hand just as you need them. It’s about creating a seamless extension of the chef’s hands, reducing friction and allowing focus to remain on the food itself. A well-organized toolkit is a sign of a well-organized mind, I always think.
6. Cutting Board Systems: More Than Just Plastic
Cutting boards are fundamental to prep, but they can also be a major source of disorganization and, more importantly, cross-contamination if not managed properly. Implementing a color-coded system is standard practice in most professional kitchens for excellent reasons. Typically: Red for raw meat, Yellow for raw poultry, Blue for raw seafood, Green for fruits and vegetables, Brown for cooked meats, White for dairy/bakery (though some systems vary). This visual cue is incredibly effective at preventing dangerous bacteria from spreading. But the system only works if it’s strictly adhered to and if the boards themselves are properly stored and maintained. Storing them upright in a dedicated rack allows them to air dry properly, preventing mold and bacterial growth. Never stack wet boards. Ensure boards are replaced when they become excessively scored or warped, as deep grooves can harbor bacteria that are hard to clean. Having enough boards for each designated zone is also key – you don’t want someone prepping chicken waiting for the only yellow board to be washed. It’s about having the right board sanitation protocols and adequate storage solutions in place.
7. Taming the Trash: Efficient Waste Management
Prep work inevitably generates waste – vegetable peels, meat scraps, packaging. How this waste is managed significantly impacts the cleanliness and efficiency of the prep area. Having easily accessible, appropriately sized bins for trash, recycling, and potentially compost is crucial. Ideally, integrated waste bins – perhaps built into the prep table or on wheels stored directly underneath – minimize steps needed to dispose of scraps. They shouldn’t be so far away that chefs are tempted to let waste pile up on their cutting boards. Consider the workflow: where does most waste occur? Place bins strategically. Furthermore, these bins need to be emptied *frequently*, before they overflow and become hazardous or simply disgusting. Assigning this task as part of the regular workflow, not just an end-of-shift chore, keeps the area cleaner and more pleasant. For composting programs, clear labeling and staff training on what is compostable are essential. Efficient compost collection and designated recycling stations contribute not only to organization but also to sustainability efforts. A clean station with well-managed waste is simply less stressful to work in.
8. The Labeling Imperative: Date, Contents, Initials
If mise en place is the foundation and containers are the building blocks, then labels are the mortar holding it all together. Seriously, consistent labeling is non-negotiable in a professional kitchen. Every single container of prepped food, every stored ingredient, needs a label detailing *at least* three things: the contents, the date it was prepped/opened, and ideally, the initials of the person who prepped it. Why? Contents: Obvious, avoids guessing games. Date: Crucial for FIFO rotation and food safety, ensuring items are used before they expire or spoil (date marking). Initials: Accountability, and useful if there are questions about the prep. Masking tape and a Sharpie are the classic method, and they work, but make sure the tape is removed completely before washing the container to avoid sticky residue buildup. Dissolvable labels are a great innovation, washing away cleanly. Pre-printed date gun labels can also speed things up. Whatever system you choose, it needs to be used *consistently* by everyone. Unlabeled containers are a food safety risk and a major source of waste when usable food gets thrown out simply because nobody knows what it is or when it was made. This directly impacts food safety compliance.
9. Clean As You Go: Organization’s Constant Companion
This isn’t strictly an organizational *tip* in terms of layout, but it’s inseparable from maintaining an organized prep area. The “Clean As You Go” philosophy must be ingrained in every team member. It means wiping down surfaces immediately after a task, washing tools right after using them (or placing them in a designated dirty bin if immediate washing isn’t feasible), sweeping up spills promptly, and generally keeping the workspace tidy *during* the prep process, not just saving it all for closing. Integrated cleaning prevents clutter from building up, reduces the risk of cross-contamination, and makes the entire environment safer and more pleasant. It requires discipline, yes. It might feel like it slows you down initially, but in reality, working in a continuously clean space is far more efficient than periodically stopping everything for a major cleanup or trying to navigate a messy station. Having sanitation buckets (properly mixed sanitizer solution and clean cloths) readily available at each station encourages this. Think of sanitation protocols and continuous tidiness not as chores, but as integral parts of the professional chef’s workflow.
Honestly, this is one area where I sometimes struggle even in my own home kitchen – Luna, my cat, certainly doesn’t help, batting stray bits of chopped parsley onto the floor. But the principle holds. Letting mess accumulate just creates friction, both physical and mental. In a pro kitchen, that friction translates to slower service, potential hazards, and increased stress. Training staff on the importance of CA G, leading by example, and making cleaning supplies easily accessible are key. It’s a cultural thing as much as a procedural one. A chef who keeps their station immaculate even under pressure is usually a chef who is in control.
10. Purge, Reassess, Adapt: The Ongoing Process
Finally, remember that prep area organization isn’t a one-time setup. It’s an ongoing process of refinement. Schedule regular time – maybe weekly or monthly – for a periodic decluttering. Go through drawers, shelves, and coolers. Get rid of broken tools, expired products, containers without lids, anything that hasn’t been used in ages. Be honest: is that specialized gadget really earning its keep, or just taking up valuable space? Beyond decluttering, conduct a regular system evaluation. Is the current layout *really* working? Are the zones effective? Is the tool placement optimal? Talk to the team – they’re the ones using the space every day and likely have valuable insights or frustrations. Maybe the workflow has changed because of a menu update, requiring a different setup. Be prepared to make adjustments, move equipment, rethink storage. An organized prep area is an adaptable layout, one that evolves with the needs of the kitchen. Don’t get so attached to your initial setup that you resist necessary changes. Continuous improvement is the name of the game.
Bringing Order to the Creative Chaos
So there you have it – ten angles on tackling prep area organization. It might seem like a lot, but implementing even a few of these ideas can make a significant difference. It’s not about creating a sterile, joyless environment; it’s about creating a space where creativity and efficiency can coexist, where chefs can focus on their craft without fighting their surroundings. From embracing mise en place like a religion to the simple act of consistent labeling, each step contributes to a smoother, safer, and ultimately more productive kitchen.
Maybe the real challenge isn’t just implementing these systems, but maintaining them, especially when things get crazy busy. I often wonder, does the discipline required for meticulous kitchen organization spill over into other areas of life? Or is it a skill compartmentalized just for the professional space? For me, thinking about these systems helps structure my writing process, helps organize my thoughts before they hit the page. Perhaps my personal challenge, and maybe yours too, is to take one principle – maybe it’s ‘Clean As You Go’ or ‘Periodic Decluttering’ – and really try to apply it more consistently, whether in the kitchen or at my desk (Luna’s shedding alone requires constant vigilance!).
Ultimately, an organized prep area reflects a respect for the ingredients, for the craft, and for the team. It’s a tangible manifestation of professionalism. What does your prep station say about your kitchen’s philosophy right now? Is it speaking the language of calm efficiency, or is it yelling in panicked chaos? It’s never too late to start organizing, one container, one label, one designated zone at a time.
FAQ
Q: What’s the absolute first thing I should focus on for better prep area organization?
A: Without a doubt, mastering mise en place. Having all ingredients prepped and tools ready before you start cooking is the foundational step that makes everything else smoother and reduces stress significantly.
Q: My kitchen prep area is tiny! How can I possibly organize it effectively?
A: Focus heavily on vertical space – use wall shelves, magnetic strips, and under-shelf baskets. Invest in multi-use tools to reduce clutter, use standardized stackable containers, and be ruthless about decluttering anything non-essential.
Q: What are the best types of containers for food prep storage?
A: Generally, clear, stackable, standardized containers with tight-fitting lids are best. Polycarbonate or durable plastic squares and rectangles are great for visibility and efficient stacking in coolers and on shelves. Stainless steel pans (hotel pans, bain marie inserts) are essential for line use and hot/cold holding.
Q: How often should we really reorganize or declutter the prep area?
A: Tidying and basic organization should happen continuously via ‘Clean As You Go’ and at the end of each shift. A deeper periodic decluttering and system evaluation should happen regularly – perhaps monthly or quarterly – to remove unused items, reassess the layout, and ensure the system still meets the kitchen’s needs effectively.
You might also like
- Kitchen Workflow Optimization Secrets
- Essential Tools for Efficient Food Prep
- Small Commercial Kitchen Layout Ideas
@article{chef-prep-area-organization-taming-kitchen-chaos-like-a-pro,
    title   = {Chef Prep Area Organization: Taming Kitchen Chaos Like a Pro},
    author  = {Chef's icon},
    year    = {2025},
    journal = {Chef's Icon},
    url     = {https://chefsicon.com/prep-area-organization-tips-for-chefs/}
} 

