
Table of Contents
- 1 The Great Brine Breakdown: Wet vs. Dry
- 1.1 So, What’s the Science? A Non-Boring Explanation
- 1.2 Wet Brining: The Traditional Immersion
- 1.3 Dry Brining: The Simpler Salt Rub
- 1.4 The Moisture Debate: Water Weight vs. Concentrated Juice
- 1.5 Flavor Penetration: Aromatics vs. Salt
- 1.6 The Quest for Crispy Skin
- 1.7 Logistics: Space, Time, and Cleanup
- 1.8 Beyond the Big Bird: Brining Chicken and Other Poultry
- 1.9 My Take: Leaning Towards Dry, But Keeping Options Open
- 2 Final Thoughts: Brine Your Own Way
- 3 FAQ
Alright folks, let’s talk turkey. Or chicken. Or duck, I suppose. Basically, let’s talk about making poultry taste amazing, specifically diving into the murky, sometimes salty waters of brining. If you’ve ever roasted a bird, especially a big one like a Thanksgiving turkey, you’ve probably heard the term ‘brine’ thrown around. Maybe you’ve even tried it. But then you hear about *dry* brining, and suddenly it’s a whole debate: wet brine vs dry brine. Which one actually gives you that incredibly juicy, flavorful bird everyone dreams of? It’s a question I’ve wrestled with in my own kitchen here in Nashville, often with my cat Luna judging my every move from the countertop (don’t worry, she gets shooed off before any actual food prep happens).
Coming from a marketing background, I tend to analyze things, maybe overanalyze sometimes? I look at the ‘user experience’ of cooking methods, the ‘value proposition’ of the final dish. And brining, well, it’s got layers. It’s not just about adding salt; it’s about moisture retention, flavor penetration, texture transformation… it’s fascinating stuff. When I first moved here from the Bay Area, I was deep into the whole wet brining scene – big buckets, complex aromatic liquids, the whole nine yards. It felt like the ‘authentic’ way. But space is always a factor, and frankly, wrestling a slippery, multi-gallon container filled with raw poultry and brine isn’t exactly my idea of kitchen zen. Then dry brining entered the chat, promising similar results with less fuss. Skeptical Sammy mode: activated.
So, what’s the real deal? Is one definitively ‘better’? Or is it more nuanced, depending on the bird, the desired outcome, or even just your personal tolerance for kitchen chaos? That’s what we’re going to unpack today. We’ll dig into the science (don’t worry, I’ll keep it digestible), compare the processes, weigh the pros and cons of each method, and talk about how they impact everything from the juiciness of the meat to the crispiness of the skin. I’ve done my experimenting, made my share of both perfectly moist and sadly dry birds, and I’m ready to share my thoughts. Hopefully, by the end of this, you’ll have a clearer idea of which team you’re on – Team Wet Brine or Team Dry Brine – or maybe, just maybe, you’ll realize there’s a place for both in your culinary playbook. Let’s get salty.
The Great Brine Breakdown: Wet vs. Dry
Before we pit these two methods against each other, let’s make sure we’re all on the same page about what brining actually *is*. At its core, brining is a process used to increase the moisture content and enhance the flavor of meat, particularly lean cuts like poultry breast that are prone to drying out during cooking. It involves treating the meat with salt before cooking. The magic lies in how that salt interacts with the muscle fibers. Think of it as prepping the meat for its big moment in the oven or on the grill, ensuring it stays succulent and tasty.
So, What’s the Science? A Non-Boring Explanation
Okay, bear with me for a little science – it actually helps understand *why* brining works. It boils down to two main processes: osmosis and diffusion, plus some protein magic. When you surround meat with a salt solution (either liquid or just salt crystals), concentration gradients are created. In a wet brine, the liquid outside the meat has a higher salt concentration (and lower water concentration) than the fluid inside the meat cells initially. Osmosis tries to balance this out, so water *wants* to move out of the meat. BUT, something else happens simultaneously. Salt ions (sodium and chloride) are small enough to diffuse *into* the meat. This influx of salt changes the protein structure within the muscle fibers. Specifically, it causes some proteins (like myosin) to denature, or unwind, a bit. This unwinding allows the proteins to hold onto more water and also creates gaps that water can fill. Crucially, the salt disrupts the muscle filament structure, preventing them from contracting as tightly when heated. Less contraction means less moisture squeezed out during cooking. So, even though some initial water might *try* to leave via osmosis, the salt going *in* alters the proteins so they can absorb and retain much more water overall, including some of the brine liquid itself. It sounds counter-intuitive that salt water makes meat juicier, but it’s this protein interaction that’s key.
Dry brining works a bit differently but achieves a similar end goal through the same protein modification principle. When you rub salt directly onto the poultry skin, the salt draws moisture out of the meat onto the surface through osmosis. This moisture dissolves the salt, creating a highly concentrated brine right on the surface of the bird. Then, diffusion takes over. This concentrated brine is slowly reabsorbed back into the meat, carrying the salt ions with it. Just like with wet brining, these salt ions denature proteins, increasing their water-holding capacity. The difference is, you’re not adding *external* water; you’re essentially using the meat’s own moisture to create the brine and then enabling it to hold onto that moisture (and its natural juices) more effectively during cooking. It’s a more concentrated process, arguably. Does this mean less overall moisture added compared to a wet brine? Maybe, but the moisture it *does* have is pure meat juice, not absorbed brine water. This distinction becomes important later when we talk flavor and skin.
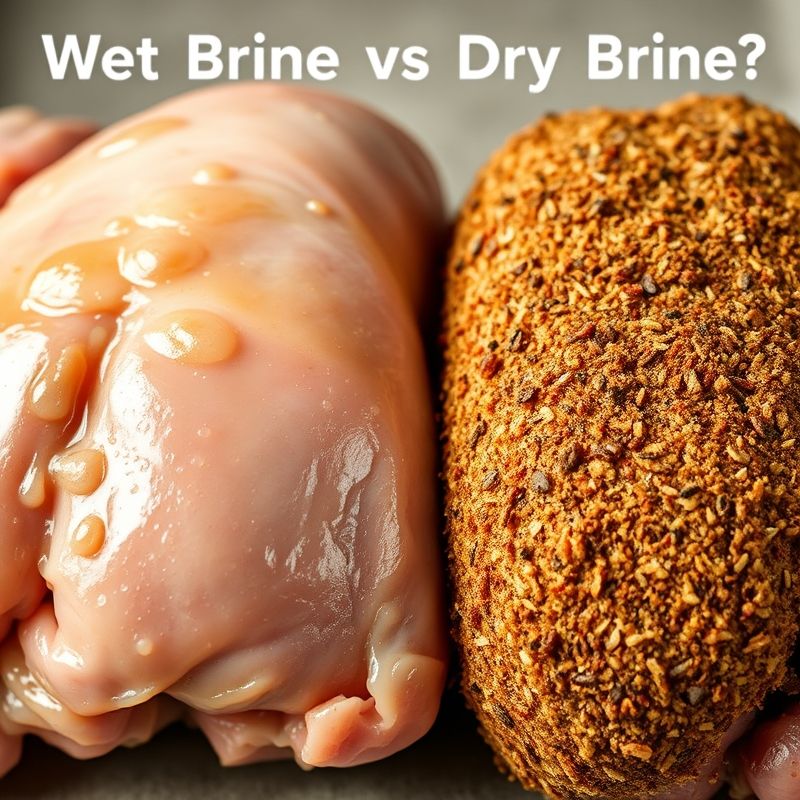
Wet Brining: The Traditional Immersion
This is probably what most people picture when they hear ‘brine’. It involves completely submerging the poultry in a saltwater solution for a specific period. Typically, the solution is about 5-8% salt by weight (roughly 1 cup of kosher salt per gallon of water, though this varies wildly depending on the salt type and recipe). You can also add sugar (which aids browning and balances flavor), herbs, spices, aromatics – whatever flavor profile you’re aiming for. The bird needs to stay submerged and refrigerated for several hours, or even days for a large turkey.
Pros: It definitely adds moisture; the physical weight of the bird increases as it absorbs the brine. This can be a great insurance policy against dryness, especially for notoriously lean cuts or for very long cooking processes. It also allows for deep infusion of flavors if you add aromatics like garlic, peppercorns, bay leaves, citrus peels, etc., to the liquid. Many people swear by the unparalleled juiciness achieved with a wet brine. It feels substantial, like you’re really *doing* something.
Cons: Oh, the logistics! First, you need a container large enough to hold the bird *and* enough brine to keep it fully submerged. For a big turkey, this often means a food-grade bucket, a large cooler, or maybe even specialized brining bags. Second, all that liquid plus the bird takes up significant refrigerator space, which is often prime realestate, especially around holidays. Third, it can be messy – sloshing brine water, handling a slippery, wet bird. Fourth, and this is a big one for me, the added water can sometimes dilute the natural flavor of the poultry, making it juicy but slightly… watery? And achieving crispy skin can be more challenging because the skin is waterlogged; you often need to air-dry the bird thoroughly after brining and before cooking.
Dry Brining: The Simpler Salt Rub
Dry brining, sometimes called pre-salting, involves rubbing the poultry generously with salt (and potentially other seasonings like pepper, herbs, or spices) and letting it rest, uncovered, in the refrigerator. There’s no added liquid. The amount of salt is usually calculated based on the weight of the bird, often around 1/2 to 1 teaspoon of kosher salt per pound. The salt initially draws out moisture, forms that concentrated surface brine, and then gets reabsorbed, seasoning the meat and helping it retain its natural juices.
Pros: Simplicity and space-saving are huge advantages. All you need is salt and refrigerator space for the bird itself, usually on a rack set over a baking sheet to catch any drips. There’s no large container of liquid to deal with. Many proponents, myself included sometimes, feel dry brining results in a more concentrated, natural poultry flavor, since you’re not diluting it with brine water. A major bonus is that the process inherently dries out the skin as the bird sits uncovered in the fridge. This leads to significantly crispier skin upon roasting, often without any extra steps needed before cooking. It feels cleaner, less cumbersome. Is this the best approach? For ease and crispy skin, it’s definitely compelling.
Cons: It might not add as much sheer *volume* of moisture as wet brining, so if maximum perceived juiciness (even if slightly diluted) is your absolute top priority, wet brining might still edge it out for some. You also don’t get the same opportunity to infuse liquid-based aromatic flavors deep into the meat, though you can certainly add herbs and spices to the salt rub for surface flavor. It requires planning ahead, as dry brining typically needs at least 12-24 hours for chicken and up to 3 days for a large turkey to allow the salt to penetrate effectively. You also need to be comfortable leaving an uncovered raw bird in your fridge (placed safely away from other foods, of course).
The Moisture Debate: Water Weight vs. Concentrated Juice
This is where things get really interesting and opinions diverge sharply. Wet brining undeniably adds water weight to the bird. You can feel it – the bird is heavier after soaking. This translates to juiciness, absolutely. When you carve into a wet-brined bird, moisture is often very apparent. But is it *flavorful* moisture? Sometimes, I find that moisture tastes a bit diluted, like poultry-flavored water rather than rich meat juice. It’s juicy, yes, but perhaps lacks depth.
Dry brining, on the other hand, doesn’t add external water. It works by enabling the meat to hold onto its *own* natural juices more effectively. So, while the bird might not gain overall weight, the juices it retains during cooking are pure, concentrated poultry flavor. To me, this often results in meat that tastes more intensely of chicken or turkey. It’s still incredibly moist, just in a different, perhaps more profound way. I’m torn between the foolproof moisture insurance of wet brining and the superior flavor concentration of dry brining… but ultimately, for flavor, I often lean towards dry.
Think about it like this: wet brine is like plumping up a grape by soaking it in water, while dry brine is like preventing a raisin from ever losing its moisture in the first place. Both approaches combat dryness, but the character of the final moisture is different. Which is ‘better’ might depend on whether you prioritize sheer volume of moisture or the quality and concentration of that moisture. There’s also the argument that some moisture loss during cooking is inevitable, and the extra water from wet brining simply provides a larger buffer.
Flavor Penetration: Aromatics vs. Salt
Flavor is the other major battleground. With wet brining, you have the opportunity to dissolve all sorts of aromatics – herbs, spices, citrus, garlic, onion – into the brine liquid. The idea is that as the brine is absorbed, these flavors are carried deep into the meat. Does it work? To some extent, yes. Salt is very effective at penetrating meat, but larger flavor molecules from herbs and spices? The science is a bit debated. Some argue these larger molecules mostly flavor the surface and the brine liquid itself, which then lightly flavors the meat. Others believe some penetration occurs. My experience suggests wet brining *can* impart subtle background notes from aromatics, but the dominant flavor added is still salt.
Dry brining seems more straightforward in its flavor impact. The primary flavor agent penetrating the meat is salt. Any herbs, spices, or sugar mixed with the salt largely stay on or near the surface, flavoring the skin and the outermost layer of meat. However, by enhancing the meat’s natural flavor and seasoning it thoroughly from within with salt, dry brining creates a foundation that lets the poultry’s own taste shine. You can then build other flavors through rubs applied just before cooking, sauces, or basting. I sometimes feel that the ‘infused’ flavors from wet brines can be a bit muddled, whereas dry brining gives you a clean, well-seasoned canvas. Maybe I should clarify… it’s not that wet brine flavors are bad, just sometimes less distinct than the pure poultry flavor enhanced by a dry brine.
The Quest for Crispy Skin
Ah, crispy skin. For many (myself included), it’s a non-negotiable part of perfectly cooked poultry. This is one area where dry brining typically has a distinct advantage. The process involves leaving the salted bird uncovered in the refrigerator for days. The cold, dry air of the fridge, combined with the salt drawing moisture to the surface (where it evaporates), effectively dries out the skin. This desiccated skin renders its fat and crisps up beautifully during roasting, often achieving that coveted shattering texture.
Wet brining presents the opposite situation. The bird emerges from its bath thoroughly waterlogged, skin included. Even if you pat it dry meticulously, the skin itself is still saturated with moisture. This moisture needs to evaporate before the skin can start to brown and crisp, which takes longer in the oven and can sometimes result in less-than-perfectly crispy skin, or even rubbery patches. To counteract this, you often need an extra step: letting the wet-brined bird air-dry in the refrigerator for several hours (or even overnight) *after* brining and before roasting. This adds another step and more time to the process, somewhat negating the perceived simplicity of just soaking it. So, if ultra-crispy skin is your holy grail, dry brining offers a more direct path.
Logistics: Space, Time, and Cleanup
Let’s be practical. Cooking, especially for holidays or gatherings, often involves kitchen Tetris. Wet brining demands significant real estate: a large container and enough fridge space to hold it for potentially several days. It also requires sourcing a food-safe container if you don’t have one. Handling the bird means dealing with potential spills and splashes of raw-poultry-infused saltwater. Cleanup involves washing a large, potentially unwieldy container. The process itself, while mostly hands-off during the soaking time, requires upfront prep to make the brine and careful handling.
Dry brining is far more space-efficient. The bird sits on a rack over a sheet pan, taking up only slightly more vertical space than the bird itself. No special containers needed. Handling is minimal – just the initial rub-down and then transferring it to the oven. Cleanup is usually just washing the sheet pan and rack. The main logistical factor for dry brining is time planning – you need to start it 1-3 days before cooking. But the actual hands-on time is very short. For me, living in a place with a decently sized but not enormous kitchen, and valuing my sanity during busy cooking times, the sheer ease and minimal footprint of dry brining are incredibly appealing. It just feels less… stressful.
Beyond the Big Bird: Brining Chicken and Other Poultry
While the Thanksgiving turkey often gets the most brine attention, these methods work wonders for other poultry too. A whole roasted chicken benefits immensely from either method. Because chickens are smaller, the brining times are shorter – maybe 4-8 hours for a wet brine, or 12-24 hours for a dry brine. Chicken pieces, like breasts or thighs, can also be brined. Boneless, skinless chicken breasts, notorious for drying out, become much more forgiving after a quick brine (even just 30-60 minutes in a wet brine or a couple of hours with a dry brine can make a difference).
Duck, with its fatty skin, might seem like it doesn’t need brining, but brining can still season the meat beautifully. For duck, I almost exclusively prefer dry brining, as it helps season the meat while also crucially drying out that thick skin, promoting better rendering and crisping. Cornish game hens, quail – any bird you plan to roast, grill, or even pan-sear can potentially benefit from the flavor and moisture boost of a well-executed brine. The key is adjusting the salt concentration (especially for wet brines, maybe slightly less salt) and timing based on the size and type of bird.
My Take: Leaning Towards Dry, But Keeping Options Open
So, after all this back and forth, where do I land? If you’ve been reading along, you can probably guess I lean towards dry brining for most applications these days. The concentrated flavor, the superior crispy skin, and the sheer practicality are hard to beat. It feels like a more elegant solution, achieving fantastic results with less fuss and mess. Roasting a dry-brined chicken or turkey yields consistently delicious, deeply seasoned meat and that shatteringly crisp skin that makes people swoon. It aligns with my preference for enhancing, rather than diluting, the natural taste of high-quality ingredients.
However, I’m not dogmatic about it. Is wet brining dead to me? Not entirely. If I had a bird that was perhaps slightly older, or if I was really concerned about it drying out during a very long, slow smoke, I might consider a wet brine for that extra moisture insurance. If I wanted to experiment with infusing very specific liquid flavors (like an apple cider brine for pork, though we’re talking poultry today), wet brining is the way to go. But for my standard roast chicken or the all-important Thanksgiving turkey? Nine times out of ten, I’m reaching for the salt and clearing a space in the fridge for a dry brine. Maybe it’s the analytical marketer in me appreciating the efficiency, or just the Nashville home cook valuing flavor and texture. It just… works better for me, most of the time.
Final Thoughts: Brine Your Own Way
So, wet brine vs dry brine – which is definitively ‘better’? The unsatisfying but honest answer is: it depends. It depends on your priorities (maximum moisture vs. concentrated flavor vs. crispy skin vs. ease of use), your available space and time, and frankly, your personal preference. Dry brining offers incredible flavor concentration, foolproof crispy skin, and practical advantages. Wet brining provides maximum moisture infusion and the potential for subtle aromatic flavoring, though it comes with logistical challenges and potentially less crispy skin.
My advice? Try both! Don’t just take my word for it, or anyone else’s. Roast two chickens side-by-side, one wet-brined, one dry-brined. See which process you find less annoying. Taste the results. Which one makes *you* happier? Maybe you’ll become a staunch advocate for one method. Maybe you’ll find, like me, that you prefer one for most occasions but keep the other in your back pocket. The goal, after all, is delicious poultry, and both methods can get you there. The journey, the experimentation, that’s half the fun, isn’t it? I guess the real challenge isn’t picking a side, but continuing to experiment and refine your own technique until you nail *your* perfect bird, every single time.
FAQ
Q: Can I use table salt for brining?
A: It’s generally not recommended. Table salt often contains iodine and anti-caking agents that can impart a metallic taste. More importantly, its fine grains make it much saltier by volume than kosher salt or sea salt. Most brine recipes are developed using kosher salt (like Diamond Crystal or Morton). If you *must* use table salt, you need to use significantly less – roughly half by volume compared to kosher salt – to achieve the same salinity, and measuring by weight is always more accurate.
Q: How long should I brine my poultry?
A: It depends on the method and the size of the bird. For wet brining, a general guideline is about 1 hour per pound, but not exceeding 12-18 hours for chicken or 24-48 hours for a large turkey (longer can make the texture mushy). For dry brining, allow at least 12 hours for chicken pieces, 24 hours for a whole chicken, and 48-72 hours (2-3 days) for a turkey. You need to give the salt time to penetrate.
Q: Do I need to rinse the bird after brining?
A: After wet brining, yes, it’s generally recommended to rinse the bird thoroughly inside and out to remove excess surface salt, and then pat it extremely dry. If you don’t rinse, the surface can be overly salty. After dry brining, do NOT rinse! Rinsing would undo all the work of drying the skin. Simply pat away any visible excess salt clumps if desired, but generally, you just move it straight to roasting.
Q: Can I add sugar or other seasonings to my dry brine?
A: Absolutely! While salt is the key functional ingredient for the brining effect, you can definitely add sugar (helps with browning and balances flavor), black pepper, paprika, dried herbs (like thyme, rosemary, sage), garlic powder, or onion powder to your dry brine mixture. These will primarily flavor the skin and the very outer layer of meat, complementing the deep seasoning from the salt.
You might also like
- Perfect Roast Chicken Every Time: Tips & Tricks
- The Ultimate Guide to Thanksgiving Turkey Preparation
- Flavor Layering Techniques for Poultry Dishes
@article{wet-brine-vs-dry-brine-which-is-best-for-poultry,
    title   = {Wet Brine vs Dry Brine: Which Is Best for Poultry?},
    author  = {Chef's icon},
    year    = {2025},
    journal = {Chef's Icon},
    url     = {https://chefsicon.com/wet-brine-vs-dry-brine-which-is-better-for-poultry/}
} 

