
Table of Contents
- 1 Optimizing Your Tiny Culinary Powerhouse
- 1.1 1. Workflow Analysis: The Underrated First Step
- 1.2 2. Go Vertical: Your Walls Are Prime Real Estate
- 1.3 3. Adapting Classic Layouts for Small Spaces
- 1.4 4. Multi-Functional Equipment: The Space-Saving Superstars
- 1.5 5. Strategic Station Placement: Minimizing Steps, Maximizing Flow
- 1.6 6. The Power of Mobility: Wheels Can Be Your Friend
- 1.7 7. Clever Storage: Every Nook and Cranny Counts
- 1.8 8. Let There Be Light (and Comfort): Ergonomics and Illumination
- 1.9 9. Taming the Trash: Waste Management Strategies
- 1.10 10. Safety and Ventilation: Non-Negotiables
- 2 Making the Most of What You’ve Got
- 3 FAQ
Okay, let’s talk tiny kitchens. If you’re running a restaurant, especially a smaller spot, a bistro, or maybe even a food truck (those count!), you know the struggle. Every square inch counts, right? It feels like a constant game of Tetris, but with hot pans and sharp knives. I remember my first apartment kitchen back in the Bay Area – tiny doesn’t even begin to cover it. Trying to cook a proper meal felt like performing ballet in a phone booth. Now, imagine scaling that up to a commercial operation with multiple staff, health codes, and the pressure of service. Yikes. It’s a real challenge, but definitely not an insurmountable one. Here in Nashville, I see so many cool, independent restaurants thriving in spaces that look impossibly small from the outside. How do they do it?
It’s all about smart design and even smarter planning. Seriously, the layout of your kitchen is probably one of the most critical factors determining your restaurant’s efficiency, safety, and even profitability. A poorly designed small kitchen leads to chaos, bottlenecks, frustrated staff, slower service, and potentially even safety hazards. It’s a domino effect you really want to avoid. I’ve spent a lot of time thinking about systems and flow, partly because of my marketing background analyzing customer journeys, but also just because I’m fascinated by how things *work*. And a restaurant kitchen is one of the most intense, fascinating systems out there. It’s organized chaos, hopefully leaning more towards the organized side.
So, I wanted to dive into some practical small-restaurant-kitchen-layout-ideas-maximizing-space. This isn’t just about cramming equipment in; it’s about creating a functional, flowing workspace that makes the most of limited square footage. We’ll look at different approaches, equipment choices, storage hacks, and the little details that make a big difference. Maybe some of these ideas will spark something for your own space, or perhaps just make you appreciate the ingenuity behind those bustling little kitchens you love visiting. Trust me, getting this right can feel like finding hidden treasure – unlocking potential you didn’t even know your space had. Let’s dig in, maybe we can figure this out together.
Optimizing Your Tiny Culinary Powerhouse
1. Workflow Analysis: The Underrated First Step
Before you even think about moving a fridge or buying a shelf, you absolutely *have* to map out your workflow. Seriously, don’t skip this. What’s your menu like? What dishes are most popular? What are the key steps involved in preparing them, from raw ingredient storage to the final plate hitting the pass? Follow the food’s journey. Where does produce come in? Where is it washed and prepped? Where does meat get portioned? Where does cooking happen? Plating? Dishwashing? Each step needs a designated area, even if that area is tiny or serves multiple purposes at different times. Think about the movement of staff too. You want to minimize unnecessary steps, crossovers, and backtracking. A cook shouldn’t have to walk across the entire kitchen constantly just to get from the fryer to the plating station. That wastes precious seconds and energy, and increases the risk of collisions – especially when things get hectic during a rush.
I find drawing it out helps. A simple diagram showing the flow for your top 5 menu items can reveal surprising bottlenecks. Maybe the prep area is too far from the walk-in, or the dish pit creates a traffic jam near the service exit. This analysis informs everything else. It tells you which stations need to be adjacent, which equipment is used most frequently together, and where your high-traffic zones are. Consider creating work zones: a prep zone, a cooking zone (often broken down further into hot line, cold line, fryer station, etc.), a plating/service zone, and a cleaning zone. Even if these zones overlap slightly or are very compact, defining them mentally and physically helps organize the chaos. It’s like setting up invisible lanes on a highway; it guides movement and prevents jams. Is this the most glamorous part? No. Is it absolutely foundational? Yes. It’s the blueprint upon which everything else is built. Without understanding your specific flow, any layout choice is just a guess.
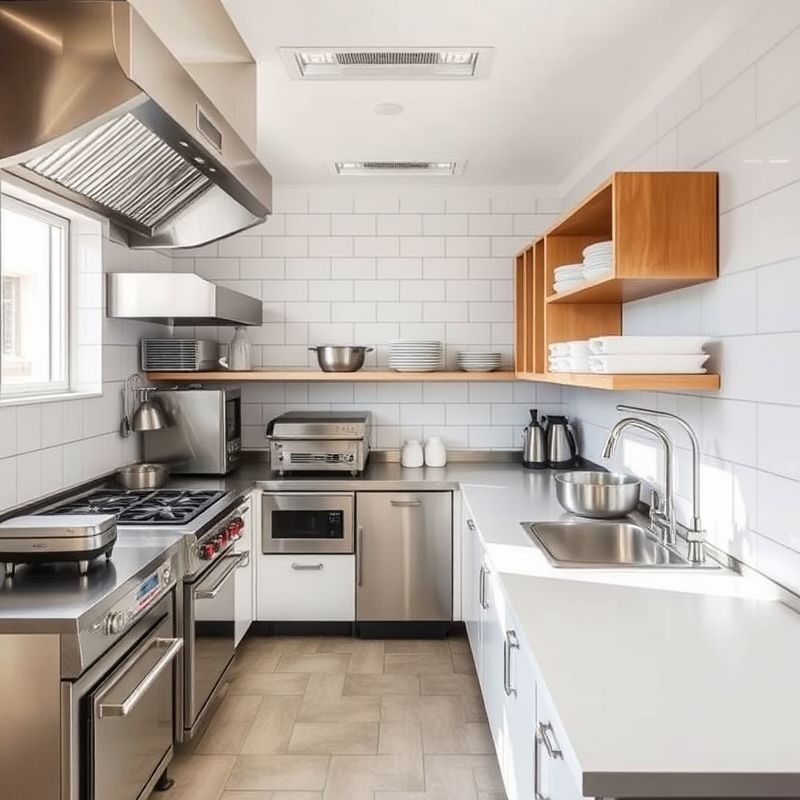
2. Go Vertical: Your Walls Are Prime Real Estate
When floor space is at a premium, the only way to go is up! Seriously, look at your walls. They are probably the most underutilized asset in a small kitchen. Think vertical storage. Installing sturdy, stainless steel wall shelves can dramatically increase your storage capacity without taking up valuable floor space. Use them for frequently accessed ingredients (spices, oils, small containers), small appliances (blenders, mixers when not in use), or clean pots and pans. Pot racks mounted overhead or on walls can free up entire cabinets. Magnetic knife strips are another classic space-saver, keeping essential tools accessible and off the counter. Even consider wall-mounted holders for things like foil, plastic wrap, and paper towels.
Don’t just think shelves, either. What about pegboards? Customizable pegboard systems can hold utensils, small pans, and various tools, keeping them organized and visible. Tall, narrow shelving units can slot into awkward gaps. Think about stacking compatible containers in storage areas. Could you use risers on existing shelves to create a second level? The goal is to draw the eye (and the storage) upward. Of course, safety is key here. Ensure everything is securely mounted and installed correctly – you don’t want shelves collapsing mid-service. Also, consider ergonomics; frequently used items should be within easy reach, while less-used items can go higher up. It might seem obvious, but I’ve seen kitchens where the most-used pans require a step stool. That’s just inefficient. Maximize that vertical space, it’s practically free square footage waiting to be claimed.
3. Adapting Classic Layouts for Small Spaces
Okay, textbook kitchen layouts like the Island, Zone, or Assembly Line are often designed with larger spaces in mind. But the principles behind them can still be adapted. The Assembly Line (or Production Line) layout is often the most efficient for small, narrow kitchens, sometimes called a Galley kitchen. Workstations are arranged in sequence along one or two parallel walls, following the flow of food preparation – prep, cook, plate. This minimizes movement and is great for linear tasks, like making sandwiches or pizzas. The key is ensuring enough clearance between the lines (if you have two) for staff to move without bumping into each other – ideally at least 4 feet, but sometimes you have to work with less, maybe 3.5 feet in a real pinch, though that’s tight.
Could a modified Zone layout work? This involves creating distinct work areas (zones) for different tasks (prep, cooking, baking, etc.). In a small kitchen, these zones might be very compact, perhaps just a small counter section with dedicated equipment underneath or overhead. It requires careful planning to prevent zones from interfering with each other. An Island layout usually needs more space, placing a central workstation for cooking or prep. In a *very* small space, this is tough, but maybe a small, mobile island/prep table could function similarly, offering flexibility? I’m torn on recommending a true island for tiny spaces… maybe it’s better to stick to optimizing the perimeter? Let’s consider the Galley again. It forces a linear flow, which can be very efficient if your menu supports it. The main drawback is potential congestion if multiple people need to pass through the same narrow corridor. Careful scheduling and defined roles can mitigate this somewhat. Ultimately, the ‘best’ layout is the one that best fits your specific menu, workflow, and the physical constraints of your room. Don’t be afraid to create a hybrid layout that borrows elements from different styles.
4. Multi-Functional Equipment: The Space-Saving Superstars
This is a big one. In a small kitchen, every piece of equipment needs to earn its keep. Ideally, it should perform multiple tasks. Think multi-functional equipment. A combi oven, for instance, can steam, bake, roast, and grill, potentially replacing several separate appliances. Yes, they have a higher upfront cost, but the space savings and versatility can be immense. Consider undercounter refrigerator or freezer drawers with worktop surfaces – you get cold storage and prep space in one footprint. Induction cooktops are another great option; they heat up fast, are energy-efficient, easy to clean, and provide a flat surface that can sometimes be used for plating or prep when cool (carefully, of course!).
Instead of a separate countertop mixer, griddle, and slicer taking up space, could you use high-quality attachments for a heavy-duty stand mixer? Look for immersion blenders instead of bulky countertop models if your volume allows. Tilting skillets can braise, sauté, boil, and act as a griddle. The key is to analyze your menu and identify where consolidation is possible without sacrificing quality or essential functionality. It’s a balancing act. Sometimes specialized equipment is unavoidable for signature dishes. But for general tasks, consolidation is king. Make a list of all the equipment you *think* you need, then critically evaluate if a single, more versatile piece could do the job of two or three items. Remember to factor in cleaning time and maintenance as well. Fewer, harder-working pieces often mean simpler operations overall. This requires research and potentially a larger initial investment, but the long-term payoff in space and efficiency is often worth it. It’s about working smarter, not harder… or rather, making your equipment work smarter for you.
5. Strategic Station Placement: Minimizing Steps, Maximizing Flow
We touched on workflow, but let’s drill down into station placement. The goal is logical adjacency. Your prep station, for instance, should ideally be located near your primary ingredient storage (like the walk-in or reach-in refrigerators) and also relatively close to the cooking line. This minimizes the distance staff need to travel carrying ingredients back and forth. Think about the relationship between the cooking line and the plating/service area. These should be as close as possible, often adjacent, to ensure food gets plated quickly and efficiently while it’s still hot and fresh. The pass (where finished dishes are handed off to servers) needs clear access from both the cooking/plating area and the service staff side.
The dishwashing station is another critical placement. It needs to be accessible for servers dropping off dirty dishes *without* forcing them to walk through the main cooking or prep zones. Ideally, it should also be somewhat close to storage for clean dishes, though this is sometimes a compromise. Think about the ‘landing zone’ for deliveries – where do supplies come in? There should be a clear path from the delivery door to the storage areas (dry storage, walk-in) that avoids disrupting the main kitchen workflow. It sounds like common sense, but it’s surprising how often these adjacencies are ignored, leading to constant, low-level inefficiency that adds up significantly during a busy shift. Map out these relationships visually. Use circles or squares for stations and draw lines representing movement paths. Look for the shortest, most direct routes. Minimize crossover points where different tasks or staff members might collide. Every step saved is time gained and energy conserved.
6. The Power of Mobility: Wheels Can Be Your Friend
Don’t underestimate the value of putting things on wheels! In a small kitchen, flexibility is key. Mobile equipment like rolling prep tables, shelving units, or ingredient bins can be incredibly useful. Need extra prep space during peak hours? Roll out a stainless steel table. Need to rearrange for a deep clean? Unlock the casters and move things aside easily. Have a piece of equipment that’s only used occasionally, like a large mixer or slicer? Store it on a heavy-duty rolling stand and wheel it into position when needed, then tuck it away afterwards.
This allows you to reconfigure parts of your kitchen layout dynamically based on the task at hand or the time of day. Maybe a certain area is used for baking prep in the morning but needs to be clear for the plating rush in the evening. Mobile tables make this transition much easier. However, there are caveats. Ensure you use high-quality, locking casters – you don’t want your prep table rolling away mid-chop! Also, consider utility connections. Things like fryers or ovens usually need fixed gas or electrical lines and ventilation, making them unsuitable for mobility. But for prep surfaces, storage racks, waste bins, and certain countertop appliances mounted on stands, wheels offer valuable adaptability. Is it practical for everything? No. But strategically incorporating mobile elements can provide that crucial bit of flexibility that makes a tight space workable. It allows the space to transform based on need, rather than being rigidly fixed.
7. Clever Storage: Every Nook and Cranny Counts
Beyond vertical shelving, get creative with storage everywhere else. Think about the space *under* counters. Instead of standard cabinets with hard-to-reach back areas, consider deep drawers. Full-extension drawers allow you to see and access everything inside easily, maximizing usable space. Use drawer dividers to keep things organized. What about corners? They are notoriously awkward. Lazy Susans or specialized corner pull-out shelving systems can make these spaces accessible and useful, rather than black holes where forgotten ingredients go to expire. Look for opportunities to install slim shelving units in narrow gaps between equipment or at the end of counter runs – perfect for storing sheet pans, cutting boards, or spice containers.
Think about the doors of cabinets too – adding small racks or hooks inside doors can provide extra storage for small items, lids, or utensils. Utilize clear, stackable containers for dry goods and prepped ingredients. Being able to see what’s inside saves time and helps with inventory management. Label everything clearly! It seems basic, but it prevents grabbing the wrong container during a rush. Maximize space *within* your walk-in cooler and freezer too, using sturdy, adjustable shelving that allows for good air circulation. Don’t neglect the space above equipment (if safe and code-compliant) or even above doorways for storing rarely used items. The mantra is: leave no wasted space. Every cubic inch has potential if you look hard enough. My cat Luna is an expert at finding hidden spots; maybe I should put her in charge of storage design?
8. Let There Be Light (and Comfort): Ergonomics and Illumination
This might seem secondary to layout, but it’s crucial for both efficiency and morale in a small space. Good lighting can make a cramped kitchen feel more open and is essential for safety. Poorly lit areas make prep work harder and increase the risk of accidents. Ensure bright, even illumination throughout the kitchen, paying special attention to task areas like prep counters and the cooking line. Use under-cabinet lighting to eliminate shadows on work surfaces. Natural light is great if you have windows, but reliable artificial light is a must.
Ergonomics is equally important. When space is tight, inefficient movements are amplified. Ensure work surfaces are at a comfortable height for your staff to reduce strain. Place frequently used tools and ingredients within easy reach – the concept of the ‘cook’s cockpit’ where everything needed is an arm’s length away. Use anti-fatigue mats in areas where staff stand for long periods, like the prep station, cooking line, and dish pit. While not strictly ‘layout’, designing the *experience* of working in the space matters. A comfortable, well-lit kitchen is a safer, faster, and happier kitchen, even if it’s small. Investing in good lighting and ergonomic considerations isn’t a luxury; it’s a practical necessity for maximizing performance in confined quarters.
9. Taming the Trash: Waste Management Strategies
Waste management can become a huge headache in a small kitchen. Piles of prep scraps, packaging, and dirty containers can quickly overwhelm limited floor space, creating clutter and potential hazards. You need a clear strategy. First, minimize waste at the source through smart purchasing and prep techniques (using vegetable scraps for stock, for example). Second, implement an efficient disposal system. Use compact waste bins designed for tight spaces. Consider under-counter pull-out bins to keep them hidden and off the floor. Strategically locate bins near the areas that generate the most waste – typically prep stations and the dishwashing area.
Have separate, clearly labeled bins for trash, recycling, and compost/food waste if applicable. This not only helps with sustainability but can also reduce the sheer volume in the main trash bin. Crucially, establish a routine for emptying these bins frequently throughout the day, especially during and after busy periods. Don’t wait until they are overflowing. Designate a temporary holding area for full bags awaiting removal from the building, ensuring this area doesn’t block traffic or create sanitation issues. Maybe slim, vertical bins work better than traditional round ones? Explore options specifically designed for commercial kitchens. Effective waste management is vital for maintaining hygiene and clear pathways in a space where every inch is critical.
10. Safety and Ventilation: Non-Negotiables
Finally, and most importantly, never compromise on safety and proper ventilation, no matter how small your kitchen. Tight spaces can actually increase certain risks. Ensure adequate clearance around hot cooking equipment according to manufacturer specifications and fire codes. Maintain clear pathways to fire extinguishers and emergency exits – these should never be blocked, even temporarily. Install a proper commercial hood ventilation system sized appropriately for your cooking equipment. This is critical for removing heat, smoke, grease vapors, and odors, which can build up quickly in a small space, creating an uncomfortable and potentially hazardous environment. Ensure the hood is cleaned regularly to prevent grease buildup, a major fire hazard.
Check local health and safety codes meticulously. They dictate requirements for things like handwashing sinks, sanitation stations, food storage temperatures, and required clearances. Sometimes specific compact equipment is designed to meet code in smaller footprints. Ensure proper storage for cleaning chemicals, away from food prep areas. Non-slip flooring is also essential. In a small kitchen, a slip or fall can be particularly dangerous due to the proximity of hot surfaces and sharp objects. Prioritizing kitchen safety and adequate ventilation isn’t just about compliance; it’s about protecting your staff and your business. Don’t let space constraints lead you to cut corners here. It’s simply not worth the risk.
Making the Most of What You’ve Got
Whew, okay. That was a lot to unpack. Designing or redesigning a small restaurant kitchen is undeniably a puzzle. There’s no single ‘perfect’ solution because every space, every menu, and every team is different. It requires careful thought, creativity, and sometimes, a willingness to challenge conventional setups. Looking back at all these points – workflow, vertical space, layout types, multi-functional gear, station placement, mobility, storage hacks, lighting, ergonomics, waste, safety – it’s clear that success lies in a holistic approach. You can’t just focus on one aspect; they all interconnect.
The key takeaway, I think, is intentionality. Don’t just let your kitchen happen by default. Actively analyze your needs, measure your space meticulously (twice!), and plan every element. Think about how each piece of equipment, each workstation, each storage unit contributes to the overall flow and efficiency. Sometimes the best ideas come from constraints. That tiny footprint might force you to be more innovative, more streamlined, and ultimately, more efficient than you might have been with acres of space. It demands discipline and smart choices.
So, maybe the real challenge isn’t just fitting everything in, but embracing the constraints to build something truly optimized? Perhaps the question isn’t ‘how do I fit everything?’ but ‘what is truly essential, and how can I make it work beautifully here?’ It requires a shift in mindset, seeing the small space not just as a limitation, but as a design challenge waiting for a clever solution. I wonder how many truly great neighbourhood gems thrive precisely because their small kitchens forced them to focus and perfect their craft? It’s something to think about, anyway. Now, time to see if Luna has rearranged my own (thankfully not restaurant-sized) kitchen again.
FAQ
Q: What’s the absolute minimum space needed for a small restaurant kitchen?
A: There’s no single magic number, as it heavily depends on the menu complexity, equipment needs, staff size, and local health codes. However, highly efficient small kitchens can sometimes operate in as little as 100-200 square feet, but this requires extremely careful planning, multi-functional equipment, and a very streamlined menu. Codes regarding clearances around equipment and aisle widths often dictate the practical minimum.
Q: Is an assembly line (Galley) layout always best for narrow kitchens?
A: It’s often the most efficient for long, narrow spaces because it promotes a linear workflow, minimizing cross-traffic. However, its suitability depends on your menu and production style. If you have complex dishes requiring multiple cooks to access different stations simultaneously, it can cause bottlenecks. Sometimes a modified zone approach within the narrow space might work better, or ensuring adequate width (ideally 4ft+) between parallel counters is crucial.
Q: How much should I budget for multi-functional equipment versus standard pieces?
A: Multi-functional equipment like combi ovens often has a significantly higher upfront cost than individual appliances. However, you need to factor in the savings from buying fewer pieces overall, potential utility savings (some are more energy-efficient), and the immense value of saved space. Analyze the total cost of ownership and the spatial constraints. Sometimes, the premium price is easily justified by the space saved and versatility gained in a small kitchen footprint.
Q: Can I use residential equipment in a small commercial kitchen to save space and money?
A: Generally, no. Commercial kitchens require commercial-grade equipment (NSF certified, etc.) for several reasons. Commercial equipment is built for heavy-duty, continuous use, durability, and ease of cleaning to meet health codes. Residential appliances typically aren’t designed for this volume, may void warranties if used commercially, and likely won’t pass health inspections. Using residential gear can also pose safety risks and insurance issues.
You might also like
- Essential Equipment for Ghost Kitchen Startup
- Optimizing Workflow in High-Volume Kitchens
- Compact Kitchen Solutions for Food Truck Design
@article{small-restaurant-kitchen-layout-ideas-that-actually-maximize-space,
    title   = {Small Restaurant Kitchen Layout Ideas That Actually Maximize Space},
    author  = {Chef's icon},
    year    = {2025},
    journal = {Chef's Icon},
    url     = {https://chefsicon.com/small-restaurant-kitchen-layout-ideas-maximizing-space/}
} 
