
Table of Contents
- 1 Optimizing Your Kitchen’s Core Flow
- 1.1 1. Understanding Workflow is Everything
- 1.2 2. Zoning Your Kitchen Like a Pro
- 1.3 3. The Work Triangle (and Its Commercial Kitchen Cousin)
- 1.4 4. Equipment Placement Matters… A Lot
- 1.5 5. Storage Solutions: Think Vertically and Smartly
- 1.6 6. Aisles and Traffic Flow: Give ‘Em Room!
- 1.7 7. The Crucial Role of Warewashing
- 1.8 8. Lighting and Ventilation: Often Overlooked Heroes
- 1.9 9. Flexibility and Future-Proofing
- 1.10 10. Leveraging Design Services & Technology
- 2 Bringing It All Together
- 3 FAQ
Okay, let’s talk kitchens. Not the cozy kind where you maybe burn toast on a Sunday morning (guilty!), but the high-octane heart of any food business: the commercial kitchen. I’ve seen enough of them, from my days back in the Bay Area hustle to the vibrant food scene here in Nashville, to know that the difference between smooth sailing and utter chaos often comes down to one thing: layout. Seriously, a poorly designed kitchen is like trying to run a marathon with your shoes tied together. It’s stressful, inefficient, and someone’s probably going to trip. That’s why diving into commercial kitchen layout efficiency tips isn’t just about aesthetics; it’s about sanity, safety, and the bottom line.
I remember walking into a friend’s new restaurant venture a few years back. Talented chef, amazing concept, but the kitchen… oh boy. The prep area was miles from the walk-in, the dish pit created a major bottleneck near the service line, and cooks were practically doing pirouettes around each other just to grab a pan. It was pure pandemonium during the dinner rush. It got me thinking, not just as a food lover but with my marketing hat on – efficiency isn’t just operational, it impacts the entire customer experience, staff morale, everything. You can have the best ingredients in the world, but if your kitchen flow is garbage, you’re fighting an uphill battle. It’s a system, and like any system, it needs intelligent design.
So, what’s the plan here? I want to unpack some of the core principles and practical tips for designing a commercial kitchen layout that actually *works*. We’re talking about boosting that workflow, minimizing those wasted steps (and frustrations), ensuring safety, and ultimately, making the heart of your operation beat a whole lot smoother. Whether you’re sketching out a brand new space or looking to renovate an existing one, thinking critically about layout is probably the most impactful thing you can do. We’ll cover everything from zoning and workflow analysis to equipment placement and those often-overlooked details like lighting. Let’s try and make some sense of the organized chaos, shall we?
Optimizing Your Kitchen’s Core Flow
1. Understanding Workflow is Everything
Before you even think about where the shiny new oven goes, you gotta map out the journey your food takes. It sounds simple, maybe even a bit basic, but trust me, this is foundational. Think about it: raw ingredients come in, they get stored, prepped, cooked, plated, and finally served. Then, dirty dishes make the return trip to be washed. Ideally, this path should be as linear and logical as possible, a smooth current rather than a series of whirlpools. Workflow analysis involves tracing these steps, identifying where cooks have to double back, where paths cross unnecessarily, or where bottlenecks form. Are they walking halfway across the kitchen just for common spices? Is the receiving door miles from storage? Every extra step is wasted time and energy, multiplied by every employee, every single shift. We’re aiming for peak ergonomics here – designing the space to fit the natural movements and limitations of the human body, reducing strain and fatigue. You might even use process mapping, literally drawing out the flow, to visualize the inefficiencies. It’s analytical, sure, but incredibly practical. You want ingredients and staff moving forward through the process, not backtracking constantly. It’s like choreographing a dance, but with hot pans and sharp knives.
2. Zoning Your Kitchen Like a Pro
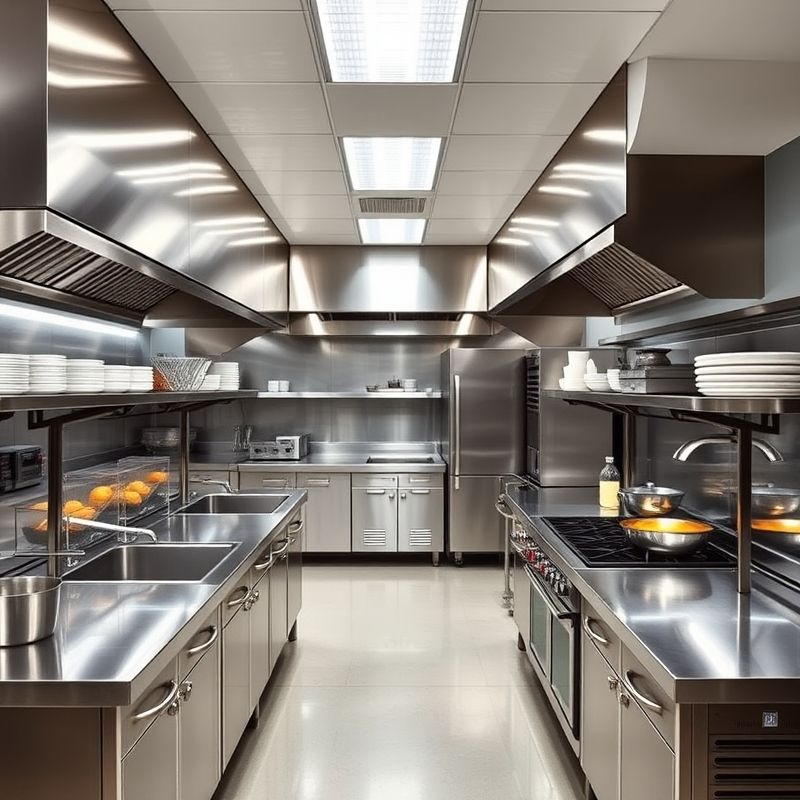
Alright, once you understand the flow, the next logical step is breaking the kitchen down into distinct work zones. Imagine invisible walls separating different activities. This isn’t just about organization; it’s crucial for safety and efficiency. Your main kitchen zones typically include: Receiving (where goods enter), Storage (dry goods, refrigerated, frozen), Food Preparation (washing, chopping, mixing), Cooking Line (ovens, ranges, fryers), Plating/Service Area (where dishes are finished and picked up), and Warewashing (dish and pot cleaning). The key is to arrange these zones to support that smooth workflow we just talked about. Prep areas should ideally be close to storage, the cooking line needs to be adjacent to prep, and the plating area needs easy access for servers without them cutting through the cooking chaos. Critically, you absolutely need clear separation between raw food prep and cooked food areas to prevent cross-contamination prevention – that’s non-negotiable for health codes. Think about the logical flow between zones. Does it make sense for the dish pit to be right next to the fryer station? Probably not. Getting these zones right minimizes movement, prevents accidents, and keeps everything running smoothly. Sometimes visualizing this is tough, especially in tight spaces. I’ve heard some folks use professional design services; suppliers like Chef’s Deal sometimes offer free kitchen design consultations, which can be super helpful for mapping out these zones effectively based on your specific menu and volume.
3. The Work Triangle (and Its Commercial Kitchen Cousin)
Anyone who’s ever looked at home kitchen design has heard of the work triangle – that imaginary triangle connecting the sink, refrigerator, and stove. The idea is to keep these key points close for efficiency. Now, in a commercial kitchen, it’s… well, it’s more complex than a simple triangle. You’ve got multiple stations, specialized equipment, and way more staff. But the *principle* still holds: minimize travel distance between related tasks. Instead of one big triangle, think in terms of dedicated workstations. A fry cook needs their fryer, landing space, breading station, and potentially a dedicated freezer or fridge nearby. A garde manger chef needs counter space, sinks, coolers, and cutting tools all within easy reach. Each station should be a mini-triangle, or maybe a square or a line, optimized for the specific tasks performed there. The goal is station efficiency – enabling a cook to perform the majority of their tasks with minimal movement. They shouldn’t have to sprint across the kitchen for a commonly used tool or ingredient. It’s about creating self-contained units of productivity within the larger kitchen ecosystem. Does the strict triangle apply? Not really. Does the concept of minimizing steps between key points apply? Absolutely, maybe even more so.
4. Equipment Placement Matters… A Lot
Okay, this seems obvious, but the *strategy* behind equipment placement goes deep. It’s not just about finding a spot where the giant mixer fits. You need to group equipment logically based on workflow and type. Put your fryers together, your ranges side-by-side, your ovens in a bank. This streamlines movement for cooks working those stations. But you also have to consider the less obvious stuff. Heavy heat-producing equipment like ovens and fryers needs to be under adequate ventilation needs – specifically, a properly sized commercial hood system. Don’t just guess on this; it’s a safety and compliance issue. You also need to think about utility connections – gas lines, plumbing, electrical outlets (and the *right kind* of outlets). Moving heavy equipment later because you didn’t plan utilities is a nightmare, trust me. Consider the flow *around* the equipment too. Don’t place a bulky tilting skillet where it blocks a main pathway when tilted. Think about door swings on ovens and refrigerators. Does opening one block access to another crucial piece of equipment? Getting this right often requires expertise. Professional installation services, like those offered by places like Chef’s Deal, are crucial not just for hooking things up correctly but ensuring placement is safe and makes sense operationally. They handle the heavy lifting and the technical details, which is a huge relief.
5. Storage Solutions: Think Vertically and Smartly
Storage in a commercial kitchen is like closet space at home – you can never seem to have enough. But efficiency isn’t just about *how much* space you have, it’s about *how you use it*. The mantra here should be vertical storage. Walls are prime real estate! Install sturdy shelving units (stainless steel is standard for easy cleaning) that go as high as safely reachable. Use under-counter space wisely with drawers or shelves. Rolling racks offer flexibility for storing prepped items or cooling baked goods. Accessibility is key; frequently used items should be within easy reach (between shoulder and knee height ideally), while less-used items can go higher or lower. And please, please implement the FIFO (First-In, First-Out) principle for inventory rotation. Label everything with dates, store new stock behind old stock. This minimizes spoilage and waste, which directly impacts your food costs. Shelving needs to be positioned logically too – dry storage near receiving and prep, cold storage easily accessible to the relevant prep and cooking stations. You want accessible storage that doesn’t require a ten-minute hunt for a bag of flour or a specific spice blend. It sounds tedious, but organized storage is a massive time-saver and waste-reducer.
6. Aisles and Traffic Flow: Give ‘Em Room!
Ever tried squeezing past someone carrying a hot stockpot in a narrow aisle? Yeah, not fun. And potentially dangerous. Proper aisle width is absolutely critical for both safety and efficiency in a commercial kitchen. Too narrow, and you create bottlenecks, increase the risk of collisions and burns, and generally just make everyone’s job harder. Too wide, and you might be wasting valuable floor space that could be used for equipment or workstations. There are general guidelines – often around 36-48 inches for single-person aisles and 48-60+ inches for main traffic routes where multiple people or carts might pass. But it really depends on your specific operation. Are staff frequently moving large carts? Do multiple cooks need to access the same equipment simultaneously? You need serious traffic flow management. Map out the main pathways – from receiving to storage, storage to prep, prep to cookline, cookline to service, service to dish pit, and dish pit back out. Identify potential crossing points or areas where congestion is likely. The goal is bottleneck prevention. Sometimes simply angling a piece of equipment slightly or choosing a model with a smaller footprint can make a world of difference. Don’t underestimate the importance of clear, adequately sized pathways. It’s the circulatory system of your kitchen.
7. The Crucial Role of Warewashing
Ah, the dish pit. Often relegated to a dark corner, but oh-so-important for the entire operation. An inefficient warewashing setup can bring a busy service to a grinding halt faster than almost anything else. The location of the warewashing station is key. It needs to be easily accessible for servers dropping off dirty dishes, but ideally separated (physically or by workflow design) from food prep and cooking areas to prevent contamination. Think about the sanitation flow: a clear landing area for dirty items (scraping/rinsing station), the dish machine itself, and then a clean drainboard/drying area leading towards storage or back to the service line. There needs to be a distinct separation between dirty and clean to avoid re-contaminating cleaned items. Consider the dish return process. How do clean dishes get back to the line or storage? Is there a clear path? Do staff have to cross busy traffic lanes? Also think about pot washing – often needing larger sinks and more space, potentially separate from the main dish machine area. An efficient warewashing zone keeps the supply of clean plates, pans, and utensils flowing, which is essential during peak hours. Underestimate it at your peril.
8. Lighting and Ventilation: Often Overlooked Heroes
You can have the perfect layout and the best equipment, but if your staff can’t see what they’re doing or they’re choking on greasy air, efficiency plummets. Good kitchen lighting is not a luxury; it’s a necessity for safety and accuracy. Task areas like prep stations and the cooking line need bright, direct light to prevent accidents (think knife slips) and ensure food quality. Ambient lighting should be sufficient to navigate safely. Use fixtures that are durable and easy to clean (vapor-proof fixtures are common). Equally important, if not more so, is ventilation. We touched on commercial hood systems earlier, but their importance can’t be overstated. They remove heat, smoke, grease, and steam generated by cooking equipment. This isn’t just about comfort; it’s about fire safety (grease buildup is a major hazard) and maintaining good air quality. A poorly ventilated kitchen is hot, smoky, smelly, and downright unpleasant, leading to decreased morale and productivity. Proper ventilation involves not just the exhaust hood but also makeup air systems to replace the exhausted air. Getting this balance right can be complex and often requires professional assessment. Is this something you can DIY? Probably not the ventilation system design. Consulting experts, maybe even those tied to suppliers who handle complex installations like Chef’s Deal, ensures you meet codes and create a workable environment.
9. Flexibility and Future-Proofing
The food industry changes fast. Menus evolve, service styles shift, volume might increase (hopefully!). Designing a kitchen with zero flexibility is setting yourself up for future headaches. How can you build in some adaptability? One way is through kitchen flexibility using mobile equipment. Putting prep tables, shelving units, and even some smaller cooking equipment on heavy-duty casters allows you to reconfigure stations relatively easily as needs change. Maybe you run a special event that requires a different setup, or perhaps a menu change necessitates more fryer capacity temporarily. Modular design principles can also help. Instead of completely custom-built fixtures, using standardized modular components can make future modifications simpler and less expensive. It’s also worth thinking about future-proofing when planning utilities. Maybe run an extra gas line or electrical circuit to an area where you *might* add equipment later, even if it’s not in the initial budget. Is this always practical? I get it, budgets are tight. But thinking ahead, even in small ways, can save major renovation costs down the road. It’s about anticipating potential changes and not locking yourself into a completely rigid design. A little ‘what if’ planning goes a long way.
10. Leveraging Design Services & Technology
Let’s be real, designing an efficient, compliant, and functional commercial kitchen layout is complex. There are so many factors – workflow, ergonomics, safety codes, equipment specs, ventilation, plumbing, electrical… it’s a lot to juggle. This is where professional help can be invaluable. Many restaurant owners, especially first-timers, benefit immensely from kitchen design services. Experienced designers understand the nuances, know the codes, and can often spot potential problems you’d overlook. As I mentioned, some equipment suppliers, like Chef’s Deal, actually offer free kitchen design services, which is a fantastic resource. They can help translate your menu and operational needs into a tangible, efficient layout. Beyond human expertise, layout software (CAD programs) allows for precise planning and visualization. You can experiment with different arrangements, check clearances, and create detailed blueprints. And don’t forget technology integration. Modern kitchens often incorporate Kitchen Display Systems (KDS) instead of paper tickets, sophisticated POS systems, and even smart equipment. Planning for the placement and power/data needs of this tech from the outset is crucial. Thinking about the whole package – design, equipment, installation, maybe even financing options if it’s a big project – is key. Good suppliers can offer comprehensive solutions, expert consultation, and support throughout the process, making sure you get a kitchen that truly performs.
Bringing It All Together
So, we’ve walked through the kitchen, from receiving door to dish pit, thinking about flow, zones, placement, and all those crucial details. It’s clear that designing an efficient commercial kitchen isn’t just about cramming equipment into a room. It’s a strategic process that blends operational knowledge, ergonomic principles, safety regulations, and a bit of foresight. The payoff is huge: reduced stress for staff, faster ticket times, lower food waste, better safety, and ultimately, a healthier bottom line and happier customers.
Is there one ‘perfect’ layout? Probably not. Every space is unique, every menu has different demands, every budget has limitations. But the *principles* of efficient design – smooth workflow, logical zoning, smart placement, safety considerations – are universal. It requires careful thought, planning, and maybe admitting when you need a bit of expert help. I’m always tweaking things in my own little world, even my home office setup, looking for ways to streamline. Applying that same critical eye to a commercial kitchen feels like an even bigger, more impactful challenge.
Maybe the real takeaway is that an efficient layout isn’t a static endpoint, but an ongoing process of observation and refinement? You build the best kitchen you can, then you watch how it works in practice, identify new bottlenecks or inefficiencies, and make adjustments. It’s a commitment to continuous improvement, really. What do you think – is the ‘perfect’ kitchen layout ever truly finished?
FAQ
Q: What’s the most common mistake people make when designing a commercial kitchen layout?
A: Honestly, I think the most frequent fumble is failing to properly analyze and plan for workflow. People get excited about the equipment or fixated on one specific area and forget to map out the entire journey of food and staff from start to finish. This leads directly to backtracking, bottlenecks, and overall inefficiency.
Q: How much space should I leave for aisles in my kitchen?
A: There are codes and general rules of thumb, often suggesting 36-48 inches for minor aisles and 48-60 inches or more for main thoroughfares, especially if carts are used. However, the ‘right’ width really depends on your specific kitchen’s size, the number of staff working simultaneously, and the type of equipment and tasks being performed. It’s best to plan based on your actual operational needs, ensuring safe and easy movement.
Q: Can I design my own commercial kitchen layout without professional help?
A: You certainly *can* sketch out ideas, and your input is crucial because you know your concept best. However, translating those ideas into a fully compliant, safe, and maximally efficient design is complex. Professionals understand building codes, health regulations, ventilation requirements, and ergonomic best practices. Leveraging expertise, perhaps through services like the free design help offered by suppliers like Chef’s Deal, is often highly recommended to avoid costly mistakes.
Q: How important is ventilation really in a kitchen layout?
A: Extremely important. Proper ventilation, primarily through commercial hood systems, is critical for several reasons: fire safety (removing grease-laden vapors), health code compliance, staff comfort and safety (removing heat, smoke, and steam), and even protecting the building structure from heat and moisture damage. It’s not an area to cut corners on; it needs to be designed and installed correctly based on the cooking equipment used.
You might also like
- Small Commercial Kitchen Design Ideas
- Choosing the Right Commercial Kitchen Equipment
- Restaurant Kitchen Safety Checklist
@article{smart-commercial-kitchen-layout-efficiency-tips-from-sammy,
    title   = {Smart Commercial Kitchen Layout Efficiency Tips from Sammy},
    author  = {Chef's icon},
    year    = {2025},
    journal = {Chef's Icon},
    url     = {https://chefsicon.com/commercial-kitchen-layout-efficiency-tips/}
} 

