
Table of Contents
- 1 Unlocking Efficiency: Key Storage Strategies
- 1.1 Going Vertical: The Untapped Frontier
- 1.2 Walk-In Wisdom: Organizing the Cold Zones
- 1.3 Under-Counter Utility: Making the Most of Low Spaces
- 1.4 Wall Mount Wonders: Freeing Up Surfaces
- 1.5 Mobile Storage Magic: Flexibility on Wheels
- 1.6 Containerization is King (or Queen): The Power of Standardization
- 1.7 Shelving Strategies Revisited: Material and Placement
- 1.8 Small Wares Storage: Taming the Utensil Drawer
- 1.9 Dry Storage Discipline: Beyond the Basics
- 1.10 The Receiving Area: First Stop, Critical Step
- 2 Wrapping It Up: Finding Your Storage Zen
- 3 FAQ
Alright, let’s talk about something near and dear to my heart, even though I’m mostly writing about it from my Nashville home office these days (with Luna supervising, naturally). Commercial kitchens. Specifically, the unsung hero – or sometimes villain – of the back-of-house: storage. I was grabbing lunch at this little bistro downtown Nashville the other week, amazing hot chicken sandwich, but I peeked back towards the kitchen pass and just saw… chaos. Boxes stacked precariously, containers overflowing, stuff everywhere. It got me thinking about just how critical optimal storage solutions for commercial kitchens really are. It’s not just about tidiness; it’s about efficiency, safety, and frankly, sanity.
Back when I was deep in the marketing trenches in the Bay Area, I worked with a few restaurant clients, and touring their kitchens was always eye-opening. Some were gleaming models of efficiency, others… less so. The difference often came down to how they handled storage. It’s this weirdly complex puzzle of maximizing limited space, keeping ingredients fresh and accessible, maintaining hygiene standards, and ensuring smooth workflow. Forget the fancy combi ovens for a second; if you can’t find the salt or you’re tripping over sacks of potatoes, nothing else matters much. It’s like trying to write code on a laptop buried under piles of paper – theoretically possible, but practically a nightmare.
So, what’s the secret sauce? Is there one? Probably not a single secret, but more like a combination of strategies and having the right tools. Over my years observing, analyzing (can’t help the marketing brain), and just plain eating in places, I’ve picked up a few things about what works and what really, really doesn’t. This isn’t just about buying more shelves; it’s about a systematic approach. We’re going to dive into some practical ideas, look at different types of storage, and figure out how to make that back-of-house less of a frantic scramble and more of a well-oiled machine. We’ll cover everything from maximizing vertical space to the nitty-gritty of container choices and why your receiving area layout matters more than you think. Ready to tame the clutter?
Unlocking Efficiency: Key Storage Strategies
Going Vertical: The Untapped Frontier
Okay, first things first: look up. Seriously. One of the most underutilized resources in almost any kitchen, commercial or otherwise, is vertical space. When floor space is at a premium (and let’s be honest, when isn’t it?), building upwards is often the only way to go. Think about installing tall, sturdy shelving units. Adjustable shelving is your best friend here, allowing you to customize heights based on what you’re storing – big Cambros of flour one day, smaller prep containers the next. Don’t just stick to the walls either; consider island shelving units if you have the central floor space, creating storage accessible from multiple sides. We often default to thinking horizontally, probably because that’s how we move through the world, but shifting that perspective vertically can unlock cubic footage you didn’t even know you had. It feels counterintuitive sometimes, stacking things high, maybe a bit precarious? But with the right shelving – properly anchored, rated for the weight – it’s perfectly safe and incredibly efficient.
Material matters too. Wire shelving is popular for a reason: it allows for air circulation (crucial in coolers and dry storage), makes it easy to see inventory, and prevents dust accumulation compared to solid shelves. However, for storing smaller items that might fall through, or in areas prone to spills, solid shelving or polymer shelf liners might be better. Polymer shelving is fantastic in damp environments like walk-in coolers or dishwashing areas because it won’t rust like some metals might over time. It’s often more expensive initially, I know, but think about the longevity and hygiene benefits. It’s an investment. The key is matching the shelving type to its specific location and purpose within the kitchen ecosystem. Don’t forget wall-mounted shelves above prep tables for frequently used ingredients or tools – keeps counters clear and items within easy reach.
Walk-In Wisdom: Organizing the Cold Zones
Walk-in coolers and freezers are notorious black holes if not managed properly. It’s easy for things to get shoved to the back and forgotten until they resemble a science experiment. The first rule? FIFO (First-In, First-Out). This isn’t just a suggestion; it’s gospel for food safety and cost control. How do you enforce it? Clear labeling with receiving dates and use-by dates is non-negotiable. Arrange items so older stock is always used before newer stock. This requires discipline from the entire team, a system everyone understands and follows. It sounds simple, maybe even patronizing to mention, but the number of times I’ve seen it ignored is staggering.
Beyond FIFO, think about the physical organization. Use sturdy, rust-resistant shelving – again, polymer or heavy-duty coated wire is ideal here. Keep everything off the floor using dunnage racks for bulk items like boxes of produce or cases of meat. This is crucial for hygiene and air circulation. Group similar items together: produce in one section, dairy in another, meats (properly stored on lower shelves to prevent cross-contamination drips) elsewhere. Consider using clear storage bins for smaller items so you can see contents at a glance. Is investing in all those clear bins worth it? I think so. It reduces the time spent rummaging and improves inventory accuracy. You need a system that makes it *easy* to do the right thing. Think pathways too – ensure there’s clear walking space, no obstructions.
Under-Counter Utility: Making the Most of Low Spaces
Prep tables and workstations are prime real estate. The surfaces are vital, but what about the space underneath? Leaving it empty is a missed opportunity. Under-counter storage can dramatically improve workflow by keeping essential tools, ingredients, and supplies right where they’re needed. Options abound: simple open shelving for frequently accessed pots and pans, enclosed cabinets for cleaning supplies or less-used equipment, or even refrigerated/freezer drawers for holding prepped ingredients right at the point of use. Imagine a garde manger station with refrigerated drawers holding pre-cut vegetables, cheeses, and dressings – efficiency heaven!
These aren’t just about cramming more stuff in; they’re about ergonomic efficiency. Reducing the number of steps a cook needs to take to grab an ingredient or a tool saves time and energy, which adds up significantly over a busy shift. Think about installing drawers instead of cabinets where possible – easier to see and access everything without having to crouch down and dig around. Of course, there’s a balance. Cram too much under there, or let it get disorganized, and it becomes a tripping hazard or a cleaning nightmare. Like everything else, it needs a system. Maybe designated drawers for specific items, regular clean-outs scheduled. The goal is accessible storage, not just hidden clutter.
Wall Mount Wonders: Freeing Up Surfaces
Counter space is arguably the most valuable commodity in a commercial kitchen. Every square inch dedicated to storage is an inch not available for prep, plating, or placing equipment. That’s where walls come into play again, but this time for smaller items. Wall-mounted storage is fantastic for things you need to grab quickly and frequently. Think magnetic knife strips – way safer and more hygienic than a knife block, and keeps blades sharp. Wall-mounted spice racks keep seasonings visible and accessible without cluttering the prep surface. Utensil racks with hooks for whisks, ladles, and spatulas achieve the same goal.
Pot racks, either wall-mounted or hanging from the ceiling, can free up enormous amounts of cabinet or shelf space, though you need to consider traffic flow and head clearance for hanging racks. Pegboards, often associated with workshops, can be surprisingly effective in kitchens too, offering flexible storage for various small tools and pans. Are there downsides? Sure. Installation needs to be solid – you don’t want a loaded spice rack crashing down mid-service. And visually, too much wall clutter can make a space feel busy or disorganized if not planned well. Maybe I should clarify… it’s not about plastering every available wall inch, but strategically using wall space for high-frequency items to optimize workflow on the counters below. It’s about intentionality.
Mobile Storage Magic: Flexibility on Wheels
Sometimes, the best storage solution isn’t fixed. Mobile storage units – think rolling utility carts, ingredient bins on casters, mobile shelving units – offer incredible flexibility. Need to transport large quantities of prepped ingredients from the main prep area to the line? Load up a cart. Need extra landing space during a busy service? Roll a stainless steel cart into position. Storing bulk ingredients like flour or sugar? Large bins on wheels can be easily moved for cleaning underneath or refilling. This adaptability is huge in dynamic kitchen environments where needs can change from day to day or even hour to hour.
The ability to easily move storage units also simplifies cleaning protocols. You can roll entire shelving units out of the way to thoroughly clean floors and walls, which is much harder with fixed installations. However, ‘mobile’ can sometimes morph into ‘randomly parked everywhere’. Without clear guidelines and designated ‘parking spots’ for these units when not in use, they can quickly become obstacles, hindering traffic flow and creating safety hazards. It’s like those electric scooters scattered all over Nashville sidewalks – useful, but annoying when left in the middle of everything. So, embrace the flexibility, but implement some structure around where these rolling units belong when stationary.
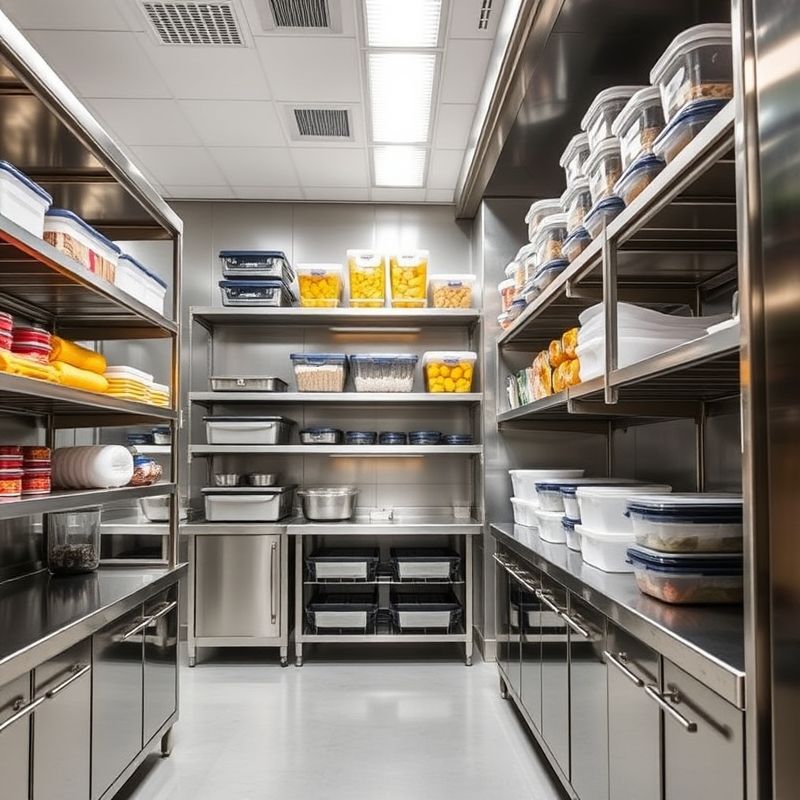
Containerization is King (or Queen): The Power of Standardization
This might seem basic, but the impact of using the right food storage containers cannot be overstated. Moving away from a haphazard collection of random tubs, reused takeout containers (please, no!), and miscellaneous bins towards a standardized system is transformative. Choose a line of containers that are durable, commercial dishwasher safe, and ideally, stackable with interchangeable lids. Square or rectangular containers are generally more space-efficient than round ones, minimizing wasted space on shelves and in coolers.
Clear containers are often preferable because they allow for quick visual identification of contents, reducing the need to open multiple containers to find what you’re looking for. Think polycarbonate (like Cambro) or polypropylene. Make sure they have tight-fitting lids to maintain freshness and prevent spills or cross-contamination. Having standardized sizes means they stack neatly and securely, maximizing vertical shelf space again. I’m torn sometimes between the durability of polycarbonate and the slightly lower cost of polypropylene… but ultimately, investing in quality, standardized containers pays off through reduced waste, better organization, and improved efficiency. It eliminates that frustrating game of Tetris trying to fit mismatched containers onto a shelf.
Shelving Strategies Revisited: Material and Placement
We touched on shelving materials earlier, but let’s dive a bit deeper. The main contenders are typically stainless steel, chrome-plated wire, polymer, and epoxy-coated wire. Stainless steel shelving (especially solid) is incredibly durable, easy to clean, and resistant to corrosion, but it’s also the most expensive. Chrome-plated wire is a budget-friendly option for dry storage, but it can rust if the plating gets damaged, especially in damp environments. That brings us back to epoxy-coated wire and polymer shelving, which are excellent choices for walk-ins and dishwashing areas due to their high resistance to rust and moisture. Polymer often has antimicrobial properties built-in, like Microban, offering an extra layer of hygiene protection. Is this added protection strictly necessary with good cleaning protocols? Maybe not, but it’s a nice backup.
Beyond material, think about placement and type. Use solid shelves where spills are likely or for storing small, loose items. Use wire shelves to promote air circulation around packaged goods or produce. Consider specialized shelving like wine racks or can racks for specific inventory needs. Ensure shelves are rated for the weight they need to hold – overloading is dangerous and can damage the units. And crucially, maintain proper spacing: keep the lowest shelf several inches off the floor (codes often specify 6 inches) for cleaning access and pest prevention, and ensure adequate clearance between shelves for accessibility and airflow. Proper shelf planning is foundational.
Small Wares Storage: Taming the Utensil Drawer
Pots, pans, baking sheets, utensils, cutting boards, small appliances… the sheer volume of ‘small wares’ in a commercial kitchen is immense. Keeping them organized and accessible is a constant battle. Overflowing drawers where utensils get jammed, precarious stacks of pans ready to avalanche – sound familiar? Dedicated storage is key. Use deep drawers with dividers for utensils, grouping like items together. Wall-mounted racks or pegboards, as mentioned, are great for hanging pots, pans, and tools. Consider specialized racks for sheet pans or cutting boards, keeping them stored vertically and separated for easy access and drying.
Think about workflow. Store items near where they are most used. Pots and pans near the range, cutting boards and knives near prep stations, mixing bowls near mixers. Seems obvious, right? But it requires conscious planning during layout design or reorganization. Maybe I should clarify: it’s not just about having *a* place for everything, but having the *right* place. For small appliances (blenders, food processors, immersion circulators), dedicate specific shelf space or under-counter cabinets. Avoid just stuffing them wherever they fit. Having well-organized small wares storage reduces search time, minimizes frustration, and contributes to a calmer, more efficient kitchen environment.
Dry Storage Discipline: Beyond the Basics
Dry storage areas need just as much attention as refrigerated zones. They’re susceptible to pests, spoilage, and disorganization. Key principles remain the same: FIFO, clear labeling, and keeping everything off the floor. Use airtight containers for bulk goods like flour, sugar, grains, and pasta. This not only maintains freshness but also provides crucial protection against pests (rodents, insects). Invest in good quality, food-grade bins, preferably on wheels for larger quantities.
Shelving should allow for easy visibility and access. Again, wire shelving often works well here for air circulation, unless storing items prone to spilling. Maintain a consistent organization system – group items logically (baking supplies together, canned goods together, pastas/grains together). Regularly check expiration dates and rotate stock diligently. Temperature and humidity control are also important; dry storage should ideally be cool, dry, and well-ventilated to prolong shelf life. A common mistake? Treating the dry storage room as a dumping ground for non-food items or equipment. Keep it dedicated to food to maintain hygiene and organization. Effective dry storage management prevents costly waste and ensures ingredients are always safe and ready to use.
The Receiving Area: First Stop, Critical Step
Storage planning doesn’t start inside the walk-in or on the prep line; it starts the moment goods enter the building. The receiving area needs to be designed for efficient and safe handling of deliveries. There should be adequate space to check deliveries against invoices without blocking traffic flow. Have sturdy tables or platforms for inspection. Crucially, there needs to be a clear, immediate path to the appropriate storage area – dry goods to dry storage, refrigerated items straight to the cooler, frozen items immediately to the freezer. Minimizing the time temperature-sensitive foods spend in the temperature ‘danger zone’ (roughly 40°F to 140°F or 5°C to 60°C) is paramount for food safety.
Think about having designated tools in the receiving area: box cutters, thermometers for checking temperatures, labeling supplies (date gun!), and maybe even a scale. Carts should be readily available to transport goods quickly. A poorly organized receiving process can lead to products sitting out too long, getting misplaced, or not being properly checked in, leading to inventory errors and potential safety issues down the line. Is this technically ‘storage’? Maybe not in the static sense, but it’s the crucial first step in the entire storage system. A bottleneck here impacts everything that follows. Optimizing receiving workflow is intrinsically linked to optimal storage.
Wrapping It Up: Finding Your Storage Zen
So, we’ve journeyed through the nooks and crannies of commercial kitchen storage, from the soaring heights of vertical shelving to the chilly depths of the walk-in and the crucial first steps in the receiving area. It’s clear that optimal storage isn’t just about having enough shelves; it’s a complex interplay of space maximization, workflow efficiency, food safety protocols, and the right equipment choices. Using vertical space, implementing strict FIFO and labeling, choosing appropriate containerization and shelving materials, leveraging mobile and wall-mounted options, and maintaining discipline in every storage zone – these are the building blocks.
It requires a systematic approach, constant vigilance, and buy-in from the entire team. It’s easy to let things slide during a busy service, but that’s when the systems matter most. Maybe the real challenge isn’t just implementing these solutions, but maintaining them day in, day out. It’s about building habits and a culture of organization. Does it sound daunting? Perhaps. But the payoff – in reduced waste, improved efficiency, lower stress levels, and a safer environment – is immense.
What’s the one thing you could change *this week* in your kitchen’s storage setup? Maybe it’s finally tackling that messy corner of the dry storage room, investing in some clear, standardized containers, or simply enforcing stricter labeling. I challenge you to identify one area and make a tangible improvement. It doesn’t have to be a massive overhaul overnight. Small, consistent steps towards better organization can collectively transform how a kitchen operates. After all, a calm, organized storage system is the foundation upon which culinary creativity can truly flourish. Or maybe I’m just projecting my own desire for order onto the beautiful chaos of cooking? Nah, pretty sure organization helps.
FAQ
Q: What’s the single most important factor in commercial kitchen storage?
A: It’s tough to pick just one, as it’s really a system! But if forced, I’d say organization combined with FIFO (First-In, First-Out). Proper organization makes everything accessible and efficient, while FIFO is absolutely critical for food safety and minimizing waste. They work hand-in-hand.
Q: How much does good commercial kitchen storage cost?
A: Costs vary wildly depending on the size of the kitchen, the quality and type of materials chosen (e.g., stainless steel vs. polymer vs. wire), and whether you need specialized solutions like mobile units or refrigerated drawers. Basic wire shelving is relatively inexpensive, while custom walk-in shelving systems or heavy-duty polymer solutions represent a larger investment. Think of it as an investment in efficiency and safety, not just an expense.
Q: What are the best storage solutions for very small kitchens?
A: In tight spaces, maximizing vertical space is key – tall, narrow shelving units are essential. Utilize wall space extensively with mounted shelves, magnetic knife strips, and utensil racks. Under-counter storage (drawers, shelves) is crucial. Mobile carts that can be moved out of the way are also very helpful. Think multi-functional: can a prep surface also have built-in storage below? Every square inch counts.
Q: How often should storage areas be thoroughly cleaned?
A: Cleaning frequency depends on the area and usage, but generally, daily spot cleaning is necessary, especially around prep areas and spills. Shelving should be wiped down regularly (daily or weekly depending on location and what’s stored). A deep clean of all storage areas, including walk-ins and dry storage (emptying shelves, cleaning walls/floors), should happen on a regular schedule – perhaps weekly or bi-weekly for high-use areas, and maybe monthly for others, following local health codes and HACCP plans.
You might also like
- Designing Efficient Restaurant Kitchen Layouts
- Maximizing Workflow in Small Commercial Kitchens
- Essential Guide to HACCP Compliance in Kitchen Design
@article{smart-commercial-kitchen-storage-solutions-that-work,
    title   = {Smart Commercial Kitchen Storage Solutions That Work},
    author  = {Chef's icon},
    year    = {2025},
    journal = {Chef's Icon},
    url     = {https://chefsicon.com/optimal-storage-solutions-for-commercial-kitchens/}
} 

