
Table of Contents
- 1 Dissecting the Famous Triangle: Making Sense of Kitchen Flow
- 1.1 What *IS* the Kitchen Work Triangle Anyway? The Core Concept
- 1.2 The ‘Rules’ (and Why Maybe We Should Bend Them)
- 1.3 Optimizing Leg 1: Fridge to Sink (The Prep Pathway)
- 1.4 Optimizing Leg 2: Sink to Stove (From Wet to Hot)
- 1.5 Optimizing Leg 3: Stove to Fridge (The Quick Grab)
- 1.6 Beyond the Big Three: Incorporating Other Workstations
- 1.7 The Island Dilemma: Helper or Hindrance?
- 1.8 Small Kitchens: Making the Triangle Work (When Space is Tight)
- 1.9 Lighting and Ergonomics: The Unsung Heroes of Efficiency
- 1.10 Putting It All Together: A Reality Check and Your Personal Flow
- 2 So, What’s the Takeaway on the Triangle?
- 3 FAQ
Okay, let’s talk kitchens. Specifically, let’s talk about moving around in them without bumping into things, dropping stuff, or generally feeling like you’re running a marathon just to make spaghetti. I spend a *lot* of time in my kitchen here in Nashville – partly because I love cooking, partly because working from home means the fridge is always calling, and partly because my cat, Luna, seems to think the area between the stove and the sink is her personal drag strip. This brings me to the classic concept: the kitchen work triangle. You’ve probably heard of it. It sounds a bit… dated? Like something from a 1950s home economics textbook. But honestly, understanding it, even if you decide to break its ‘rules,’ is pretty key to making your kitchen actually *work* for you, not against you.
When I moved from the Bay Area, unpacking my kitchen boxes felt like step one in truly settling into Nashville life. My old place had this sprawling, slightly awkward kitchen. My current one is cozier, shall we say. It forced me to really think about layout and efficiency. The work triangle – that imaginary shape connecting the centers of your sink, your refrigerator, and your stove/cooktop – became my obsession for a hot minute. It’s supposed to represent the path of least resistance for the cook, minimizing steps and maximizing convenience. Sounds simple, right? Well, like most things involving human behavior and spatial design, it’s got layers. Sometimes those layers feel like an onion you’re crying over while trying *not* to trip over the aforementioned cat.
So, what’s the deal with optimizing this triangle? Is it still the gold standard, or just a dusty guideline in the age of open-plan living, giant islands, and kitchens that double as offices and homework stations? I’ve spent some time thinking about this, analyzing my own movements (yes, I actually tracked my steps during a particularly complex recipe, much to Luna’s confusion), and digging into the principles behind it. This isn’t about rigidly adhering to decades-old diagrams. It’s about understanding the *why* behind the triangle – the core ideas of workflow efficiency, safety, and comfort – and then applying those ideas smartly to *your* space, whether it’s a sprawling chef’s dream or a compact corner that has to do it all. We’ll break down the concept, look at each leg of the triangle, consider modern kitchen realities, and figure out some practical kitchen-work-triangle-optimization-tips you can actually use, even if you’re not planning a full reno.
Dissecting the Famous Triangle: Making Sense of Kitchen Flow
Alright, let’s get into the nitty-gritty. The kitchen work triangle isn’t just some abstract geometry problem; it’s rooted in practical observation about how most cooking happens. Think about the typical flow: You grab ingredients from the fridge (point 1), take them to the sink (point 2) for washing and prep, and then move to the stove (point 3) for cooking. Cleaning up often reverses part of this flow. The idea is to keep these three key zones relatively close but not *too* close, and critically, to keep the path between them unobstructed. It’s about minimizing wasted steps and creating a clear, efficient core work area. This concept really took hold post-WWII, when kitchens were becoming more standardized and efficiency was the name of the game. It was a leap forward from earlier, often haphazard kitchen layouts.
What *IS* the Kitchen Work Triangle Anyway? The Core Concept
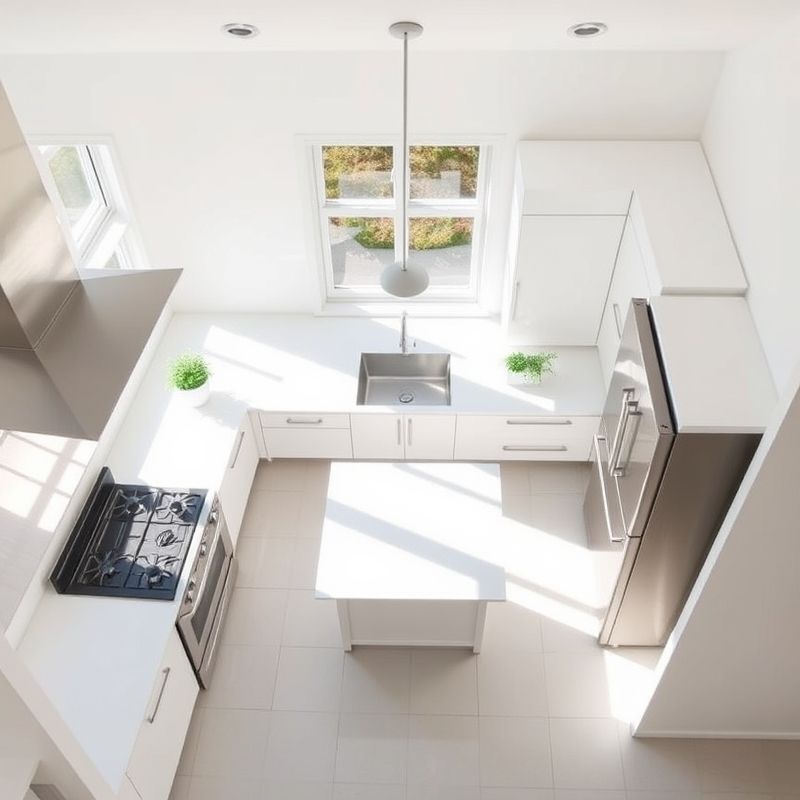
At its heart, the kitchen work triangle connects the primary centers of activity: the refrigerator (storage), the sink (cleaning/prep), and the stove/cooktop (cooking). Imagine drawing lines between the front-center of each of these appliances. That’s your triangle. The goal is functional proximity. You don’t want to hike miles between grabbing veggies from the fridge and washing them, nor do you want to pivot precariously with a hot pan to reach the sink. It sounds almost insultingly simple, but you’d be surprised how many kitchens, even new ones, get this fundamentally wrong. Obstructions like poorly placed islands, doors swinging into the path, or just general clutter can completely torpedo the triangle’s effectiveness, leading to frustration and inefficiency. It’s less about the perfect equilateral shape and more about the unimpeded flow between these crucial work zones. I sometimes wonder if the original designers ever anticipated the sheer amount of *stuff* we accumulate in our kitchens now, from air fryers to stand mixers, all vying for counter space and potentially blocking those sacred triangle pathways.
The ‘Rules’ (and Why Maybe We Should Bend Them)
Okay, so the traditional guidelines suggest each leg of the triangle should measure between 4 and 9 feet. The total distance of all three legs added together should ideally be between 13 and 26 feet. Less than 13 feet, and things might feel cramped, with zones potentially overlapping dangerously (like the fridge door hitting someone at the sink). More than 26 feet, and you’re just walking too much, turning cooking into a workout you didn’t sign up for. Crucially, major traffic paths (like the route to the dining room or back door) shouldn’t cut through the triangle. These are the classic ‘rules’. But here’s where my analytical side kicks in, questioning convention. Are these rules, developed for a specific type of kitchen and family structure, still universally applicable? Modern kitchens often feature multiple cooks, specialized workstations (baking centers, coffee bars), and the ubiquitous kitchen island. Sometimes, a ‘zone’ approach might make more sense than a strict triangle. Maybe the ‘rule’ is more of a strong suggestion, a starting point for thinking about layout efficiency rather than an unbreakable law. I lean towards flexibility, adapting the principle rather than blindly following the measurements. Is this the best approach? Let’s consider the individual paths…
Optimizing Leg 1: Fridge to Sink (The Prep Pathway)
This leg is arguably where many cooking tasks begin. You retrieve ingredients – veggies, meat, dairy – from the refrigerator and typically head straight for the sink to wash, rinse, or thaw. Efficiency here is key to a smooth start. One major tip? Ensure you have adequate ‘landing space‘ either next to or directly across from the refrigerator. This is counter space where you can temporarily place items you’ve just taken out before moving them to the sink. Without it, you end up juggling armfuls of groceries or balancing things precariously on the floor (guilty!). The path itself should be clear. In my kitchen, Luna loves lounging precisely in this pathway, so constant vigilance is required. Ideally, the fridge door swing shouldn’t obstruct access to the sink. Think about the sequence: open fridge, grab items, place on landing space, close fridge, pick up items, walk to sink. Minimizing the steps and potential fumbles in this food preparation sequence saves time and prevents spills. It’s also worth considering the *type* of fridge. A French door model might need less swing clearance than a single-door behemoth. It’s these little details in refrigerator placement that add up.
Optimizing Leg 2: Sink to Stove (From Wet to Hot)
This is often the busiest leg of the triangle, connecting the primary prep and cleaning zone (sink) with the cooking zone (stove). You’re moving washed vegetables, pots filled with water, and potentially messy prep bowls. Safety and convenience are paramount here. You absolutely need uninterrupted counter space between the sink and the stove. This is your main prep area. Too little space, and you’re constantly shuffling cutting boards, bowls, and utensils, feeling cramped and disorganized. Too much space, and you’re carrying potentially hot or heavy items further than necessary. The ideal distance allows for comfortable prepping without excessive walking. Also, consider the relationship with the dishwasher, usually located next to the sink. Ensure the open dishwasher door doesn’t block the path to the stove – a common and frustrating design flaw. Imagine draining a large pot of boiling pasta; you need a clear, direct path from the stove/cooktop to the sink accessibility area without performing a dangerous obstacle course. This leg demands careful planning for a safe and efficient cooking zone.
Optimizing Leg 3: Stove to Fridge (The Quick Grab)
This leg might seem less critical than the others, as you don’t typically move directly from active cooking *to* the fridge with hot items. However, it’s still part of the core triangle and needs consideration. Think about those moments you need to grab an extra splash of milk, another egg, or that forgotten condiment mid-cooking. A clear path prevents awkward reaches across hot surfaces or unnecessary detours around islands or tables. Having a heat-resistant landing space near the stove is also vital, not necessarily for things going *to* the fridge, but for items coming *off* the heat. While optimizing this leg might focus more on keeping the traffic flow clear rather than specific landing zones related to the fridge itself, its openness contributes to the overall feeling of spaciousness and lack of obstruction within the primary work area. It ensures the triangle remains an efficient core, even for those quick back-and-forth movements that are part of any real-world cooking workflow. Don’t underestimate the psychological impact of clear pathways; they just make the kitchen feel easier to use.
Beyond the Big Three: Incorporating Other Workstations
Let’s be real: modern kitchens are more than just a sink, stove, and fridge. We have microwaves, stand mixers, coffee makers, maybe even dedicated baking zones or secondary prep sinks. How do these fit into our tidy triangle? This is where the concept needs to evolve. Some experts talk about ‘work zones’ rather than a single triangle. You might have a baking zone with the mixer, oven, and nearby counter space. A beverage station with the coffee maker, mugs, and maybe a small bar fridge. A dedicated prep sink on an island can create a secondary, smaller triangle or work zone, especially useful if multiple people are cooking. The key isn’t to force everything into *the* triangle, but to apply the *principles* of the triangle – proximity of related tools and tasks, clear pathways, adequate landing space – to these additional workstations. Does the microwave placement make sense relative to the fridge (for reheating leftovers) or the main prep area? Is the coffee station near the water source and mugs? Thinking in terms of task-based kitchen zones acknowledges the complexity of modern kitchen design and how we actually use our spaces today. The triangle forms the core, but efficient zones orbit around it.
The Island Dilemma: Helper or Hindrance?
Ah, the kitchen island. It’s the dream feature for many, promising extra counter space, storage, seating, even housing a sink or cooktop. But oh boy, can it mess up a work triangle if poorly planned. An island plopped right in the middle of the path between sink and stove, or fridge and sink, becomes a major obstruction, forcing you to constantly walk around it. This adds steps and frustration, completely negating the triangle’s purpose. The key is clearance. Most guidelines recommend at least 36 inches (ideally 42-48 inches, especially if appliances open into the space or it’s a major walkway) of clear floor space around the island. You need room to move, open appliance doors, and potentially have more than one person working without bumping elbows. Consider the island’s function too. If it houses the main cooktop or prep sink, it fundamentally changes the triangle’s shape, potentially creating two triangles or a more linear workflow. If it’s just counter space and storage, ensure it doesn’t impede the flow between the main three points. An island should facilitate, not block, efficient traffic patterns and workflow. It’s a common source of obstructions if not thoughtfully integrated.
Small Kitchens: Making the Triangle Work (When Space is Tight)
Optimizing the work triangle feels even more crucial in a small kitchen layout, where every inch counts and inefficiency feels magnified. You don’t have the luxury of sprawling distances. Common small kitchen layouts like the galley kitchen (two parallel walls) or the L-shaped kitchen (two perpendicular walls) naturally lend themselves to a compact triangle. In a galley, the sink, stove, and fridge are often split between the two walls, creating a tight, step-saving triangle if clearances are maintained (again, 36-48 inches between counters is vital). In an L-shape, the three points typically occupy the two walls, forming a natural triangle with open floor space. The challenge in small kitchens is often storage and counter space, not necessarily the triangle’s distances. This is where maximizing vertical storage (wall cabinets reaching the ceiling, pot racks, magnetic knife strips) becomes essential to keep the limited counter space clear and the triangle pathways unobstructed. A small kitchen can be incredibly efficient if the work triangle is well-defined and kept clear of clutter. It forces a discipline that larger kitchens sometimes lack.
Lighting and Ergonomics: The Unsung Heroes of Efficiency
We talk a lot about layout and distance, but the work triangle’s effectiveness also hinges on factors like lighting and ergonomics. Trying to chop vegetables in shadow or constantly bending awkwardly to reach into low cabinets undermines any well-planned spatial arrangement. Good task lighting directly above the main work areas – sink, stove, and key counter prep spaces – is crucial. Undercabinet lighting is fantastic for illuminating countertops. Pendant lights over an island can define the space and provide focused light. Beyond lighting, consider ergonomics. Is the counter height comfortable for you? (Standard is 36 inches, but this can be adjusted). Are frequently used items stored within easy reach, between shoulder and knee height, to minimize bending and stretching? Is there enough knee space if you have seating at an island or peninsula? These elements contribute significantly to user comfort and reduce fatigue, making the time spent working within the triangle more pleasant and sustainable. A perfectly measured triangle is useless if it’s physically uncomfortable or poorly lit to work in.
Putting It All Together: A Reality Check and Your Personal Flow
So, we’ve dissected the triangle, explored its legs, considered islands, small spaces, and supporting factors. What now? The ultimate goal isn’t to achieve textbook perfection according to diagrams drawn decades ago. It’s about creating a kitchen that works efficiently and comfortably for *you* and how *you* cook. Maybe your ‘triangle’ is slightly stretched because of architectural constraints. Maybe you prioritize having the coffee maker in the most convenient spot, even if it slightly intrudes on a theoretical pathway. That’s okay. Use the triangle concept as a diagnostic tool. Walk through the steps of making a common meal in your kitchen. Where are the bottlenecks? Where do you feel cramped or find yourself taking unnecessary steps? Identifying these friction points is the first step towards improvement. Sometimes, small changes – relocating the utensil crock, adding a small rolling cart for extra landing space, improving lighting – can make a bigger difference than obsessing over perfect measurements. Before any major kitchen renovation, do this kind of layout testing. Consider your personal workflow. Are you a baker needing a dedicated zone? Do multiple people cook together? Let the triangle guide you, but don’t let it dictate against your lived reality. My own Nashville kitchen triangle isn’t ‘perfect’ by the book, but after some tweaking, the flow works for me (and mostly for Luna). That’s the practical application that truly matters.
So, What’s the Takeaway on the Triangle?
Wrapping this up, the kitchen work triangle isn’t some mystical geometric formula you must slavishly obey. Think of it more as a foundational concept, a really solid starting point for designing or evaluating a kitchen layout based on decades of observing how people cook. Its core principles – minimizing steps between key tasks, ensuring clear pathways, providing adequate workspace – are still incredibly relevant for workflow efficiency and safety. But it’s not static. Modern kitchens and lifestyles demand flexibility.
Maybe the real challenge isn’t adhering to the 4-to-9-foot rule, but thoughtfully adapting the *spirit* of the triangle to your specific space, your appliances, and your unique cooking habits. Whether you’re planning a full remodel or just trying to make your current setup less frustrating, mapping out your own triangle (or zones) and identifying those obstructions or overly long pathways is a powerful exercise. I challenge you to actually do it – sketch your kitchen, mark the big three, and see what shape emerges. What’s the one small tweak you could make this week to improve your flow?
Ultimately, the ‘best’ kitchen layout is the one that feels intuitive and comfortable *to you*. Will future kitchen tech, like smarter appliances or even robotic assistants, eventually make the triangle obsolete? I’m honestly not sure. Part of me, the analytical marketing guy, sees the potential for massive disruption. The other part, the guy who just wants to make dinner without tripping over the cat, thinks the fundamental need for efficient movement between storage, prep, and cooking will probably stick around in some form. It’s a fascinating space to watch, isn’t it?
FAQ
Q: Is the kitchen work triangle still relevant in 2025?
A: Yes, absolutely, but perhaps more as a guiding principle than a strict rule. The core idea of minimizing steps between the fridge, sink, and stove for efficiency and safety remains highly relevant. However, modern kitchen designs with islands, multiple workstations, and open-plan layouts often require adapting the concept, perhaps thinking more in terms of ‘work zones’ built around the triangle’s foundation.
Q: What are the ideal distances for the kitchen work triangle legs?
A: Traditional guidelines suggest each leg should be between 4 and 9 feet long. The total perimeter (all three legs added together) should ideally be between 13 and 26 feet. Shorter can feel cramped, longer means too much walking. But remember, these are guidelines, not rigid requirements.
Q: How does a kitchen island affect the work triangle?
A: An island can be a great asset, but it can also obstruct the work triangle if not planned carefully. Ensure there’s adequate clearance (at least 36-42 inches, more is often better) around the island so it doesn’t block the natural pathways between the sink, stove, and fridge. If the island houses one of these key components, it fundamentally changes the triangle’s layout.
Q: Can the work triangle concept be applied to small kitchens like galley or L-shaped layouts?
A: Definitely. In fact, it’s often even more critical in small kitchens where space is limited. Galley and L-shaped layouts naturally lend themselves to compact, efficient triangles. The key in small spaces is often keeping the limited counter space clear and pathways unobstructed through smart storage solutions, ensuring the triangle functions smoothly despite the smaller footprint.
You might also like
- Small Kitchen Storage Solutions to Maximize Space
- Kitchen Island Ideas Balancing Function and Style
- Pantry Organization Tips for an Efficient Kitchen
@article{kitchen-work-triangle-tips-for-better-flow,
    title   = {Kitchen Work Triangle Tips for Better Flow},
    author  = {Chef's icon},
    year    = {2025},
    journal = {Chef's Icon},
    url     = {https://chefsicon.com/kitchen-work-triangle-optimization-tips/}
} 

