
Table of Contents
- 1 The Low and Slow Philosophy: More Than Just Temperature
- 1.1 Choosing Your Weapon: The Smoker
- 1.2 The Soul of Smoke: Wood Selection
- 1.3 Temperature Control: The Constant Battle
- 1.4 The Rub: More Than Just Salt and Pepper
- 1.5 Moisture Management: To Spritz or Not to Spritz?
- 1.6 Surviving the Stall: Patience is Key
- 1.7 Meat Matters: Selection and Prep
- 1.8 Timing and Tenderness: When Is It Done?
- 1.9 The Crucial Rest: Don’t Skip This Step!
- 2 Wrapping It All Up: The Journey Continues
- 3 FAQ
Alright, let’s talk about something near and dear to my heart, something that requires patience, a bit of science, and a whole lot of love: low and slow smoking techniques. Ever since I moved to Nashville from the Bay Area, I’ve dived headfirst into the barbecue scene. It’s more than just cooking here; it’s a culture, a ritual almost. And the cornerstone of truly great barbecue? Mastering the art of cooking meat slowly over low heat, letting smoke work its magic. It’s not just about throwing wood chips in a grill; it’s a delicate dance between temperature, time, wood, and the meat itself. Luna, my rescue cat, often sits by the window while I’m tending the smoker, probably wondering why I spend hours staring at a metal box. Sometimes I wonder too.
I remember my first attempts vividly. Dry brisket, ribs that were somehow both tough *and* falling apart in the wrong way… it was a learning curve, to say the least. I read forums, watched countless videos, and mostly, I practiced. A lot. What I realized is that while recipes are great starting points, true mastery comes from understanding the *why* behind the techniques. Why certain woods? Why that specific temperature range? Why the dreaded stall? It’s this deeper understanding that turns cooking into an art form, moving beyond simply following instructions. This isn’t just about feeding yourself; it’s about patience, observation, and creating something truly special.
So, in this piece, I want to break down what I’ve learned – the successes, the failures (oh, the failures!), and the little nuances that make a big difference. We’ll cover everything from choosing your smoker and wood to managing the fire, understanding rubs and moisture, and knowing when your masterpiece is finally ready. Whether you’re just starting out or looking to refine your skills, my hope is to share some insights that will help you on your own low and slow journey. It’s less of a strict guide and more of a collection of thoughts and techniques I’ve found useful. Maybe some of it will resonate, maybe you’ll find your own path. That’s the beauty of barbecue, isn’t it? There’s always more to learn, always another variable to tweak.
The Low and Slow Philosophy: More Than Just Temperature
Okay, let’s get into the meat of it (pun absolutely intended). The term low and slow gets thrown around a lot, but what does it *really* mean? Typically, we’re talking about maintaining cooking temperatures between 225°F and 275°F (roughly 107°C to 135°C). This temperature range is crucial for a couple of reasons. Firstly, it allows tough cuts of meat, rich in connective tissue like collagen (think brisket, pork shoulder, ribs), to break down gradually. This collagen renders into gelatin, giving the meat that incredibly moist, tender texture we crave. Rushing this process with higher heat just tightens up the muscle fibers and leads to tough, dry results. You simply can’t cheat time when it comes to rendering fat and collagen properly. It’s a chemical and physical transformation that needs hours, not minutes.
Secondly, this lower temperature range is ideal for absorbing smoke flavor. The compounds in wood smoke adhere better to cooler, moist surfaces. Cooking too hot can actually hinder smoke absorption and sometimes create acrid, unpleasant flavors. It’s about bathing the meat in gentle, consistent smoke over a long duration, allowing those complex flavors to penetrate deep within. This isn’t about aggressive, billowy white smoke; you’re looking for that thin, almost invisible ‘blue smoke’ which indicates a clean-burning fire releasing the best aromatic compounds. Achieving this often means careful fire management, which we’ll dive into later. It’s a subtle art, coaxing flavor rather than forcing it.
But beyond the technical aspects, low and slow is a mindset. It requires patience. It demands attention, but not constant fiddling. It’s about setting things up correctly, trusting the process, and making minor adjustments along the way. In our fast-paced world, dedicating 6, 10, even 1_ hours to cooking something feels almost rebellious. It forces you to slow down, to observe, to be present. It connects you to a more primal way of cooking, transforming humble ingredients into something extraordinary through the simple application of heat and smoke over time. It’s a commitment, and the reward is usually well worth the wait. You learn to read the smoker, the weather, the meat itself. It becomes intuitive, eventually.
Choosing Your Weapon: The Smoker
The vessel you use for your low and slow adventures matters. A lot. There’s a bewildering array of smokers out there, each with its pros and cons. You’ve got your classic offset smokers, which look impressive and offer fantastic flavor potential but demand constant attention to fire management. Then there are pellet smokers (like Traeger, Pit Boss, etc.), which offer set-it-and-forget-it convenience with digital temperature control, making them super accessible for beginners. Purists sometimes scoff, but honestly, they produce great results consistently. Is it cheating? Maybe a little, but who cares if the food tastes amazing? I wrestled with this myself – the romance of managing a live fire versus the ease of automation. Ultimately, consistency won for my weeknight smokes, though I still love breaking out the offset on a lazy Saturday.
Then you have kamado grills (like the Big Green Egg or Kamado Joe), ceramic cookers that are incredibly efficient with fuel and hold temperatures remarkably steady once dialed in. They’re versatile too, capable of high-heat searing and low-and-slow smoking. Electric smokers are another option, often very affordable and easy to use, though some argue they don’t produce smoke flavor quite as deep or complex as wood-fired units. And let’s not forget the humble Weber Kettle grill, which can absolutely be set up for effective low and slow cooking using techniques like the snake method or charcoal banks. Your choice depends on your budget, how much effort you want to put into fire management, the space you have, and frankly, what kind of experience you’re looking for. There’s no single ‘best’ smoker; the best one is the one that fits your lifestyle and helps you make food you love. For those looking at higher volume or even commercial applications, suppliers like Chef’s Deal offer a wide range of professional-grade smokers and can provide consultation on what fits specific needs, whether it’s capacity, fuel type, or space constraints. They even offer kitchen design services, which could be handy if you’re planning a serious outdoor kitchen setup.
The Soul of Smoke: Wood Selection
If temperature is the body, wood is the soul of smoked food. The type of wood you use imparts distinct flavor profiles, and choosing the right one can elevate your barbecue from good to sublime. It’s not just about burning any wood; you need seasoned hardwood burned correctly to produce that desirable thin blue smoke. Green wood or smoldering, choked fires produce creosote, which tastes bitter and acrid. Yuck. You want hardwoods – fruitwoods like apple and cherry offer milder, sweeter smoke, fantastic for poultry, pork, and fish. Nut woods like pecan (similar to hickory but milder) and hickory itself provide stronger, heartier flavors, classic partners for pork and beef. Then you have the king, oak, often considered a great all-arounder, stronger than fruitwoods but milder than hickory, excellent for brisket and larger cuts. And let’s not forget mesquite, the powerhouse, incredibly strong and prone to bitterness if overused, but magical for grilling or short smokes on beef.
Matching wood to meat is part art, part tradition. Delicate meats like fish or chicken can be easily overwhelmed by strong woods like mesquite or even hickory. Pork shoulder loves apple, cherry, or hickory. Brisket often sings with oak or a mix of oak and hickory. But don’t be afraid to experiment! Sometimes mixing woods creates unique complexity. I often use a base of oak with some cherry chunks thrown in for my pork ribs. The form matters too – chunks burn slower and more consistently than chips, making them better for long smokes. Chips are better for shorter cooks or adding a quick burst of smoke. Pellets, used in pellet smokers, are compressed sawdust and come in all the varieties mentioned above. The key is clean combustion. You want the wood to smolder gently, not burn aggressively or choke off oxygen. This ensures you’re getting flavor compounds, not just soot.
Temperature Control: The Constant Battle
Maintaining a consistent temperature, usually in that magic 225°F-275°F zone, is arguably the most critical skill in low and slow smoking. Fluctuations are inevitable, but minimizing their severity and duration is key. How you achieve this depends heavily on your smoker type. With an offset, it’s all about managing the fire in the firebox – adding splits of wood at the right time, adjusting vents (intake and chimney) to control airflow, which dictates the heat. Too much air, the fire burns too hot; too little, it smolders and produces bad smoke. It’s a constant balancing act, demanding frequent checks and adjustments. Maybe I should clarify… it *feels* constant, especially at first, but you develop a rhythm.
Pellet smokers make this incredibly easy with their automated augers feeding pellets and fans managing airflow based on a thermostat setting. Kamados are great retainers of heat, so once you get the vents dialed in (usually small adjustments make a big difference), they can cruise for hours. Electric smokers use heating elements regulated by thermostats. With charcoal smokers or kettle grills, you’re managing airflow through vents and often using techniques like the Minion method or the snake method to ensure a long, slow burn of the charcoal. Regardless of the smoker, a reliable dual-probe thermometer is your best friend. One probe monitors the smoker’s ambient temperature at grate level (don’t rely on the built-in lid thermometer, they’re often inaccurate), and the other monitors the internal temperature of your meat. Understanding how airflow affects your specific smoker is paramount. It takes practice, observation, and maybe a few frustrating cooks, but mastering temperature stability is fundamental.
The Rub: More Than Just Salt and Pepper
Before the meat even hits the smoker, the rub comes into play. A good rub does more than just add flavor; it helps create that delicious crust, known as the bark, that’s so prized in barbecue. Bark formation is a complex process involving the dehydration of the meat’s surface, rendered fats, and the polymerization of spices interacting with smoke and heat. Most barbecue rubs start with a base of salt and pepper. Salt plays a crucial role, not just in seasoning but also in drawing moisture to the surface, which helps smoke adhere and aids in bark formation through the Maillard reaction and caramelization (especially if sugar is present).
Beyond salt and pepper, the possibilities are endless. Common ingredients include paprika (for color and mild flavor), garlic powder, onion powder, chili powder, cumin, cayenne (for heat), and sugar (brown sugar or white sugar). Sugar adds sweetness but also caramelizes, contributing significantly to dark, crispy bark. However, sugar can burn at higher temperatures, so finding the right balance is key, especially if you’re cooking closer to the 275°F end of the low and slow spectrum. Some rubs are simple (like a classic Texas brisket rub of just salt and pepper), while others are complex concoctions with a dozen or more ingredients. Application matters too. You want an even coating, adhering well to the meat. Some folks use a binder like yellow mustard, olive oil, or even water to help the rub stick. I’m torn between mustard and just letting the meat’s natural moisture do the job… honestly, I don’t notice a huge difference most times, but the ritual of slathering mustard is kind of satisfying. The key is building a foundation of flavor that complements both the meat and the smoke. Don’t be afraid to make your own rubs; it’s cheaper and allows complete control over the flavor profile.
Moisture Management: To Spritz or Not to Spritz?
Maintaining moisture during a long smoke is critical for texture and can also influence bark formation and smoke absorption. There are several ways to approach this. One common method is using a water pan inside the smoker. The evaporating water adds humidity to the cooking chamber, which helps keep the meat surface moist (aiding smoke adhesion) and can help stabilize the smoker temperature due to the thermal mass of the water. Is this the best approach? It’s certainly popular and effective, especially in less humid environments or smokers prone to drying out.
Another technique is spritzing or mopping. This involves periodically spraying the meat surface with a liquid – common choices include water, apple juice, apple cider vinegar, beer, or broth mixtures. Spritzing does a few things: it cools the surface slightly (which can potentially slow cooking but also help smoke adhere), adds moisture, and can layer subtle flavors depending on the liquid used. It might also help prevent the bark from getting too dark or dry in spots. However, opening the smoker frequently to spritz causes temperature drops, potentially extending the cook time. There’s a debate here: some pitmasters swear by spritzing every 30-60 minutes, while others argue it’s unnecessary if you manage your humidity well (e.g., with a water pan) and can actually wash away some of the rub and developing bark. I tend to spritz occasionally, maybe after the first 3-4 hours once the bark has started to set, primarily if the surface looks like it’s drying out too much. Use a fine mist spray bottle and be quick about it to minimize heat loss.
Finally, some cooks use injections, particularly for large cuts like brisket and pork shoulder. Injecting a flavorful liquid (often broth-based with spices) deep into the muscle adds moisture and flavor from the inside out. This can be especially helpful for leaner cuts or simply to boost juiciness. It’s a bit more interventionist, but undeniably effective for ensuring a moist end product. Ultimately, moisture management is about balance – keeping the environment humid enough and the meat surface receptive to smoke without hindering bark formation or drastically extending your cook time.
Surviving the Stall: Patience is Key
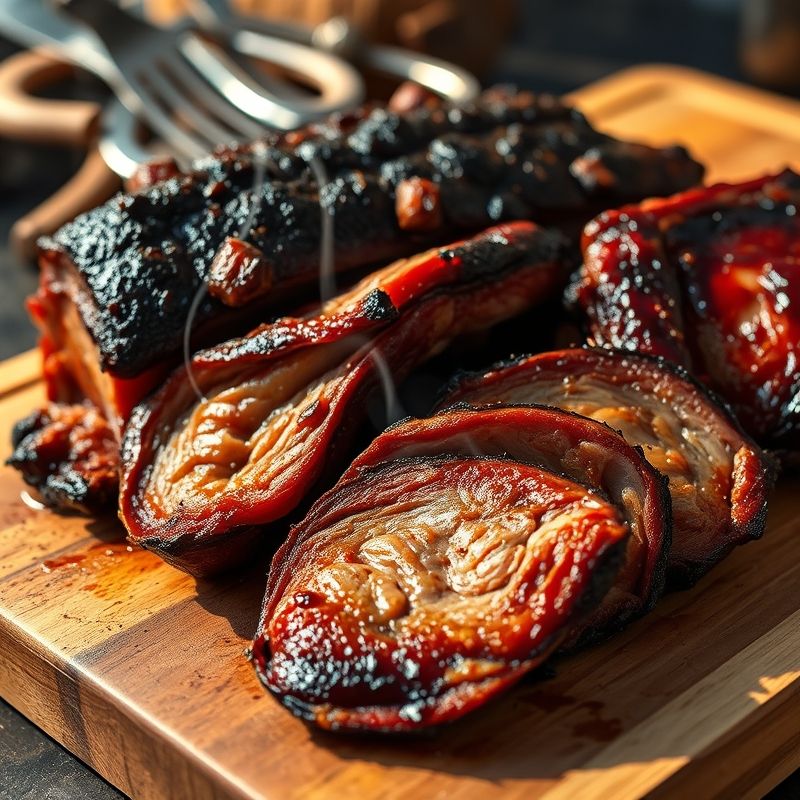
Ah, the dreaded stall. If you’ve smoked large cuts like brisket or pork shoulder, you’ve likely encountered this phenomenon. It’s that frustrating period, often somewhere between 150°F and 165°F internal temperature, where the meat temp seems to hit a wall and stops rising, sometimes for hours. What’s going on? The primary cause is evaporative cooling. As the meat heats up, moisture evaporates from its surface. This evaporation process has a cooling effect, much like sweating cools our bodies. When the rate of evaporative cooling equals the rate of heat being supplied by the smoker, the temperature stalls. It’s simple physics, but it can feel like black magic when you’re staring at a thermometer that hasn’t budged in two hours.
So, what do you do? First, don’t panic! It’s a natural part of the process. You have a few options. One is to simply wait it out. Eventually, enough moisture will evaporate from the surface, the cooling effect will lessen, and the temperature will start climbing again. This often results in the best bark, as the surface continues to dry and render. The second option is the famous Texas Crutch: wrapping the meat tightly in foil or butcher paper. Wrapping traps moisture, reducing evaporative cooling and pushing the meat through the stall much faster. Foil creates more of a steaming effect, which can soften the bark but speeds things up considerably. Butcher paper (specifically unwaxed, food-grade pink butcher paper) is somewhat breathable, allowing some moisture to escape, which helps preserve the bark better than foil while still accelerating the cook. I often use butcher paper for brisket once the bark has the color I like. There’s no right or wrong way; it depends on whether your priority is speed/moisture retention (foil) or bark preservation (paper/no wrap). Understanding the stall means you won’t be tempted to crank up the heat, which would ruin the low and slow process.
Meat Matters: Selection and Prep
You can have the best smoker and technique in the world, but if you start with subpar meat, your results will be compromised. Choosing the right cut and quality is crucial. For low and slow, you typically want cuts with ample connective tissue and intramuscular fat (marbling). These are often tougher, less expensive cuts that transform beautifully over long cooking times. Think brisket (specifically the packer cut with both the point and flat), pork shoulder (also called pork butt or Boston butt), pork ribs (spareribs, St. Louis cut, or baby backs), beef ribs, and whole chickens.
Look for good marbling within the muscle – those white flecks of fat will render during cooking, adding flavor and moisture. For brisket, a thick, even flat and a well-marbled point are desirable. For pork shoulder, look for a good fat cap (though you’ll likely trim some of it) and nice intramuscular fat. Quality grades matter too (like USDA Prime, Choice, Select for beef). Higher grades generally mean more marbling and potentially a more tender result, though excellent barbecue can be made from Choice or even Select grades with the right technique. Maybe I should clarify… skill can elevate a lesser cut, but starting with great raw material gives you a significant advantage.
Prep usually involves trimming excess hard fat (which won’t render nicely) while leaving enough fat cap (typically ¼ inch) for moisture and flavor. For ribs, removing the tough membrane (silverskin) from the bone side is almost always recommended, as it can be tough and prevents the rub and smoke from penetrating. After trimming, apply your rub, letting it adhere. Some people like to rub the night before to allow the salt to penetrate (like a dry brine), while others rub just before putting the meat on the smoker. I’ve done both and find that for large cuts, an overnight rub can enhance flavor slightly, but it’s not strictly necessary. The key is starting with a good piece of meat appropriate for the cooking method and prepping it properly.
Timing and Tenderness: When Is It Done?
This is where art meets science again. While internal temperature is a crucial guideline, it’s not the *only* indicator of doneness, especially with low and slow cooking. Different cuts are technically ‘done’ (safe to eat) at lower temperatures, but they won’t be *barbecue tender* until they reach higher internal temps where collagen has fully rendered. For brisket and pork shoulder, this typically happens somewhere between 195°F and 205°F (90°C – 96°C) internal temperature. However, relying solely on that number can be misleading. Some briskets might be perfectly tender at 198°F, while others need to go to 203°F or even higher.
The real test is probe tenderness. This means probing the meat with your thermometer probe (or a skewer) in several places, particularly the thickest parts. It should slide in and out with very little resistance, often described as feeling like probing room-temperature butter. For brisket, you check both the flat and the point. For pork shoulder, check deep in the muscle, avoiding the bone. For ribs, the bend test is common: pick up the rack with tongs, and if it bends easily and the surface cracks, they’re likely ready. The meat should also have pulled back from the ends of the bones. Learning the feel of ‘done’ takes practice. Don’t be afraid to trust your senses over just the thermometer reading. Temperature gets you in the ballpark; feel tells you when the game is won.
The Crucial Rest: Don’t Skip This Step!
You’ve spent hours carefully tending the fire, managing temperature, and nursing your meat to perfection. It hits that magic temperature and feels perfectly tender. The temptation is overwhelming: slice into it immediately! Resist! The resting period is absolutely crucial for juicy, flavorful barbecue. While cooking, the muscle fibers tighten and squeeze out moisture. Resting allows those fibers to relax and reabsorb some of the juices that have been pushed towards the surface. Slicing too early means all that precious moisture ends up on your cutting board instead of in the meat.
How long should you rest? It depends on the cut and size. For smaller items like ribs or chicken, 15-30 minutes might suffice. For large cuts like brisket and pork shoulder, a longer rest is essential, often at least one hour, and ideally 2-4 hours or even longer for very large pieces. To rest, wrap the meat tightly in foil or butcher paper (if it wasn’t already wrapped) and then wrap it in old towels. Place this bundle inside a dry cooler (an insulated container, often called a faux cambro). This setup will keep the meat hot and safe for several hours while allowing it to rest properly. This resting phase not only improves moisture but also allows the internal temperature to stabilize and the flavors to meld. It’s the final, vital step in the low and slow process. Skipping it is like running a marathon and stopping 10 feet from the finish line. If you’re investing in equipment, maybe from a place like Chef’s Deal that offers professional holding cabinets for commercial kitchens, you understand the importance of temperature control even *after* the cook. For home cooks, a good cooler does the trick perfectly.
Wrapping It All Up: The Journey Continues
So there you have it – a rambling tour through the world of low and slow smoking. We’ve touched on the philosophy, the gear, the wood, managing heat and moisture, the science behind the stall, choosing meat, and knowing when it’s truly done (and rested!). It seems like a lot, and honestly, it is. There are countless variables, and every cook is a little different. Weather, humidity, the specific piece of meat, the mood of your smoker – it all plays a part. That’s what makes it challenging, but also incredibly rewarding.
Don’t strive for perfection on your first try, or even your tenth. Embrace the learning process. Take notes. Pay attention to what worked and what didn’t. Was the fire too hot? Did the bark get too dark? Was it juicy enough? Every cook teaches you something. For me, the biggest takeaway has been the importance of patience and observation. You can’t rush low and slow. You have to let time and gentle heat do their work. And you have to learn to read the signs – the color of the smoke, the feel of the meat, the way the temperature behaves.
Ultimately, the best technique is the one that works for you, in your backyard, with your equipment. So, my challenge to you isn’t to follow these steps rigidly, but to use them as a starting point for your own experiments. Will you master it overnight? Probably not. Will you make some amazing food (and maybe some mediocre food) along the way? Absolutely. And isn’t that journey the best part? Now, if you’ll excuse me, I think I hear my smoker calling… or maybe that’s just Luna wanting her dinner.
FAQ
Q: What’s the best beginner smoker for low and slow cooking?
A: It really depends on budget and desired effort level. Pellet smokers offer great convenience and temperature control, making them very beginner-friendly. A Weber Kettle grill is also a versatile and affordable option if you’re willing to learn charcoal management techniques like the snake method. Kamado grills are efficient but have a higher price point. Electric smokers are simple but might offer less authentic smoke flavor for some tastes.
Q: How important is internal temperature versus cooking time?
A: Internal temperature and ‘probe tenderness’ are far more important than time. Cooking time is just an estimate and can vary wildly based on the specific cut of meat, smoker temperature fluctuations, weather, and whether you wrap the meat. Always cook to temperature and feel, not to the clock.
Q: Can I use wood chips instead of wood chunks for long smokes?
A: Wood chunks are generally better for long low and slow sessions because they smolder and release smoke more slowly and consistently. Wood chips burn much faster, requiring frequent replenishment and potentially causing temperature spikes or inconsistent smoke. Chips are better suited for shorter cooks or adding smoke flavor when grilling.
Q: My bark isn’t getting dark or crusty. What am I doing wrong?
A: Several factors affect bark formation. Ensure your rub has ingredients that contribute to crust (salt, sugar, paprika). Maintain consistent temperature – fluctuations can hinder bark. Avoid wrapping too early; let the bark fully set and achieve the desired color before wrapping (if you choose to wrap). Ensure adequate airflow in your smoker, as stagnant, humid air can sometimes lead to softer bark. Finally, don’t spritz too frequently, as this can wash away rub and prevent drying.
You might also like
- Essential Tools for Successful Barbecue Smoking
- Understanding Different Types of Commercial Smokers
- Perfecting Your Brisket Rub: Recipes and Tips
@article{achieving-perfect-low-and-slow-smoked-meats,
    title   = {Achieving Perfect Low and Slow Smoked Meats},
    author  = {Chef's icon},
    year    = {2025},
    journal = {Chef's Icon},
    url     = {https://chefsicon.com/mastering-low-and-slow-smoking-techniques/}
} 

