
Table of Contents
- 1 Decoding Commercial Exhaust Hoods: Your Kitchen’s Unsung Hero
- 1.1 Why Your Commercial Exhaust Hood is a BIG Deal (Not Just Hot Air)
- 1.2 Hood Types: Know Your Options (Type I vs. Type II)
- 1.3 Sizing Matters: Getting the Dimensions Right
- 1.4 Understanding Airflow (CFM) and Makeup Air – The Balancing Act
- 1.5 Hood Styles and Designs: Function Meets (Some) Form
- 1.6 Filters: The Unsung Guardians of Your System
- 1.7 Don’t Forget the Exhaust Fan! (The Engine of the System)
- 1.8 Codes, Regulations, and Permits: Navigating the Maze
- 1.9 Considering Cost: Beyond the Sticker Price
- 1.10 Making the Final Decision: Expert Help and Smart Shopping
- 2 Wrapping It Up: A Breath of Fresh Air
- 3 FAQ
Alright folks, Sammy here, your friendly neighborhood marketing guy turned food fanatic, reporting from my cozy home office here in Nashville – Luna, my rescue cat, is currently supervising from her favorite sunbeam, probably judging my typing speed. Today, we’re diving into something that’s, well, not always the sexiest topic in the culinary world, but it’s absolutely vital: choosing the right commercial exhaust hood. I know, I know, it doesn’t have the immediate allure of a perfectly seared steak or a delicate soufflé, but trust me on this one. Get this wrong, and your dream kitchen can quickly turn into a smoky, greasy, and frankly, dangerous nightmare. It’s one of those foundational pieces of equipment that can make or break your kitchen’s efficiency, safety, and even the well-being of your staff.
I’ve spent a good chunk of my career analyzing systems – how things connect, why they work (or don’t), and how people interact with them. And a commercial kitchen? That’s one heck of a complex system. After relocating from the Bay Area to embrace Nashville’s vibrant scene, I’ve had my fair share of conversations with chefs, restaurant owners, and kitchen designers. One recurring theme? The sheer importance, and often the underestimation, of proper ventilation. I remember one chef friend, back in California, who skimped on his initial hood setup. The constant battles with smoke, the greasy film on everything, the staff complaints… it was a lesson learned the hard way. He eventually had to do a costly overhaul. It’s not just about sucking smoke out; it’s about creating a functional, safe, and compliant workspace.
So, why am I, a marketing expert with a food blog, tackling this? Because I’m endlessly curious about the ‘why’ and ‘how’ behind everything, especially in the food world. And because I see so many people get overwhelmed by the technical jargon and the sheer number of options. My goal here on Chefsicon.com, which, by the way, is still blowing my mind with over 2 million page views a month (thanks, y’all!), is to break down these complex topics into something more digestible. We’re going to look at the different types of hoods, how to size them, the mysteries of airflow and makeup air, the dreaded codes and regulations, and how to make a smart investment. Think of this as your comprehensive, slightly opinionated, but hopefully very helpful guide to not messing up one of the most critical decisions for your commercial kitchen. Let’s get into it, shall we?
Decoding Commercial Exhaust Hoods: Your Kitchen’s Unsung Hero
Why Your Commercial Exhaust Hood is a BIG Deal (Not Just Hot Air)
Let’s be straight up, your commercial exhaust hood is way more than just a shiny piece of metal hanging over your cookline. It’s the guardian of your kitchen’s air quality, a silent workhorse that plays a massive role in overall operations. Its primary job, obviously, is to capture and exhaust smoke, grease-laden vapors, steam, and heat generated by your cooking equipment. But the implications go so much deeper. We’re talking about fire prevention – a huge one. Grease is highly flammable, and if it accumulates in your ductwork because your hood isn’t doing its job, you’re sitting on a ticking time bomb. Proper ventilation significantly reduces this risk. Then there’s employee comfort and health. Imagine working an eight-hour shift in a hot, smoky, smelly environment. Not pleasant, right? A good hood improves air quality, reduces temperatures, and makes the kitchen a more bearable, even safer, place to work. This can directly impact staff morale, productivity, and even retention. And let’s not forget kitchen hygiene; a hood helps prevent that nasty grease film from settling on every surface, making cleaning easier and reducing the risk of pest infestations. Lastly, and this is a biggie, there’s regulatory compliance. Fire codes, health codes… they all have strict requirements for kitchen ventilation. Fail to meet them, and you could be looking at fines or even a shutdown. So yeah, it’s a pretty big deal.
The impact on your energy bills is another angle to consider. It might seem counterintuitive, but the *right* hood system can actually contribute to energy efficiency, while the wrong one can be a massive drain. An undersized hood won’t capture contaminants effectively, leading to all the problems mentioned above. An oversized hood, or one with an unnecessarily powerful fan, might be exhausting more conditioned (heated or cooled) air than necessary, forcing your HVAC system to work overtime to compensate. This is especially true if your makeup air system isn’t properly integrated or managed. It’s this intricate dance of air in, air out, and maintaining a balance. I sometimes think people just go for the biggest, baddest hood they can find, thinking ‘more is better,’ but that’s not always the case. Precision is key. It’s about matching the hood’s capacity to the actual needs of your cooking appliances and kitchen volume. This is where careful calculation and, dare I say, a bit of science comes into play.
And think about how your exhaust system affects everything else in the kitchen. If your hood is pulling out a massive volume of air without adequate makeup air being supplied, you create negative pressure. This can cause all sorts of weird issues: exterior doors that are hard to open, pilot lights on gas appliances extinguishing, backdrafting from gas water heaters or ovens (which can pull dangerous carbon monoxide into the kitchen), and even affecting the performance of other vented appliances. My friend I mentioned earlier, the one in the Bay Area? His initial setup had terrible makeup air. The kitchen would get so stuffy in summer because the AC couldn’t cope with the negative pressure and the heat load. It became this cascade of problems, all stemming from an improperly designed ventilation system. It really highlighted for me how interconnected everything in a commercial kitchen is. It’s not just a collection of individual appliances; it’s an ecosystem.
Finally, remember this is a long-term investment. A commercial exhaust hood isn’t like a set of pans you replace every few years. A good quality, properly installed system should last for many, many years. So, the decision you make now will have repercussions – good or bad – for a significant portion of your business’s lifespan. Trying to save a few bucks upfront by skimping on the hood or its installation can lead to much higher costs down the line, whether through increased energy consumption, premature equipment failure, fines, or even catastrophic events like fires. Therefore, getting it right the first time is not just a nice-to-have; it’s an economic and safety imperative. It requires research, planning, and often, expert advice. It’s an investment in the safety, efficiency, and longevity of your entire culinary operation.
Hood Types: Know Your Options (Type I vs. Type II)
Okay, so when you start looking at hoods, one of the first big distinctions you’ll encounter is Type I versus Type II. This isn’t just a minor detail; it’s fundamental to getting the right system for your needs. Getting this wrong isn’t just inefficient, it’s a serious safety hazard and a code violation. It’s like trying to use a bicycle helmet for motorcycle racing – just not designed for the same level of risk.
Type I Hoods: The Grease Wranglers
These are the heavy lifters, the ones designed for the tough jobs. Type I hoods, also known as grease hoods, are mandatory over appliances that produce grease-laden vapors and smoke. Think your ranges, fryers, griddles, charbroilers, and woks. These hoods are built to capture that greasy air and, crucially, to help manage the fire risk associated with it. They feature grease filters – typically baffle filters made of stainless steel or aluminum – designed to extract a significant portion of the grease particles from the exhaust air before it enters the ductwork. This is super important because grease buildup in ducts is a primary cause of kitchen fires. Type I hoods are almost always constructed from durable materials like stainless steel to withstand the harsh kitchen environment and to facilitate easier cleaning. Furthermore, they are usually required to be integrated with a fire suppression system, like an Ansul system, which can automatically discharge fire retardant in case of a flare-up on the cookline. So, if you’re cooking anything that sizzles, pops, or fries with grease, a Type I hood is non-negotiable. The entire system, from the hood canopy to the exhaust fan, is engineered for this specific, demanding task.
Type II Hoods: Steam & Odor Tamers
Then you have Type II hoods, sometimes called condensate hoods or heat/fume hoods. These are designed for appliances that primarily produce heat, steam, condensation, and odors, but *not* grease. Think about your dishwashers (especially high-temp ones), ovens (like convection or baking ovens that don’t typically produce greasy effluent), steamers, and some coffee roasters. Because they aren’t dealing with grease, Type II hoods don’t require the sophisticated grease filtration systems found in Type I hoods. They might have simple mesh filters for particulate matter, but their main job is to remove heat and moisture to improve the kitchen environment and prevent condensation buildup on ceilings and walls. They are generally simpler in construction and less expensive than Type I hoods. However, and this is a critical point I’ve seen cause confusion: you absolutely cannot use a Type II hood over grease-producing equipment. It simply isn’t designed for it, won’t provide adequate fire protection, and will quickly become a caked-on, hazardous mess. It’s not about trying to save money by opting for a simpler hood; it’s about matching the hood type to the specific effluent produced by your appliances. This distinction is paramount for safety and code compliance. Always verify the requirements for each piece of equipment under the hood.
Sizing Matters: Getting the Dimensions Right
Now, let’s talk size. And no, this isn’t one of those times where bigger is automatically better, though undersizing is definitely a problem. The physical dimensions of your exhaust hood are critical for its ability to effectively capture the smoke, heat, and grease rising from your cooking equipment. There’s a generally accepted rule of thumb called ‘overhang’. This means your hood should extend beyond the edges of the cooking appliances it’s covering. The standard recommendation is usually a 6-inch overhang on all open sides. So, if you have a range that’s 36 inches deep and 48 inches wide, and it’s against a wall (open on three sides), your hood should ideally be at least 42 inches deep (36 + 6) and 60 inches wide (48 + 6 + 6). This overhang creates a larger capture area, helping to ensure that convective currents and minor drafts don’t pull contaminants out from under the hood and into the kitchen. Always, always, always check your local codes, though, as they might have specific overhang requirements that supersede general guidelines. Some jurisdictions might require more, especially for very hot or smoky equipment.
But physical size is only part of the equation. The other critical factor is the required airflow, measured in Cubic Feet per Minute (CFM). This is the volume of air the exhaust fan needs to pull through the hood to effectively capture and remove contaminants. Calculating the correct CFM is a bit more technical and depends on several factors: the type of cooking appliances (a charbroiler needs more CFM than a pasta cooker), the heat output of those appliances, the physical size and style of the hood, and even the layout of your kitchen. There are different methods for calculating CFM, some based on the linear foot of the hood, others on the type of equipment. For instance, heavy-duty, grease-producing equipment will demand a higher CFM per linear foot than light-duty equipment. It’s not just about the hood size; it’s about the *intensity* of what’s happening underneath it. This is where things can get tricky, and it’s often where professional help is invaluable. Getting the CFM wrong means your expensive hood system might not perform as expected. Too low, and you’ll have poor capture. Too high, and you’re wasting energy and potentially creating other problems like excessive noise or pulling too much conditioned air out of the space.
The consequences of improper sizing, both in terms of physical dimensions and CFM, can be quite severe. An undersized hood or insufficient airflow will result in poor capture efficiency. This means smoke, grease, and heat escape into the kitchen, leading to a disgusting work environment, grease buildup on walls and ceilings (a fire hazard and cleaning nightmare), and potential health code violations. It also puts more strain on your staff and can even affect the taste of food if unwanted odors linger. I sometimes wonder if this is where many new restaurateurs, trying to manage tight budgets, make compromises that end up costing them more in the long run. It’s tempting to just ‘eye it up’ or go with a slightly smaller option to save space or money, but the physics of airflow don’t really care about your budget constraints. They just are.
And don’t forget that the style of hood impacts sizing requirements too. For example, island canopy hoods, which are positioned over cooking batteries in the middle of a kitchen, are exposed to drafts from all four sides. Because of this, they generally need to be larger and have higher CFM rates than comparable wall canopy hoods to achieve the same level of capture efficiency. A wall provides a natural barrier on one side, helping to contain the plume. Island setups are inherently more challenging for ventilation. Then there are proximity hoods, or backshelf hoods, which are smaller and mounted closer to the cooking surface. These are often used for specific pieces of equipment and have their own sizing considerations. It’s a complex interplay of factors, and precision is key to a well-performing system.
Understanding Airflow (CFM) and Makeup Air – The Balancing Act
We’ve touched on CFM, but let’s dive a little deeper because it’s so fundamental to effective ventilation. CFM, or Cubic Feet per Minute, is the measure of air volume moved by the exhaust fan. The right CFM ensures that the air velocity at the face of the hood is sufficient to capture the thermal plume (the rising column of hot air, smoke, and grease) from your cooking equipment and draw it into the exhaust system. If your CFM is too low, the plume can spill out from under the hood, defeating its purpose. If it’s excessively high, you might be pulling too much conditioned air out of your kitchen, leading to wasted energy. You could also create uncomfortable drafts for your kitchen staff. Calculating the target CFM involves considering the type of cooking (light, medium, heavy-duty), the length of the hood, and sometimes specific formulas provided in codes like the International Mechanical Code (IMC) or by manufacturers. It’s not a one-size-fits-all number; it’s tailored to your specific setup.
Now, here’s a concept that is critically important and, in my experience, often misunderstood or overlooked, especially by those new to commercial kitchens: makeup air (MUA). Think about it: your exhaust system is constantly pulling large volumes of air *out* of your kitchen. If you’re taking air out, you have to put air back in. Otherwise, you create a negative pressure environment. It’s like trying to suck all the air out of a sealed plastic bottle – eventually, the bottle collapses, or you can’t suck any more out. In a kitchen, negative pressure can cause a whole host of problems: it can make exterior doors difficult to open (because the pressure outside is higher), it can cause backdrafting in flues for gas appliances (pulling carbon monoxide into the space – extremely dangerous!), it can reduce the effectiveness of your exhaust hood itself (as there’s not enough air to easily flow into it), and it can even cause pilot lights to go out. It’s a serious issue, both for safety and operational efficiency. So, makeup air systems are designed to replace the exhausted air, maintaining a neutral or slightly positive air pressure in the kitchen.
Makeup air systems aren’t just about pumping any old air back in. Depending on your climate, this makeup air often needs to be tempered – meaning heated in the winter and sometimes cooled in the summer. Pumping in raw, freezing outside air in January in a place like Nashville (or anywhere with cold winters) would create incredibly uncomfortable working conditions and could also affect food temperatures and even cause pipes to freeze. Similarly, bringing in hot, humid air in the summer adds to your AC load. So, tempered MUA units heat or cool the incoming air to a more comfortable temperature before it’s introduced into the kitchen. Untempered MUA is sometimes used in milder climates or for specific applications, but tempered MUA is generally preferred for staff comfort and energy management. The design of the MUA system, including how and where the air is introduced back into the kitchen, is crucial for avoiding drafts and ensuring it integrates well with the exhaust system. It’s a true balancing act.
The integration of your MUA system with your exhaust hood is paramount for energy efficiency and overall kitchen comfort. Modern systems often use variable speed fans for both exhaust and MUA, controlled by sensors, to adjust airflow based on cooking activity. This means you’re not running at full blast (and full energy consumption) when only a couple of burners are on. This intelligent control can lead to significant energy savings over time. It’s this holistic view of the ventilation system – hood, exhaust fan, ductwork, and makeup air – working in concert that defines a truly effective and efficient setup. I always find these interconnected systems fascinating; it’s like a miniature atmospheric system designed specifically for your kitchen. Mess up one part, and the whole thing can go haywire.
Hood Styles and Designs: Function Meets (Some) Form
While the primary purpose of a commercial exhaust hood is undeniably functional, there are different styles available, each suited to particular kitchen layouts and types of cooking equipment. The choice of style directly impacts capture efficiency and how the system integrates into your overall kitchen design. Let’s look at the most common ones.
Wall Canopy Hoods
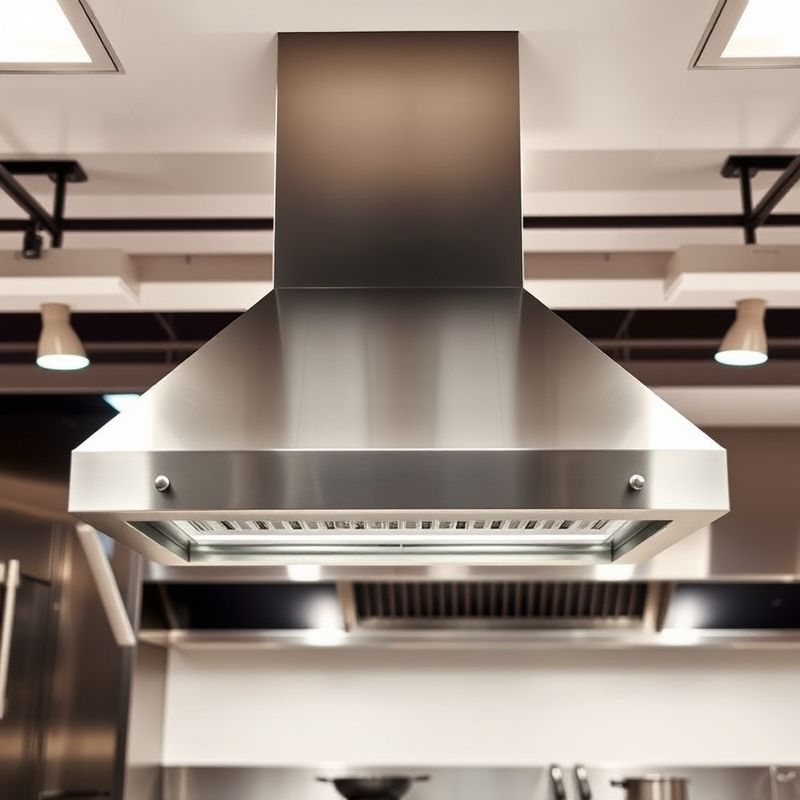
These are probably the most ubiquitous style you’ll see. Wall canopy hoods are, as the name suggests, mounted on the wall above cooking equipment that is placed along a perimeter wall. They are generally very effective because the wall itself acts as a barrier on one side, helping to contain the effluent (the smoke, grease, and steam) and guide it into the hood. They come in various depths and lengths to accommodate different cookline configurations. Because they are so common, there’s a wide range of options available in terms of size, features, and even some minor aesthetic variations, although function always trumps form in this department. Their design typically allows for straightforward ducting up through the wall or ceiling.
Island Canopy Hoods (Single or Double)
When your cooking equipment is arranged in an island configuration – think a central bank of ranges or fryers in the middle of the kitchen – you’ll need an island canopy hood. These are suspended from the ceiling and are open on all four sides. Because they lack the back wall to help contain the plume, they are more susceptible to cross-drafts in the kitchen, which can pull contaminants out from under the hood. To compensate for this, island hoods often need to be larger than a comparable wall canopy hood (more overhang) and may require higher exhaust rates (CFM) to ensure effective capture. They can be single island (for a single line of equipment) or double island (for back-to-back lines of equipment). While they offer layout flexibility, their ventilation demands are generally higher.
Proximity (Backshelf/Low Proximity) Hoods
Proximity hoods, also known as backshelf hoods or low-proximity hoods, are smaller and mounted much closer to the cooking surface of specific appliances. You’ll often see them over equipment like charbroilers, griddles, or salamanders that are placed against a wall. They are designed to capture contaminants right at the source, before they have much chance to disperse. This close proximity can make them quite efficient for the appliances they are designed for, and they can be a good solution in kitchens with low ceilings where a full-size canopy hood might not fit. However, they are only suitable for the equipment directly beneath and in front of them; they won’t provide coverage for adjacent taller equipment or for general area ventilation. They are a specialized solution for specific applications.
While the look of your exhaust hood might not be your top priority in a busy commercial kitchen, some consideration is given to materials and finish. The vast majority of commercial hoods are made from stainless steel due to its durability, resistance to corrosion, and ease of cleaning. Different grades of stainless steel (like Type 304 or Type 430) might be used, with Type 304 generally being more corrosion-resistant and often preferred for its longevity, though it can be pricier. The finish is typically a brushed or polished look. While some custom hoods might incorporate slight design flourishes, the reality is that effectiveness over aesthetics is the guiding principle. A hood that looks great but doesn’t perform is worse than useless. The design should first and foremost optimize airflow and capture, and facilitate easy cleaning and maintenance.
Filters: The Unsung Guardians of Your System
If the exhaust fan is the engine of your ventilation system, then the filters are its first line of defense, especially in Type I (grease) hoods. Their job is to remove a significant portion of the grease particles from the air before it enters the ductwork and travels to the exhaust fan. This is absolutely critical for reducing fire risk, as grease accumulation in ductwork is a major hazard. It also helps to protect the fan and other components from excessive grease buildup, which can impair performance and shorten their lifespan. Let’s look at the common types.
The most common type you’ll see these days are baffle filters. These are typically made from stainless steel or aluminum and consist of a series of interlocking baffles that force the grease-laden air to change direction multiple times. As the air whips around these baffles, heavier grease particles can’t make the turns as easily as the air itself. They impact the surfaces of the baffles and drain down into collection troughs or trays. Stainless steel baffle filters are generally preferred for their durability and ease of cleaning – most are dishwasher-safe, which is a huge plus in a busy kitchen. Aluminum ones are lighter and less expensive but may not be as robust over the long term. You might also encounter older systems with mesh filters, which look like layers of metal screen. While they can trap grease, they tend to clog easily, are much harder to clean thoroughly, and can themselves become a fire hazard if not meticulously maintained. Most codes and best practices now favor baffle filters. Some high-efficiency hoods might use more advanced extractor cartridges or other proprietary filtration technologies, which can offer superior grease removal but may come with a higher initial cost and specific maintenance requirements.
I cannot stress this enough: regular cleaning and maintenance of your hood filters are non-negotiable. This isn’t just a suggestion; it’s a fundamental requirement for fire safety and hood performance. Clogged, greasy filters are a severe fire hazard. They also restrict airflow, making your exhaust fan work harder and less efficiently, and reducing the hood’s ability to capture smoke and fumes. The frequency of cleaning depends on the type and volume of cooking. For high-volume operations with lots of frying or charbroiling, filters might need cleaning daily. For less intensive cooking, it might be weekly. But they need to be on a strict cleaning schedule. Seriously, people, clean your filters! It’s probably one of the most commonly neglected tasks, and the consequences can be dire. Luna, my cat, has an easier cleaning schedule than a busy restaurant’s hood filters, and that’s saying something.
The choice and condition of your filters directly impact the overall airflow and efficiency of your entire ventilation system. As filters become loaded with grease, the gaps through which air can pass become smaller and smaller. This increases the resistance to airflow, known as static pressure. Your exhaust fan then has to work much harder to pull the same amount of air through the system. If the fan isn’t powerful enough to overcome this increased resistance, the actual CFM will drop, leading to poor capture at the hood. It’s a vicious cycle: dirty filters lead to reduced airflow, which leads to more grease escaping into the kitchen and potentially into the ducts, which further increases fire risk. So, clean filters are not just about cleanliness; they are about maintaining the designed performance of your entire system and keeping everyone safe.
Don’t Forget the Exhaust Fan! (The Engine of the System)
The exhaust hood itself is just a passive collector; the real work of pulling air out of your kitchen is done by the exhaust fan. This powerful piece of machinery is typically located on the roof (an upblast fan) or sometimes inline within the ductwork or as a utility set fan housed outdoors. Choosing the right fan and ensuring it’s correctly sized and installed is just as critical as choosing the right hood. After all, a high-performance race car with a tiny scooter engine isn’t going to win any races.
There are a few common types of exhaust fans used in commercial kitchen ventilation. Upblast exhaust fans are very common for Type I grease hood systems. They are mounted on the rooftop and discharge the exhaust air vertically, away from the roof surface, which helps to prevent grease from damaging the roofing material and reduces fire risk. Downblast fans, which discharge air downwards onto the roof, are generally not suitable for greasy exhaust. Utility set fans are self-contained units that can be mounted either indoors (e.g., in a mechanical room, if properly ducted) or outdoors, and can be used for various exhaust applications, including kitchen ventilation. The choice often depends on the building structure, roof accessibility, and local code requirements.
Sizing the fan correctly is paramount. It’s not just about picking a fan that can move a certain CFM. The fan must also be able to overcome the static pressure of the entire system. Static pressure is the resistance to airflow created by the hood itself, the filters, the ductwork (length, diameter, number of bends), and any other components like fire dampers. A long, convoluted duct run will have higher static pressure than a short, straight one. The fan must be selected to deliver the required CFM *at the calculated static pressure* of your specific system. If the fan is undersized for the static pressure, it won’t be able to pull the designed airflow, and your hood won’t perform effectively. This is where professional system design really comes into its own, as these calculations can be complex. Fan performance curves, provided by manufacturers, are used to match a fan to the system’s requirements.
When it comes to the fan’s motor and drive mechanism, you’ll generally encounter two types: belt drive and direct drive. Belt drive fans use a belt and pulley system to connect the motor to the fan wheel. This allows for some flexibility in adjusting the fan speed by changing pulley sizes and can sometimes result in quieter operation. However, belts wear out and require regular inspection and replacement, adding to maintenance. Direct drive fans have the fan wheel mounted directly onto the motor shaft. This design is simpler, with fewer moving parts, generally requiring less maintenance and often being more energy-efficient. However, they can sometimes be noisier, and fan speed is typically fixed or controlled by a variable frequency drive (VFD) on the motor. I’m often torn when people ask which is ‘better’. I think it really depends on the specific application, budget, and maintenance capabilities. Direct drive seems to be gaining popularity due to lower maintenance, but belt drives still have their place. The key is to understand the pros and cons of each.
And, just like with every other part of this system, access for maintenance and cleaning is crucial. Rooftop fans, in particular, need to be installed with safe access for service personnel. They also need to have proper grease collection boxes if they are upblast fans handling greasy exhaust, and these need to be emptied regularly. If a fan is hard to get to, chances are its maintenance will be neglected, leading to premature failure or reduced performance. It’s these practical considerations that often get overlooked in the initial design phase but can make a huge difference in the long-term operation and cost of your system.
Ah, codes and regulations. Not the most thrilling part of setting up a kitchen, I’ll admit, but absolutely essential. When it comes to commercial kitchen ventilation, you’re dealing with serious safety issues – primarily fire, but also general health and safety. So, there’s a whole raft of codes and standards you need to be aware of and comply with. The big one in the U.S. is often NFPA 96 (Standard for Ventilation Control and Fire Protection of Commercial Cooking Operations). This document lays out detailed requirements for the design, installation, operation, inspection, and maintenance of commercial kitchen ventilation systems. Then there are model codes like the International Mechanical Code (IMC) and the International Fire Code (IFC), which are often adopted, sometimes with local amendments, by state and local jurisdictions. These codes cover everything from hood construction and sizing, ductwork materials and installation, exhaust fan specifications, makeup air requirements, and fire suppression systems. Compliance is not optional; it’s a legal requirement for safe and legal operation.
This is why one of my strongest pieces of advice is to check with your local authorities *before* you buy or install anything. Your local fire marshal’s office and the health department are the ultimate arbiters of what’s acceptable in your specific location. They can tell you about any local amendments or specific interpretations of the codes that you need to follow. What might be perfectly fine in one city or county could be a violation in another. I remember when I was still in the Bay Area, the variations between different municipalities, even those close to each other, could be surprising. Here in Nashville, I’m sure there are local nuances too. A quick call or meeting upfront can save you an immense amount of headache, time, and money down the road. Imagine investing in a whole new hood system only to find out it doesn’t meet local requirements and you have to rip it out and start again. Nightmare fuel for any business owner.
And yes, you will almost certainly need permits for the installation of a commercial exhaust hood system. This typically involves submitting plans for review and approval by the relevant local authorities (building department, fire department, health department) before any work begins. The plans will need to show that the proposed system complies with all applicable codes. After installation, there will be inspections to ensure the work was done correctly and according to the approved plans. This formal process is in place to protect you, your employees, your customers, and your property. Don’t try to bypass it; the consequences can be severe, including fines, forced shutdowns, and potentially voiding your insurance coverage if something goes wrong.
Given the complexity of the codes and the critical safety implications, this is generally not a DIY project for the average restaurant owner. Working with certified and experienced installers is highly recommended, if not required by your local jurisdiction. Professionals who specialize in commercial kitchen ventilation understand the codes, know how to perform the necessary calculations for sizing and airflow, and have the expertise to install the system correctly and safely. They’ll also be familiar with the permit process. This is an area where trying to cut corners can have very serious repercussions. Some suppliers, and this is something I’ve noticed with companies like Chef’s Deal, offer professional installation services as part of their package. This can be a huge advantage, as they are not just selling you a piece of equipment but providing an end-to-end solution that ensures it’s installed correctly and compliantly. They deal with these systems day in and day out, so they’re well-versed in the intricacies.
Considering Cost: Beyond the Sticker Price
Let’s talk money. A commercial exhaust hood system is a significant capital investment, there’s no getting around that. The initial purchase price of the hood itself, the exhaust fan, and the makeup air unit (if required, which it usually is) can run into thousands, or even tens of thousands, of dollars depending on the size and complexity of your kitchen and the type of cooking you do. It’s often one of the pricier single pieces of infrastructure in a new kitchen build-out or renovation. But the sticker price is just the beginning of the story when it comes to the true cost.
Installation costs can also be substantial. This isn’t just a matter of hanging the hood on the wall. It involves potentially complex ductwork installation (which might require penetrating roofs or walls), electrical wiring for the fan and any integrated lighting or controls, plumbing for fire suppression systems, and connections for the makeup air unit. If structural modifications to the building are needed to support the hood or route the ductwork, that adds another layer of expense. The cost of installation can sometimes rival the cost of the equipment itself, especially in challenging retrofits. This is why getting detailed quotes that break down equipment versus labor costs is so important.
Then there are the ongoing operational costs. This is where a well-designed, energy-efficient system can really pay dividends over time, or conversely, where a poorly chosen system can bleed you dry. The primary operational costs are energy consumption – running the exhaust fan and the makeup air unit. If your MUA needs to be heated or cooled, that can be a significant energy draw, especially in climates with extreme temperatures. The efficiency of the fan motor, the design of the ductwork (minimizing static pressure), and the use of smart controls (like demand-controlled kitchen ventilation systems that adjust fan speeds based on cooking load) can all impact your monthly utility bills. Don’t forget the cost of consumables like filters (if you’re using disposable types, though most are cleanable) and the labor or service costs for regular filter cleaning and system maintenance.
And that brings us to maintenance costs. All mechanical systems require maintenance to keep them running efficiently and safely. For an exhaust hood system, this includes regular cleaning of the hood, filters, and ductwork (professional duct cleaning is usually required periodically by code), inspection and servicing of the exhaust fan (checking belts, bearings, motor), and testing of the fire suppression system. A cheaper, lower-quality hood might save you money upfront, but if it requires more frequent repairs or has a shorter lifespan, it could end up costing you more in the long run. This is where the concept of total cost of ownership (TCO) comes into play. It’s something we marketing folks talk about a lot, but it’s genuinely critical for big-ticket items like this. You need to look beyond the initial purchase price and consider all the costs associated with owning and operating the system over its entire lifecycle.
For many businesses, especially new startups or those undertaking a major expansion, the upfront cost of a complete ventilation system can be a hurdle. This is where exploring different purchasing options can be helpful. Some equipment suppliers, and I know Chef’s Deal is one that sometimes offers this, provide competitive pricing and financing options. Leasing or financing can help spread out the initial capital expenditure, making it more manageable for your cash flow. It’s always worth asking your potential suppliers what kind of payment plans or financing support they can offer. Just be sure to read the fine print and understand all the terms and interest rates involved. But it can definitely make acquiring the *right* system, rather than just the cheapest one, more feasible.
Making the Final Decision: Expert Help and Smart Shopping
So, you’ve waded through the types, sizes, airflow considerations, codes, and costs. How do you actually pull the trigger and make that final decision? My first piece of advice here is: don’t feel like you have to go it alone, especially if you’re feeling overwhelmed by the technical details. Is this the best approach for everyone? Perhaps not for seasoned veterans with multiple build-outs under their belt, but for most, seeking expert advice is a smart move. Consult with experienced HVAC (Heating, Ventilation, and Air Conditioning) professionals who specialize in commercial kitchen systems. Talk to reputable kitchen designers. And definitely lean on knowledgeable equipment suppliers. Their expertise can be invaluable in navigating the complexities and ensuring you select a system that is not only compliant but also perfectly suited to your specific operational needs.
When you’re evaluating suppliers, look for those who offer more than just a product off a shelf. You want a partner who can provide genuine support and expertise. For example, some companies, like Chef’s Deal, offer valuable services such as free kitchen design services. This can be incredibly helpful because the exhaust hood doesn’t exist in a vacuum; it’s part of a larger kitchen layout. Their designers can help ensure that the hood is properly integrated with your cookline, that airflow patterns are considered, and that the overall kitchen design is efficient and compliant. They also often provide expert consultation, guiding you through the selection process based on your menu, cooking volume, and budget. This kind of comprehensive support can make a huge difference, particularly for new restaurant owners or those undertaking a significant renovation. They can help you see how all the pieces of the kitchen puzzle, from the layout to the specific equipment choices, including the all-important hood, fit together harmoniously.
It’s always wise to get multiple quotes from different suppliers or installers. However, when you’re comparing these quotes, make absolutely sure you’re comparing apples to apples. A lower price might look tempting, but it could mean they’re quoting a smaller or less capable hood, a fan that’s not quite right for your static pressure, a less robust makeup air system, or perhaps it doesn’t include certain installation components or services. Ask for detailed breakdowns: what specific hood model is being quoted? What’s the exhaust fan specification? Is makeup air included, and if so, is it tempered? What exactly is covered in the installation cost? What are the warranty terms? Understanding the full scope of each proposal is crucial for making an informed comparison. Don’t just look at the bottom-line number.
And finally, my last bit of advice here is a plea: please, please do not skimp on the quality and suitability of your commercial exhaust hood system just to save a few dollars upfront. This is such a critical piece of infrastructure for the safety, legality, and efficiency of your entire kitchen operation. Choosing an inadequate or poorly installed system can lead to a cascade of problems: poor air quality, fire hazards, staff discomfort, health code violations, increased cleaning burdens, higher energy bills, and premature equipment failure. It’s truly one of those areas where investing in the right solution from the outset will pay off many times over in the long run. Maybe I should clarify that. It’s not necessarily about buying the absolute most expensive option on the market, but about selecting the most *appropriate*, reliable, and code-compliant system for your specific needs and cooking applications. Think long-term value, not just short-term cost.
Wrapping It Up: A Breath of Fresh Air
Whew! We’ve covered a lot of ground, haven’t we? From the fundamental differences between Type I and Type II hoods to the nitty-gritty of CFM calculations, makeup air, filter types, and the ever-present building codes. It’s clear that choosing the right commercial exhaust hood is a complex decision, but it’s one that profoundly impacts your kitchen’s daily operations and long-term success. It’s about so much more than just getting rid of smoke; it’s about creating a safe, comfortable, and efficient working environment for your team, protecting your investment, and ensuring you meet all legal requirements.
My hope, after rambling on (as I tend to do when I get into a topic I find interesting – Luna’s now giving me the ‘are you done yet?’ stare), is that you feel a bit more empowered to tackle this. Remember the key takeaways: understand the type of effluent your equipment produces to choose between Type I and II. Get the sizing and overhang right. Don’t neglect the critical role of makeup air – it’s a system, not just a hood. Always, always consult your local codes and work with professionals. And think about the total cost of ownership, not just the initial price tag. It’s an investment that, when made wisely, truly allows everyone in the kitchen to breathe a little easier, both literally and figuratively.
So, the question I’ll leave you with is this: considering all these factors, what’s the one aspect of choosing a commercial exhaust hood that now feels less daunting, or perhaps, what’s the biggest challenge you still foresee in your own selection process? It’s a journey of discovery, and even after all this, I’m sure there are nuances I’m still learning. But hopefully, this deep dive from your pal Sammy has provided a solid foundation for making an informed choice. Get this right, and you’re well on your way to a smoother, safer, and more successful kitchen operation. And that, my friends, is a beautiful thing.
FAQ
Q: How often do I really need to clean my commercial exhaust hood system, including the filters and ducts?
A: This really depends on your cooking volume and the type of food you prepare. For Type I hoods dealing with heavy grease loads (e.g., from charbroilers or high-volume frying), filters might need cleaning daily or several times a week. The hood canopy itself should be cleaned regularly, perhaps weekly. The ductwork, however, requires professional cleaning at intervals specified by NFPA 96 and your local fire codes – this could be quarterly, semi-annually, or annually, based on usage. For Type II hoods (non-grease), cleaning is less intensive but still necessary to remove dust and condensation.
Q: Can I just buy a used commercial exhaust hood to save money?
A: You can, but it comes with significant risks. A used hood might not meet current codes, could be damaged in ways that aren’t immediately obvious, or may not be the correct size or type for your specific appliances. You’d also need to ensure it was professionally cleaned and that all components (like filters and any integrated fire suppression parts) are in good working order and compatible with your setup. If you go this route, it’s absolutely crucial to have it inspected by a qualified professional and approved by your local authorities *before* installation. Sometimes the perceived savings can be wiped out by the cost of bringing it up to code or if it fails prematurely.
Q: What’s the biggest mistake people make when choosing a commercial exhaust hood?
A: From what I’ve observed and heard, one of the biggest and most common mistakes is underestimating the importance of, or improperly designing, the makeup air system. People focus on the hood and the exhaust fan, but they forget that the air being pulled out needs to be replaced. An inadequate MUA system leads to negative pressure, poor hood performance, safety hazards (like CO backdrafting), and uncomfortable working conditions. Another common mistake is simply undersizing the hood or the CFM, often in an attempt to save money, which then fails to capture contaminants effectively.
Q: Do I need a fire suppression system with my exhaust hood?
A: For virtually all Type I commercial exhaust hoods (those used over grease-producing appliances), a dedicated, automatic fire suppression system is required by code (e.g., NFPA 96 and local fire codes). These systems are designed to detect and extinguish fires that may occur on the cooking appliances or within the hood and ductwork. They typically use wet chemical agents. Type II hoods (for steam, heat, and fumes, but not grease) generally do not require an integrated fire suppression system of this type, as the fire risk is much lower. Always verify specific requirements with your local fire marshal.
@article{critical-choices-selecting-your-commercial-exhaust-hood,
    title   = {Critical Choices: Selecting Your Commercial Exhaust Hood},
    author  = {Chef's icon},
    year    = {2025},
    journal = {Chef's Icon},
    url     = {https://chefsicon.com/choosing-the-right-commercial-exhaust-hood/}
} 

