
Table of Contents
- 1 Decoding the Craft: Your Guide to Fish Filleting
- 1.1 1. Understanding Your Subject: The Fish Itself
- 1.2 2. The Essential Tool: Choosing Your Fillet Knife
- 1.3 3. Safety First: Handling Knives and Fish Securely
- 1.4 4. The Prep Work: Scaling and Gutting (The Necessary Evils)
- 1.5 5. The First Cut: Opening Up a Round Fish
- 1.6 6. Working Along the Backbone: Releasing the First Fillet (Round Fish)
- 1.7 7. Flipping and Repeating: The Second Fillet (Round Fish)
- 1.8 8. Tackling Flatfish: A Different Kettle of… Fish
- 1.9 9. Skinning the Fillets: The Art of a Clean Separation
- 1.10 10. Trimming and Pin-Boning: The Final Touches for Perfection
- 2 Beyond the Cut: Final Thoughts on Filleting
- 3 FAQ
Hey everyone, Sammy here, tuning in from my cozy home office in Nashville – Luna, my rescue cat, is currently supervising from her favorite sunbeam, probably dreaming of tuna. Today, we’re diving into something that I think is a truly fundamental skill for anyone who loves cooking, especially if you’re into fresh seafood: essential knife skills for perfect fish fillets. I know, I know, filleting fish can seem super intimidating. I remember my first few attempts back in the Bay Area; let’s just say they were more like fish… crumbles. It was humbling. But like anything, with the right knowledge, the right tools, and a bit of practice, it becomes not just doable, but genuinely satisfying. There’s something incredibly rewarding about taking a whole fish and transforming it into beautiful, ready-to-cook fillets. It connects you to the food in a deeper way, and honestly, it often means fresher, better-quality fish on your plate because you’re doing the final prep yourself.
Why bother, you ask? Well, apart from the sheer cool factor of mastering a classic culinary technique, filleting your own fish can save you money. Whole fish are often cheaper than pre-cut fillets. Plus, you get the bones and head, which are pure gold for making incredible fish stock – something you just can’t buy in a carton with the same depth of flavor. And let’s be real, there’s a certain pride in serving up a dish where you’ve handled every step from whole to plate. It’s a skill that, once learned, sticks with you, kind of like riding a bike, but with potentially tastier results. My journey from mangled messes to reasonably neat fillets wasn’t overnight, it involved patience, a few nicks (on the fish, mostly!), and a growing appreciation for the anatomy of these slippery creatures. I’ve come to see it as a sort of meditative practice; it requires focus and a gentle hand, a bit like tuning a guitar, just with a different kind of sharpness involved.
So, in this post, I want to break down the process, share some tips and tricks I’ve picked up, and hopefully demystify fish filleting for you. We’ll cover everything from choosing the right knife – because believe me, the wrong knife is a recipe for frustration – to the step-by-step techniques for different types of fish. We’ll talk about safety, which is paramount, and those little finishing touches that elevate your fillets from ‘good enough’ to ‘restaurant quality.’ My goal here isn’t just to give you a set of instructions, but to help you understand the ‘why’ behind each step, so you can adapt and improve on your own. Think of this as less of a rigid rulebook and more of a friendly guide from someone who’s been there, made the mistakes, and eventually found a rhythm. Ready to get your hands a little fishy? Let’s go.
Decoding the Craft: Your Guide to Fish Filleting
1. Understanding Your Subject: The Fish Itself
Before you even think about picking up a knife, let’s talk about the star of the show: the fish. Understanding a bit about what you’re working with is absolutely crucial. First off, freshness is non-negotiable. Look for fish with bright, clear eyes (not cloudy or sunken), firm flesh that springs back when you press it, and gills that are a vibrant red or pink, not slimy or brown. It should smell like the ocean, or a clean lake, not overly ‘fishy’ or ammoniated. If you’re lucky enough to be near a good fishmonger or can catch your own, you’re already a step ahead. Here in Nashville, I’ve found some surprisingly good sources, but it definitely takes a bit more effort than when I was living by the coast. The difference fresh fish makes to the final fillet, both in terms of texture and ease of filleting, is night and day.
Next, consider the type of fish you’re dealing with. Broadly, fish can be categorized into round fish (like salmon, trout, bass, cod) and flatfish (like flounder, sole, halibut, turbot). This distinction is important because the filleting technique differs significantly. Round fish typically yield two large fillets, one from each side of the backbone. Flatfish, on the other hand, have a different bone structure and are usually filleted to produce four smaller fillets – two from the top (dark skin side) and two from the bottom (light skin side). Knowing the basic fish anatomy – where the backbone runs, the location of the rib cage, the flare of the collar bones – will guide your knife. You’re essentially tracing the bone structure to release the meat. It’s like learning a map before you set out on a journey. The more familiar you are with the terrain, the smoother your path will be. Don’t be afraid to gently feel the fish, locate the spine with your fingers. This tactile feedback is invaluable.
2. The Essential Tool: Choosing Your Fillet Knife
Alright, let’s talk hardware. If there’s one piece of equipment that can make or break your fish filleting experience, it’s the knife. You might be tempted to grab your trusty chef’s knife, and while it *can* work in a pinch, it’s far from ideal. A dedicated fillet knife is designed specifically for this task. So, what makes a good one? First, the blade. You’ll typically want a blade that’s relatively thin and flexible. This flexibility allows the knife to bend and glide along the contours of the fish’s bones, maximizing your yield and minimizing waste. I’ve found that a blade with too much stiffness can make it hard to stay close to the bone, and you end up leaving precious meat behind. Conversely, too much flex can feel like you’re not in control. It’s a balance, and personal preference plays a part.
Blade length is another consideration. Fillet knives come in various lengths, usually ranging from 6 to 9 inches, sometimes even longer for very large fish. For most common pan-sized fish, a 7-inch blade is a good all-rounder. You want a blade that’s long enough to make smooth, continuous cuts through the length of the fillet. The material of the blade matters too; high-carbon stainless steel is a popular choice as it holds an edge well and resists corrosion, which is important when you’re dealing with moisture and fish oils. And speaking of edges, sharpness is absolutely paramount. A dull knife is dangerous because it requires more pressure, increasing the risk of slipping. It also tears the flesh rather than slicing cleanly, resulting in a ragged, unappetizing fillet. Invest in a good knife sharpener and learn how to use it, or get your knives professionally sharpened regularly. When I was upgrading my kitchen tools, I spent a fair bit of time looking at options. Professional suppliers like Chef’s Deal often showcase a wide array of knives, and it’s useful to see what the pros use, even for home applications. They cater to a lot of commercial kitchens, so their range includes some really durable, high-performance options that can last a lifetime if cared for. Some even offer advice on selecting the right tools, which can be a bonus if you’re feeling overwhelmed by choice.
3. Safety First: Handling Knives and Fish Securely
This might seem obvious, but I can’t stress it enough: safety is your top priority when working with incredibly sharp knives and slippery fish. A moment’s carelessness can lead to a nasty cut, and nobody wants a trip to the emergency room interrupting their dinner prep. So, let’s establish some ground rules. First, your cutting surface. Use a stable, non-slip cutting board. A damp cloth or paper towel placed underneath your cutting board can prevent it from sliding around on your countertop. This is a simple trick, but it makes a huge difference. Make sure your board is large enough to comfortably accommodate the fish and give you room to work.
Next, how you hold the fish. Fish are, by nature, slippery. Some people like to use a fish clamp or a gripper to hold the tail, but a clean kitchen towel or even paper towels can provide a much better grip and help control the fish. This also helps keep your non-knife hand clean and less slippery. Now, for the knife hand: a proper grip on your fillet knife is crucial for both control and safety. You should have a firm but relaxed grip. Avoid the ‘death grip,’ as it tenses your muscles and reduces finesse. Your fingers should be curled away from the blade’s path. Many chefs recommend using a cut-resistant glove on your non-knife hand, especially when you’re learning. There’s no shame in it; it’s a smart precaution. I’ll admit, I was a bit resistant at first, thinking it was overkill for home use, but after a close call or two, I saw the wisdom. It just gives you that extra layer of confidence. Always cut away from your body and be mindful of where your fingers are at all times. Slow and steady wins the race here, especially when you’re starting out. There’s no prize for speed if it means sacrificing a fingertip. Luna certainly wouldn’t be impressed.
4. The Prep Work: Scaling and Gutting (The Necessary Evils)
Okay, now we get to the slightly less glamorous, but utterly essential, preparatory stages: scaling and gutting. Some fish you buy might already be gutted, or even scaled, but knowing how to do it yourself is a valuable skill, especially if you’re catching your own or buying truly whole fish. Scaling the fish, if it has scales, is usually the first step. Why? Because scales get everywhere if you try to cut through them, and they’re unpleasant to eat. You can use a dedicated fish scaler, or the back of a knife (though a scaler is more efficient and safer). Hold the fish firmly by the tail and scrape from tail to head, against the grain of the scales. Do this under a gentle stream of running water or inside a plastic bag to contain the flying scales – trust me on this, you don’t want to be finding scales in your kitchen for weeks. It’s a bit messy, yes, but a necessary prelude.
Once scaled (or if your fish is scaleless like catfish or has tiny, edible scales like trout), it’s time for gutting, if it hasn’t been done. This involves removing the internal organs. Place the fish on its side. Make a shallow incision with the tip of your sharp fillet knife along the belly, from the anal vent (a small hole near the tail) up to the base of the gills. Be careful not to cut too deeply, as you don’t want to puncture the intestines, which can release bacteria and taint the flesh. Reach inside the cavity and gently pull out the organs. You might need to snip the connection near the gills. Rinse the cavity thoroughly under cold running water, removing any remaining bits of organ and bloodline (the dark strip running along the backbone). This step is crucial for hygiene and flavor. Properly cleaned fish will taste much better and last longer if you’re not cooking it immediately. It’s the groundwork, the foundation upon which your beautiful fillets will be built. It’s a bit like prepping a canvas before painting; the better the prep, the better the final artwork.
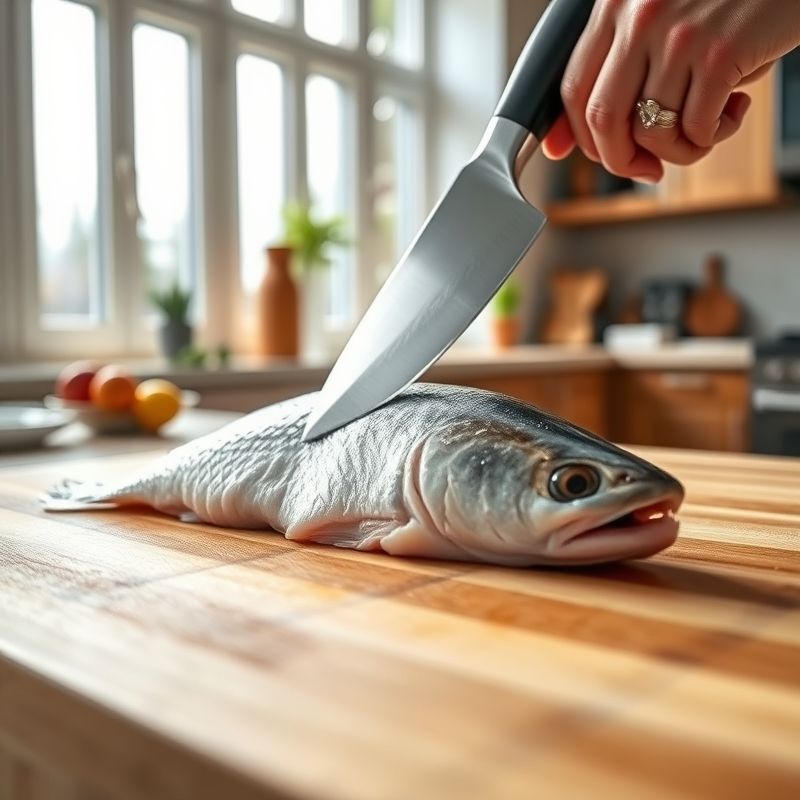
5. The First Cut: Opening Up a Round Fish
Now we’re getting to the heart of it – actually separating meat from bone. Let’s start with a round fish, like a salmon, trout, or snapper. Lay your cleaned fish on its side on your cutting board, usually with its back facing you. The first key incision is made along the dorsal side (the back) of the fish. Take your fillet knife and make a cut just behind the gills, angling your knife slightly towards the head, down until you feel the backbone. This cut should go from the top of the fish down to about the belly cavity. Some people like to cut all the way through the head here to detach it, others leave it on for stability. I’m a bit torn on this; sometimes I do, sometimes I don’t. Perhaps I should clarify: if you leave it partially attached, it can act as a sort of handle.
Once that initial head-area cut is made, turn your knife so the blade is flat, parallel to the cutting board, with the sharp edge facing the tail of the fish. Begin to make a long, smooth cut along one side of the dorsal fin, from the head towards the tail, keeping the tip of your knife running right against the backbone. You want to feel the bones with your knife; it’s your guide. Don’t try to saw through it; use the length of the blade in smooth strokes. The idea here is to separate the flesh cleanly from the top of the backbone. This isn’t about brute force; it’s about precision and letting the knife do the work. This first cut is critical as it sets the stage for releasing the entire fillet. It’s where your understanding of the fish’s anatomy really comes into play. You’re essentially unzipping the fish along its spine. It takes a bit of practice to get the feel for it, to know how much pressure to apply. My first few attempts probably looked more like I was excavating rather than filleting, but patience pays off.
6. Working Along the Backbone: Releasing the First Fillet (Round Fish)
With that initial top cut made along the backbone of your round fish, you’re now ready to release the first fillet. This is where the flexibility of your fillet knife truly shines. Continue to keep the blade angled slightly downwards, pressing gently against the fish’s skeletal frame. Use long, smooth, sweeping strokes of the knife, working from the head towards the tail, gradually separating the fillet from the rib cage and backbone. You should be able to hear and feel the knife gliding over the bones – a soft, scraping sound. This is good; it means you’re staying close to the bone and not leaving too much meat behind. It’s a delicate balance; press too hard, and you might cut through the bones or into the fillet on the other side. Too light, and you’ll leave a lot of flesh on the frame.
As you cut, gently lift the fillet away from the bones with your non-knife hand. This allows you to see where you’re cutting and helps the fillet separate more easily. When you reach the rib cage, you have a couple of options. Some people prefer to cut through the rib bones and remove them later from the fillet. I personally prefer to try and cut *over* the rib cage, angling my knife slightly more to glide along the outer curve of these fine bones. This leaves the rib bones attached to the frame, resulting in a cleaner fillet from the get-go, though it can be a bit trickier and you might lose a tiny bit more meat if you’re not careful. Is this the best approach? Let’s consider… for beginners, cutting through them and then trimming might be easier. For more experienced hands, going over them can be more efficient. Ultimately, you’ll find what works for you. Continue cutting all the way down to the belly and along the length of the fish until the fillet is completely free from the skeleton. You should now have one beautiful fillet and the fish frame remaining. That feeling of cleanly releasing a whole fillet is immensely satisfying, like solving a tricky puzzle.
7. Flipping and Repeating: The Second Fillet (Round Fish)
You’ve successfully liberated one fillet – nice work! Now, it’s time for the other side. Flip the fish over so the remaining intact side is facing up. The process for the second fillet is essentially a mirror image of the first, though some people find the second side a little more awkward because the fish now has less structure and might lie flatter or be a bit more wobbly. Again, start with an incision just behind the gill plate, cutting down to the backbone. Then, just as before, turn your knife and make a long, smooth cut along the backbone from head to tail, keeping your blade angled slightly against the bones.
Use those same sweeping strokes, letting the knife do the work, and gently lift the fillet as you go. Pay attention to the feel and sound of the knife against the bones. Consistency is key here. Try to replicate the pressure and angle you used on the first side. It’s easy to rush the second fillet, but take your time to ensure it’s just as clean as the first. Again, you’ll encounter the rib cage. Decide whether you’re going over or through the rib bones, maintaining your chosen technique. Continue cutting until this second fillet is also completely detached. What you should be left with is two fillets and a fish skeleton (which, I remind you, is destined for a glorious stock!). Don’t worry if your first few attempts aren’t perfectly symmetrical or if you leave a little more meat on the bone than you’d like. It’s a learning curve. Each fish you fillet will teach you something new. I remember when I first started, my second fillets often looked a bit sad compared to the first. It took practice to develop that ambidextrous feel, or rather, the ability to adapt to the changed landscape of the half-filleted fish.
8. Tackling Flatfish: A Different Kettle of… Fish
Now, let’s switch gears and talk about flatfish. These guys, like flounder, sole, plaice, or halibut, have a completely different anatomy than round fish, and therefore require a different filleting technique. They swim flat along the seabed, so they have both eyes on one side of their head (the ‘top’ or darker-skinned side) and a symmetrical bone structure that runs down the center. Instead of two large fillets, you’ll typically get four smaller, thinner fillets from a flatfish: two from the top side and two from the bottom (lighter-skinned) side. The flesh is often more delicate, so a gentle touch is even more important.
Start with the fish dark-skin-side up. The first cut is a defining one: make an incision down the center of the fish, following the lateral line (you can usually feel it) from just behind the head all the way to the tail. You’re aiming to cut down to the backbone, but not through it. Next, make cuts along the top and bottom edges of the fish, just inside the fins, from the head to the tail, again cutting down to the bone. You’ve essentially created a frame around the first two potential fillets. Now, starting from the central incision, insert your fillet knife (a very flexible one is great here) and, keeping it as flat as possible against the bones, cut outwards towards the edge of the fish, releasing one of the top fillets. Use short, careful strokes, peeling the fillet back as you go. Repeat this for the second top fillet on the other side of the central incision. Then, flip the fish over and repeat the entire process on the light-skinned side to get the remaining two fillets. It feels a bit more like meticulously working around a framework than the sweeping cuts on a round fish. It took me a while to get the hang of flatfish; my initial attempts often resulted in slightly mangled pieces. But their delicate flavor is so worth the effort, especially for something like a classic Sole Meunière.
9. Skinning the Fillets: The Art of a Clean Separation
Once you have your beautiful fillets, you often need to remove the skin, unless the recipe specifically calls for skin-on (like for crispy skin salmon, which is divine). Skinning fish fillets is another skill that looks tricky but is quite straightforward with the right technique. You’ll need your sharp fillet knife and a firm grip. Lay the fillet skin-side down on your cutting board, with the tail end (the narrower end) towards you. Make a small, angled cut at the very tip of the tail end, through the flesh down to the skin, but not through the skin itself. This gives you a little ‘tab’ of skin to grip.
Now, switch your grip. Hold that skin tab firmly with your non-knife hand (using a paper towel can help with grip here, as fish skin is very slippery). Place your fillet knife, with the blade angled slightly downwards (towards the skin, away from the flesh), between the flesh and the skin. The angle is crucial – too steep, and you’ll cut through the skin or leave a lot of flesh on it; too shallow, and you’ll take chunks out of your fillet. Holding the skin taut with one hand, use a gentle sawing motion with the knife, wiggling it back and forth while pushing it forward, away from you, along the length of the fillet. The idea is to keep the knife pressed against the skin, letting it guide the separation. You should see the fillet cleanly separating from the skin. If you’re doing it right, you’ll be left with a clean fillet and a piece of skin with very little, if any, flesh attached. Don’t rush this. It’s tempting to try and pull it off in one go, but slow, controlled movements yield the best results. Some fish are easier to skin than others; thinner, more delicate skins can be a challenge. But oh, the satisfaction when that skin comes away perfectly clean! It’s like a magic trick you perform on your own cutting board.
10. Trimming and Pin-Boning: The Final Touches for Perfection
We’re on the home stretch! You’ve got your fillets, possibly skinned them, but there are a few final touches that can elevate them from good to truly perfect: trimming and pin-boning. First, trimming. Inspect your fillets for any ragged edges, bits of fin, or remaining belly membrane (especially if you cut through the rib cage on a round fish). Use your sharp knife to carefully trim these away, neatening the appearance of the fillet. If you left the rib bones in, now is the time to remove them. You can usually feel them along one edge of the fillet. Carefully slide your knife underneath the rib bones, angling it slightly upwards, and cut them away in one piece if possible, trying to remove as little flesh as possible.
Then comes pin-boning, which is particularly relevant for fish like salmon and trout. Pin bones are small, intramuscular bones that run along the centerline of the fillet in some species. While edible, they can be unpleasant to encounter in a cooked dish. To remove them, you’ll need a good pair of fish bone tweezers or clean needle-nose pliers. Run your finger gently along the fillet (against the grain of the muscle) to locate the bones – you’ll feel their sharp tips. Once you find one, grip it firmly with the tweezers and pull it out, usually in the direction it’s naturally angled, with a slight wiggle. This helps prevent tearing the flesh. Work your way systematically along the fillet. It can be a bit tedious, especially on a large fillet, but it makes a huge difference to the eating experience. I always think of Luna; she’s very particular about bones. This final step is like the detailed editing of an article – it’s what polishes the work and makes it truly ready for the audience. It’s that extra bit of care that shows you’re serious about your craft. And there you have it – beautiful, bone-free, perfectly trimmed fillets, ready for your culinary masterpiece!
Beyond the Cut: Final Thoughts on Filleting
So, there you have it – a pretty deep dive into the world of fish filleting. It might seem like a lot to take in, and honestly, your first few attempts might not be magazine-cover perfect. Mine certainly weren’t. There will be moments of frustration, maybe a fillet that looks a bit… abstract. But the key, as with so many things in the kitchen and in life, is persistence and a willingness to learn from each experience. The tactile feedback of the knife against bone, the subtle adjustments in angle and pressure – these are things you truly get a feel for with practice. I sometimes wonder, is the pursuit of the ‘perfect’ fillet more about the journey of skill acquisition than the end result itself? Perhaps it’s both.
I genuinely believe that learning to fillet your own fish is one of the most rewarding culinary skills you can acquire. It connects you more deeply to your food, offers better quality and flavor, and, dare I say, it’s pretty empowering. Plus, think of the amazing fish stock you’ll be making! My challenge to you, if you haven’t tried it before, is to pick up a whole fish next time you’re at the market. Choose a relatively easy one to start with, like a trout or a snapper. Arm yourself with a sharp fillet knife, review these steps, and just give it a go. What’s the worst that can happen? You might have slightly rustic-looking fillets for dinner, but they’ll taste all the better for the effort you put in. And who knows, you might just discover a new passion, a new rhythm in your kitchen. Luna will be silently judging, of course, but that’s just part of the fun.
FAQ
Q: Can I really use any sharp knife to fillet fish if I don’t have a proper fillet knife?
A: While you *can* technically use a very sharp chef’s knife or boning knife in a pinch, it’s not ideal. Fillet knives are specifically designed with thin, flexible blades that allow you to navigate the contours of the fish bones more effectively, minimizing waste and making the process easier and safer. Investing in even an inexpensive fillet knife will make a significant difference.
Q: How can I be absolutely sure the fish I’m buying is fresh enough for filleting?
A: Freshness is key! Look for fish with bright, clear, and slightly bulging eyes (not sunken or cloudy). The gills should be a rich red or pink, not brownish or slimy. The flesh should be firm and spring back when pressed, and there shouldn’t be a strong ‘fishy’ or ammonia-like odor; it should smell clean, like the ocean or fresh water. If possible, buy from a reputable fishmonger you trust.
Q: What’s the most common mistake beginners make when learning to fillet fish?
A: One of the most common mistakes is using a dull knife, which leads to tearing the flesh and requires excessive pressure, increasing risk. Another is not staying close enough to the bone, resulting in a lot of wasted meat left on the frame. Rushing the process is also a frequent issue. Take your time, focus on your knife angle, and let the knife do the work with smooth, controlled strokes.
Q: After filleting, how should I store the fish fillets if I’m not cooking them immediately?
A: Pat the fillets dry with a paper towel, then wrap them tightly in plastic wrap or place them in an airtight container. Store them in the coldest part of your refrigerator (usually the bottom shelf or a dedicated meat/fish drawer). For best quality, use fresh fillets within 1-2 days. If you need to store them longer, freezing is a good option. Wrap them well to prevent freezer burn.
@article{essential-knife-skills-for-flawless-fish-fillets-at-home,
    title   = {Essential Knife Skills for Flawless Fish Fillets at Home},
    author  = {Chef's icon},
    year    = {2025},
    journal = {Chef's Icon},
    url     = {https://chefsicon.com/essential-knife-skills-for-perfect-fish-fillets/}
} 
