
Table of Contents
- 1 Unlocking Your Kitchen’s Hidden Potential: Counter Space Strategies
- 1.1 1. The Vertical Ascent: Thinking Upwards, Not Outwards
- 1.2 2. Wall Power: Magnetic Strips, Pegboards, and Beyond
- 1.3 3. Over-the-Sink Solutions: Clever or Cumbersome?
- 1.4 4. The Art of Multi-Functionality: Furniture That Works Harder
- 1.5 5. Appliance Audit: Taming the Countertop Titans
- 1.6 6. Drawer and Cabinet Wizardry: The Power of Internal Organization
- 1.7 7. Cutting Board Strategies: Beyond the Basic Block
- 1.8 8. The ‘One In, One Out’ Philosophy: A Lifestyle Tweak
- 1.9 9. Embrace the Lid: Container Lids as Mini-Shelves
- 1.10 10. The Power of Clean-As-You-Go: A Habit for Clarity
- 2 Finding Your Countertop Zen
- 3 FAQ: Your Counter Space Questions Answered
Alright, let’s talk about something near and dear to my heart, and probably yours too if you’re reading this: the eternal struggle for counter space in a small kitchen. It’s Sammy here, from Chefsicon.com, and if there’s one thing that can turn my culinary Zen into a frantic scramble, it’s not having enough elbow room to chop an onion without knocking over the olive oil. I remember my first apartment back in the Bay Area – I swear the entire kitchen counter was the size of a large serving platter. You learn to get creative, fast. Or you eat a lot of takeout. Thankfully, I’ve picked up a few tricks since then, especially now that I’m settled here in Nashville, where, even if the kitchens are a bit more generous, the principles of smart space usage still totally apply. Luna, my rescue cat, seems to think any clear counter is an invitation for a nap, so keeping things maximized is a dual-purpose endeavor for me.
We’ve all been there, right? You’re trying to follow a recipe, you’ve got ingredients everywhere, your cutting board is teetering precariously, and you just wish you had an extra two feet of glorious, empty countertop. It’s not just about aesthetics; it’s about functionality, efficiency, and frankly, sanity. A cluttered counter leads to a cluttered mind, and that’s no way to enjoy the process of cooking, which should be a joy, not a Tetris game. I’ve spent a lot of time thinking about this, not just as a food lover but as someone fascinated by systems and how we interact with our spaces. It’s a surprisingly deep topic when you get into it. So, what we’re going to do today is dive into some practical, actionable maximizing-counter-space-hacks-for-small-kitchens. These aren’t just your run-of-the-mill tips; I want to explore some ideas that really make a difference, from simple mindset shifts to clever gadgets you might not have considered.
The goal here isn’t just to give you a list of things to buy. It’s to help you rethink your kitchen, to see the hidden potential in those cramped corners and overlooked vertical spaces. We’ll explore how to make your kitchen work *for* you, not against you. Because let’s be honest, a well-organized kitchen, even a tiny one, can feel like a sanctuary. We’ll cover everything from going vertical to choosing multi-functional items and even the psychology behind why a clear counter feels so darn good. So grab a coffee (hopefully you have space to put it down!), and let’s get into making your small kitchen feel a whole lot bigger. Maybe I should clarify, this isn’t about making your kitchen physically larger, obviously, but about making it *feel* and *function* as if it were. There’s a difference, a big one.
Unlocking Your Kitchen’s Hidden Potential: Counter Space Strategies
1. The Vertical Ascent: Thinking Upwards, Not Outwards
This one sounds obvious, I know, but hear me out. We’re so conditioned to think horizontally when it comes to surfaces, but in a small kitchen, your walls are your best friends. Seriously. Think about all that unused vertical real estate just begging to be utilized. Installing wall-mounted shelves is probably the first thing that comes to mind, and for good reason. Open shelving can be fantastic for frequently used items – spices, oils, everyday dishes. It keeps them off the counter but still within easy reach. I was a bit hesitant about open shelves at first, worried about dust, but honestly, if you’re using the items regularly, it’s not a huge issue. Plus, it forces you to be a bit more curated and tidy, which isn’t a bad thing. It’s a visual reminder, almost. When selecting shelves, consider the depth. You don’t want them so deep that they become obtrusive or make the space feel more closed in. Slimmer profiles are often better in tiny spaces.
Beyond basic shelves, consider pot racks. Now, some people have strong opinions on pot racks – love ’em or hate ’em. I used to be in the ‘hate ’em’ camp, thinking they looked cluttered. But in my current Nashville setup, I have a small one for my most-used pans, and it’s a game-changer. It freed up an entire cabinet and, surprisingly, I think it adds a bit of that ‘chef’s kitchen’ vibe. It’s crucial to ensure anything you mount is incredibly secure, especially if you’re in a rental. You don’t want your spice collection raining down on you mid-stir-fry. There are also some really clever tiered organizers that can sit on the counter but utilize vertical space for things like mugs or small bowls, effectively doubling or tripling your storage in that small footprint. It’s all about changing your perspective from the flat plane of the counter to the three-dimensional volume of your kitchen.
2. Wall Power: Magnetic Strips, Pegboards, and Beyond
Okay, sticking with the vertical theme, let’s talk about making your walls *work* for you in even more dynamic ways. Magnetic knife strips are an absolute classic for a reason. They get that bulky knife block off your counter, saving precious inches, and they keep your knives in good condition (as long as you place and remove them carefully). I find them much more hygienic than traditional blocks too. Plus, there’s something undeniably cool about seeing your knives neatly displayed. But don’t stop at knives! Magnetic strips can hold spice tins (the ones with metal lids or bottoms), small metal tools, even keys if you have a little command center area near your kitchen entrance. It’s surprisingly versatile.
Then there’s the humble pegboard. Julia Child famously had one, and if it’s good enough for Julia, it’s good enough for us, right? A pegboard system, like those you see in workshops, can be incredibly effective in a kitchen. You can hang utensils, small pans, cutting boards, colanders – anything with a handle or a hole. The beauty of a pegboard is its flexibility. You can rearrange hooks and holders as your needs change. I’ve seen people paint them to match their kitchen decor, turning a utilitarian item into a design feature. You could even mount small baskets or shelves onto the pegboard for things like garlic bulbs or small spice jars. The trick is to not overcrowd it. A well-organized pegboard looks intentional; a chaotic one just looks like, well, chaos. Maybe that’s the key for a lot of these solutions: intention.
3. Over-the-Sink Solutions: Clever or Cumbersome?
This is an area where I’m sometimes torn, but ultimately, I think there are some genuinely brilliant ideas. The space over your sink is often just… air. Why not make it useful? Over-the-sink cutting boards are a popular option. These are designed to fit snugly over one basin of your sink, or sometimes the whole thing, effectively extending your countertop. This is amazing for prep work, especially if your main counter is tiny. You can chop veggies and sweep the scraps directly into the sink or a compost bin below. Some even come with built-in colanders. My main concern with these used to be, where do you store the cutting board when you need the sink? But many are designed to be slim enough to tuck away easily beside the fridge or in a narrow cabinet. Is this the best approach for everyone? Let’s consider the alternatives, or rather, the adjuncts. You can also find over-the-sink dish drying racks. These are often multi-tiered and can hold a surprising number of dishes, letting them drip directly into the sink and freeing up counter space that a traditional rack would occupy. Some are roll-up mats made of silicone-coated steel rods, which are super easy to store. I think the key here is to choose something that genuinely suits your workflow. If you’re constantly needing full access to your sink, a permanent fixture might be annoying. But for temporary gains in counter space, these can be lifesavers.
4. The Art of Multi-Functionality: Furniture That Works Harder
When space is at a premium, every single item in your kitchen should earn its keep, and that goes double for furniture. Think about pieces that can serve multiple purposes. A rolling kitchen cart or island is a fantastic example. It can provide extra counter space when you need it, storage underneath for appliances or cookware, and then be rolled out of the way when you don’t. Some even have drop-leaf extensions to expand the surface area further. I had one in a previous apartment, and it was my chopping station, my baking center, and sometimes even my breakfast bar. Luna, my cat, also thought it was her personal observation deck, but that’s another story. Look for carts with good quality casters that lock, so it doesn’t go rogue while you’re kneading dough.
Another hero of the small kitchen is the drop-leaf table. It can be mounted to a wall and folded down when not in use, or it can be a freestanding table with leaves that can be raised to provide dining space or extra prep surface. This is particularly useful if your kitchen also has to function as your dining area. Even things like nesting tables, while not strictly kitchen furniture, can be brought in to provide temporary surfaces. The idea is to have flexibility. Fixed, bulky furniture is the enemy of a small, dynamic kitchen. I’m always looking for items that can transform or disappear. It’s like a little bit of magic in your home, making the space adapt to you, rather than the other way around.
5. Appliance Audit: Taming the Countertop Titans
Let’s be brutally honest: how many of those appliances sitting on your counter do you *actually* use every day? The toaster, the coffee maker, maybe the kettle. But what about the giant stand mixer, the fancy juicer you used twice, or the air fryer that’s taken up permanent residence? Appliances are notorious counter space hogs. My approach is to conduct a regular appliance audit. If I haven’t used something in a month (or three, for more seasonal items), it gets relegated to a cabinet, a high shelf, or even storage elsewhere if it’s rarely needed. It might sound harsh, but reclaiming that space is so worth it. This is where I sometimes struggle myself, I admit. I love a good kitchen gadget! But the joy of a clear counter often outweighs the convenience of having everything instantly accessible.
For the appliances you *do* use regularly but don’t want permanently on display, consider an appliance garage. This is essentially a cabinet that sits on your countertop, with a door that lifts up or slides away, hiding the appliances when not in use. It keeps them accessible but out of sight. If an appliance garage isn’t feasible, think about the footprint of your essential appliances. When it’s time to replace something, look for more compact models. There are some great slim toasters and smaller coffee makers that do the job just as well without devouring your precious workspace. And maybe, just maybe, question if you need a separate appliance for every single task. A good immersion blender, for example, can do the job of a regular blender for many tasks and takes up way less space.
6. Drawer and Cabinet Wizardry: The Power of Internal Organization
What happens inside your cabinets and drawers has a direct impact on your countertops. If finding anything is a chaotic mess, you’re more likely to leave things out for convenience, leading to clutter. This is where smart internal organization becomes a superpower. Think drawer dividers for utensils and gadgets – no more junk drawer jumbles! For deep drawers, consider tiered organizers or even vertical storage solutions for things like baking sheets and cutting boards. I’m a huge fan of pull-out shelves or drawers in base cabinets. They bring everything to you, so you’re not excavating the back of the cabinet on your hands and knees. Those dark recesses are where Tupperware lids go to disappear, I’m convinced.
In upper cabinets, shelf risers can effectively double your storage space for things like mugs or small plates. Lazy Susans are brilliant for corner cabinets, making sure nothing gets lost in the abyss. The principle here is maximizing every cubic inch *within* your storage, so that less needs to live *on* your counters. It’s an investment of time to get it all set up, and maybe a small investment in organizers, but the payoff in daily functionality and reduced counter clutter is immense. I find that when my cabinets are organized, I’m much more likely to put things away immediately, which is half the battle. It’s a bit like setting up a good filing system for your office; it just makes everything smoother.
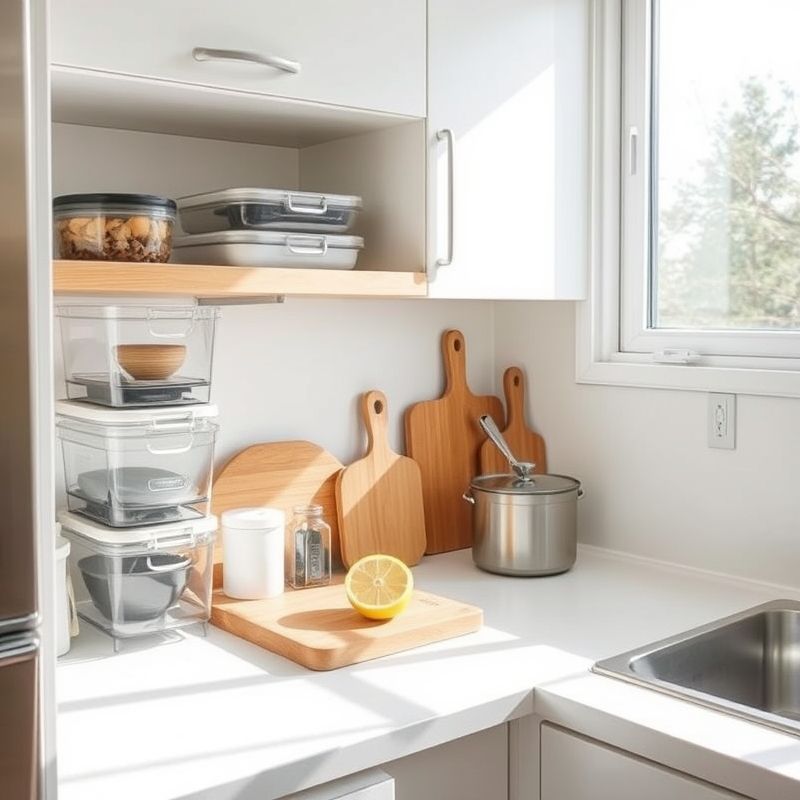
7. Cutting Board Strategies: Beyond the Basic Block
We touched on over-the-sink cutting boards, but the humble cutting board itself deserves more attention in the quest for counter space. Instead of one giant, thick wooden board that lives permanently on your counter (unless you have the space and it’s a beautiful feature piece), consider a collection of thinner, lighter boards that can be easily stored. Flexible cutting mats are fantastic because they take up virtually no space and can be rolled or stored flat. They’re also great for funneling chopped ingredients directly into a pot or bowl. I keep a stack of these in various colors for different food types to avoid cross-contamination.
Another clever idea is a cutting board that fits over your stovetop burners when they’re not in use. If you have a flat glass or induction cooktop, this can add a significant amount of temporary workspace. Just be absolutely sure the burners are off and cool! For gas stoves, this is trickier and generally not recommended for safety reasons unless the board is specifically designed for it and provides ample clearance. Some people also use large, sturdy trays as mobile prep stations. You can load up a tray with your ingredients and a small cutting board, do your prep, and then easily clear it away. It’s about thinking of your prep surface as adaptable and not necessarily fixed to one spot.
8. The ‘One In, One Out’ Philosophy: A Lifestyle Tweak
This isn’t a physical hack, but more of a mindset shift that can profoundly impact your counter space (and overall clutter). The ‘one in, one out’ rule is simple: every time you bring a new kitchen item into your home – be it a gadget, a mug, a serving dish – an old one has to leave. This forces you to be more intentional about your purchases and prevents the slow, insidious creep of clutter. It’s tough, I won’t lie. That cute new French press is calling your name, but do you really need it if you already have two other coffee-making devices? Applying this rule can be a bit of a personal challenge. It forces you to evaluate what you truly use and value.
This philosophy extends beyond just new purchases. Regularly declutter your existing items. That chipped mug you never use? The lidless container? The specialty gadget for that one dish you made five years ago? It’s time to let them go. Freeing up cabinet and drawer space through decluttering means more things can be stored properly, leaving your counters clear. I try to do a quick kitchen declutter session seasonally. It’s amazing what accumulates. Sometimes I think my kitchen secretly orders things online when I’m not looking. But seriously, being a bit ruthless here can make a huge difference not just to your counters, but to your overall sense of calm in the kitchen.
9. Embrace the Lid: Container Lids as Mini-Shelves
This might sound a bit odd, but stick with me. You know those flat lids from your food storage containers, or even the flat tops of some canisters? In a pinch, or for very specific, small items, these can act as tiny, temporary shelves or platforms on your counter. For example, if you have a small stack of spice jars you’re using for a recipe, instead of spreading them out, you could potentially place a larger, flat lid on the counter and stack a couple of them on it, or place it next to a taller item to create a small, elevated niche. I know, I know, this is getting into micro-management of space, but sometimes those little inches count! It’s not a permanent solution, obviously, but more of a quick-fix when you’re in the middle of cooking and just need a tiny bit more surface. It’s about seeing potential in unexpected places. Maybe I should clarify, I’m not suggesting building precarious towers, but using a sturdy, flat lid to slightly elevate or consolidate very small, light items temporarily. It’s a bit of a MacGyver move for the kitchen.
Another way to think about lids is to ensure your canisters and storage containers *have* good, flat, stackable lids. If you’re storing things like flour, sugar, or coffee on the counter (which is sometimes unavoidable or preferred), choosing containers that can be stacked securely saves horizontal space. It’s a simple thing, but poorly designed containers with domed or awkward lids can eat up more counter real estate than necessary. This ties back to the ‘every item earns its keep’ idea – even your storage containers should be working efficiently for you.
10. The Power of Clean-As-You-Go: A Habit for Clarity
This last one is less of a ‘hack’ and more of a foundational habit, but it’s so crucial for maintaining counter space, especially in small kitchens, that I have to include it. The clean-as-you-go (CAYG) method is a game-changer. Instead of letting dirty dishes, ingredient wrappers, and spills accumulate while you cook, deal with them immediately. Washed a vegetable? Put the peeler and scraps away or in the compost. Emptied a can? Rinse it and put it in the recycling. Used a mixing bowl? If you’re done with it, wash it or at least rinse it and stack it neatly in the sink or dishwasher. It seems like more work in the moment, but it prevents that overwhelming build-up that makes your counters disappear under a mountain of mess. This is something professional chefs do religiously, and for good reason. It keeps their workspace functional and reduces stress.
I’ll admit, when I’m tired or in a huge rush, CAYG is the first thing to go out the window. But I always regret it later when I’m faced with a disaster zone. When I *do* stick to it, cooking is so much more pleasant. My counters stay clearer, I can find things more easily, and the final cleanup is a breeze. It also means that if you need to suddenly use a bit of counter for an unexpected step, it’s more likely to be available. This habit, more than any gadget, contributes to a feeling of spaciousness and control in a small kitchen. It’s a discipline, for sure, but one that pays off big time. It also means Luna has fewer opportunities to ‘help’ by investigating discarded food wrappers.
Finding Your Countertop Zen
So, there you have it – a deep dive into the world of maximizing counter space in small kitchens. We’ve gone from looking up at our walls to peering into the depths of our cabinets, and even questioned our appliance loyalties. It’s clear that creating more functional counter space isn’t just about one magic solution, is it? It’s a combination of clever storage, multi-functional items, good habits, and a willingness to rethink how we use our kitchens. I think the biggest takeaway for me, and hopefully for you, is that even the tiniest kitchen has untapped potential. It’s about being a bit of a detective, looking for those overlooked opportunities.
Ultimately, the goal is to make your kitchen a place you love to be in, a place that supports your culinary adventures rather than hindering them. Will my counters always be perfectly clear? Probably not – I live here, I cook here, and Luna occasionally redecorates. But by implementing some of these strategies, the baseline level of functionality and calm is so much higher. I challenge you to pick just one or two ideas from this list and try them out this week. See what a difference it makes. You might be surprised at how much more spacious and inviting your small kitchen can feel. Perhaps the real question isn’t just how to maximize space, but how to maximize our enjoyment of the spaces we have, no matter their size. Food for thought, eh?
FAQ: Your Counter Space Questions Answered
Q: I’m renting and can’t drill holes for shelves. What are my best options for vertical storage?
A: Great question! For renters, tension rods can be surprisingly useful – you can hang lightweight items or S-hooks for utensils between cabinets or in window recesses. Freestanding shelving units that are narrow and tall can also work wonders. Look for over-the-cabinet door organizers for things like cutting boards or cleaning supplies, and consider using strong adhesive hooks for lighter items, though always test them in an inconspicuous spot first and check the weight limits. Countertop tiered shelves are also a fantastic no-drill option to use vertical space effectively.
Q: What’s the single most impactful thing I can do to get more counter space quickly?
A: Honestly, a ruthless declutter of what’s currently *on* your counters. Take everything off. Clean the surface. Then, only put back the absolute essentials you use daily. Find new homes for everything else in cabinets, drawers, or even a nearby pantry if you have one. This immediate visual and functional difference can be incredibly motivating and often reveals more usable space than you thought you had. It’s less about adding something new and more about taking things away.
Q: Are expensive organizing gadgets really worth it, or can I DIY solutions?
A: It’s a mix! Some specialized organizers, like good quality pull-out cabinet drawers or very specific drawer dividers, can be worth the investment for the functionality and durability they offer. However, there are SO many DIY options. Repurpose shoeboxes or attractive containers as drawer organizers. Use old jars for spice storage. A simple piece of wood can become a shelf. I think it’s about assessing the problem: if it’s a tricky corner cabinet, a specialized lazy Susan might be best. If it’s just taming utensil chaos, DIY might be perfect. Don’t feel pressured to buy everything; creativity goes a long way!
Q: My kitchen is tiny, and I also use it as my dining space. Any tips for making the counter double as an eating area?
A: Absolutely. If you have a section of counter that can be kept clear, investing in a couple of comfortable, space-saving stools (saddle stools or backless ones that can tuck underneath) can turn it into an instant breakfast bar. Ensure that part of the counter is deep enough for knees if possible, or consider an overhanging section if you’re planning any minor renos. A drop-leaf table attached to a wall or the end of a counter run can also serve as both prep space and dining space. The key is clear delineation – keep the ‘eating’ zone tidy and inviting, perhaps with a small placemat, so it feels distinct from the ‘working’ kitchen zones.
@article{small-kitchen-counter-space-real-hacks-that-work,
    title   = {Small Kitchen Counter Space: Real Hacks That Work},
    author  = {Chef's icon},
    year    = {2025},
    journal = {Chef's Icon},
    url     = {https://chefsicon.com/maximizing-counter-space-hacks-small-kitchens/}
} 

