
Table of Contents
- 1 Why Bother Cleaning Your Air Fryer Regularly? (More Than Just Looks)
- 2 Gathering Your Cleaning Arsenal: Simple Stuff You Already Have
- 3 The Pre-Clean Ritual: Safety and Prep Work
- 4 Cleaning the Basket and Drawer: The Greasy Culprits
- 5 Tackling the Inside of the Air Fryer: The Main Chamber
- 6 The Heating Element: Handle with Care!
- 7 Dealing with Stubborn Odors: Beyond the Grease
- 8 Cleaning the Exterior: Keeping it Shiny
- 9 Drying and Reassembly: The Final Steps
- 10 Frequency of Cleaning: How Often is Enough?
- 11 Wrapping It Up: Your Path to Air Fryer Bliss
- 12 FAQ
Hey everyone, Sammy here from Chefsicon.com, writing to you from my cozy home office here in Nashville – Luna, my rescue cat, is currently supervising from her favorite sunbeam, probably dreaming of dropped chicken bits. Today, we’re tackling a topic that I know is on a lot of your minds because, let’s be honest, we all ADORE our air fryers, right? They’re magic boxes that give us crispy goodness without all the deep-frying fuss. But the dark side? The cleanup. Ugh. Just thinking about old, caked-on grease can make you want to order takeout. If you’ve ever peered into yours after a particularly enthusiastic session of chicken wing making and felt a wave of despair, you’re not alone. I’ve been there, many, many times. It’s one of those chores that’s so easy to put off, until suddenly your kitchen smells faintly of last Tuesday’s salmon every time you preheat it.
I remember this one time, not long after I moved to Nashville from the Bay Area, I was trying to impress some new friends with my supposedly famous air-fried pickles. Well, I hadn’t cleaned the fryer properly after making some, shall we say, *aromatic* garlic bread the night before. The pickles came out crispy, sure, but with a distinct, and not entirely pleasant, garlic-pickle fusion flavor. Not quite the culinary triumph I was aiming for! It was a bit embarrassing, and a clear sign that my cleaning habits needed an upgrade. It’s funny how quickly a kitchen gadget can go from hero to zero if you neglect the basics. Luna, of course, was entirely unbothered, probably hoping for pickle droppings regardless of the smell.
So, today, I want to share my tried-and-true methods for cleaning your air fryer the easy way. We’re not talking about spending hours scrubbing or using crazy chemicals. This is about smart, efficient cleaning that keeps your machine happy, your food tasting great, and your kitchen smelling fresh. We’ll go through everything step-by-step, from the basic tools you’ll need (you probably have them already!) to tackling those stubborn spots and even how to keep it from getting super dirty in the first place. Think of this as less of a chore list and more of an investment in future deliciousness. Because a clean air fryer is a happy air fryer, and a happy air fryer makes better food. It’s a simple equation, really. Let’s get into it, and hopefully, by the end, you’ll feel a lot more confident about keeping your air fryer in tip-top shape without dreading the process. Maybe you’ll even start to, dare I say, find a little satisfaction in it? Okay, maybe that’s pushing it, but we can aim for ‘not terrible’.
Why Bother Cleaning Your Air Fryer Regularly? (More Than Just Looks)
It’s easy to just wipe down the basket and call it a day, especially when you’re tired and just want to relax after dinner. I get it. But trust me, regularly and thoroughly cleaning your air fryer goes way beyond just making it look pretty on your countertop. There are some genuinely important reasons to stay on top of this, and they impact everything from your health to how long your beloved appliance will even last. Sometimes I think we treat these gadgets like they’re invincible, but a little TLC goes a long, long way. It’s like changing the oil in your car, you know? You don’t *see* the immediate benefit, but you’re preventing bigger problems down the line. It’s a bit of a mental shift from ‘chore’ to ‘care’.
Health and Hygiene First
This is the big one, folks. Old food particles, grease, and grime stuck in your air fryer can become a breeding ground for bacteria and even mold if left for too long. Think about it – it’s a warm, often moist environment after cooking. Perfect for unwanted microbial guests. When you cook your next meal, those contaminants can get transferred to your fresh food. Nobody wants a side of last week’s bacteria with their crispy fries, right? Proper cleaning, especially with hot soapy water, helps to sanitize the components that come into contact with your food, ensuring that what you’re eating is safe and healthy. This isn’t just about visible gunk; it’s about the microscopic stuff you can’t see. It’s one of those things that, once you really think about it, you can’t unthink. And for me, knowing my cooking tools are truly clean just gives me peace of mind.
Then there’s the issue of flavor integrity. If you’ve ever cooked fish in your air fryer and then, a day or two later, made some sweet potato fries that had a suspiciously fishy aftertaste, you know exactly what I’m talking about. Old oils and food residues can go rancid and transfer unwanted flavors and odors to whatever you cook next. This can completely ruin the taste of your food. A clean air fryer means that your apple crisps will taste like apples, not like the onion rings you made last night. It allows the true flavors of your ingredients to shine through, which is kind of the whole point of cooking, isn’t it? It’s a subtle thing, but it makes a huge difference to the overall quality of your meals. I’m pretty passionate about food, as you know, and flavor contamination is a big no-no in my book.
And finally, let’s talk about appliance lifespan and performance. Built-up grease and food debris can actually damage your air fryer over time. Grease can clog vents, interfere with the fan mechanism, or even become a fire hazard if it gets too close to the heating element and ignites. Yes, a dirty air fryer can genuinely be a safety risk! Moreover, when components are caked with grime, the air circulation might not be as efficient, meaning your food might not cook as evenly or get as crispy. Regular cleaning prevents these issues, ensuring your air fryer works effectively and safely for years to come. It’s an investment in the machine itself. You spent good money on it; a little cleaning helps protect that investment. It’s just smart ownership.
Gathering Your Cleaning Arsenal: Simple Stuff You Already Have
Alright, now that we’re all convinced (I hope!) that cleaning is crucial, let’s talk about what you actually need. The good news is you probably don’t need to rush out and buy a bunch of specialty cleaning products. For the most part, effective air fryer cleaning relies on household staples that are gentle yet effective. I’m a big fan of keeping things simple, and frankly, some of those super-strong chemical cleaners can be a bit much, both for the appliance and for your peace of mind when you’re cooking food in it later. Plus, Luna has a sensitive nose, so I try to avoid anything too pungent in the kitchen anyway.
The Essentials List
Here’s what I usually have on hand for an air fryer deep clean:
- Warm water: Your number one friend.
- Mild dish soap: A good quality one that’s effective at cutting grease. Dawn is a classic for a reason, but any decent brand will do.
- Baking soda: This is a fantastic natural abrasive for stubborn, caked-on bits. It’s gentle enough not to scratch most surfaces but tough on grime.
- White vinegar (optional but recommended): Great for deodorizing and cutting through certain types of grease. A diluted solution can work wonders.
- A soft sponge or cloth: Emphasis on SOFT. You want to avoid anything that could scratch the non-stick coating of your basket or drawer. Microfiber cloths are excellent.
- A non-abrasive scrub brush: An old toothbrush or a small, soft-bristled kitchen brush is perfect for getting into crevices and cleaning the mesh of the basket without causing damage.
- Paper towels or a clean dry cloth: For drying everything thoroughly.
That’s pretty much it! See? Nothing too exotic. The key is using these simple tools effectively and regularly.
It’s really important to steer clear of harsh chemical oven cleaners, steel wool, or any overly abrasive scouring pads. These can easily damage the non-stick coating on your air fryer basket and drawer. Once that coating is compromised, food will start to stick more, making future cleaning even harder, and potentially releasing bits of the coating into your food, which is definitely not ideal. Gentle cleaning is the name of the game. Think of it like caring for a good non-stick pan – you wouldn’t attack that with steel wool, would you? The same principle applies here. Sometimes, the gentlest approach is actually the most effective in the long run, preventing damage that creates more work later. It’s a bit counterintuitive if you’re used to blasting grime with heavy-duty stuff, but patience and the right (mild) products win the day with air fryers.
Why are these simple items so effective? Well, dish soap is formulated to break down grease (that’s its primary job, after all). Warm water helps to loosen food particles and dissolve grease. Baking soda provides a mild abrasive action that can lift stuck-on food without scratching, and it also helps to neutralize odors. Vinegar, being acidic, can dissolve mineral deposits and cut through certain types of grime, plus it’s a natural deodorizer. It’s all basic chemistry, really, but it works. And because these are common food-safe items (or easily rinsed away), you don’t have to worry about toxic residues being left behind in your cooking appliance. It always makes me feel better knowing I’m not inadvertently seasoning my food with chemical cleaner remnants. Plus, it’s generally cheaper and better for the environment than relying on single-purpose, harsh chemical sprays. A win-win, I’d say.
The Pre-Clean Ritual: Safety and Prep Work
Before you even think about getting your air fryer wet, there are a couple of crucial preparatory steps. This isn’t just about making the cleaning process smoother; it’s primarily about safety first. I know it’s tempting to just dive in, especially if you’re in a hurry, but taking a minute or two for these pre-steps can save you a lot of trouble, and potential harm. It’s like a chef’s mise en place, but for cleaning. Get everything ready, and the main task becomes much easier and safer.
Unplug and Cool Down – Seriously!
This cannot be stressed enough: Unplug your air fryer from the electrical outlet before you do anything else. Water and electricity are a dangerous combination, and you don’t want to risk an electric shock or damage to the appliance. It seems obvious, but it’s amazing how easily this can be overlooked when you’re on autopilot. Make it the absolute first step, every single time. Second, ensure the air fryer has completely cooled down. Trying to clean a hot appliance is a recipe for burns, and hot components can also be damaged by sudden temperature changes if you introduce cold water. Give it at least 30 minutes after use, or until it’s cool to the touch. Patience here is not just a virtue; it’s a safety requirement. I usually let mine cool while I’m doing the dishes from the meal.
Once it’s unplugged and cool, the next step is disassembly. Most air fryers have a basket and a drawer (or a crisper plate/tray) that are designed to be easily removed. Carefully take these parts out of the main unit. This allows you to clean them more thoroughly and also gives you better access to the interior of the air fryer. Check your manufacturer’s manual if you’re unsure how to remove these components, but it’s usually pretty straightforward. Handling these parts over a sink or a bin can also help catch any loose crumbs that might fall out, saving you a bit of countertop cleanup later. It’s all about working smarter, not harder.
With the removable parts out, give them a quick initial debris removal. Turn the basket and drawer upside down over your trash can or sink and gently shake or tap them to dislodge any large, loose crumbs or food particles. You might be surprised how much comes out! Doing this first means there’s less gunk to deal with when you start washing, and it prevents those larger bits from clogging your sink drain. It’s a small step, but it makes the actual washing process a bit less messy and more efficient. Sometimes I use a soft, dry brush to sweep out stubborn loose bits before they even hit the water. Every little bit helps make the main event easier.
Cleaning the Basket and Drawer: The Greasy Culprits
Alright, these are the parts that usually bear the brunt of the cooking action – the basket and the drawer (or crisper tray). They’re where all the grease drips and the food bits accumulate, so they often need the most attention. But don’t worry, with the right approach, even a fairly grimy basket can be brought back to its former glory without endless scrubbing. The key here is often letting a good soak do the heavy lifting for you. I used to try and scrub them immediately, and it was always a struggle. Then I discovered the power of patience and a good soak.
Soaking Power: Your First Line of Attack
Your best friend for cleaning the air fryer basket and drawer is a good, long soak in hot, soapy water. Fill your sink (or a basin large enough to hold the parts) with hot water and add a generous squirt of your favorite dish soap. Submerge the basket and drawer and let them soak for at least 20-30 minutes. If they’re really greasy or have a lot of baked-on food, you might want to let them soak for an hour, or even longer. The hot water and soap will work together to loosen the grease and soften the food residue, making it much easier to wipe away. This step alone can save you a ton of elbow grease. While they’re soaking, you can maybe tackle another quick kitchen chore, or just relax with a cup of coffee. That’s what I do; makes it feel less like dedicated “cleaning time.”
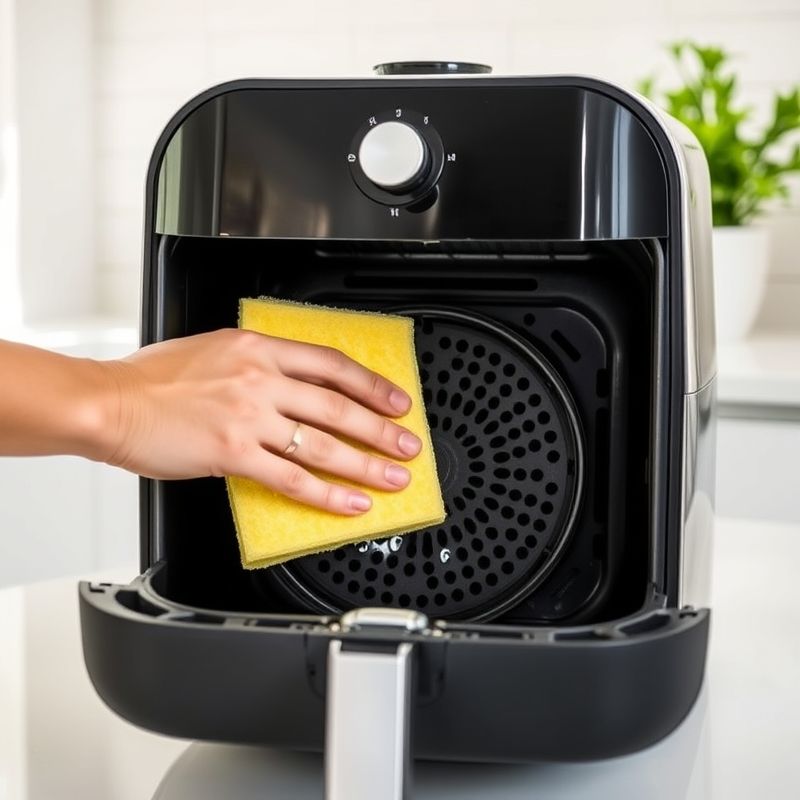
After a good soak, most of the grime should be significantly easier to remove. Use a soft sponge or a non-abrasive cloth to wipe down all the surfaces of the basket and drawer. Pay special attention to the mesh or holes in the basket, as food particles love to hide there. A soft-bristled brush (like an old toothbrush) can be really helpful for getting into these tricky areas without scratching the non-stick coating. If you encounter some more stubborn grease or baked-on bits that didn’t fully loosen during the soak, resist the urge to grab a harsh scrubber. Instead, you can apply a bit more direct pressure with your soft sponge, or move on to the next trick. Is this the best approach for *every* single spot? Maybe not, some really tough spots might need a bit more. Let’s consider that next.
For those really tough, caked-on areas, a baking soda paste is your secret weapon. Mix a small amount of baking soda with a few drops of water to create a thick paste. Apply this paste directly to the stubborn spots on the basket or drawer and let it sit for 10-15 minutes. The mild abrasive quality of the baking soda will help to lift the grime without damaging the non-stick surface. After it has sat for a bit, gently scrub the area with your soft sponge or brush. You should find that the gunk comes away much more easily. Rinse thoroughly with warm water to remove all traces of soap and baking soda. This method is surprisingly effective, and it’s much kinder to your air fryer (and your hands) than aggressive scrubbing with harsh tools.
Tackling the Inside of the Air Fryer: The Main Chamber
Once the basket and drawer are soaking or clean, it’s time to turn our attention to the interior of the air fryer itself – the main chamber where all the magic happens. This area might not look as obviously dirty as the basket, but splatters and grease can definitely accumulate on the walls and, importantly, near the heating element. Keeping this area clean is vital for performance and preventing any unwanted smoky smells during cooking. It’s a bit more awkward to clean than the removable parts, but it’s definitely doable with a little care.
Wiping Down the Interior Walls
For the interior walls, you’ll want to use a soft, damp cloth or sponge. Make sure it’s well wrung out – you don’t want excess water dripping into the electrical components. You can use just plain warm water, or for a bit more cleaning power, dip your cloth in a solution of warm water and a tiny drop of mild dish soap. Some people, myself included, also like using a diluted vinegar solution (equal parts white vinegar and water) as it’s great for cutting grease and deodorizing. Wipe down all the interior surfaces you can reach. You might need to contort your hand a bit to get into all the corners, but take your time. It’s important to be thorough but gentle. Remember, the goal is to remove grime, not to flood the machine.
One of the trickiest parts of cleaning the interior is being careful around the heating element care. This component is usually located at the top of the air fryer chamber and can be quite delicate. Avoid spraying any cleaning solutions directly onto it, and be very gentle if you need to wipe near it. We’ll talk more specifically about cleaning the element itself in the next section, but for now, just focus on cleaning the walls *around* it. If there are food splatters on the ceiling of the chamber near the element, try to dab them off with your damp cloth rather than scrubbing vigorously. The less direct contact with the element, the better, unless your manufacturer’s instructions specifically guide you on cleaning it directly.
What about those stubborn splatters or bits of baked-on food that you find on the interior walls or bottom of the chamber (if accessible)? If a damp cloth isn’t quite cutting it, you can try a couple of things. First, you can let your damp, slightly soapy cloth sit on the stubborn spot for a few minutes to soften it up. For more persistent spots, you can use a soft-bristled brush (like that trusty old toothbrush) dipped in your cleaning solution to gently scrub the area. Again, avoid anything abrasive. Some people find that making a paste of baking soda and water and applying it to the spots for a few minutes before gently wiping can also help. Just be sure to wipe away all residue thoroughly with a clean, damp cloth afterward. The key is patience and gentle persistence; aggressive scrubbing is rarely the answer inside the main unit.
The Heating Element: Handle with Care!
Okay, let’s talk about the heating element. This is often the part that people are most hesitant to clean, and for good reason – it’s a critical and often delicate component of your air fryer. Improper cleaning here could potentially damage the element or the appliance. So, the first and most important piece of advice is to always consult your manufacturer guidelines. Your air fryer’s manual should provide specific instructions (or warnings) about cleaning the heating element. Some manufacturers might explicitly say not to clean it at all, or only to do so in a very specific way. Always follow those instructions above anything you read online, including here!
Gentle Does It
If your manual gives the green light for cleaning the heating element, or if it’s visibly soiled with grease or food debris (which can cause smoking and odors), the approach must be extremely gentle. The element can be easily bent or damaged. First, ensure the air fryer is unplugged and completely cool. Often, the best tool for the job is a soft, dry brush – like a clean paintbrush or a very soft toothbrush. You can use this to gently brush away any loose crumbs or light dust from the element. Sometimes, just this simple step is enough to keep it in good working order. It’s more about dislodging than deep cleaning.
If there’s some light grease or stuck-on particles, and your manual permits, you *might* be able to use a slightly damp (again, very well wrung out!) soft cloth. Do NOT spray any liquids directly onto the heating element. If you use a cloth, wipe very gently. Some people find it helpful to turn the air fryer upside down (if the design allows and it’s stable) to get better access to the element and to allow any dislodged debris to fall out. However, only do this if you’re confident the unit is secure and it won’t cause any damage. If you’re at all unsure, it’s better to err on the side of caution and just stick to dry brushing what you can easily reach. The goal is to remove anything that might burn or smoke, not to make it sparkle like new. This is one area where ‘good enough’ is often the wisest approach to avoid accidental damage to this delicate component.
One trick I’ve seen mentioned, though I’d use it with extreme caution and only if really necessary and your manual doesn’t forbid it, is to run the air fryer empty for a few minutes after gently cleaning around the element. The idea is that this might help burn off any tiny residual particles. However, if there’s significant grease buildup on or near the element, this could also cause smoking, so it’s a bit of a judgment call. My personal preference is to focus on preventing build-up in the first place by not overfilling the basket and by cleaning the main chamber regularly, so the element itself requires minimal direct attention. Prevention is definitely better than cure when it comes to this sensitive part of the appliance. Honestly, I mostly just give mine a gentle brush when it’s cool and leave it at that unless there’s a very obvious issue.
Dealing with Stubborn Odors: Beyond the Grease
Sometimes, even after a good cleaning, your air fryer might retain some… let’s call them ‘aromatic memories’ of past meals. Fish, spicy foods, or even just strong seasonings can leave behind lingering odors that you don’t necessarily want mingling with your next batch of delicate cupcakes or whatever you’re planning. So, what can you do to freshen things up when soap and water aren’t quite enough to banish those ghosts of dinners past? Thankfully, there are a few simple, natural tricks you can use. It’s kind of like airing out a room, but for your kitchen gadget.
Freshening Up Your Fryer
One of the most popular and effective methods is the lemon freshener trick. There are a couple of ways to do this. You can cut a lemon in half or into thick slices, place it in the air fryer basket, and run the air fryer at a moderate temperature (say, around 300-350°F or 150-175°C) for about 10-15 minutes. The steam and a_o_ils from the lemon will help neutralize odors. Alternatively, you can squeeze the juice of half a lemon into a small, oven-safe bowl with about half a cup of water, place the bowl in the air fryer basket, and run it for a similar amount of time. The citrusy steam works wonders! Just be sure to let the air fryer cool down afterwards and wipe out any condensation. This usually leaves a much more pleasant, fresh scent behind. And who doesn’t like the smell of lemon?
Another effective deodorizing method involves white vinegar – that trusty kitchen multi-tasker. Similar to the lemon juice method, you can create a vinegar steam. Mix equal parts white vinegar and water (maybe a quarter cup of each) in a small, oven-safe bowl. Place the bowl in the air fryer basket and run the appliance at a moderate temperature (around 300°F or 150°C) for about 5-10 minutes. The acetic acid in the vinegar is great at breaking down odor-causing particles. After it runs, let the air fryer cool, remove the bowl, and then wipe down the interior with a clean, damp cloth to remove any vinegar scent (though it usually dissipates quickly). This method is particularly good for stronger, more persistent odors. I find it works well after cooking something like salmon or heavily spiced foods.
Finally, don’t underestimate the power of simply airing it out. After you’ve cleaned your air fryer and all its components are completely dry, try leaving the basket and drawer slightly ajar for a few hours, or even overnight if possible (and if it’s safe from curious pets like my Luna!). This allows air to circulate freely through the appliance and can help dissipate any remaining faint odors. Sometimes, all it needs is a bit of fresh air. Combining this with one of the active deodorizing methods above usually does the trick for even the most stubborn smells. It’s a simple, passive step, but it can make a difference, especially if you’re sensitive to smells.
Cleaning the Exterior: Keeping it Shiny
While the inside of the air fryer is all about food safety and performance, the outside is about aesthetics and, well, just keeping your kitchen looking clean and tidy. Fingerprints, dust, and occasional splatters can make even the most high-tech appliance look a bit sad. Luckily, cleaning the exterior surfaces of your air fryer is usually pretty straightforward. It’s the finishing touch that makes you feel like the job is truly done. I always find that a clean exterior makes the whole kitchen feel a bit brighter.
Wiping Down the Outside
For most air fryer exteriors, a simple wipe-down with a soft, damp cloth is all that’s needed. You can use plain warm water, or if there are some greasy marks, a cloth lightly dampened with a solution of warm water and a tiny drop of mild dish soap. Wring the cloth out well, as you don’t want excess water seeping into any vents or seams. Wipe down all the plastic or metal surfaces, and then you can go over it again with a clean, dry cloth to prevent water spots and streaks, leaving a streak-free shine. Microfiber cloths are fantastic for this, as they tend to buff surfaces nicely without leaving lint behind.
A crucial point here is to be extra careful around any control panel safety aspects, especially if your air fryer has a digital display or touch-sensitive buttons. Avoid spraying any liquids directly onto these areas. Instead, lightly dampen your cloth, wring it out thoroughly, and then gently wipe the panel. If you’re concerned about moisture, you can even just use a dry microfiber cloth to buff away fingerprints from display screens. Getting moisture into the electronics is a surefire way to cause problems, so gentle and dry is the mantra for control panels. It’s one of those areas where less is definitely more when it comes to liquids.
If your air fryer has a stainless steel exterior, you might notice it shows fingerprints and water spots more easily. For these surfaces, you can use a cleaner specifically designed for stainless steel, following the product instructions. Always spray the cleaner onto your cloth, not directly onto the appliance. Alternatively, a microfiber cloth lightly dampened with a bit of white vinegar can sometimes work well to remove smudges from stainless steel, followed by a wipe with a clean, dry cloth. Always wipe in the direction of the grain of the stainless steel if it has one – this helps to prevent streaking and gives the best finish. It’s those little details that make a difference in how clean it looks and feels.
Drying and Reassembly: The Final Steps
You’ve done all the hard work of soaking, scrubbing, and wiping. The grease is gone, the odors are banished, and your air fryer components are sparkling. But don’t pack it all up just yet! The drying and reassembly stage is just as important as the cleaning itself. Rushing this can lead to problems down the line, so a little patience here will pay off. It’s the home stretch, and getting this right ensures your fryer is ready and safe for its next culinary adventure.
Patience is Key: Ensure Everything is Bone Dry
The absolute golden rule here is thorough drying. Every single component – the basket, the drawer/crisper plate, and any part of the interior you wiped down – must be completely dry before you reassemble the air fryer and especially before you plug it back in or store it. Moisture left behind can lead to a few undesirable outcomes. Firstly, it can promote rust or corrosion, especially on any metal parts or screws, even if they’re coated. Secondly, trapped moisture in a closed environment can encourage mildew or funky smells to develop, undoing all your hard deodorizing work. And most importantly, any moisture near electrical components is a safety hazard. So, take your time with this step.
You have a couple of options for drying. You can meticulously towel-dry each part with a clean, absorbent cloth. This is the quickest method if you need to use your air fryer again soon. Microfiber towels are great for this as they are very absorbent and don’t leave lint. Alternatively, you can let the parts air dry completely. If you choose to air dry, place the components on a dish rack or a clean towel in a well-ventilated area. This might take a few hours, depending on the humidity in your kitchen. I often wash mine after dinner and let the parts air dry overnight. Whichever method you choose, double-check all crevices and corners to ensure no hidden water droplets remain. For the interior of the main unit, if you wiped it down, leave the drawer out for a while to ensure it also air dries thoroughly before closing it up.
Once you’re absolutely certain that every piece is bone dry, it’s time for proper reassembly. Carefully place the crisper plate or tray back into the basket, and then slide the basket and drawer assembly back into the main air fryer unit. Make sure everything clicks or fits into place securely, just as it was before you took it apart. It should slide in smoothly without forcing. If you encounter resistance, double-check that everything is aligned correctly. Storing your air fryer with the basket and drawer properly inserted helps to keep the interior clean and dust-free until its next use. And that’s it! Your air fryer is clean, dry, reassembled, and ready for action. Doesn’t that feel good?
Frequency of Cleaning: How Often is Enough?
So, you’ve mastered the art of cleaning your air fryer, but the big question remains: how often do you actually need to do all this? Is it an every-use kind of chore, or can you get away with less frequent deep cleans? The honest answer is, it depends. It depends on what you cook, how often you use your air fryer, and your own personal standards of cleanliness. But there are some general guidelines and tell-tale signs that can help you establish a good cleaning frequency that works for you. The goal is to find a balance that keeps your fryer hygienic and performing well without making you feel like you’re constantly scrubbing.
Listen to Your Fryer (and Your Nose!)
Ideally, you should give your air fryer basket and drawer a good wash with hot soapy water after every use, or at least after every few uses if you’ve only cooked something relatively dry and non-greasy (like reheating bread or cooking frozen fries that don’t shed much oil). Think of it like washing a pan you’ve just used. This kind of preventative cleaning is much easier than tackling a massive build-up of grease later on. A quick wash when the residue is still fresh takes just a few minutes. A full deep clean of the interior chamber and a check of the heating element might not be necessary every single time, but should probably be done on a regular basis – say, once a week if you use your air fryer daily, or every couple of weeks for less frequent users. Or maybe I should clarify… the difference between a quick rinse and a full scrub-down is significant. The quick wash is for the basket/drawer after most uses. The deep clean is for everything, periodically.
Your air fryer will often give you clear signs that it’s overdue for a cleaning. If you notice smoke coming from the unit during cooking (and you’re not cooking something exceptionally fatty at a super high temperature), that’s often burnt-on grease or food particles either in the basket, drawer, or on/near the heating element. Persistent unpleasant odors that linger even when the fryer is cool, or that transfer to your food, are another major indicator. If your food starts sticking more than usual, or if you can see visible grease build-up or food debris caked onto the components, then it’s definitely time for a thorough clean. Don’t wait for these signs to become overwhelming; addressing them early makes the job much easier. Trust your senses – if it looks dirty, smells funny, or starts acting unusually, it’s probably crying out for a wash.
Ultimately, establishing good user habits is key. Making a quick clean of the basket and drawer part of your post-meal cleanup routine can save you a lot of hassle in the long run. If you cook something particularly greasy or messy, like marinated chicken wings or breaded items, it’s best to clean those parts immediately after they’ve cooled. For the less frequent but still essential deep cleans, maybe set a reminder in your calendar, or tie it to another weekly kitchen chore. The more you make it a regular habit, the less daunting it will feel, and the better your air fryer will serve you. It’s like any good habit; a little consistent effort reaps big rewards in terms of appliance longevity, food quality, and peace of mind. And your kitchen won’t have that ‘eau de old dinner’ aroma that Luna definitely doesn’t appreciate (even if she pretends not to notice anything but potential snacks).
Wrapping It Up: Your Path to Air Fryer Bliss
Well, there you have it – my comprehensive, and hopefully not too overwhelming, guide to cleaning your air fryer the easy way. We’ve journeyed from the ‘why’ to the ‘how often,’ covering all the nooks and crannies in between. It might seem like a lot of information, but once you get into a rhythm, you’ll find that keeping your air fryer sparkling isn’t the monumental task it once seemed. It’s really about working smart, using gentle but effective methods, and being consistent. And trust me, the reward of delicious, perfectly crispy food from a clean machine is totally worth the little bit of effort. Plus, no more weird flavor mashups, which is a win in my book!
The main takeaways? Regular, gentle cleaning is your best friend. Simple household items like dish soap, baking soda, and vinegar are usually all you need. Always prioritize safety by unplugging and cooling the unit. And listen to your appliance – it’ll often tell you when it needs a good scrub. I think what I’ve learned, especially since moving to Nashville and really leaning into home cooking more, is that taking care of your tools, even the seemingly simple ones, elevates the whole experience. It’s a form of respect for the process, and for the food you’re making.
So, here’s my challenge to you, if you’ve been putting off this task: try these steps. Set aside a little time, gather your simple supplies, and give your air fryer the TLC it deserves. I bet you’ll notice a difference in how it performs, how your food tastes, and even just how you feel about using it. And who knows, maybe Luna will finally stop giving me that judgmental stare when the kitchen gets a bit smoky from old grease. Though, knowing her, she’ll just find something else to be judgy about. What do you think – could a cleaner air fryer actually lead to a happier cat? Probably not directly, but a happier chef makes for a happier household, right? Let me know how it goes!
FAQ
Q: Can I use oven cleaner on my air fryer?
A: Generally, no. Oven cleaners are typically very harsh and abrasive, designed for durable oven interiors. They can easily damage the non-stick coating on your air fryer’s basket and drawer, and the fumes can linger. It’s much safer to stick to mild dish soap, baking soda, and vinegar.
Q: Are air fryer parts dishwasher safe?
A: Many air fryer baskets and drawers are designed to be dishwasher safe, usually on the top rack. However, it’s absolutely crucial to check your manufacturer’s manual first. Some non-stick coatings might degrade faster with harsh dishwasher detergents and high heat. If in doubt, handwashing with mild soap is always a safe bet.
Q: What if I have really burnt-on food that just won’t come off the basket?
A: For super stubborn, burnt-on messes, try a prolonged soak (even overnight) in hot, soapy water. Then, make a thick paste of baking soda and a little water, apply it to the area, let it sit for 15-30 minutes, and then gently scrub with a non-abrasive sponge or brush. For really extreme cases, you might try gently scraping with a plastic or silicone scraper (nothing metal!). Avoid anything that could scratch the coating.
Q: How do I prevent my air fryer from getting so dirty in the first place?
A: Prevention is key! You can use perforated parchment paper liners or silicone liners specifically designed for air fryers (ensure they allow for airflow). Avoid overcrowding the basket, as this can cause food to cook unevenly and splatter more. Shaking out loose crumbs before they bake on helps too. And, of course, cleaning any significant spills or greasy residue from the basket and drawer as soon as the appliance has cooled after use will make a huge difference.
@article{simple-air-fryer-cleaning-your-easy-method,
    title   = {Simple Air Fryer Cleaning: Your Easy Method},
    author  = {Chef's icon},
    year    = {2025},
    journal = {Chef's Icon},
    url     = {https://chefsicon.com/cleaning-your-air-fryer-the-easy-way/}
} 

