
Table of Contents
- 1 Keeping Your Charcoal Grill in Prime Condition: A Deep Dive
- 1.1 Section 1: Why Bother? The Zen of Grill Maintenance
- 1.2 Section 2: The Post-Grill Ritual: Immediate Clean-Up Wins
- 1.3 Section 3: Deep Cleaning Your Grates: More Than Just a Scrape
- 1.4 Section 4: Tackling the Bowl and Lid: Ash, Grease, and Grime
- 1.5 Section 5: Rust Never Sleeps: Prevention and Treatment Strategies
- 1.6 Section 6: Air Vents and Dampers: Crucial for Temperature Control
- 1.7 Section 7: Inspecting and Tightening: The Nuts and Bolts (Literally!)
- 1.8 Section 8: The Importance of Proper Ash Disposal – Safety First!
- 1.9 Section 9: Seasonal Care: Hibernation and Spring Awakening
- 1.10 Section 10: Performance Boosters: Beyond Basic Cleaning
- 2 Final Thoughts Before You Fire It Up
- 3 FAQ
Alright folks, Sammy here, tuning in from my little corner of Nashville. The sun’s starting to get that proper summer intensity, and you know what that means – prime grilling season is upon us. There’s just something primal and deeply satisfying about cooking over live fire, isn’t there? That smoky aroma, the sizzle of food hitting hot grates… it’s a ritual. But here’s the thing: that trusty charcoal grill, the heart of so many good times, needs a bit of TLC to keep delivering those epic meals. We’re talking about maintaining your charcoal grill, not just for longevity, though that’s a huge part of it, but for pure, unadulterated performance. I learned this the hard way a few years back with a beloved but neglected kettle grill that eventually rusted through its ash catcher, mid-burger session. Tragic, I tell you. Luna, my cat, looked particularly unimpressed with the whole smoky debacle from her perch on the porch railing.
So, what’s the secret sauce to keeping your charcoal companion in tip-top shape? It’s not really a secret, more like a series of good habits. Think of it like tuning an instrument; a little regular effort makes all the difference in the sound, or in this case, the sear. We’re going to dive into the nitty-gritty, from the immediate post-cook cleanup (yes, even when you’re full and sleepy) to the deeper seasonal spruce-ups. I want to cover how to really get those grates clean, tackle the dreaded rust monster, make sure your vents are working for you, not against you, and even some tips for boosting overall performance. It might sound like a chore, but honestly, I’ve come to find a certain zen in it. It’s a way to connect with the tool, understand its workings, and ultimately, make better food. Plus, a well-maintained grill just looks better on the patio, doesn’t it? It’s a statement. It says, “I take my char seriously.”
This isn’t just about scrubbing, though. It’s about understanding how these simple machines work and why certain steps are crucial. We’ll explore the best ways to handle ash, protect your grill from the elements (Nashville weather can be a fickle beast, lemme tell ya), and make sure every component, from the lid to the legs, is sound. My goal here is to equip you with practical advice that actually makes a difference, stuff I’ve picked up over years of enthusiastic, sometimes messy, grilling. Maybe you’re a seasoned pitmaster, or perhaps you just unboxed your first Weber Kettle. Either way, I reckon there’ll be a nugget or two in here for you. Let’s get those grills ready for a long, delicious life. Because honestly, good barbecue is a terrible thing to waste on a poorly performing grill.
Keeping Your Charcoal Grill in Prime Condition: A Deep Dive
Section 1: Why Bother? The Zen of Grill Maintenance
So, first things first, why should we even spend our precious weekend minutes fussing over a dirty grill? I mean, it’s just gonna get dirty again, right? Well, yeah, but that’s kinda like saying why make your bed. There’s a method to the madness, a certain satisfaction in the upkeep. For me, grill maintenance is more than just a chore; it’s part of the whole grilling experience. It’s about respect for the tool that brings so much joy (and deliciousness). A clean grill functions better, pure and simple. No leftover gunk means truer flavors, less unwanted smoke from burning old grease, and more even heat distribution. Think about it – those caked-on bits from last week’s chicken? They’re not adding ‘seasoning’; they’re adding carbon and potentially off-flavors. Plus, regular cleaning prevents rust and corrosion, which significantly extends the lifespan of your grill. A grill that lasts longer saves you money and reduces waste. That’s a win-win in my book.
Beyond the practical, there’s almost a meditative quality to it. Okay, maybe ‘meditative’ is a stretch when you’re scraping stubborn gunk, but there’s definitely a sense of accomplishment. It’s like, you’re preparing your canvas before painting a masterpiece. And let’s be honest, a gleaming grill is a point of pride. It shows you care. I remember my dad meticulously cleaning his grill after every use, and at the time, I thought he was just being finicky. Now? Now I get it. It’s about control, precision, and setting yourself up for success. A dirty, neglected grill is unpredictable. A clean one? That’s a reliable partner in your culinary adventures. Plus, it’s safer – grease buildup is a major fire hazard. So yeah, we bother because it leads to better tasting food, a longer-lasting grill, and a safer, more enjoyable cooking experience. It’s an investment in future deliciousness.
Section 2: The Post-Grill Ritual: Immediate Clean-Up Wins
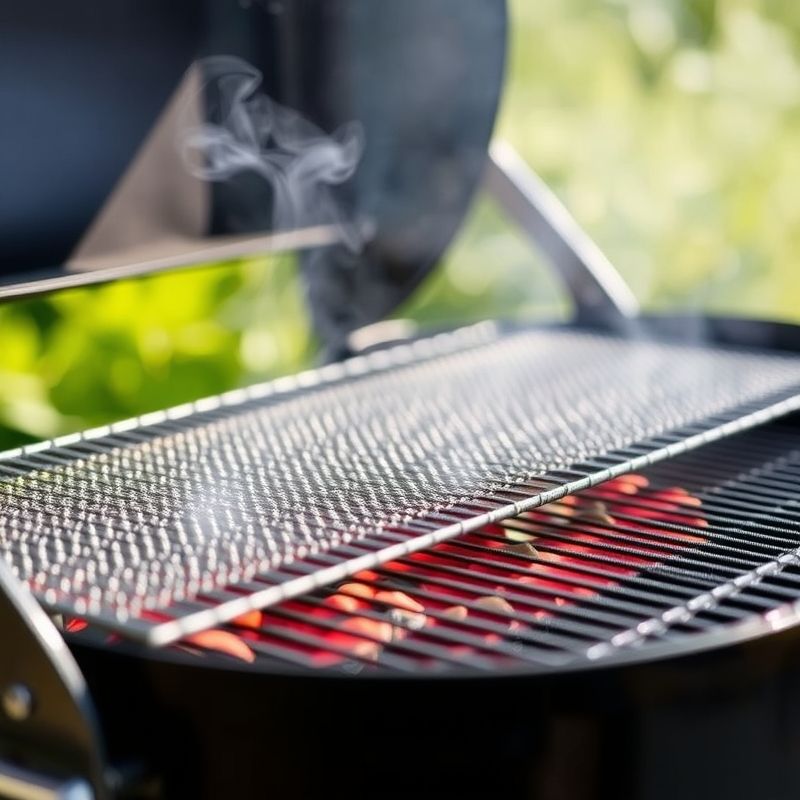
Alright, you’ve just pulled off some epic ribs, everyone’s patting you on the back, and the siren song of the couch is strong. I get it. But trust me on this: spending just 10-15 minutes on an immediate post-grill clean-up will save you SO much hassle later. This is where the magic happens, or rather, where the future-you thanks the present-you. The key is to act while the grill is still warm (not blazing hot, mind you – safety first!). That cooked-on food and grease is much easier to remove before it cools and hardens into a cement-like substance. My go-to tool here is a good quality grill brush. There’s a lot of debate about wire bristles versus other types, and honestly, you need to find what works for you and your grates. The important thing is to use it vigorously on the grates while they’re warm. Scrape off all those bits of food. Get both sides if you can easily flip your grate, or at least the top surface really well.
Once the grates are brushed, if you have a system for it, it’s a good idea to deal with some of the ash. For kettle grills, ensure the bottom vents are closed to stop ash from blowing around, then once it’s completely cool, you can manage the ash. For other models, follow their specific instructions. The main thing is not letting a huge pile of ash sit in the bottom of your grill for days on end. Ash can absorb moisture, and that damp ash sitting against the metal bowl of your grill is a recipe for rust and corrosion. I also give the inside of the lid a quick wipe if there’s any condensation or grease spatter, again, easier while warm. It’s these little things, done consistently, that make a huge difference. It’s like washing dishes right after dinner instead of letting them pile up. Less daunting, more effective. This isn’t about a full strip-down clean every time, just the essential immediate actions to prevent build-up and make deeper cleans less frequent and less… terrifying.
Section 3: Deep Cleaning Your Grates: More Than Just a Scrape
Okay, so the quick post-grill scrape is great for daily duty, but every few cooks, or if things are looking particularly gnarly, your grill grates need a deep clean. This is where you really get them back to their gleaming best. There are a few ways to go about this. If they’re stainless steel or porcelain-coated and really gunked up, you might consider removing them from the grill (once it’s completely cool, obviously!) and soaking them. A large utility sink, a plastic tub, or even a heavy-duty trash bag can work for this. Hot, soapy water is a good start; some folks swear by a bit of vinegar or baking soda in the mix. Let them soak for a while, maybe an hour or even longer for really stubborn stuff. This helps loosen all that cooked-on residue. After soaking, a sturdy scrub brush or a non-abrasive scouring pad (especially for porcelain to avoid scratching) is your friend. Put some elbow grease into it!
For cast iron grates, the approach is a bit different. You want to avoid long soaks in soapy water as it can strip the seasoning and promote rust. For these, a good scraping while warm is still key. If they need more, you can use a stiff brush and minimal water, then dry them THOROUGHLY immediately. Like, bone dry. And then, the crucial step for cast iron: re-seasoning your grates. After cleaning and drying, apply a thin coat of cooking oil (something with a high smoke point, like canola, grapeseed, or vegetable oil) to all surfaces of the grate. Then, you can heat the grill for a bit to let that oil polymerize and create that beautiful non-stick, protective layer. This not only helps with cooking but also protects against rust. Even for stainless or porcelain, a light oiling after a deep clean can help maintain them. It’s an extra step, but man, cooking on truly clean and seasoned grates? It’s a game changer for food release and those beautiful grill marks.
Section 4: Tackling the Bowl and Lid: Ash, Grease, and Grime
Beyond the grates, the bowl and lid of your charcoal grill also need attention. These areas collect ash, grease drips, and general cooking grime. Letting this stuff build up isn’t just unsightly; it can affect airflow, attract pests, and, as we’ve mentioned, lead to corrosion. First up, the ash. Once the grill is completely cold, remove all spent charcoal and ash from the bottom of the bowl. A dedicated ash tool or a small shovel works well. Be thorough. As I said before, ash plus moisture equals rust, the arch-nemesis of any grill. If your grill has an ash catcher, empty that regularly too. For the grease and grime, a good degreaser can be your best friend. Look for one that’s safe for grill surfaces. Spray it on, let it sit for a bit to break down the gunk, and then wipe it out with paper towels or a rag. For really baked-on stuff, you might need a plastic scraper – avoid anything metal that could scratch the finish of your grill bowl or lid.
Don’t forget the inside of the lid! It often gets coated with a layer of smoke and grease, which can sometimes flake off onto your food if not cleaned. It might look like peeling paint, but it’s usually just carbonized grease. A good scrub with soapy water or a degreaser usually takes care of it. While you’re cleaning the bowl and lid, it’s also a good time to do a quick visual inspection for any damage. Look for chips in the porcelain enamel (if you have it) or any signs of excessive rust. Catching these things early can help you address them before they become major problems. A clean interior also means better heat reflection and more efficient cooking. It’s all connected, you see? It’s tempting to just focus on the grates because that’s where the food goes, but the overall cleanliness of the grill body is just as important for longevity and performance. Luna sometimes tries to ‘help’ by batting at the cleaning rags, which is… less than helpful, but cute.
Section 5: Rust Never Sleeps: Prevention and Treatment Strategies
Ah, rust. The silent killer of many a fine grill. If you’re like me and live in a place like Nashville where humidity can be a real factor, or if your grill is exposed to rain, rust prevention is a battle you need to wage proactively. The number one defense? A good quality grill cover. I know, I know, they can be a bit of a pain to put on and take off, but seriously, it’s worth it. A cover protects your grill from rain, dew, and even harsh sun, all of which can contribute to rust and degradation of parts. Make sure the grill is completely cool and dry before you cover it, though, as trapping moisture underneath can actually make things worse. If you’re not using a cover, try to store your grill in a sheltered location, like a garage or shed, when not in use, especially during wetter months.
What if rust has already reared its ugly head? Don’t panic; it’s often treatable, especially if caught early. For light surface rust on grates (especially cast iron), a good scrub with a wire brush or steel wool can remove it. Afterwards, be sure to clean thoroughly and re-season cast iron grates immediately. For rust on the grill body, the approach depends on the material and finish. You might gently sand or use a rust remover product (test in an inconspicuous area first!). Once the rust is removed, you might need to touch up the paint if it’s a painted surface, using a high-heat grill paint. The key is to remove the active rust and then protect the exposed metal. Keeping vulnerable metal parts lightly oiled can also help. For instance, if there are unpainted steel legs or joints, a quick wipe with an oily rag now and then can provide a barrier against moisture. It’s a bit like waxing a car; that protective layer makes a big difference. Ignoring rust is like ignoring a leaky faucet – it only gets worse and more expensive to fix over time.
Section 6: Air Vents and Dampers: Crucial for Temperature Control
Let’s talk about something that’s absolutely critical for controlling your charcoal grill’s temperature: the air vents or dampers. Usually, you’ll have intake dampers near the bottom of the grill that control how much air gets to the coals, and exhaust dampers on the lid that control how much heat and smoke escape. These need to be clean and functioning smoothly for you to have any hope of mastering your fire. Over time, they can get clogged with soot, grease, or even bits of debris. If they’re stiff or stuck, you won’t be able to make those fine adjustments needed to hit your target cooking temperature, whether you’re going for a low-and-slow smoke or a searing hot cook.
Cleaning them is usually pretty straightforward. Use a brush to clear away any loose soot or ash. If they’re sticky with grease, a cloth dampened with a bit of degreaser or hot soapy water can work wonders. Just be careful not to bend or damage the vent mechanisms. After cleaning, check that they open and close smoothly through their entire range of motion. If they’re a bit stiff, sometimes a tiny bit of food-grade lubricant on the pivot points can help, but use sparingly – you don’t want it dripping onto your food. The ability to precisely control airflow is what separates frustrated grillers from charcoal ninjas. When your vents are clean and responsive, you can dial in temperatures with surprising accuracy. It’s the difference between guessing and knowing. So, don’t overlook these unassuming but vital parts of your grill. They are the lungs of your fire.
Section 7: Inspecting and Tightening: The Nuts and Bolts (Literally!)
This might sound a bit like I’m suggesting you perform open-heart surgery on your grill, but really, it’s just about giving it a quick once-over for structural integrity. Your grill, especially if it’s a cart model or has legs and wheels, is held together by nuts, bolts, and screws. Over time, with the heating and cooling cycles, vibrations from moving it around, and general use, these can sometimes loosen up. A wobbly grill isn’t just annoying; it can be a safety hazard. Imagine it collapsing mid-cook with a load of hot coals – yikes. So, every so often, maybe at the beginning of the grilling season or during a deep clean, take a few minutes to check these connections. Wiggle the legs, check the handle on the lid, inspect the wheels and their axles.
If anything feels loose, grab the appropriate screwdriver or wrench and tighten it up. Don’t go full Hercules on it and strip the threads, just snug them up. This is also a good time to inspect other components like the handle itself – is it cracked or loose? Are the wheel casters rolling freely, or are they jammed with dirt and debris? A little preventative maintenance here can prevent a bigger problem down the line. I once had a wheel fall off my old grill while moving it, simply because the nut had vibrated loose over years of neglect. Nearly sent the whole thing tumbling. Lesson learned. It’s these little details that contribute to the overall safety and longevity of your equipment. Think of it as a pre-flight check for your grilling adventures. It’s one of those things that, you know, you just gotta do for peace of mind. It’s not glamorous, but it’s important.
Section 8: The Importance of Proper Ash Disposal – Safety First!
We’ve talked about cleaning ash out of the grill, but what do you *do* with it? Proper ash disposal is super important, primarily for safety reasons, but also for just being a good neighbor and environmentally responsible. Hot ashes are a serious fire hazard. Coals can smolder for a surprisingly long time – hours, even a day or more after you think they’re out. Never, ever dump hot or even warm ashes directly into a plastic trash can or a paper bag. That’s just asking for trouble. The best practice is to let the ashes cool completely in the grill for at least 24-48 hours. I know, patience is a virtue, but it’s critical here.
Once you’re absolutely certain they’re cold, transfer them to a dedicated metal ash can with a tight-fitting lid. Not plastic, not cardboard – metal. This contains them safely until you can dispose of them permanently. Some people like to add a little water to the ashes in the metal can just to be absolutely sure there are no lingering embers, which isn’t a bad idea. When it comes to final disposal, check your local regulations. Some municipalities allow cooled ashes to be bagged (once truly cold) and put in the regular trash, while others might have specific instructions. Some gardeners like to use wood ash (not charcoal briquette ash, which can contain additives) sparingly in their gardens, as it can provide some nutrients, but you need to know what you’re doing there as it can also alter soil pH. The main takeaway: safety with ashes is non-negotiable. Treat them with respect, and make sure they’re dead cold before they go anywhere near combustible materials.
Section 9: Seasonal Care: Hibernation and Spring Awakening
For many of us, charcoal grilling is a three-season affair, though I know some hardy souls who grill year-round (respect!). If you’re planning to put your grill away for the winter, or even just for an extended period of non-use, a bit of seasonal prep for storage can make a world of difference when you pull it out again. First, give it a really thorough cleaning – grates, bowl, lid, everything. You don’t want old grease and food particles sitting there for months, attracting pests or promoting corrosion. Make sure it’s completely dry. Then, consider coating the grates (especially cast iron) with a fresh layer of oil to prevent rust. Some people even bring their grates indoors for the winter if they live in very harsh climates.
Cover your grill with that trusty cover we talked about. If possible, store it in a dry, sheltered place like a garage or shed. This will offer the best protection against winter weather. When spring rolls around and the grilling itch returns, it’s time for the spring awakening ritual. Remove the cover, give everything a good inspection. Check for any signs of rust that might have developed, or any critters that might have decided to make your grill their winter home (it happens!). Wipe down the exterior and interior. Check your vents and all moving parts. It’s also a good idea to do a “dry run” burn before your first cook of the season – just light a small batch of charcoal and let it burn off any dust or residues that might have accumulated during storage. This pre-season check-up ensures your grill is ready and safe for another glorious season of cooking. It’s like waking a sleeping giant, ready for action.
Section 10: Performance Boosters: Beyond Basic Cleaning
Okay, so we’ve covered cleaning and basic maintenance for longevity. But what about wringing every last bit of performance from your charcoal grill? Beyond just being clean, there are a few things that can elevate your grilling game. Firstly, ensure your grill is on a level surface. This might seem obvious, but an unlevel grill can lead to uneven charcoal burning and hot spots. Secondly, check for air leaks. While vents are designed to let air in and out, you don’t want excessive leaks around the lid or where the bowl meets the legs, as this can make temperature control difficult. For kettle grills, ensure the lid fits snugly. If it’s warped, that’s a problem. Sometimes, you can gently reshape a lid, or if it’s bad, a replacement might be needed for optimal performance.
Think about your charcoal setup too. Are you using the right amount of charcoal for what you’re cooking? Are you arranging it effectively for direct or indirect heat? These aren’t strictly ‘maintenance’ but are crucial for performance. Another thing, and this might be a bit more advanced, is understanding the acoustics of your grill. Okay, maybe not acoustics, but the way heat reflects. A clean inner surface, as we discussed, reflects heat better. Some hardcore enthusiasts even look into modifications, though I tend to stick with using the grill as designed. You know, it’s interesting, when you look at professional kitchen setups, the attention to detail in equipment is immense. I was looking into some heavy-duty grill accessories once and ended up on sites like Chef’s Deal. They’re known for supplying commercial kitchens, offering everything from comprehensive kitchen design and equipment solutions to professional installation services. They even do free kitchen design consultations. While my backyard Weber isn’t quite a commercial charbroiler, the principle of having well-maintained, high-performing equipment is the same. The pros demand reliability and precision, and they get that by choosing quality and maintaining it. It makes you think about the quality of even small components in our home grills and how they contribute to the overall experience. Even something as simple as a good thermometer (if your built-in one is suspect) can be a huge performance booster.
Final Thoughts Before You Fire It Up
So there you have it – a pretty thorough rundown of how to keep your charcoal grill happy, healthy, and performing like a champ. It might seem like a lot when you lay it all out, but honestly, most of these are small, quick tasks that become habit once you get into the rhythm. And the payoff? Oh, it’s huge. Better tasting food, a grill that lasts for years and years, and the quiet satisfaction of knowing you’re the master of your flame. Is this the absolute only way to do things? Probably not. Grilling is personal, and you’ll find your own groove. But these tips are a solid foundation.
I guess what I’m trying to say is, don’t see grill maintenance as a burden. See it as part of the craft. Part of the journey to delicious. Your grill is more than just a metal container for fire; it’s a partner in culinary creation. Treat it well, and it’ll reward you tenfold. Now, if you’ll excuse me, all this talk has made me hungry. I think some Nashville hot chicken, done on the grill, is calling my name. And yes, Luna will be watching, judging my every move. What will you be grilling up on your beautifully maintained machine this weekend? That’s the real question, isn’t it?
FAQ
Q: How often should I really deep clean my charcoal grill?
A: It depends on how often you grill and what you cook. A good rule of thumb is a deep clean (grates, bowl, lid) every 5-10 uses. If you cook a lot of fatty foods or use sweet sauces that caramelize and burn, you might need to do it more frequently. The quick post-grill brush-down should happen every time, though!
Q: Can I use oven cleaner on my grill grates?
A: I’d be cautious. Some oven cleaners are very harsh and can damage certain grill grate materials, especially porcelain enamel or seasoned cast iron. It’s generally better to use cleaners specifically designed for grills or stick to hot soapy water, vinegar solutions, or natural abrasives like baking soda. Always rinse thoroughly if you do use a stronger cleaner.
Q: My grill lives outside uncovered. How bad is that, really?
A: It’s not ideal, especially if you get a lot of rain or humidity. Exposure to the elements is the fastest way to encourage rust and general wear and tear. A grill cover is a relatively inexpensive investment that can add years to your grill’s life. If a cover isn’t an option, try to at least keep it in the most sheltered spot you can find.
Q: What’s the best type of brush for cleaning grill grates?
A: There’s a lot of debate here! Traditional wire bristle brushes are effective but have raised safety concerns about bristles breaking off. If you use one, inspect it regularly and replace it if it’s worn. Alternatives include coiled wire brushes, nylon bristle brushes (for cool grates), pumice stones, or even a wadded-up ball of aluminum foil held with tongs for a quick scrape. The ‘best’ often comes down to your grate material and personal preference for safety and effectiveness.
@article{charcoal-grill-care-keep-it-performing-great-longer,
    title   = {Charcoal Grill Care: Keep It Performing Great Longer},
    author  = {Chef's icon},
    year    = {2025},
    journal = {Chef's Icon},
    url     = {https://chefsicon.com/maintaining-your-charcoal-grill-tips-for-longevity-and-performance/}
} 
