
Table of Contents
- 1 Diving Into the Sweet World of Homemade Jam
- 1.1 Why Bother with Homemade Jam Anyway?
- 1.2 Essential Equipment: You Probably Already Have Most of It!
- 1.3 Understanding Pectin: Nature’s Gelling Agent
- 1.4 Sugar’s Role: More Than Just Sweetness
- 1.5 Choosing Your Fruit: The Fresher, The Better
- 1.6 The Basic Method: A Simple Strawberry Jam Recipe to Start
- 1.7 Testing for Set: The Wrinkle Test and Other Tricks
- 1.8 Jar Sterilization: Keeping it Safe and Sound
- 1.9 Beyond Strawberries: Easy Variations for Adventurous Beginners
- 1.10 Troubleshooting Common Jam Issues: Don’t Despair!
- 2 Your Jam Journey Begins Now
- 3 FAQ
Hey everyone, Sammy here, tuning in from my sunny (well, mostly sunny) home office here in Nashville. Luna, my ever-present feline supervisor, is currently napping in a patch of sunlight, probably dreaming of tuna-flavored jam – don’t worry, that’s not on today’s menu! What IS on the menu is something I get asked about surprisingly often, especially since folks know I’m pretty obsessed with all things food: easy homemade jam recipes for beginners. It sounds a bit old-fashioned, doesn’t it? Like something our grandmothers did. But let me tell you, the satisfaction of cracking open a jar of jam YOU made is pretty unbeatable. Plus, the taste? Miles ahead of most store-bought stuff, if I’m being honest.
I remember my first attempt at jam. It was… an adventure. I was probably a bit too ambitious, picked some complicated recipe from an ancient cookbook, and ended up with something that was either more like fruit syrup or closer to fruit-flavored rubber. Not my proudest culinary moment. But, like with anything, you learn! And I learned that starting simple is key. There’s a real beauty in transforming fresh, vibrant fruit into a glistening, sweet preserve. It’s like a little bit of kitchen alchemy. And here in Nashville, with access to some amazing local farms and markets, the inspiration is just endless. I mean, have you ever had jam made from truly fresh, locally picked berries? It’s a revelation.
So, if you’ve been curious about making your own jam but felt intimidated, this post is for you. We’re going to break it down, keep it super simple, and by the end, you’ll not only understand the basics but you’ll also have a couple of straightforward recipes to try. Forget the complicated techniques and fancy equipment for now. We’re aiming for delicious, achievable results that will make you feel like a kitchen superstar. Seriously, it’s easier than you think. And the bragging rights when you serve your own homemade jam? Priceless. We’ll cover the essential bits – fruit, sugar, a bit of heat, and some patience. Are you ready to get your jam on? I thought so!
Diving Into the Sweet World of Homemade Jam
Why Bother with Homemade Jam Anyway?
Okay, let’s be real. You can walk into any grocery store and grab a jar of jam. So why, in our busy lives, would we add another ‘to-do’ to the list? For me, it started as a curiosity, but it quickly became about so much more. Firstly, flavor. Oh my goodness, the flavor. When you use fresh, seasonal fruit, the taste of homemade jam is just brighter, more intense. You can actually taste the fruit, not just a generic sweetness. Secondly, you have complete control over ingredients. Want less sugar? Go for it (though we’ll talk about sugar’s role later, it’s important!). Want to avoid high-fructose corn syrup or artificial preservatives? Homemade is your answer. You know exactly what’s going into each jar.
Then there’s the sheer satisfaction. There’s something incredibly rewarding about the process itself. It’s a bit meditative, stirring the pot, watching the fruit transform. And the smell that fills your kitchen? Pure bliss. It’s also a fantastic way to preserve the best of the season. Got a haul of perfect summer berries? Turn them into jam, and you can enjoy that sunshine taste even in the dead of winter. Plus, homemade jam makes for amazing, heartfelt gifts. Seriously, a little jar of your own creation, tied with a ribbon? People LOVE that. It’s personal, it’s delicious, and it shows you cared enough to make something. Is it a bit more effort than buying? Sure. But is it worth it? Absolutely, one hundred percent. I sometimes think about the industrial scale of food production and how disconnected we can become from what we eat. Making jam, even on a small scale, feels like a tiny act of rebellion, a way to reconnect.
Essential Equipment: You Probably Already Have Most of It!
Alright, before you think you need to rush out and buy a whole bunch of specialized gear, let me reassure you. For basic, beginner-friendly jam making, you likely have most of what you need already in your kitchen. We’re not talking commercial-grade steam kettles here, just simple home kitchen stuff. First up, a large, heavy-bottomed pot or saucepan. Heavy-bottomed is key because it helps prevent the jam from scorching, which, trust me, is a smell you don’t want to experience. Stainless steel is ideal. Avoid aluminum, as it can react with acidic fruits and discolor your jam or give it a metallic taste. Something in the 6 to 8-quart range is usually a good size for typical small batches.
You’ll also need a few heatproof spoons or spatulas for stirring. Wooden spoons work, but silicone spatulas are great too because they can scrape the sides of the pot effectively. Measuring cups and spoons are a must for accuracy, especially when you’re starting out. A simple potato masher can be handy for breaking down softer fruits, though a fork works in a pinch. And, of course, you’ll need jars with lids and bands. Standard Mason jars are perfect. We’ll talk more about sterilizing them later, but make sure you have new lids for a proper seal. Some folks like to have a ladle for transferring the hot jam into jars, and a wide-mouth funnel can make this process a lot less messy. I didn’t use a funnel my first few times and, well, my countertop looked like a berry massacre. So, a funnel is a good, though not strictly essential, addition. Maybe a timer too? Though I often just go by look and feel once I get going. See? Not so scary, equipment-wise.
Understanding Pectin: Nature’s Gelling Agent
Now we’re getting into the science-y bit, but don’t worry, I’ll keep it straightforward. Pectin is the magic ingredient that makes your jam, well, jammy, instead of just fruit syrup. It’s a naturally occurring carbohydrate found in the cell walls of plants, especially fruits. When heated with sugar and acid (also naturally present in fruit), pectin forms a gel structure, giving jam its characteristic set. Some fruits are naturally high in pectin, like apples, citrus peels, cranberries, and Concord grapes. Others, like strawberries, peaches, and blueberries, are lower in pectin. This is important because if you’re using low-pectin fruit, you might need to give it a helping hand to achieve a good set.
There are a couple of ways to do this. You can combine low-pectin fruits with high-pectin ones (like adding some apple to your berry jam, though this can alter the flavor). Or, more commonly for beginners, you can use commercial pectin. Commercial pectin comes in liquid or powdered form and is derived from fruits (usually citrus peel). It makes the gelling process much more predictable, which is a huge confidence booster when you’re starting out. There are different types of commercial pectin too – some are designed for traditional high-sugar recipes, while others are formulated for low-sugar or no-sugar jams. Always follow the instructions on the pectin package *exactly*, as the method can vary. I used to think, ‘Ah, I can eyeball this,’ with pectin. Bad idea. Very bad idea. The ratios are quite specific for it to work its magic. So, to recap: pectin is your friend for achieving that perfect jam texture. It’s not cheating to use commercial pectin; it’s just smart, especially when you want reliable results.
Sugar’s Role: More Than Just Sweetness
Sugar. It’s often seen as the villain in modern diets, but in jam making, it plays a crucial, multi-faceted role that goes way beyond just making things sweet. Understanding this is pretty vital, I think. Firstly, yes, it provides sweetness, which balances the tartness of the fruit. But more importantly, sugar acts as a preservative. It does this by binding with water molecules in the fruit, making that water unavailable for ansty bacteria, yeasts, and molds to grow. This is why traditional jams, with their high sugar content, can last for so long. The concentration of sugar needs to be pretty high (typically around 60-65%) for it to be an effective preservative on its own for shelf-stable, water-bath canned jams.
Sugar also contributes significantly to the texture and set of the jam. It works in tandem with pectin and acid to create that desirable gel. If you reduce the sugar too much in a traditional recipe without making other adjustments (like using a special low-sugar pectin), you might end up with a runny, syrupy product that won’t set properly. It also impacts the color and flavor development during cooking. Now, I know many people are looking for low-sugar options, and that’s totally valid. There are ways to make low-sugar jams, usually involving specific types of pectin formulated for low-sugar applications, or by treating them more like refrigerator or freezer jams which rely on cold storage rather than sugar for preservation. Just be aware that if you drastically cut the sugar in a standard recipe, you’re not just reducing sweetness; you’re affecting its preservative qualities and its ability to gel. It’s a delicate balance. I’ve experimented quite a bit with this, and while I love a less sweet jam for fresh eating, for long-term preserving, I tend to stick closer to traditional ratios or use pectins designed for lower sugar.
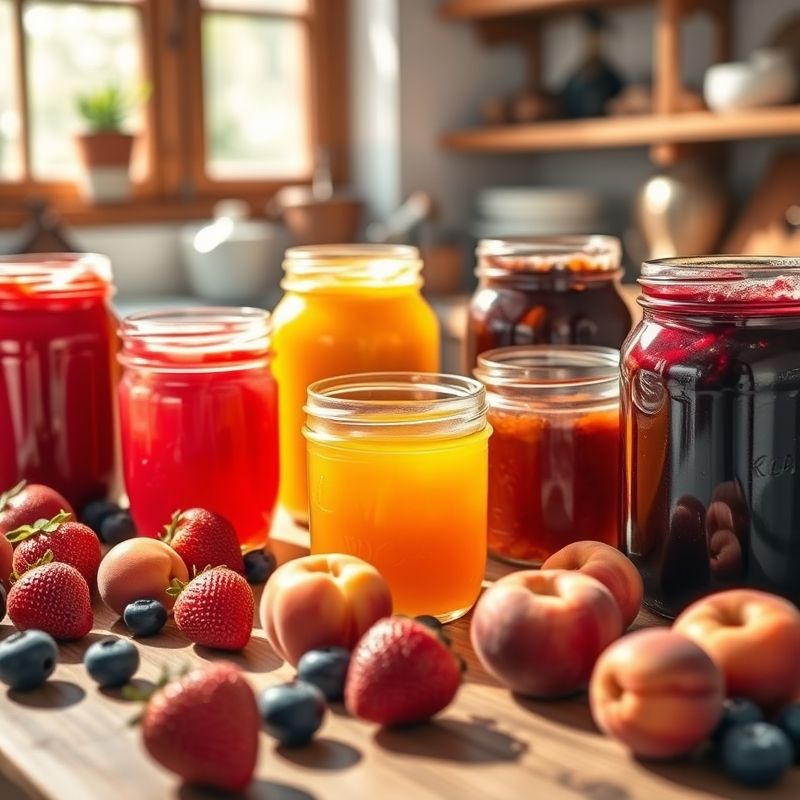
Choosing Your Fruit: The Fresher, The Better
This might seem obvious, but the quality of your jam is directly tied to the quality of your fruit. You want fruit that is ripe but still firm, bursting with flavor. Overripe, mushy fruit can result in a dull-tasting jam and might have lower pectin levels, making it harder to set. Underripe fruit, on the other hand, might be too tart and also not have fully developed its flavor or pectin. That sweet spot of ripeness is what you’re aiming for. My favorite thing is to use seasonal fruit, picked at its peak. Here in Nashville, summer means incredible berries, peaches, and later in the season, apples. Hitting up a local farmers market or even a u-pick farm is the best way to get your hands on the freshest stuff. Luna doesn’t get to come to the farmers market, sadly, but she definitely enjoys the smells when I get back with a haul.
When prepping your fruit, wash it gently and pat it dry. For berries, you’ll want to hull them (remove the green tops). For larger fruits like peaches or plums, you’ll need to pit them and chop them into smaller pieces. Some people prefer to peel peaches, some don’t – it’s a personal preference. I usually do, unless the skins are very tender. The size you chop your fruit will determine the texture of your final jam. If you like a chunky jam, leave the pieces larger. For a smoother jam, chop them finer or even crush them a bit. One thing to remember: measure your fruit *after* prepping it (hulling, pitting, chopping). Most recipes will specify, for example, ‘4 cups of crushed strawberries’, not ‘4 cups of whole strawberries’. This accuracy is important for getting the fruit-to-sugar-to-pectin ratios correct. And always, always give your fruit a good once-over for any bruised spots or blemishes; cut those away.
The Basic Method: A Simple Strawberry Jam Recipe to Start
Okay, let’s get down to actually making some jam! I think a classic strawberry jam is the perfect place for beginners to start. Strawberries are relatively easy to work with, and who doesn’t love strawberry jam? This recipe will use commercial powdered pectin for a reliable set. Remember to read the instructions on your specific pectin package, as they can vary slightly, but this is a general guide.
Here’s what you’ll generally need:
- About 4 cups of crushed fresh strawberries (this is roughly 2 quarts of whole berries, give or take)
- About 1/4 cup of fresh lemon juice (this adds acid, which helps with the set and brightens the flavor)
- 1 package (usually 1.75 oz) of powdered fruit pectin (the regular kind, not low-sugar for this recipe)
- About 5-7 cups of granulated sugar (Yes, it seems like a lot! We talked about why. Some pectins allow for slightly less, check your package. For example, Sure-Jell classic pectin often uses 4 cups fruit to 7 cups sugar, while Ball RealFruit Classic Pectin might use 5 cups crushed fruit to 7 cups sugar for strawberries. Always prioritize YOUR pectin’s instructions.)
And here’s the basic process:
- Prepare your fruit: Wash, hull, and crush the strawberries. A potato masher works great for this. Don’t puree them unless you want a very smooth, almost jelly-like consistency.
- Combine fruit, lemon juice, and pectin: In your large, heavy-bottomed pot, combine the crushed strawberries, lemon juice, and the powdered pectin. Stir well to ensure the pectin is fully dissolved and not clumpy.
- Bring to a boil: Place the pot over high heat and bring the mixture to a full rolling boil, stirring constantly. A ‘full rolling boil’ is one that doesn’t stop bubbling when you stir it.
- Add the sugar: Once boiling, add all the sugar at once. Stir, stir, stir until the sugar is completely dissolved. Keep stirring!
- Return to a boil: Continue stirring and bring the mixture back to a full rolling boil. Once it reaches that vigorous, can’t-be-stirred-down boil, boil it hard for exactly 1 minute, stirring constantly. This constant stirring is crucial to prevent scorching.
- Remove from heat: After 1 minute of hard boiling, remove the pot from the heat. Skim off any foam that has formed on the surface using a metal spoon. This foam isn’t harmful, but skimming it off makes for a clearer, prettier jam.
- Ladle into jars: Carefully ladle the hot jam into your prepared, sterilized jars, leaving about 1/4 inch headspace (space between the jam and the top of the jar).
- Process (if canning): Wipe the jar rims clean, place the lids on, and screw on the bands until fingertip tight. Process in a boiling water bath canner according to recommended times for your altitude (usually 10 minutes for small jars, but always check reliable canning resources).
This might seem like a lot of steps written out, but it actually happens pretty quickly once you start. The key is to have everything prepped and ready to go – your fruit measured, sugar measured, jars sterilized. It’s a bit like a dance, a very sweet, sticky dance.
Testing for Set: The Wrinkle Test and Other Tricks
How do you know when your jam is actually… jam? This is probably one of the trickiest parts for beginners, but there are a few reliable ways to test for the gelling point or ‘set’. If you’re using commercial pectin and following the instructions precisely (especially that 1-minute hard boil), you’re usually in good shape. However, it’s still good to know these tests. The most common and, I think, easiest for beginners is the wrinkle test. Before you start making your jam, place a few small plates in your freezer. When you think your jam might be ready (after the boil with sugar), remove the pot from the heat, take one of the cold plates from the freezer, and put a small spoonful of jam onto it. Let it sit for about 30 seconds to a minute, allowing it to cool rapidly. Then, gently push the jam with your finger. If the surface wrinkles slightly, your jam is set! If it’s still liquidy and doesn’t wrinkle, it needs to cook a bit longer. Return the pot to the heat, boil for another minute or two, and test again with a fresh cold plate.
Another method is the temperature test. Jam generally sets at around 220-222°F (104-105°C) at sea level. You’ll need an accurate candy thermometer or instant-read thermometer for this. Clip it to the side of your pot, making sure the tip isn’t touching the bottom. This method is more precise but can be fiddly if you don’t have the right thermometer. The temperature also needs to be adjusted for altitude – for every 1000 feet above sea level, subtract 2°F from the target temperature. Then there’s the sheet test or spoon test. Dip a cool metal spoon into the boiling jam and lift it, allowing the jam to drip off the side. If the jam drips off in syrupy drops, it’s not ready. If the drops become heavier and ‘sheet’ or hang off the spoon before dropping, it’s getting close or is ready. This one takes a bit more experience to judge correctly. For beginners, I really recommend sticking to the wrinkle test. It’s visual, it’s pretty foolproof, and it gives a good indication of the final texture.
Jar Sterilization: Keeping it Safe and Sound
This step is super, super important, especially if you plan to store your jam at room temperature for any length of time. Proper sterilization of your jars, lids, and bands is crucial for preventing spoilage and ensuring your jam is safe to eat. Skipping this can lead to mold growth or, worse, harmful bacteria. It might seem like a hassle, but it’s a non-negotiable part of the process for shelf-stable jam. There are a few ways to sterilize jars. The most common method for home canners is the boiling water bath method. You’ll need a large pot with a rack in the bottom (a boiling water canner is ideal, but any large stockpot with a rack will do). Place your clean jars (right side up) on the rack, fill the pot and the jars with hot water until the jars are covered by at least an inch of water. Bring the water to a rolling boil and boil for at least 10 minutes (adjust for altitude if necessary – check reliable canning guides). Keep the jars in the hot water until you’re ready to fill them. This keeps them hot, which prevents them from breaking when you pour in the hot jam (thermal shock is a real thing!).
Lids and bands also need attention. Most modern two-piece lids (like the Ball or Kerr brands) recommend washing them in hot, soapy water, rinsing well, and then keeping the lids (the flat part) in hot, simmering water (not boiling) until ready to use. The bands (rings) can just be washed and dried. Don’t boil the lids themselves, as it can damage the sealing compound. Always use new lids for each batch of jam you process for canning; bands can be reused if they are in good condition. When you fill your sterilized jars with hot jam, leave the recommended headspace (usually 1/4 inch for jams), wipe the jar rims clean with a damp cloth (any sticky residue can prevent a good seal), place the hot lid on top, and screw on the band until it’s ‘fingertip tight’ – meaning not too loose, but not cranked down super hard either. Then, the filled jars go back into the boiling water bath for processing, which we’ll touch on more if we were doing a full canning tutorial, but typically it’s about 10 minutes for jam. This final processing forces out air and creates a vacuum seal as the jars cool. You’ll hear that satisfying ‘pop’ sound as they seal – music to a canner’s ears!
Beyond Strawberries: Easy Variations for Adventurous Beginners
Once you’ve mastered a basic strawberry jam and you’re feeling a bit more confident, the world of jam making really opens up! So many fruits are just waiting to be transformed. A fantastic next step is raspberry jam. Raspberries are naturally higher in pectin than strawberries, so sometimes you can get away with a little less commercial pectin, or if you’re brave, try a no-pectin-added recipe (though that requires longer cooking and is a bit more art than science). The process is very similar to strawberry jam. Just crush the raspberries, and you’re good to go. The seeds can be a bit much for some; if so, you can press some of the crushed berries through a sieve to remove some seeds, but I personally don’t mind them.
Blueberry jam is another wonderful option. Blueberries also have a decent amount of natural pectin. Adding lemon juice is still a good idea for brightness and to aid setting. Sometimes blueberry jam can take a little longer to set, so be patient with your wrinkle test. For something a bit different, how about a mixed berry jam? Combine strawberries, raspberries, blueberries, maybe even some blackberries if they’re in season. The flavor complexity is amazing! Just make sure your total volume of crushed fruit matches what your pectin recipe calls for. Peach jam is a summer delight, though peaches are quite low in pectin, so using commercial pectin is highly recommended for beginners. You’ll want to peel, pit, and chop the peaches. Some people like to add a spice like cinnamon or a vanilla bean to peach jam for extra warmth. Don’t be afraid to experiment with small batches once you’re comfortable with the basic technique. Maybe a little bit of ginger in your blueberry jam, or a touch of mint with strawberries? The key is to change only one or two things at a time so you can see what effect it has. My cat Luna isn’t adventurous with food, but I like to think she’d approve of my jam experiments, from a safe distance of course.
Troubleshooting Common Jam Issues: Don’t Despair!
So, you followed the recipe, you did your best, but something’s not quite right. Don’t worry, it happens to everyone, even experienced jam makers! Let’s talk about a few common issues and what might have gone wrong, or what you can do. The most frequent complaint from beginners is runny jam. If your jam hasn’t set properly, it could be due to several reasons: not enough pectin (or old pectin that’s lost its potency), not enough sugar, not enough acid, or not cooking it long enough to reach the setting point. If it’s only slightly runny, you can sometimes re-cook it. Pour the jam back into the pot, add a little more pectin (dissolved according to package directions if using powdered) or more lemon juice if you suspect low acidity, and bring it back to a rolling boil for a few minutes, then test for set again. If it’s *very* runny, you might just decide to call it ‘fruit syrup’ and serve it over pancakes or ice cream – no shame in that game! I’ve definitely relabeled a few “failures” that way.
Another issue can be crystallized jam. This usually happens if there’s too much sugar, or if sugar crystals formed on the side of the pot during cooking and got stirred back in. Wiping down the sides of the pot with a wet pastry brush during cooking can help prevent this. Sometimes, adding a bit of corn syrup or glucose along with the sugar can inhibit crystallization, but that’s a more advanced tweak. What about mold? If you see mold on your jam, *do not* just scrape it off and eat the rest. Mold can penetrate deeper than you see, and some molds produce toxins. If it’s on a properly sealed, water-bath processed jar, the seal likely failed. If it’s an opened jar from the fridge, it might have been contaminated or kept too long. Always use clean utensils when dipping into your jam. If your jam is too stiff, you might have cooked it too long or used too much pectin. Unfortunately, there’s not much you can do to fix overly stiff jam, but it’s still perfectly edible. Just remember these things are learning experiences. My first few batches were all over the place, but each one taught me something. The key is not to get discouraged!
Your Jam Journey Begins Now
Well, there you have it – a whirlwind tour of easy homemade jam making for beginners! We’ve talked about why it’s so rewarding, the basic equipment you’ll need (which isn’t much!), the magic of pectin and the crucial role of sugar, how to pick the best fruit, and even walked through a simple strawberry jam recipe. Plus, we covered how to test for that elusive set, the importance of sterilization, some ideas for other fruity adventures, and what to do when things don’t go quite as planned. Phew! That was a lot, wasn’t it? But I hope it feels less like a mountain to climb and more like an exciting new path to explore in your own kitchen.
Making jam is one of those skills that feels wonderfully old-fashioned yet incredibly relevant today. It’s about connecting with your food, embracing seasonality, and creating something truly delicious with your own hands. Is every batch going to be perfect from day one? Maybe not. My early attempts certainly had their… quirks. But the learning process is part of the fun. So, here’s my challenge to you, if you’re feeling inspired: pick one simple recipe, maybe the strawberry jam we discussed, or find a good beginner recipe for your favorite berry. Gather your fruit, read through the steps, and just give it a go this weekend. What’s the worst that can happen? You might end up with some delicious fruit topping for your yogurt, even if it’s not perfectly set. And what’s the best that can happen? You discover a new passion, and your friends and family start calling you the Jam Master. Either way, it’s a pretty sweet deal, don’t you think?
FAQ
Q: Can I use frozen fruit to make jam?
A: Yes, absolutely! Frozen fruit works very well for making jam. In fact, sometimes it’s even better because freezing helps to break down the fruit’s cell walls, which can release more pectin and juice. Just thaw the fruit and measure it as you would fresh fruit. If it releases a lot of liquid during thawing, you can include some or all of that liquid in your jam, just be mindful of the total volume your recipe calls for.
Q: How long does homemade jam last?
A: If your jam has been properly processed in a boiling water bath and the jars have sealed correctly, it can last for at least a year, often longer, when stored in a cool, dark, dry place. Once opened, homemade jam should be stored in the refrigerator and is generally best consumed within a few weeks to a month, as it doesn’t have the same commercial preservatives as store-bought versions.
Q: Do I really need to sterilize the jars for jam?
A: If you are planning to process your jam in a boiling water bath for 10 minutes or longer (adjust for altitude), some guidelines say that pre-sterilizing the jars isn’t strictly necessary as the processing step itself will sterilize them. However, the jars must be scrupulously clean and hot to prevent breakage when the hot jam is added. Many experienced canners, myself included, still prefer to pre-sterilize jars as an extra precaution, especially for shorter processing times. It’s a critical step for safety and preservation if you’re not processing for that minimum time or if you’re making refrigerator/freezer jam that won’t be water-bath processed.
Q: What if my jam is too runny after it cools completely?
A: Don’t panic! If it’s just a bit loose, it can still be delicious on toast, scones, or as a topping for ice cream or yogurt. If you really want to try and thicken it, you can reprocess it. Pour the jam back into a clean pot. You can try adding a bit more pectin (make a slurry with some sugar to prevent clumping if it’s powdered pectin, or follow package directions for adding to cooked jam) or cook it a bit longer to evaporate more moisture. Then re-test for set, re-jar in sterilized jars, and re-process in a boiling water bath. Sometimes, it’s just easier to re-label it ‘fruit sauce’ and enjoy it as is!
@article{easy-homemade-jam-recipes-your-sweet-start-for-beginners,
    title   = {Easy Homemade Jam Recipes: Your Sweet Start for Beginners},
    author  = {Chef's icon},
    year    = {2025},
    journal = {Chef's Icon},
    url     = {https://chefsicon.com/easy-homemade-jam-recipes-for-beginners/}
} 

