
Table of Contents
- 1 Tackling the Chiller Chaos: Your Walk-In Organization Blueprint
- 1.1 1. The “Why” Behind the Chill: More Than Just Cold Air
- 1.2 2. Declutter and Conquer: The Great Walk-In Purge
- 1.3 3. Zone Defense: Mapping Your Walk-In for Victory
- 1.4 4. Shelf Smarts: Maximizing Vertical and Horizontal Space
- 1.5 5. The FIFO Imperative: Making it Second Nature
- 1.6 6. Label Like a Pro: Clarity is King (and Queen)
- 1.7 7. Container Power: Choosing the Right Vessels
- 1.8 8. Airflow is Your Ally: Don’t Block the Breeze
- 1.9 9. The Cleaning Crusade: Regular Rituals for a Pristine Walk-In
- 1.10 10. Team Training: Getting Everyone on Board the Organization Train
- 2 Beyond the Chill: Final Thoughts on Walk-In Wisdom
- 3 FAQ
Alright folks, Sammy here, your friendly neighborhood marketing guy turned food obsessive, beaming in from my Nashville home office – where Luna, my rescue cat, is probably judging my snack choices right now. Today, we’re diving headfirst into a topic that might not sound glamorous, but trust me, it’s the bedrock of a smooth-running, profitable restaurant: walk-in cooler organization hacks. I know, I know, it’s not exactly a Michelin-star dish, but without a well-organized walk-in, those star dishes might never even make it to the pass, or worse, they might make someone sick. And nobody wants that. It’s one of those behind-the-scenes things that, when done right, makes everything else just… flow. Like a perfectly composed symphony, or, you know, a really good bourbon on a Friday night here in Music City.
I’ve seen my fair share of walk-ins in my time, both as a wide-eyed newbie in the industry (a brief, chaotic stint in a Bay Area cafe that still gives me minor shivers) and now as someone who geeks out on restaurant systems. The difference between a meticulously organized cooler and one that looks like a Jackson Pollock painting made of food boxes? It’s night and day. It’s the difference between calm efficiency and frantic searching, between profit and loss, between a happy health inspector and… well, you get the picture. We’re talking about more than just tidiness; we’re talking about food safety, inventory management, and ultimately, your restaurant’s sanity. Is it a big claim? Maybe. But stick with me. I think by the end of this, you’ll see the profound in the practical.
So, what are we going to unpack today? We’re going to explore actionable, real-world strategies to tame that chilly beast. Think of this as your roadmap to walk-in nirvana. We’ll cover everything from the initial purge (because let’s be honest, there’s always *something* lurking in the back) to smart shelving, labeling like your life depends on it (because in a way, it does), and getting your whole team on board. These aren’t just theoretical concepts; these are hacks I’ve seen work, things that can make a tangible difference. Let’s get that cooler so organized, it’ll make your accountant weep tears of joy. Or at least give you a knowing nod. That’s a win in my book.
Tackling the Chiller Chaos: Your Walk-In Organization Blueprint
1. The “Why” Behind the Chill: More Than Just Cold Air
Before we even think about moving a single box, let’s ponder *why* walk-in cooler organization is so darn critical. It’s easy to see it as just a big fridge, right? A place to stuff things to keep them from spoiling. But it’s so much more. A well-organized walk-in is a cornerstone of food safety. Proper spacing and clear labeling prevent cross-contamination – raw meats separated from ready-to-eat items, allergens kept in their designated spots. This isn’t just about following health codes; it’s about protecting your customers and your reputation. Think about the last time you felt a bit iffy after a meal out… yeah, not a good feeling. Proper organization directly combats that risk.
Then there’s the financial angle. How much food do you think gets wasted because it’s lost in the depths of a chaotic cooler, only to be rediscovered when it’s past its prime? Or because something new was placed in front of something older, leading to spoilage? This is where meticulous organization, especially implementing a strict FIFO (First-In, First-Out) system, translates directly into cost savings. Every item used before it expires is money saved. And let’s not forget efficiency. When your team can find what they need quickly, without digging through piles of mystery boxes, service speeds up, stress levels go down, and the whole kitchen operates more smoothly. It’s like a well-oiled machine versus one that’s constantly grinding its gears. Which one sounds better for business? I’m guessing the former. It’s a system, and like any system, its effectiveness is directly tied to its organization.
2. Declutter and Conquer: The Great Walk-In Purge
Okay, deep breaths. This is often the part everyone dreads, but it’s essential. The Great Walk-In Purge. You can’t organize clutter, you can only move it around. So, the first step is a ruthless decluttering session. Schedule a time, maybe during a slower period, and get your team involved. Pull *everything* out. Yes, everything. This might seem daunting, but it’s the only way to truly see what you’re working with and to give the cooler itself a thorough cleaning (more on that later). As you take things out, inspect every single item. Check expiration dates religiously. Look for signs of spoilage. Be honest: if something is past its prime, or if you can’t remember the last time you used that obscure ingredient you bought for a special three years ago, it’s time for it to go. It’s tough, I get it, especially when you think about food cost, but holding onto unusable product is just taking up valuable shelf space and potentially creating a hazard.
Once you’ve sorted into ‘keep’, ‘toss’, and ‘maybe use immediately if safe’ piles, take a moment to assess what you have. Are there items you consistently over-order? Are there things that always seem to get lost and expire? This decluttering phase isn’t just about throwing things away; it’s a crucial data collection point for better inventory management moving forward. Maybe you’ll realize you don’t need ten different brands of hot sauce, or that a particular cut of meat just isn’t moving. This insight is gold. It helps you refine your ordering, reduce waste, and ultimately, save money. It’s like spring cleaning for your restaurant’s stomach, and believe me, it’ll feel so much better afterwards. A clean slate, a fresh start. Who doesn’t love that?
3. Zone Defense: Mapping Your Walk-In for Victory
Now that your walk-in is sparkling clean and free of ancient relics, it’s time to think strategically about where everything will live. This is where creating designated zones comes into play. Think of your walk-in like a tiny, chilly city. Each neighborhood (zone) has its purpose. This isn’t just about making things look neat; it’s fundamentally about food safety and efficiency. The golden rule? Raw meats, poultry, and seafood should always be stored on the lowest shelves. Why? To prevent their juices from dripping onto and contaminating other foods, especially ready-to-eat items. This is non-negotiable. I’ve seen some pretty scary setups in my day, and this simple rule could have prevented a lot of potential problems.
Beyond that, group similar items together. Dedicate a section for dairy, another for fresh produce (keeping in mind that some fruits and veggies don’t play well together due to ethylene gas production – a topic for another day, perhaps!), another for prepared sauces and ingredients, and so on. Think about workflow too. Items that are used frequently together or by the same station should ideally be located near each other, or at least in an easily accessible spot. If your garde manger station constantly needs specific herbs and dressings, don’t make them trek to the back of the cooler every time. This logical mapping minimizes search time, reduces the chance of errors, and makes restocking much more intuitive. You could even use color-coded bins or shelf labels to visually reinforce these zones. It’s about creating a system that’s so clear, even the newest team member can understand it with minimal training. It might take a bit of trial and error to figure out the perfect layout for your specific menu and kitchen flow. Is this the best approach? Maybe. It’s worth experimenting. What works for a bustling pizzeria might not be ideal for a fine-dining spot. The key is intentionality.
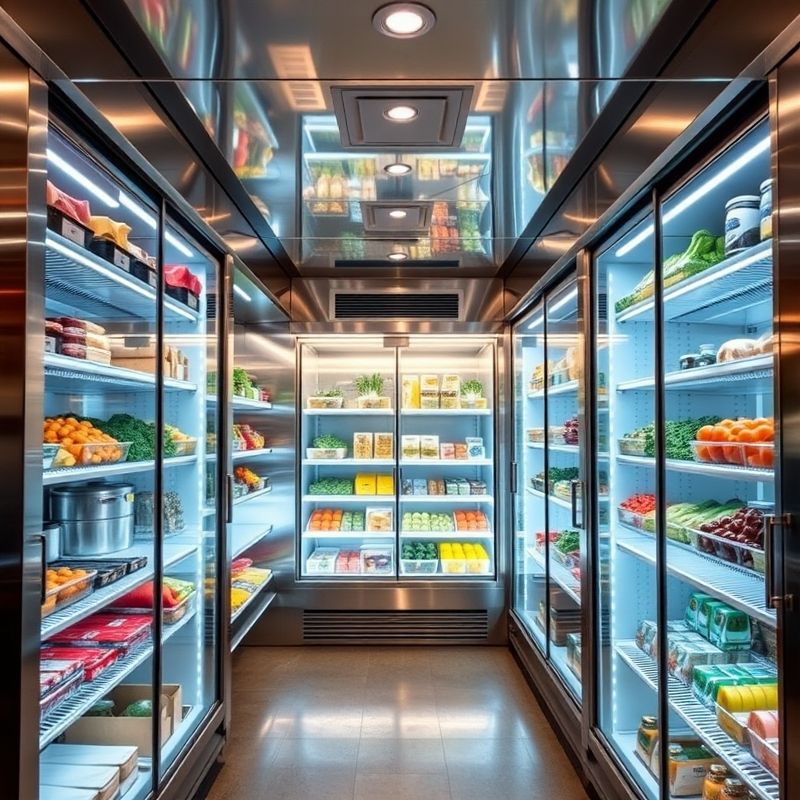
4. Shelf Smarts: Maximizing Vertical and Horizontal Space
Let’s talk shelving. It’s the unsung hero of walk-in cooler organization. The right shelving, used correctly, can dramatically increase your storage capacity and improve accessibility. First off, ensure your shelving is made of a durable, non-corrosive material like stainless steel or heavy-duty coated wire. These are easier to clean and can withstand the cold, damp environment. Avoid wooden shelves like the plague; they’re porous, hard to sanitize, and can harbor bacteria. Yikes. When arranging your shelves, think vertically. Many walk-ins have high ceilings, and not utilizing that vertical space is a missed opportunity. Adjustable shelving is fantastic because it allows you to customize shelf height to accommodate different sized containers and products, minimizing wasted space between shelves.
However, don’t just cram things in. Overcrowding shelves is a major no-no. It restricts air circulation (which we’ll talk more about soon), leading to uneven cooling and potential hot spots where bacteria can thrive. It also makes it harder to see what you have and to practice FIFO. Leave some breathing room between items and between stacks. Consider using shelf liners, especially on wire shelves, for smaller items that might fall through or to make cleaning easier. But make sure these liners are also food-safe and easily cleanable. Another tip? Don’t store anything directly on the floor. Health codes usually require items to be at least six inches off the ground. This prevents contamination from floor dirt and pests, and makes mopping a breeze. It might seem like a small detail, but these little things add up to a much safer and more efficient cooler. It’s about being clever with the space you have, not just filling it up. Are there new shelving systems out there I should know about? Probably. The industry is always innovating.
5. The FIFO Imperative: Making it Second Nature
Ah, FIFO. First-In, First-Out. It sounds simple, and it is, but its consistent implementation is absolutely paramount in any food service operation. This principle dictates that older stock should always be used before newer stock. Why is this so critical? Two main reasons: food safety and cost control. Using older products first ensures that food is consumed while it’s at its peak quality and before it has a chance to spoil or become unsafe. This directly reduces the risk of foodborne illness. From a financial perspective, FIFO minimizes waste. Every time you throw out expired product, you’re essentially throwing money in the bin. Consistent FIFO practices can significantly cut down on this type of loss, directly impacting your bottom line. It’s a fundamental part of good inventory management.
So, how do you make FIFO a reality and not just a nice idea? It starts with labeling – clearly marking all incoming products with the date they were received and/or the use-by date. When stocking shelves, new items *always* go behind the older items. Train your staff on this relentlessly. Make it a non-negotiable part of their routine. Some restaurants use a two-bin system for certain items, or color-coded date labels to make it even more visually obvious which items need to be used first. During prep, chefs and cooks should be conditioned to reach for the items at the front (the older ones). It requires discipline and constant reinforcement, especially in a busy kitchen environment where speed is often prioritized. But skipping FIFO is a false economy. The time saved by grabbing the closest item can be quickly offset by the cost of spoiled food or, far worse, a customer getting sick. It needs to become an ingrained habit, like washing hands. Is it always easy? No, especially during a crazy rush. But it’s always, always important. The consistency is key.
6. Label Like a Pro: Clarity is King (and Queen)
If FIFO is the law, then clear labeling is the constitution that upholds it. You simply cannot effectively manage your inventory or ensure food safety without a robust labeling system. Every single item in your walk-in, from bulk ingredients to prepped components, needs a label. And not just any label – a *clear*, informative one. What should be on it? At a minimum: the name of the item and the date it was received or prepped. For prepped items, a “use-by” date is also crucial. Some kitchens also include the initials of the person who prepped it, which can be useful for accountability and tracking if issues arise.
Consistency is vital. Choose a labeling format and stick to it. Whether you use handwritten labels (make sure the handwriting is legible!), a label maker, or pre-printed labels with fill-in-the-blank sections, ensure everyone on the team knows the system and uses it correctly. Store labels and markers in an easily accessible spot, ideally right near the walk-in or in the prep area. Consider using waterproof labels and markers, as condensation can be an issue in coolers. Color-coding can be your friend here too. For example, you could use different colored labels for different days of the week for prepped items, making it visually easy to see what needs to be used first. Think about the information density. Too much info can be overwhelming, too little is useless. It’s a balance. The goal is for anyone to be able to look at an item and immediately understand what it is and its status. No more mystery containers! No more sniffing something tentatively and wondering, “Is this still good?” Clear labels eliminate guesswork, reduce errors, support your FIFO efforts, and are a sign of a truly professional kitchen. It’s a small detail that speaks volumes about your operation’s commitment to quality and safety.
7. Container Power: Choosing the Right Vessels
The containers you use to store food in your walk-in are just as important as the shelves they sit on. Choosing the right storage solutions can make a huge difference in terms of organization, space utilization, and food safety. First and foremost, all containers must be food-grade. This means they are made of materials that won’t leach harmful chemicals into the food. Clear containers are generally preferable because they allow you to see the contents at a glance, reducing the need to open them (which can affect temperature and introduce contaminants) and making inventory checks faster. Polycarbonate (like Cambros) or polypropylene containers are popular choices as they are durable, clear, and often stackable.
Speaking of stacking, opt for containers that are designed to stack securely. This maximizes your shelf space, especially vertical space, and creates a more stable, organized environment. Avoid using random, mismatched containers that don’t stack well, as this can lead to unstable piles and wasted space. Lids are also critical. Ensure every container has a tight-fitting lid to protect food from contamination and to help maintain its quality and freshness. For certain items, especially liquids or those prone to spillage, make sure the lids are leak-proof. When storing raw meats, poultry, or fish, use dedicated, clearly labeled containers and, as mentioned before, always store them on the bottom shelves to prevent any drips from contaminating other foods. It’s also a good idea to avoid storing food in its original cardboard packaging if possible, as cardboard can absorb moisture, harbor bacteria, and isn’t easily cleanable. Transfer products to appropriate food-safe containers upon receipt. This might seem like an extra step, but it’s a crucial one for maintaining a hygienic walk-in.
8. Airflow is Your Ally: Don’t Block the Breeze
Your walk-in cooler works by circulating cold air to keep everything at the desired temperature. Proper air circulation is essential for its efficiency and for maintaining consistent temperatures throughout the unit. When your cooler is overpacked, or when items are pushed right up against the walls or blocking the evaporator fans, it severely impedes this airflow. This can lead to several problems. Firstly, it can create warm spots within the cooler where the temperature rises above safe levels, promoting bacterial growth. Secondly, it makes the cooling unit work harder, consuming more energy and potentially leading to premature wear and tear on the equipment. This means higher utility bills and potentially costly repairs. Not ideal.
So, how do you ensure good airflow? Leave space between stacks of containers. Don’t pack shelves so tightly that air can’t move freely around and between items. Keep products away from the walls by a few inches, and never, ever block the vents or the evaporator fan unit. These fans are what distribute the cold air, and if they’re blocked, your cooler simply won’t work effectively. It’s also a good idea to regularly check that the fan guards are clean and free of debris. Think of it like this: your cooler needs to breathe. If you suffocate it with product, it can’t do its job properly. This might mean you can’t store quite as much product as you physically could cram in there, but the trade-off in terms of food safety, product quality, and equipment longevity is well worth it. It’s about working with the system, not against it. And let’s be honest, a cooler that’s not working overtime is a happier, quieter cooler.
9. The Cleaning Crusade: Regular Rituals for a Pristine Walk-In
A clean walk-in is a safe walk-in. It’s as simple as that. Regular, thorough cleaning is non-negotiable. Spills, drips, and food debris can quickly become breeding grounds for bacteria, mold, and unpleasant odors. Establishing a consistent cleaning protocol is essential. This shouldn’t be an afterthought or something that only happens when the health inspector is due. It needs to be part of your team’s regular routine. How often? Well, spills should be cleaned up immediately, of course. Beyond that, a daily sweep or mop of the floor is a good idea. Shelves should be wiped down regularly – perhaps weekly for a general wipe-down, with a deeper clean monthly or as needed. Walls and ceilings also need attention, though perhaps less frequently.
Develop a cleaning schedule and assign responsibilities. Make sure your team has the right tools and cleaning agents – food-safe sanitizers are a must. During deeper cleans, it’s best to remove products from the shelves to ensure you can clean every surface thoroughly. Pay special attention to corners, shelf supports, and door seals, as these are areas where grime can accumulate. And don’t forget the evaporator fan coils and drip pans; these can harbor mold if not cleaned regularly (though this might be a job for maintenance professionals depending on the unit). A clean walk-in not only prevents contamination and odors but also makes it a more pleasant environment for your staff to work in. It also makes it easier to spot any potential pest issues early on. It’s an investment in food safety and the overall health of your kitchen. It’s one of those tasks that isn’t glorious, but the peace of mind it brings is invaluable. I sometimes wonder if my own fridge gets this level of attention… probably not, Luna doesn’t seem to mind though.
10. Team Training: Getting Everyone on Board the Organization Train
You can have the most perfectly designed walk-in organization system in the world, with beautiful labels and pristine shelves, but if your team isn’t on board and doesn’t follow the system, it will quickly fall apart. Consistent staff training is the glue that holds it all together. From day one, new hires should be trained on your walk-in procedures: how to properly stock items using FIFO, the zoning system, labeling requirements, cleaning protocols, and the importance of maintaining airflow. Don’t just tell them what to do; explain *why* these procedures are in place. When people understand the reasoning behind the rules (especially regarding food safety and cost control), they are much more likely to comply.
Create clear, written Standard Operating Procedures (SOPs) for walk-in organization and maintenance. Post these in an accessible location. Conduct regular refresher training sessions. Lead by example – if managers and senior chefs consistently follow the rules, it sets the tone for the rest of the team. Make walk-in checks part of the daily or weekly routine for supervisors. Gentle reminders and positive reinforcement can go a long way. Sometimes, it might be helpful to involve the team in developing or refining the system. When people have a say in how things are done, they often feel more ownership and are more invested in making it work. Is this the ultimate solution for team buy-in? Perhaps not for every single person, but it’s a solid start. The goal is to create a culture where everyone understands that a well-organized walk-in is a shared responsibility and a key contributor to the restaurant’s success. It’s not just one person’s job; it’s everyone’s. This isn’t just about rules; it’s about instilling pride in a well-run operation.
Beyond the Chill: Final Thoughts on Walk-In Wisdom
So, there you have it. A deep dive into the often-overlooked world of walk-in cooler organization. It might seem like a lot to take in, a lot of small details. And it is. But like so many things in the culinary world, and in life really, it’s the attention to these details that separates the good from the truly great. Or, in this case, the chaotic and wasteful from the efficient and safe. I challenge you to look at your walk-in not just as a cold box, but as a dynamic system, a critical hub that, when optimized, can unlock so much potential for your restaurant. Can a perfectly organized walk-in solve all your problems? Probably not. But it can sure make a heck of a lot of them smaller.
Ultimately, what does a well-organized walk-in really represent? Is it just about neat shelves and dated labels? Or does it speak to something deeper – a commitment to excellence, a respect for ingredients, a dedication to the well-being of your customers and your team? I tend to think it’s the latter. It’s a tangible manifestation of professionalism and care. Maybe I’m overthinking it, getting all philosophical about a refrigerator. But then again, sometimes the most profound insights are found in the most mundane places. What do you think? Is your walk-in ready for its close-up?
FAQ
Q: How often should I completely empty and clean my walk-in cooler?
A: While daily spot cleaning and weekly shelf wipe-downs are crucial, a full empty-and-deep-clean is often recommended quarterly or at least twice a year. However, this can depend on your volume and the types of food stored. High-volume operations or those dealing with lots of raw proteins might need to do it more frequently. Always check local health code requirements as they might have specific mandates.
Q: What’s the ideal temperature range for a restaurant walk-in cooler?
A: For general refrigeration, the ideal temperature is typically between 34°F and 40°F (1°C and 4°C). It’s critical to have a reliable thermometer inside the walk-in (preferably two, one near the door and one further back) and to check temperatures multiple times a day to ensure it’s holding steady and within the safe zone for food safety.
Q: Are there specific types of shelving you recommend for walk-in coolers?
A: Yes, NSF-certified wire shelving (like epoxy-coated or stainless steel) is generally the best choice. It’s durable, allows for good air circulation, and is easy to clean. Avoid wood or any non-sealed porous materials. Adjustable shelving is also highly recommended to maximize space and accommodate different product sizes.
Q: My staff struggles with consistently following FIFO. Any tips?
A: Consistent training and reinforcement are key. Make it visual: use clear date labels, consider color-coding for days of the week, and always stock new items behind old ones. Make it part of opening/closing checklists. Explain the ‘why’ – the impact on food cost and safety. Some kitchens even assign specific team members to oversee FIFO in particular sections. It takes time to build the habit, so be patient but persistent. Lead by example!
@article{walk-in-cooler-sanity-hacks-for-restaurant-order,
    title   = {Walk-In Cooler Sanity: Hacks For Restaurant Order},
    author  = {Chef's icon},
    year    = {2025},
    journal = {Chef's Icon},
    url     = {https://chefsicon.com/walk-in-cooler-organization-hacks-for-restaurants/}
} 
