The Best Fluffy Pancakes recipe you will fall in love with. Full of tips and tricks to help you make the best pancakes.
Why Your Commercial Kitchen’s Lighting Might Be Sabotaging Your Team (And How to Fix It)
Let me tell you about the time I walked into a high-end Nashville restaurant’s kitchen at 6 PM on a Friday. The place was packed, tickets were flying, and the line cooks were moving like a well-oiled machine, until I noticed one of them squinting at a cutting board, knife hovering over a pile of herbs like he was defusing a bomb. The problem? The overhead lights were casting shadows right where he needed clarity most. That’s when it hit me: lighting in commercial kitchens isn’t just about brightness, it’s about precision, safety, and even morale.
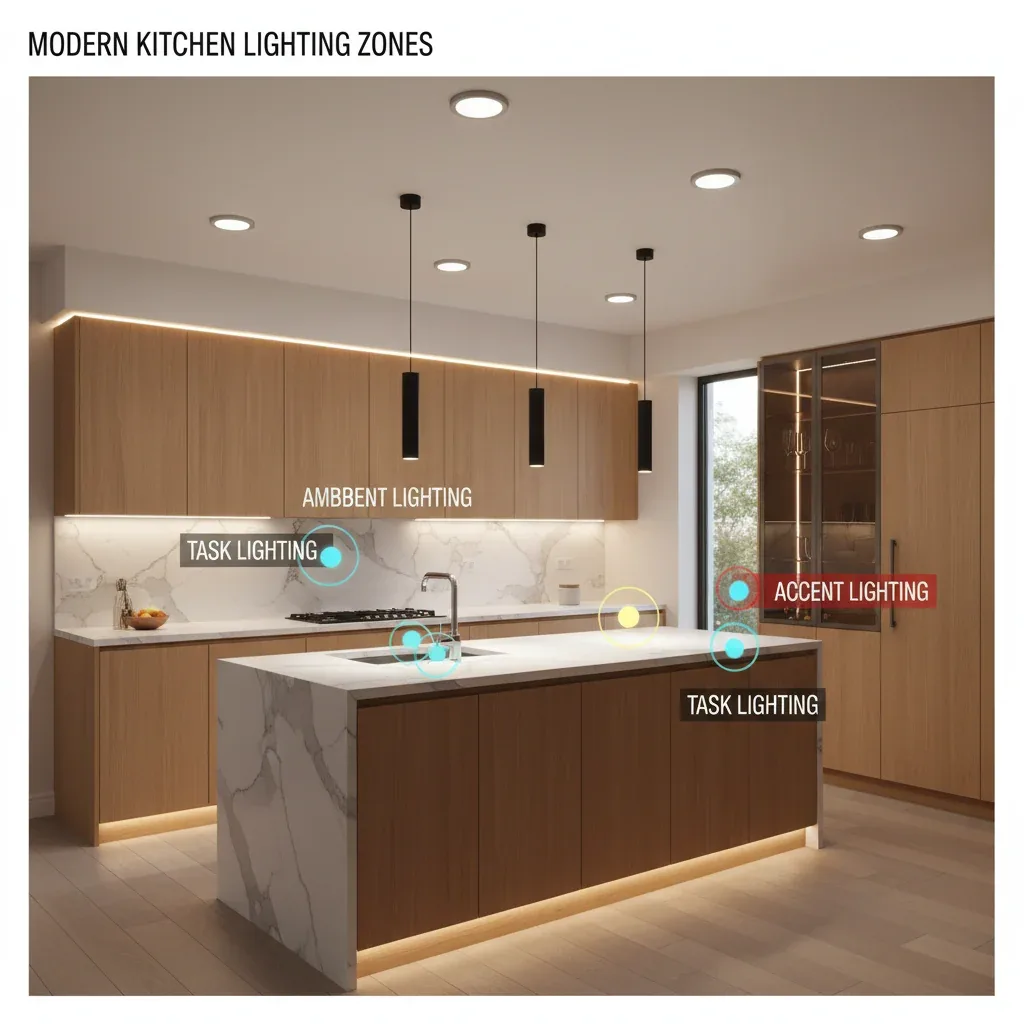
I’ve spent years writing about kitchen design, efficiency, and the little details that make or break a food service operation. And if there’s one thing I’ve learned, it’s that most people treat lighting as an afterthought. They’ll agonize over the perfect range or the most efficient walk-in cooler, but when it comes to lighting, they slap up some fluorescents and call it a day. Big mistake. Task lighting vs. ambient lighting in commercial kitchens isn’t just a design choice, it’s a functional necessity. Get it wrong, and you’re looking at slower service, more mistakes, and even safety hazards. Get it right, and you’ll see a kitchen that hums along like a symphony.
In this deep dive, we’re going to break down the differences between task lighting and ambient lighting, why both matter, and how to strike the perfect balance in your commercial kitchen. We’ll talk about real-world applications, the science behind lighting (yes, there’s science), and even some common pitfalls I’ve seen in kitchens from Nashville to San Francisco. By the end, you’ll know exactly how to light your kitchen for maximum efficiency, safety, and, dare I say, happiness. Because let’s be real: no one wants to work in a cave, especially not when the dinner rush is in full swing.
So, grab a coffee (or a bourbon, if you’re in Nashville like me), and let’s shed some light on this topic, pun absolutely intended.
The Basics: What’s the Difference Between Task Lighting and Ambient Lighting?
Ambient Lighting: The Foundation of Your Kitchen’s Glow
Ambient lighting is the backbone of your kitchen’s lighting scheme. It’s the general illumination that fills the space, ensuring no one’s stumbling around in the dark or mistaking the salt for sugar (though, let’s be honest, that’s happened to the best of us). Think of it as the base layer-it’s not meant to highlight specific tasks but to create a uniform brightness that makes the entire kitchen functional and safe.
In most commercial kitchens, ambient lighting comes from overhead fixtures like recessed lights, troffers, or even high-bay LEDs. These are typically installed in the ceiling and spread light evenly across the space. The goal here isn’t to make the kitchen as bright as an operating room (though some health inspectors might argue otherwise), but to provide enough light so that staff can move around safely, see what they’re doing, and, crucially, avoid accidents. Ever tried carrying a pot of boiling water through a dimly lit kitchen? Yeah, don’t.
But here’s where things get tricky. Ambient lighting isn’t one-size-fits-all. The ideal brightness depends on the size of your kitchen, the layout, and even the color of your walls and floors. Dark surfaces absorb light, while light-colored surfaces reflect it, which means you might need more (or fewer) fixtures depending on your kitchen’s aesthetic. And let’s not forget about color temperature-measured in Kelvins (K)-which affects how “warm” or “cool” the light appears. More on that later, because it’s a rabbit hole worth diving into.
Is ambient lighting enough on its own? In a word: no. That’s where task lighting comes in.
Task Lighting: The Spotlight for Precision Work
If ambient lighting is the foundation, task lighting is the laser focus. It’s the directed illumination that ensures your chefs can see what they’re doing when precision matters most, whether that’s chopping onions, plating a delicate dessert, or checking the doneness of a steak. Task lighting is all about reducing shadows, improving visibility, and minimizing eye strain, especially in areas where fine motor skills are required.
In a commercial kitchen, task lighting is typically installed in specific work zones: under cabinets, above prep stations, near cooking lines, or even inside refrigerators and storage areas. The most common types of task lighting include undercabinet LEDs, pendant lights, track lighting, and adjustable spotlights. These fixtures are designed to be bright but focused, casting light exactly where it’s needed without creating glare or harsh shadows.
Here’s the thing about task lighting: it’s not just about brightness, it’s about placement and control. A poorly placed task light can be worse than no light at all. For example, if you install undercabinet lights too far back, they’ll cast shadows right where your chef’s hands are working. Too far forward, and they’ll create glare on the countertop. And if the light is too harsh or too dim, it can cause eye strain, which, let’s face it, is the last thing your team needs during a 12-hour shift.
So, which one is more important? Ambient or task lighting? The answer, as with most things in life, is it depends. But here’s my hot take: you need both, and you need them to work together seamlessly. A kitchen with only ambient lighting is like a painter trying to work with a single broad brush, it’s functional, but it lacks precision. A kitchen with only task lighting is like trying to read a book with a flashlight, it’s focused, but exhausting. The magic happens when you combine the two.
The Science Behind Lighting: Why It Matters More Than You Think
Lumens, Lux, and Kelvins: The Numbers That Define Your Kitchen’s Light
Let’s geek out for a minute. If you’ve ever shopped for light bulbs, you’ve probably seen terms like lumens, lux, and Kelvins thrown around. But what do they actually mean, and why should you care? Because, my friend, these numbers are the difference between a kitchen that feels like a dungeon and one that feels like a well-oiled machine.
First up: lumens. This is the measure of how much light a bulb produces. The higher the lumens, the brighter the light. For ambient lighting in a commercial kitchen, you’re typically looking at 5,000 to 10,000 lumens per fixture, depending on the size of the space. Task lighting, on the other hand, might range from 500 to 2,000 lumens per fixture, since it’s more focused. But here’s the catch: more lumens doesn’t always mean better. Too much light can create glare, which is just as bad as not enough light.
Next: lux. This is the measure of how much light actually hits a surface. Think of it as lumens per square meter. For example, a kitchen prep area might need 500 lux to be functional, while a dishwashing station might only need 200 lux. The key here is uniformity-you don’t want some areas to be brightly lit while others are dim, because that creates visual fatigue and can lead to mistakes. Ever tried reading a menu in a dimly lit restaurant? It’s annoying, right? Now imagine doing that while trying to julienne a carrot at warp speed. Not ideal.
Finally: Kelvins (K). This is where things get interesting. Kelvins measure the color temperature of light, which affects how “warm” or “cool” it appears. Lower Kelvin numbers (2,700K–3,000K) produce a warm, yellowish light, similar to incandescent bulbs. Higher Kelvin numbers (4,000K–6,500K) produce a cool, bluish light, which is closer to daylight. So, which one should you choose for your kitchen?
Here’s where I’m torn. Cool light (4,000K–5,000K) is generally recommended for commercial kitchens because it mimics natural daylight, which is easier on the eyes and makes it easier to see true colors (important for food prep and plating). But, and this is a big but-warm light (2,700K–3,000K) can create a more inviting atmosphere, which might be nice in open kitchens or chef’s tables where guests can see the action. The problem with warm light is that it can make it harder to spot imperfections in food or judge doneness. So, what’s the solution? Maybe a mix of both? Or maybe stick with cool light for task areas and warm light for ambient? I’m still figuring this one out, to be honest.
The Psychology of Light: How It Affects Your Team’s Performance
Lighting doesn’t just affect what your team can see, it affects how they feel. And in a high-stress environment like a commercial kitchen, that’s a big deal. Studies have shown that poor lighting can lead to increased fatigue, reduced productivity, and even higher rates of accidents. On the flip side, good lighting can improve mood, focus, and efficiency. So, if you’re still using those flickering fluorescent tubes from the ‘90s, it might be time for an upgrade, not just for your food, but for your team’s sanity.
Let’s talk about circadian rhythms. These are the natural cycles that regulate our sleep-wake patterns, and they’re heavily influenced by light. Exposure to cool, bright light (like daylight) during the day helps keep us alert and focused. That’s why many commercial kitchens opt for 5,000K–6,500K lighting-it helps keep the team awake and energized, especially during long shifts. But here’s the catch: too much cool light, especially late at night, can disrupt sleep patterns and lead to burnout. Maybe I should clarify: it’s not just about the Kelvin number, but also about when and where the light is used. For example, you might want brighter, cooler light during prep and service, but dimmer, warmer light during cleanup or late-night shifts.
Then there’s the issue of glare. Glare is the enemy of productivity. It causes eye strain, headaches, and, let’s be real, irritability. And in a kitchen, glare can come from all sorts of places: shiny countertops, stainless steel appliances, even the surface of a pot of soup. The solution? Diffused lighting. This means using fixtures that spread light evenly, rather than concentrating it in one spot. Think of it like the difference between a spotlight and a softbox in photography. One is harsh and direct; the other is soft and flattering. Your kitchen should be the latter.
Finally, let’s talk about color rendering. The Color Rendering Index (CRI) measures how accurately a light source reveals the true colors of objects. A CRI of 100 means the light is identical to natural daylight, while a CRI of 80 or below means colors will look distorted. In a kitchen, where you’re dealing with food, this matters, a lot. Imagine trying to judge the ripeness of a tomato under a light with a low CRI. It’s like trying to paint a portrait in the dark. For commercial kitchens, you’ll want a CRI of 80 or higher, with 90+ being ideal for areas where color accuracy is critical (like plating or pastry).
Real-World Applications: Where Task Lighting and Ambient Lighting Collide
The Prep Station: Where Precision Meets Speed
Let’s start with one of the most critical areas in any commercial kitchen: the prep station. This is where your team chops, slices, dices, and measures, often at lightning speed. It’s also where task lighting is non-negotiable. A poorly lit prep station is a recipe for disaster (pun intended). Knives slip, fingers get nicked, and ingredients get mismeasured. Not to mention, it slows everything down. Ever tried julienning a carrot in dim light? It’s like trying to thread a needle while riding a rollercoaster.
So, what’s the best way to light a prep station? Undercabinet LEDs are the gold standard. They’re bright, energy-efficient, and, when installed correctly, cast light directly onto the cutting board without creating shadows. But here’s the thing: not all undercabinet lights are created equal. You’ll want to look for high-CRI LEDs (90+) to ensure color accuracy, and adjustable brightness so your team can dial it up or down depending on the task. For example, chopping herbs might require brighter light than slicing bread, so flexibility is key.
But what about ambient lighting in the prep area? It’s still important, but it should be secondary to task lighting. The ambient light should fill in the gaps, ensuring the rest of the kitchen isn’t too dark in comparison. Think of it like a stage: the prep station is the star, and the ambient light is the supporting cast. One shouldn’t outshine the other (literally).
Here’s a pro tip: avoid placing ambient lights directly above prep stations. Why? Because they’ll cast shadows right where your team’s hands are working. Instead, position ambient lights around the perimeter of the kitchen or use indirect lighting (like cove lighting) to create a soft, even glow. And if you’re using recessed lights, make sure they’re shielded to reduce glare.
The Cooking Line: Where Heat Meets Light
The cooking line is the heart of any commercial kitchen. It’s where the magic happens, where raw ingredients are transformed into culinary masterpieces. But it’s also a high-stress, high-stakes environment, where timing is everything and mistakes can be costly. That’s why lighting here needs to be bright, focused, and heat-resistant.
First, let’s talk about heat resistance. Commercial kitchens get hot, like, *really* hot. And not all light fixtures are built to handle that kind of environment. LED fixtures are your best bet because they produce very little heat and are more durable than traditional incandescent or fluorescent bulbs. But even LEDs can degrade over time if they’re exposed to extreme temperatures, so make sure you’re using fixtures rated for high-heat environments.
Now, let’s talk about placement. The cooking line is a busy place, with chefs moving back and forth, reaching for ingredients, and monitoring multiple dishes at once. That’s why task lighting here needs to be flexible and adjustable. Pendant lights are a popular choice because they can be positioned directly over the cooking surface, casting light where it’s needed most. But they’re not the only option. Track lighting is another great choice because it allows you to direct light exactly where it’s needed, and it’s easy to adjust as your kitchen layout evolves.
But here’s where I’m torn: how bright should the cooking line be? On one hand, you want enough light to see what you’re doing, especially when dealing with open flames or hot oil. On the other hand, too much light can create glare, which is distracting and potentially dangerous. Maybe the solution is dimmable fixtures that can be adjusted based on the time of day or the specific task. For example, you might want brighter light during prep and service, but dimmer light during cleanup. Or maybe you stick with a consistent brightness and rely on diffusers to soften the light. I’m still figuring this one out, but I’d love to hear your thoughts.
And let’s not forget about ambient lighting on the cooking line. While task lighting is critical, ambient light still plays a role. It helps create a cohesive lighting scheme that makes the kitchen feel like one unified space, rather than a collection of disjointed work zones. Plus, it ensures that chefs can see what’s happening around them, which is important for safety and efficiency. Just make sure the ambient light isn’t too bright, you don’t want it to compete with the task lighting.
The Dishwashing Station: Where Lighting Gets Overlooked
Let’s be real: the dishwashing station is the unsung hero of any commercial kitchen. It’s where the dirty work happens, literally. And yet, it’s often the most poorly lit area in the kitchen. Why? Because it’s not as glamorous as the cooking line or the prep station. But here’s the thing: a poorly lit dishwashing station is a safety hazard. Slippery floors, sharp knives, and broken glass are already risks, add dim lighting to the mix, and you’ve got a recipe for disaster.
So, what’s the best way to light a dishwashing station? Task lighting is key. You’ll want bright, focused light that illuminates the sink, the drying racks, and the surrounding area. Undercabinet LEDs or pendant lights are great options here, as long as they’re positioned to avoid casting shadows. And because dishwashing stations are often wet, you’ll want waterproof fixtures to prevent electrical hazards.
But ambient lighting is still important. It ensures that the dishwashing station doesn’t feel like an afterthought, and it helps create a smooth transition between the dish area and the rest of the kitchen. Just make sure the ambient light isn’t too bright, you don’t want it to create glare on wet surfaces, which can be blinding.
Here’s a pro tip: use motion-activated lighting in the dishwashing area. This ensures that the lights are only on when someone is actually using the station, which saves energy and reduces eye strain. Plus, it’s a nice touch for late-night cleanup crews who might not want to fumble for a light switch in the dark.
The Walk-In Cooler: Where Lighting Gets Cold (Literally)
Walk-in coolers are one of the most overlooked areas when it comes to lighting. And yet, they’re one of the most important. Why? Because a poorly lit walk-in is a safety hazard. Slips, falls, and even food spoilage can happen if your team can’t see what they’re doing. Plus, let’s be honest: no one wants to step into a dark, cavernous cooler to grab a tub of butter. It’s like something out of a horror movie.
So, what’s the best way to light a walk-in cooler? Bright, even lighting is key. You’ll want LED fixtures because they’re energy-efficient and produce very little heat (which is important in a cold environment). But not all LEDs are created equal. Look for fixtures with a high CRI (90+) to ensure color accuracy, and waterproof ratings to handle the moisture and condensation that’s common in coolers.
But here’s where things get tricky: walk-in coolers are tight spaces, which means you need to be strategic about placement. Overhead fixtures are a good start, but they can cast shadows if they’re not positioned correctly. Strip lighting along the walls or shelves is another great option because it provides even illumination without taking up too much space. And if you really want to get fancy, motion-activated lights are a game-changer. They ensure the lights are only on when someone is in the cooler, which saves energy and reduces wear and tear on the fixtures.
And let’s not forget about ambient lighting in the walk-in. While task lighting is important, you’ll still want some ambient light to create a uniform brightness that makes the space feel less like a dungeon and more like a functional part of the kitchen. Just make sure the ambient light isn’t too bright, you don’t want it to compete with the task lighting or create glare on reflective surfaces.
Common Mistakes (And How to Avoid Them)
Mistake #1: Relying Too Much on Ambient Lighting
I get it: ambient lighting is easy. You slap up some overhead fixtures, flip a switch, and call it a day. But here’s the problem: ambient lighting alone isn’t enough. It’s like trying to read a book with a single lamp in the corner of the room, it’s functional, but it’s not ideal. In a commercial kitchen, where precision is everything, you need focused, task-specific lighting to ensure your team can see what they’re doing.
So, how do you avoid this mistake? Layer your lighting. Start with a solid foundation of ambient light, then add task lighting in key areas like prep stations, cooking lines, and dishwashing stations. And don’t forget about accent lighting-like undercabinet LEDs or pendant lights, to highlight specific work zones. The goal is to create a balanced lighting scheme that makes the kitchen functional, safe, and visually appealing.
Mistake #2: Ignoring Color Temperature
Color temperature is one of those things that seems minor until it’s not. Too warm, and your kitchen feels like a cozy living room (not ideal for food prep). Too cool, and it feels like a sterile operating room (also not ideal). The sweet spot? 4,000K–5,000K, which mimics natural daylight and makes it easier to see true colors.
But here’s where things get tricky: not all areas of the kitchen need the same color temperature. For example, you might want cooler light (5,000K) in the prep area for maximum visibility, but warmer light (3,000K) in the dining area to create a more inviting atmosphere. The key is to match the color temperature to the task. And if you’re not sure, stick with 4,000K–5,000K-it’s the safest bet for most commercial kitchens.
Mistake #3: Forgetting About Glare
Glare is the silent killer of productivity. It causes eye strain, headaches, and, let’s be real, irritability. And in a commercial kitchen, glare can come from all sorts of places: shiny countertops, stainless steel appliances, even the surface of a pot of soup. The solution? Diffused lighting. This means using fixtures that spread light evenly, rather than concentrating it in one spot. Think of it like the difference between a spotlight and a softbox in photography. One is harsh and direct; the other is soft and flattering. Your kitchen should be the latter.
So, how do you reduce glare? Use fixtures with diffusers or shields to soften the light. Avoid placing lights directly above reflective surfaces, like stainless steel countertops or appliances. And position task lights at an angle so they don’t cast shadows or create hotspots. It’s all about controlling the light so it works for you, not against you.
Mistake #4: Skimping on Quality
Let’s be honest: lighting fixtures aren’t the most exciting part of kitchen design. They’re not as flashy as a new range or as Instagram-worthy as a custom hood. But here’s the thing: cheap lighting is a false economy. It might save you money upfront, but it’ll cost you in the long run, whether that’s through higher energy bills, frequent replacements, or even safety hazards.
So, what should you look for in quality lighting fixtures? Energy efficiency is a big one. LED fixtures are the gold standard because they use less energy, last longer, and produce less heat than traditional bulbs. Durability is another key factor, especially in a commercial kitchen, where fixtures are exposed to heat, moisture, and the occasional flying utensil. Look for fixtures with high IP ratings (which measure resistance to dust and water) and heat-resistant materials. And don’t forget about warranties. A good warranty can save you a lot of headaches (and money) down the road.
Mistake #5: Not Planning for the Future
Kitchens evolve. Menus change. Staff comes and goes. And if your lighting isn’t flexible, you’ll be stuck with a system that doesn’t meet your needs. That’s why it’s important to plan for the future when designing your lighting scheme. Dimmable fixtures are a great place to start because they allow you to adjust the brightness based on the time of day or the specific task. Adjustable task lighting (like track lighting or pendant lights) is another smart choice because it can be repositioned as your kitchen layout changes. And smart lighting systems-which allow you to control the lights via an app or voice commands, are becoming more popular in commercial kitchens. They might seem like overkill now, but they could be a game-changer down the road.
Putting It All Together: How to Design the Perfect Lighting Scheme for Your Kitchen
Step 1: Assess Your Needs
Before you start buying fixtures, take a step back and assess your kitchen’s needs. What are the most critical work zones? Where do your team members spend the most time? What tasks require the most precision? For example, if you’re running a bakery, your prep station might need brighter, more focused light than a standard restaurant kitchen. If you’re running a sushi bar, you’ll want high-CRI lighting to ensure color accuracy. And if you’re running a high-volume kitchen, you’ll need durable, heat-resistant fixtures that can stand up to the demands of service.
Here’s a quick checklist to get you started:
- Identify the most critical work zones (prep, cooking, dishwashing, etc.).
- Determine the lighting requirements for each zone (lumens, lux, CRI, etc.).
- Consider the layout of your kitchen-where are the shadows? Where is the glare?
- Think about future needs-will your menu or staffing change in the next few years?
Step 2: Choose the Right Fixtures
Once you’ve assessed your needs, it’s time to choose the right fixtures. This is where things can get overwhelming, because there are *so* many options out there. But don’t worry, we’ll break it down.
For ambient lighting, you’ll want fixtures that provide even, uniform illumination. Recessed lights, troffers, and high-bay LEDs are all great options. Look for fixtures with a high lumen output (5,000–10,000 lumens) and adjustable color temperature (4,000K–5,000K). And don’t forget about diffusers or shields to reduce glare.
For task lighting, you’ll want fixtures that provide focused, adjustable illumination. Undercabinet LEDs, pendant lights, and track lighting are all popular choices. Look for fixtures with a high CRI (90+) to ensure color accuracy, and dimmable options so your team can adjust the brightness based on the task. And if you’re lighting a high-heat area (like the cooking line), make sure the fixtures are heat-resistant.
Here’s a pro tip: don’t forget about accent lighting. Accent lighting, like undercabinet LEDs or cove lighting, can add depth and dimension to your kitchen, making it feel more inviting and less like a fluorescent-lit dungeon. Plus, it’s a great way to highlight specific work zones or architectural features.
Step 3: Position the Fixtures Strategically
Now that you’ve chosen your fixtures, it’s time to position them strategically. This is where the rubber meets the road, because even the best fixtures won’t do you any good if they’re not placed correctly.
For ambient lighting, the goal is to spread light evenly across the entire kitchen. This means positioning fixtures around the perimeter of the space and using indirect lighting (like cove lighting) to create a soft, even glow. Avoid placing ambient lights directly above work zones, as they can cast shadows right where your team’s hands are working.
For task lighting, the goal is to cast light exactly where it’s needed. This means positioning fixtures directly above or in front of work surfaces, like cutting boards, stovetops, or sinks. And because task lighting is often adjustable, you’ll want to test different positions to see what works best for your team. For example, undercabinet LEDs should be installed close to the front edge of the cabinet to avoid casting shadows. Pendant lights should be positioned at eye level to reduce glare.
Here’s where I’m torn: how do you balance task lighting and ambient lighting? On one hand, you want the task lighting to be bright and focused. On the other hand, you don’t want it to create harsh contrasts with the ambient lighting. Maybe the solution is to use dimmable fixtures for both, so you can adjust the brightness based on the time of day or the specific task. Or maybe you stick with a consistent brightness and rely on diffusers to soften the light. I’m still figuring this one out, but I’d love to hear your thoughts.
Step 4: Test and Adjust
Once your lighting is installed, it’s time to test and adjust. This is where you’ll find out if your lighting scheme is working, or if it needs some tweaks. Here’s what to look for:
- Shadows: Are there any dark spots where your team is working?
- Glare: Is the light too harsh or reflective in certain areas?
- Color accuracy: Can your team see true colors, or does the light distort them?
- Brightness: Is the light too bright or too dim for the task at hand?
Don’t be afraid to make adjustments. Lighting is an iterative process, what works on paper might not work in practice. And don’t forget to ask your team for feedback. They’re the ones using the kitchen day in and day out, so their input is invaluable. For example, you might find that the undercabinet LEDs in the prep area are too bright, or that the pendant lights over the cooking line are casting shadows. Small tweaks can make a big difference.
Step 5: Maintain Your Lighting System
Finally, don’t forget to maintain your lighting system. This means regularly cleaning fixtures to remove dust and grease (which can reduce light output), replacing bulbs as needed, and checking for any electrical issues. It’s also a good idea to reassess your lighting scheme every few years to make sure it’s still meeting your needs. Kitchens evolve, and your lighting should evolve with them.
Here’s a pro tip: keep a spare set of bulbs on hand. Nothing’s worse than a burnt-out bulb in the middle of service. And if you’re using smart lighting systems, make sure your team knows how to use them. The last thing you want is for a chef to accidentally turn off the lights because they don’t know how to adjust the settings.
The Bottom Line: Lighting Is More Than Just a Switch
At the end of the day, lighting in a commercial kitchen is about more than just flipping a switch. It’s about precision, safety, and efficiency. It’s about creating a space where your team can do their best work, without squinting, straining, or stumbling around in the dark. And it’s about balancing form and function to create a kitchen that’s as beautiful as it is practical.
So, where do you go from here? Start by assessing your kitchen’s needs. Identify the most critical work zones, determine the lighting requirements for each, and choose the right fixtures. Then, position them strategically, test and adjust, and don’t forget to maintain your system. It’s a process, but it’s worth it, because when your lighting is right, everything else falls into place.
And if you’re still not sure where to start, ask for help. Lighting designers, kitchen consultants, and even your local electrical supply store can offer valuable insights. Because at the end of the day, the best kitchens are the ones where the details matter. And lighting? It’s one of the most important details of all.
FAQ
Q: What’s the ideal color temperature for a commercial kitchen?
A: The ideal color temperature for most commercial kitchens is 4,000K–5,000K, which mimics natural daylight and makes it easier to see true colors. However, some areas, like open kitchens or chef’s tables, might benefit from warmer light (2,700K–3,000K) to create a more inviting atmosphere. The key is to match the color temperature to the task and the overall aesthetic of your kitchen.
Q: How do I reduce glare in my commercial kitchen?
A: Glare can be reduced by using diffused lighting fixtures, avoiding placing lights directly above reflective surfaces (like stainless steel countertops), and positioning task lights at an angle. Shields or diffusers can also help soften the light and reduce glare. And if you’re using recessed lights, make sure they’re shielded to prevent direct glare.
Q: What’s the difference between lumens and lux?
A: Lumens measure the total amount of light produced by a bulb, while lux measures how much light actually hits a surface. For example, a bulb might produce 1,000 lumens, but if it’s spread over a large area, the lux (light intensity) will be lower. In a commercial kitchen, you’ll want to pay attention to both-lumens for brightness and lux for light distribution.
Q: How often should I replace the bulbs in my commercial kitchen?
A: The lifespan of a bulb depends on the type of fixture and how often it’s used. LED bulbs typically last 25,000–50,000 hours, which means they might only need to be replaced every 5–10 years in a commercial kitchen. However, it’s a good idea to check your fixtures regularly for signs of wear or reduced light output. And if you’re using fluorescent or incandescent bulbs, you’ll need to replace them more frequently, usually every 1–2 years.
@article{task-lighting-vs-ambient-lighting-in-commercial-kitchens-the-battle-for-clarity-safety-and-efficiency,
    title   = {Task Lighting vs. Ambient Lighting in Commercial Kitchens: The Battle for Clarity, Safety, and Efficiency},
    author  = {Chef's icon},
    year    = {2026},
    journal = {Chef's Icon},
    url     = {https://chefsicon.com/task-lighting-vs-ambient-lighting-commercial-kitchens/}
}