The Best Fluffy Pancakes recipe you will fall in love with. Full of tips and tricks to help you make the best pancakes.
Small Kitchen Layout Optimization for Restaurants: How to Turn Tight Spaces Into Powerhouse Workflows
I’ll never forget the first time I stepped into a tiny restaurant kitchen in East Nashville. It was a 300-square-foot shoebox tucked behind a bustling ramen shop, and the owner, let’s call him Marco, was sweating bullets. “We’re turning away catering gigs,” he told me, “because we can’t prep two orders at once without someone getting burned.” That kitchen had everything: a six-burner range, a reach-in fridge, and a prep table that doubled as a landing zone for tickets. But the flow? It was a disaster. Cooks were playing Tetris with sheet pans, and the expo station was wedged between the handwashing sink and the walk-in door. I left that day thinking: *This isn’t just about space, it’s about survival.*
Fast forward to today, and I’ve toured dozens of small restaurant kitchens, from food trucks to Michelin-starred pop-ups. The one thing they all have in common? The best ones don’t just *fit* their equipment; they *orchestrate* it. Small kitchen layout optimization isn’t about cramming more stuff into less space. It’s about designing a system where every movement, every tool, and every inch of countertop serves a purpose. And here’s the kicker: the most efficient kitchens I’ve seen often *look* messy at first glance. Why? Because they’re built for *human* workflows, not Instagram aesthetics.
In this guide, I’m going to walk you through the exact strategies I’ve seen work in real-world small kitchens, plus a few hard lessons from the ones that didn’t. We’ll cover everything from the golden triangle rule (spoiler: it’s not just for home kitchens) to vertical storage hacks that free up floor space. You’ll learn how to:
- Map your kitchen’s bottlenecks before buying a single piece of equipment
- Choose multi-functional tools that replace three single-use gadgets
- Design flexible zones that adapt to your menu (not the other way around)
- Avoid the top 5 layout mistakes that kill efficiency in small kitchens
- Use psychological tricks to make tight spaces *feel* bigger (yes, really)
Is this the *perfect* guide? Probably not. I’m still learning, too, like the time I convinced a client to install a wall-mounted knife rack, only to realize it blocked the fire extinguisher. (Oops.) But if you’re running a restaurant with a kitchen smaller than 800 square feet, or you’re dreaming of opening one, this is the stuff no one tells you until it’s too late. Let’s dive in.
The Psychology of Small Kitchens: Why Your Brain Hates Tight Spaces (And How to Trick It)
Before we talk about equipment or workflows, let’s address the elephant in the room: small kitchens feel claustrophobic. And that’s not just an aesthetic problem, it’s a *productivity* problem. Studies on workplace design show that cramped spaces increase stress, reduce creativity, and even slow down reaction times. In a kitchen, that translates to more mistakes, slower service, and a team that’s one ticket rush away from mutiny.
But here’s the thing: your perception of space is malleable. I’ve seen kitchens half the size of Marco’s feel twice as big because the owners understood a few key psychological principles. Let’s break them down:
The 3-Second Rule for Visual Clutter
Humans subconsciously judge the size of a space within three seconds of entering it. If your eyes land on clutter, stacks of boxes, tangled cords, or equipment shoved into corners, your brain registers the space as *smaller* than it actually is. This is why open shelving (when done right) can make a kitchen feel more spacious than closed cabinets. It’s not about hiding stuff; it’s about *curating* what’s visible.
Take the tiny kitchen at *Biscuit Love* in Nashville. When they first opened, their prep area was a maze of cutting boards and ingredient bins. After a redesign, they switched to wall-mounted magnetic strips for knives and clear, labeled bins for dry goods. The result? The space *looked* cleaner, even though they were storing the same amount of stuff. The lesson: If it’s not in use, it shouldn’t be in view.
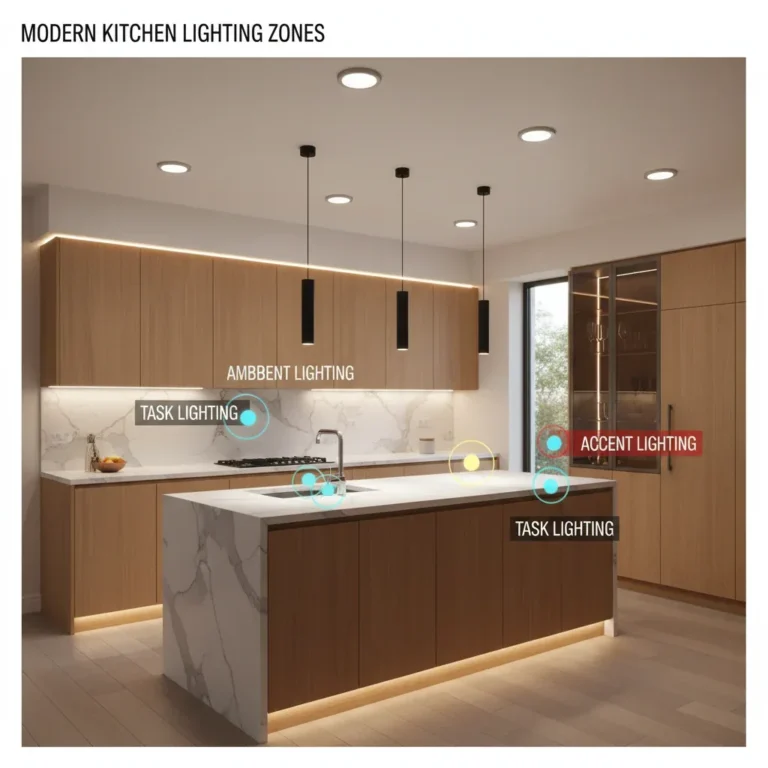
Lighting: The Invisible Space Expander
Ever notice how fast-food chains use bright, even lighting? It’s not just for food safety, it’s a psychological hack to make spaces feel larger. In small kitchens, lighting is your secret weapon. Here’s how to use it:
- Layer your lights: Combine overhead LED panels with under-cabinet task lighting. The contrast creates depth.
- Avoid shadows: Position lights so they don’t cast dark corners. A single bulb in the center of the room will make the edges feel like a cave.
- Use cool tones: Warm lighting (2700K–3000K) feels cozy but can make a space feel smaller. Cool tones (4000K–5000K) create the illusion of more room.
Pro tip: If you can’t rewire your kitchen, battery-powered puck lights under shelves or inside cabinets are a cheap fix. I’ve seen them add *perceived* square footage for under $50.
The Illusion of Movement
Here’s a weird trick: People perceive spaces as larger when there’s a sense of movement. In a kitchen, that means designing pathways that aren’t straight lines. Sounds counterintuitive, right? But think about it, when you’re walking in a straight line from the fridge to the stove, your brain focuses on the *distance*. If the path curves slightly (even just a few degrees), your eyes scan the room, making it feel more dynamic.
How to apply this:
- Angle your prep tables slightly (10–15 degrees) instead of lining them up against walls.
- Use round or oval tables instead of rectangular ones. They create natural flow.
- Avoid dead-end corners. If you have a nook, turn it into a rotating station (e.g., a bartender’s well or a dessert prep area).
Is this the most efficient layout? Maybe not on paper. But if it makes your team *feel* like they have more room, they’ll move faster, and that’s what matters.
The Golden Triangle (And Why It’s Not Enough for Restaurants)
If you’ve read anything about kitchen design, you’ve heard of the golden triangle: the idea that your fridge, stove, and sink should form a triangle to minimize steps. It’s a great starting point for home kitchens, but in a restaurant? It’s like using training wheels on a motorcycle. Here’s why:
- Restaurants have more than three work zones. Where does the expo station go? The dish pit? The walk-in?
- The triangle assumes one cook. In a restaurant, you’ve got a team moving in multiple directions at once.
- It ignores vertical space. In a small kitchen, the *air* above your head is prime real estate.
So what’s the restaurant version of the golden triangle? I call it the workflow web. Instead of three points, you’re mapping *all* the key interactions in your kitchen. Here’s how to do it:
Step 1: Map Your Menu’s “Hot Paths”
Every dish on your menu has a hot path: the sequence of steps that happen *most frequently* and *under the most pressure*. For a pizzeria, it might be:
- Grab dough from the walk-in
- Roll it out on the prep table
- Add sauce from the speed rack
- Toppings from the reach-in
- Into the oven
- Cut on the expo table
For a sushi bar, it’s different:
- Grab fish from the sushi fridge
- Rice from the rice cooker
- Nori from the dry storage
- Assemble on the cutting board
- Plate and garnish
Your first job is to draw these paths on paper. Use different colors for different dishes. Where do they overlap? Where do they cross? Those are your bottlenecks.
Step 2: The 5-Foot Rule
In a small kitchen, no two frequently used stations should be more than 5 feet apart. Why 5 feet? Because that’s the average distance a cook can reach without taking a full step. If your prep table is 8 feet from your stove, your cooks are wasting thousands of steps per shift.
Here’s how to apply it:
- Group related tasks together. Example: Keep your sauté station (range, tongs, oil, salt) within arm’s reach of your prep area (cutting boards, knives, mise en place).
- Use mobile stations for flexible spacing. A rolling prep cart can bridge the gap between the walk-in and the line.
- Avoid ”dead zones”-spaces that aren’t part of any hot path. If there’s a corner no one uses, it’s wasted space.
Step 3: The Overlap Test
Here’s a quick way to test your layout: Have two cooks simulate a rush. One person is on the line, the other is prepping. If they’re bumping into each other at any point, your layout is failing. The best small kitchens I’ve seen have overlapping zones-areas where multiple tasks can happen at once *without* collision.
Example: A wall-mounted magnetic knife strip above the prep table lets the prep cook grab a knife while the line cook reaches for a pan below. No bumping, no wasted steps.
Equipment That Pulls Double (or Triple) Duty
In a small kitchen, every piece of equipment should earn its rent. That means no single-use gadgets, no “nice-to-have” tools, and definitely no equipment that only gets used once a week. Here’s how to choose gear that works as hard as you do:
The Multi-Functional Workhorse: The Combi Oven
If I could only recommend *one* piece of equipment for a small kitchen, it’d be a combi oven. Why? Because it replaces:
- A convection oven
- A steamer
- A proofing cabinet
- A holding cabinet
- A dehydrator (in some models)
I know what you’re thinking: “But Sammy, those things are expensive!” And you’re right, they start around $5,000. But let’s do the math:
- A stand-alone convection oven: $2,000
- A steamer: $1,500
- A proofing cabinet: $1,200
- A holding cabinet: $1,000
That’s $5,700 for *four* pieces of equipment that take up 12–16 square feet of floor space. A combi oven? 3–4 square feet. And it does *more*.
Pro tip: If a combi oven is out of budget, look for a convection oven with a steam injection system. It won’t be as versatile, but it’ll get you 80% of the way there.
The Underrated Hero: The Tilting Skillet
I’ll admit it, I ignored tilting skillets for years. They looked like overgrown griddles, and I assumed they were only for institutional kitchens. Then I saw one in action at a 200-square-foot food truck in Austin. The owner used it to:
- Sauté vegetables
- Braise short ribs
- Steam rice
- Poach eggs
- Even bake cookies (yes, really)
It replaced a range, a griddle, a steam table, and a stock pot. And because it tilts, it’s easier to clean than a traditional range. If you’re tight on space, this is the Swiss Army knife of kitchen equipment.
Storage Hacks That Free Up Floor Space
In a small kitchen, vertical space is your best friend. Here’s how to use it:
- Wall-mounted pot racks: Hang them above the line to free up cabinet space. Just make sure they’re not in the way of the hood.
- Magnetic knife strips: Install them on the wall or under shelves. No more digging through drawers for the right blade.
- Pegboard walls: Customize them with hooks and shelves for utensils, pans, and even spices. The best part? You can rearrange them as your needs change.
- Overhead shelving: Use them for dry goods, backup equipment, or even hanging herbs (if they’re out of the way of the hood).
One caveat: Don’t block your fire suppression system. I’ve seen kitchens fail health inspections because a shelf was mounted too close to the hood. Always check local codes before installing anything.
The Top 5 Layout Mistakes That Kill Efficiency (And How to Fix Them)
I’ve made (or seen) all of these mistakes. Some of them cost me clients. Others cost me *sleep*. Here’s what to avoid, and how to fix it if you’ve already messed up:
Mistake #1: The “One-Way” Kitchen
This is the most common mistake in small kitchens: designing a layout where cooks have to walk in a single direction to complete a task. Example: The walk-in is at the back, the prep table is in the middle, and the line is at the front. To get from the walk-in to the line, you have to pass the prep table-twice.
Fix: Design a loop. The walk-in, prep area, and line should form a circle (or a figure-eight) so cooks can move in one direction without backtracking. If you can’t rearrange the whole kitchen, add a secondary path-even if it’s just a narrow aisle behind the prep table.
Mistake #2: Ignoring the “Dirty” Workflow
Most kitchen layouts focus on the cooking side of things, but the cleaning side is just as important. If your dish pit is on the opposite side of the kitchen from the line, your cooks are walking dirty dishes *across* the prep area. That’s a recipe for cross-contamination, and slow service.
Fix: Place the dish pit near the expo station so finished plates can go straight to the sink. If space is tight, use a rolling dish cart to transport dirty dishes without cluttering the line.
Mistake #3: The “One-Size-Fits-All” Prep Table
A single, massive prep table might seem like a good idea, until you realize it’s being used for three different tasks at once. I’ve seen kitchens where the prep table was also the landing zone for tickets, the storage spot for backup ingredients, and the only place to stage finished dishes. Chaos.
Fix: Divide and conquer. Use a smaller prep table for active work, a wall-mounted shelf for tickets, and a rolling cart for staging. If you’re really tight on space, assign zones on the same table (e.g., the left side is for prep, the right side is for staging).
Mistake #4: Blocking the Hood
This one drives me crazy. I’ve seen kitchens where the reach-in fridge or the prep table is placed directly under the hood, blocking airflow. Not only is this a fire hazard, but it also makes the kitchen hotter and smokier-which slows down your team.
Fix: Keep at least 18 inches of clearance around the hood. If you’re tight on space, mount equipment on the wall or use under-counter fridges to free up floor space.
Mistake #5: Forgetting the “Human Factor”
Kitchens are designed by architects, but they’re used by humans. And humans are messy, tired, and sometimes lazy. If your layout requires perfect execution to work, it’s going to fail during a Saturday night rush.
Fix: Design for the worst-case scenario. Ask yourself:
- Can two cooks work side by side without bumping into each other?
- Is there a clear path to the fire extinguisher?
- Can someone drop a pan without causing a chain reaction?
- Is the most-used equipment within arm’s reach?
If the answer to any of these is “no,” your layout needs work.
Flexible Zones: How to Design a Kitchen That Adapts to Your Menu
Here’s the thing about restaurant kitchens: Your menu will change. Maybe it’s seasonal ingredients, maybe it’s a new chef with different ideas, or maybe it’s a pandemic forcing you to pivot to takeout. A small kitchen *can’t* afford to be rigid. That’s why the best layouts are built around flexible zones-areas that can serve multiple purposes depending on the day.
The 3 Types of Zones Every Small Kitchen Needs
- Fixed Zones: These are the non-negotiables, the stations that *must* stay in one place. Examples:
- The line (you can’t move the range or the hood)
- The dish pit (plumbing is expensive to relocate)
- The walk-in (unless you want to move a 1,000-pound fridge)
- Semi-Fixed Zones: These can move slightly but are tied to specific equipment. Examples:
- The prep area (needs to be near the walk-in and the line)
- The expo station (should be near the pass but can shift a few feet)
- The baking station (needs an oven but can share space with prep)
- Floating Zones: These are temporary stations that can be set up as needed. Examples:
- A dessert station (can be a rolling cart for weekend brunch)
- A catering prep area (can be the expo station after hours)
- A barista station (can be a corner of the prep table for morning coffee service)
How to Create Floating Zones Without Clutter
The key to flexible zones is modularity. Here’s how to do it:
- Use rolling carts: A mobile prep cart can serve as a dessert station, a catering prep area, or extra counter space during a rush.
- Mount equipment on wheels: Even heavy equipment like work tables can be put on casters for easy rearrangement.
- Invest in foldable tables: A wall-mounted drop-leaf table can be folded down when not in use.
- Use stackable containers: Store dry goods, utensils, and smallwares in stackable bins that can be moved out of the way.
Pro tip: Label everything. In a flexible kitchen, things move around. If your cooks have to hunt for the whisk every time they need it, you’ve lost the efficiency battle.
The Hidden Costs of a Bad Layout (And How to Avoid Them)
A poorly designed kitchen doesn’t just *feel* inefficient, it costs you money. Here’s how:
1. Labor Costs
In a bad layout, cooks waste steps, time, and energy. Let’s say your prep table is 10 feet from your walk-in. If a cook makes 10 trips between them per hour, that’s 100 feet of wasted movement. Over an 8-hour shift, that’s 800 feet-almost three football fields. Now multiply that by three cooks over 365 days. That’s 876,000 feet of wasted movement per year. At an average wage of $15/hour, that’s thousands of dollars in lost productivity.
How to fix it: Map your hot paths and minimize steps. Every unnecessary movement is money down the drain.
2. Food Waste
In a cramped kitchen, cross-contamination is inevitable. If your prep area is next to the dish pit, raw chicken juices can splash onto ready-to-eat salads. If your walk-in is too far from the line, ingredients sit out too long and spoil. The USDA estimates that 30–40% of food waste in restaurants comes from poor storage and handling.
How to fix it:
- Keep raw proteins separate from ready-to-eat foods.
- Store high-risk ingredients (like dairy) in the coldest part of the walk-in.
- Use clear, labeled containers to reduce spoilage.
3. Equipment Wear and Tear
When equipment is crammed together, it overheats, gets damaged, and wears out faster. Example: If your reach-in fridge is next to the oven, it has to work harder to stay cold. That means higher energy bills and shorter lifespan.
How to fix it:
- Keep heat-generating equipment (ovens, ranges) away from cold equipment (fridges, freezers).
- Leave at least 6 inches of clearance around equipment for airflow.
- Use under-counter fridges to free up floor space.
4. Employee Turnover
Let’s be real: No one wants to work in a chaotic kitchen. If your layout is inefficient, your team is stressed, burned out, and more likely to quit. The National Restaurant Association estimates that employee turnover costs restaurants $2,000–$14,000 per employee.
How to fix it:
- Ask your team for feedback. They’re the ones using the space every day.
- Design for comfort. Even small things, like a non-slip mat or a well-placed handwashing sink-make a difference.
- Keep it clean. A cluttered kitchen is a stressful kitchen.
Real-World Examples: Small Kitchens That Work (And Why)
Theory is great, but I learn best from real examples. Here are three small kitchens that nailed their layouts, and one that didn’t (and how they fixed it).
Example 1: The 200-Square-Foot Food Truck (Austin, TX)
The Challenge: A food truck with no room for error. The menu included breakfast tacos, burgers, and smoothies-three very different workflows.
The Solution:
- Multi-functional equipment: A tilting skillet handled eggs, burgers, and sautéed veggies.
- Vertical storage: Magnetic strips for knives and pegboard walls for utensils.
- Flexible zones: The prep table doubled as the expo station during rushes.
- Smart refrigeration: A two-door under-counter fridge stored proteins and dairy, while a reach-in held backup ingredients.
The Result: The truck went from serving 50 customers per hour to 120-without adding staff.
Example 2: The 400-Square-Foot Pop-Up (Nashville, TN)
The Challenge: A pop-up restaurant operating out of a shared commissary kitchen. The menu was seasonal and ever-changing, so the layout had to be flexible.
The Solution:
- Modular stations: Rolling carts for prep, expo, and dessert.
- Overhead storage: Wall-mounted shelves for dry goods and backup equipment.
- Shared equipment: A combi oven replaced the convection oven and steamer.
- Clear pathways: The dish pit was placed near the exit to avoid cross-traffic.
The Result: The pop-up doubled its seating capacity by freeing up space in the dining area.
Example 3: The 600-Square-Foot Neighborhood Bistro (Portland, OR)
The Challenge: A neighborhood bistro with a fixed menu but limited space. The owner wanted to add catering but didn’t have room for extra equipment.
The Solution:
- Floating zones: The expo station doubled as the catering prep area after hours.
- Under-counter storage: Drawers and shelves for smallwares and backup ingredients.
- Smart refrigeration: A three-door reach-in with adjustable shelves for different-sized containers.
- Vertical prep: Wall-mounted cutting boards saved counter space.
The Result: The bistro added catering without expanding the kitchen.
Example 4: The 300-Square-Foot Disaster (And How It Was Fixed)
The Challenge: A tiny ramen shop with a one-way layout. The walk-in was at the back, the prep table was in the middle, and the line was at the front. To get from the walk-in to the line, cooks had to pass the prep table twice-once to grab ingredients, and once to return dirty containers.
The Problems:
- Bottlenecks at the prep table during rushes.
- Cross-contamination from dirty containers passing through the prep area.
- Slow service because cooks were constantly backtracking.
The Fix:
- Added a secondary path: A narrow aisle behind the prep table let cooks move from the walk-in to the line without backtracking.
- Moved the dish pit: The dish sink was relocated near the expo station to avoid cross-traffic.
- Used vertical storage: Wall-mounted shelves for dry goods freed up floor space.
The Result: The shop reduced ticket times by 30% and eliminated cross-contamination issues.
DIY vs. Hiring a Pro: When to Call in the Experts
I’ll be honest: I’ve made mistakes designing kitchens. Like the time I convinced a client to install a wall-mounted knife rack without checking the fire suppression system. (Turns out, it blocked the hood’s airflow. Whoops.) Or the time I underestimated the size of a combi oven and had to cram it into a corner where no one could open the door.
So when should you DIY your layout, and when should you hire a pro? Here’s my rule of thumb:
DIY If:
- Your kitchen is under 500 square feet.
- You’re not moving plumbing or electrical.
- Your menu is simple (e.g., burgers, tacos, or pizza).
- You’re renting the space and can’t make permanent changes.
- You have a tight budget and can’t afford a designer.
Hire a Pro If:
- Your kitchen is over 500 square feet.
- You’re relocating plumbing, gas, or electrical.
- Your menu is complex (e.g., fine dining, multi-course meals).
- You’re building from scratch (e.g., a new restaurant or a major renovation).
- You’re not sure about local codes. (Trust me, you don’t want to fail a health inspection because your handwashing sink is too far from the line.)
How to Find a Good Kitchen Designer
If you decide to hire a pro, here’s how to find a good one:
- Look for experience with small kitchens. Not all designers understand the unique challenges of tight spaces.
- Ask for references. Talk to other restaurant owners who’ve worked with them.
- Check their portfolio. Do their designs look efficient, or just pretty?
- Make sure they understand your menu. A designer who’s only worked with fast-casual chains might not get a fine-dining workflow.
- Get a detailed quote. A good designer will break down costs and explain their choices.
Pro tip: Hire a designer who’s also a chef. They’ll understand the human side of kitchen design, the stuff that doesn’t show up on blueprints.
Putting It All Together: A Step-by-Step Guide to Optimizing Your Small Kitchen
Alright, let’s bring it all home. Here’s a step-by-step guide to optimizing your small kitchen layout:
Step 1: Measure Everything
Before you move a single piece of equipment, measure your space. And I don’t mean just the length and width-measure the height of your ceilings, the depth of your counters, and the clearance around your hood. Here’s what to measure:
- Total floor space (length × width)
- Ceiling height (for vertical storage)
- Counter depth (standard is 30 inches, but some are 24 or 36)
- Hood clearance (at least 18 inches on all sides)
- Doorways and aisles (minimum 36 inches for ADA compliance)
- Plumbing and electrical outlets (note their locations)
Pro tip: Sketch your kitchen to scale. Use graph paper or a free tool like SketchUp to visualize your space.
Step 2: Map Your Hot Paths
Grab a notepad and a highlighter. List every dish on your menu, then write out the steps to make it. Look for patterns-which steps happen most often? Which ingredients are used in multiple dishes? Those are your hot paths.
Example for a burger joint:
- Grab patty from the fridge
- Season on the prep table
- Cook on the griddle
- Toast bun on the range
- Assemble on the expo table
Now, draw these paths on your sketch. Where do they overlap? Where do they cross? Those are your bottlenecks.
Step 3: Identify Your Fixed Zones
Some things can’t move. Identify your fixed zones first:
- The line (range, hood, and any built-in equipment)
- The dish pit (sink, dishwasher, and drying racks)
- The walk-in (unless you’re willing to move a 1,000-pound fridge)
- Plumbing and electrical (relocating these is expensive)
Once you know what can’t move, you can work around it.
Step 4: Design Your Semi-Fixed Zones
These are the stations that can move slightly but are tied to specific equipment. Examples:
- The prep area (needs to be near the walk-in and the line)
- The expo station (should be near the pass but can shift a few feet)
- The baking station (needs an oven but can share space with prep)
Use the 5-foot rule to place these zones. Remember: No two frequently used stations should be more than 5 feet apart.
Step 5: Create Floating Zones
These are temporary stations that can be set up as needed. Examples:
- A dessert station (can be a rolling cart for weekend brunch)
- A catering prep area (can be the expo station after hours)
- A barista station (can be a corner of the prep table for morning coffee service)
Use modular equipment (rolling carts, foldable tables) to create these zones.
Step 6: Test Your Layout
Before you buy anything, test your layout. Here’s how:
- Simulate a rush: Have two cooks walk through the steps of your busiest dish. Do they bump into each other? Are they wasting steps?
- Check for bottlenecks: Are there choke points where multiple paths cross?
- Test the flow: Can cooks move in a loop without backtracking?
- Check for dead zones: Are there corners or nooks that aren’t being used?
If something doesn’t work, go back to the drawing board. It’s cheaper to fix a mistake on paper than in real life.
Step 7: Choose Your Equipment
Now that you know where everything goes, it’s time to choose your equipment. Remember: Every piece should earn its rent. Here’s what to look for:
- Multi-functional tools: A combi oven or tilting skillet can replace multiple pieces of equipment.
- Space-saving designs: Under-counter fridges, wall-mounted shelves, and rolling carts free up floor space.
- Easy-to-clean surfaces: Stainless steel is durable and hygienic.
- Energy-efficient models: They’ll save you money in the long run.
Pro tip: Buy used. Restaurant equipment holds its value, and you can often find gently used pieces for a fraction of the cost. Just make sure to inspect it thoroughly before buying.
Step 8: Install and Train
Once your equipment is in place, it’s time to train your team. Here’s how to make the transition smooth:
- Walk them through the new layout: Explain the hot paths and bottlenecks.
- Practice a rush: Simulate a busy shift to work out the kinks.
- Get feedback: Ask your team what’s working and what’s not. They’re the ones using the space every day.
- Make adjustments: If something isn’t working, fix it. A good layout is flexible.
Final Thoughts: The Secret to Small Kitchen Success
Here’s the thing about small kitchens: They force you to be creative. You can’t just throw money at the problem, you have to think differently. The best small kitchens I’ve seen aren’t the ones with the most expensive equipment or the fanciest design. They’re the ones where every inch has a purpose, where workflows are intuitive, and where the team actually enjoys working.
So where do you go from here? Start small. Pick one bottleneck in your kitchen and fix it. Maybe it’s the prep table that’s too far from the walk-in, or the dish pit that’s in the way of the line. Whatever it is, tackle it first. Then move on to the next. Before you know it, your kitchen won’t just *fit* your equipment, it’ll work for you.
And hey, if you get stuck, ask for help. Talk to other restaurant owners, hire a designer, or even post your layout online for feedback. The restaurant community is full of people who’ve been where you are, and they’re usually happy to help.
Now, I’ve got a question for you: What’s the biggest challenge in your small kitchen? Is it space? Workflow? Equipment? Drop a comment below, I’d love to hear your story. And if you found this guide helpful, share it with a fellow restaurateur. We’re all in this together.
FAQ: Small Kitchen Layout Optimization for Restaurants
Q: What’s the minimum size for a restaurant kitchen?
A: There’s no one-size-fits-all answer, but most health departments require at least 20 square feet per employee during peak hours. For a small restaurant with 3–4 cooks, that’s 60–80 square feet. However, this doesn’t account for equipment or workflow. A more realistic minimum for a fully functional kitchen is 300–400 square feet. Anything smaller than that, and you’ll need to get creative with your layout and equipment.
Q: How can I maximize storage in a small kitchen?
A: Vertical space is your best friend. Here are a few storage hacks:
- Wall-mounted shelves: Use them for dry goods, backup equipment, or even hanging herbs.
- Magnetic strips: Install them on walls or under shelves for knives and utensils.
- Pegboard walls: Customize them with hooks and shelves for pans, utensils, and smallwares.
- Under-counter storage: Use drawers and shelves for smallwares, backup ingredients, or even under-counter fridges.
- Stackable containers: Store dry goods, spices, and small ingredients in clear, stackable bins.
Pro tip: Label everything. In a small kitchen, things move around. If your cooks have to hunt for the whisk every time they need it, you’ve lost the efficiency battle.
Q: What’s the most efficient kitchen layout for a small restaurant?
A: The most efficient layout depends on your menu, workflow, and space constraints, but here are a few tried-and-true designs:
- The Assembly Line: Best for fast-casual or quick-service restaurants. Stations are arranged in a straight line, with each cook responsible for a specific task (e.g., grilling, assembling, plating). This layout minimizes steps and maximizes efficiency.
- The Island Layout: Best for small to medium-sized kitchens with multiple cooks. The main cooking equipment (range, griddle, fryer) is in the center, with prep and storage along the walls. This layout encourages teamwork and communication.
- The Zone Layout: Best for kitchens with diverse menus. The kitchen is divided into zones (e.g., prep, cooking, expo), each with its own equipment and workflow. This layout is flexible and can adapt to different menus.
No matter which layout you choose, remember the golden rules:
- Keep frequently used stations within 5 feet of each other.
- Design a loop so cooks can move in one direction without backtracking.
- Use vertical space to free up floor space.
- Avoid bottlenecks where multiple paths cross.
Q: How can I make my small kitchen feel bigger?
A: A small kitchen doesn’t have to *feel* small. Here are a few psychological tricks to make your space feel larger:
- Lighting: Use bright, even lighting to eliminate shadows and create the illusion of more space. Combine overhead LED panels with under-cabinet task lighting for depth.
- Color: Light colors (white, light gray, pale blue) reflect more light and make a space feel larger. Avoid dark colors, which absorb light and make a space feel smaller.
- Mirrors: Install stainless steel or mirrored backsplashes to reflect light and create the illusion of more space. Just make sure they’re easy to clean.
- Open shelving: Replace closed cabinets with open shelves to create a sense of openness. Just make sure to curate what’s visible-clutter will make the space feel smaller.
- Glass doors: If you have a reach-in fridge or freezer, opt for glass doors to create a sense of transparency and openness.
- Minimalism: Keep countertops and floors clear of clutter. The more open space, the larger the kitchen will feel.
Pro tip: Angle your equipment. Instead of lining everything up against the walls, angle your prep tables and workstations slightly. This creates a sense of movement and makes the space feel more dynamic.
And there you have it, a comprehensive guide to small kitchen layout optimization. Whether you’re designing a food truck, a pop-up, or a neighborhood bistro, these strategies will help you maximize every inch without sacrificing efficiency. Now, go forth and build a kitchen that works as hard as you do.
@article{small-kitchen-layout-optimization-for-restaurants-how-to-maximize-every-inch-without-sacrificing-efficiency,
    title   = {Small Kitchen Layout Optimization for Restaurants: How to Maximize Every Inch Without Sacrificing Efficiency},
    author  = {Chef's icon},
    year    = {2026},
    journal = {Chef's Icon},
    url     = {https://chefsicon.com/small-kitchen-layout-optimization-for-restaurants/}
}