The Best Fluffy Pancakes recipe you will fall in love with. Full of tips and tricks to help you make the best pancakes.
How to Measure Your Kitchen for Commercial Refrigeration Fit Without Losing Your Mind (or Your Money)
Let me tell you about the time I nearly ruined a restaurant’s opening day. It was 2023, and I was consulting for a small but ambitious café in East Nashville, think avocado toast meets live bluegrass. The owner, Maria, had just signed a lease on a charming but cramped space in a historic building. She was convinced her vision of a “cozy, efficient kitchen” would work. Then came the refrigeration unit.
Maria had ordered a shiny new under-counter commercial fridge online because, as she put it, “It looked perfect in the photos.” Spoiler: It wasn’t. The unit arrived, and we spent an entire afternoon trying to shoehorn it into a space that was, at best, half an inch too narrow. The door wouldn’t open fully, the ventilation was blocked, and the compressor overheated within hours. We ended up having to return it, eat the restocking fee, and start over. All because we didn’t measure properly.
If you’re reading this, you’re probably in one of two camps: You’re either about to order a commercial refrigeration unit and want to avoid my mistake, or you’ve already made a mistake and are frantically Googling how to fix it. Either way, you’re in the right place. Measuring your kitchen for a commercial fridge isn’t rocket science, but it’s also not as simple as grabbing a tape measure and calling it a day. There’s clearance for ventilation, door swing, electrical access, and about a dozen other factors that can turn your dream kitchen into a logistical nightmare if you ignore them.
In this guide, I’ll walk you through everything you need to know to measure your kitchen like a pro. We’ll cover the basics, the gotchas, and the “I wish someone had told me that” moments. By the end, you’ll be able to look at a spec sheet and a floor plan and know, with confidence, whether that reach-in cooler or walk-in freezer is going to fit. And if it doesn’t? You’ll know how to adjust your plans before you drop a dime. Let’s get started.
The Absolute Basics: What You’re Actually Measuring (And Why It Matters)
1. The Three Dimensions That Rule Your Kitchen: Width, Depth, and Height
This seems obvious, right? You measure the width, depth, and height of the space where you want the fridge to go, and you’re done. If only. The problem is that commercial refrigeration units don’t just sit in a space, they occupy it. And they need room to breathe, open, and function without turning your kitchen into a sauna.
First, let’s define the three dimensions you’ll be working with:
- Width: This is the side-to-side measurement of the space. For most units, this is the most critical dimension because it’s the hardest to adjust. If your space is 36 inches wide and your fridge is 37 inches, you’re out of luck. No amount of “wiggling” is going to make that work.
- Depth: This is the front-to-back measurement. Depth is often where people get tripped up because they forget to account for things like door handles, hinges, or ventilation clearance. A unit that’s 30 inches deep might actually need 34 inches of space once you factor in the door swing and airflow.
- Height: This is the top-to-bottom measurement. Height is usually the most forgiving dimension, but it’s not irrelevant. If you’re installing an under-counter unit, you’ll need to make sure there’s enough clearance for the compressor (which is often on top) and that it doesn’t block any cabinets or shelves above it.
Here’s where I messed up with Maria: We measured the width and depth of the space but didn’t account for the door swing. The fridge fit snugly when the door was closed, but as soon as we opened it, it blocked the main walkway. In a commercial kitchen, that’s a safety hazard and a workflow killer. Don’t make the same mistake.
2. The Invisible Fourth Dimension: Clearance
If you’ve ever looked at a spec sheet for a commercial fridge, you’ve probably seen the term ”clearance requirements.” This is the space the manufacturer recommends (or requires) around the unit for proper ventilation and access. Ignore this at your peril.
Most commercial refrigeration units need at least 2 to 4 inches of clearance on all sides, but this can vary depending on the type of unit and how it’s cooled. For example:
- Air-cooled units: These need the most clearance because they rely on airflow to dissipate heat. If you cram an air-cooled unit into a tight space, the compressor will overheat, and your fridge will turn into a very expensive icebox (or worse, a fire hazard).
- Self-contained units: These have the compressor built into the unit, so they still need some clearance, but not as much as air-cooled models. That said, don’t assume you can skimp, check the spec sheet.
- Remote-cooled units: These have the compressor located elsewhere (like on the roof or in a separate room), so they don’t need as much clearance around the fridge itself. But you’ll still need to account for the refrigerant lines and electrical connections.
I’ve seen kitchens where the fridge was installed with barely an inch of clearance on the sides, and within a month, the compressor was fried. Replacing a compressor isn’t cheap, and neither is the downtime while you wait for repairs. Do yourself a favor and give your fridge the space it needs.
3. Door Swing: The Silent Workflow Killer
This is the one that gets overlooked the most, and it’s the one that can turn a well-designed kitchen into a chaotic mess. The door swing of your fridge isn’t just about whether the door opens, it’s about whether it opens without blocking anything else.
Here’s how to measure it:
- Measure the width of the door when it’s fully open. This is usually the same as the width of the unit, but not always. Some doors are wider than the unit itself, especially if they have a hinge-side overlay.
- Measure the depth of the door swing. This is how far the door extends into the room when it’s open. For example, if your fridge is 30 inches deep and the door swings out 24 inches, you’ll need at least 54 inches of space in front of the unit to open the door fully.
- Check for obstructions. Does the door hit a wall, a counter, or another piece of equipment when it’s open? If so, you’ll need to either adjust the placement of the fridge or choose a unit with a different door style (like a sliding door or a French door).
Pro tip: If you’re tight on space, consider a reversible door. Many commercial fridges allow you to switch the hinge from the left to the right (or vice versa), which can give you more flexibility in how the door swings. Just make sure to check the spec sheet, some units require you to order the door in a specific configuration.
Tools of the Trade: What You’ll Need to Measure Like a Pro
4. The Right Tools for the Job
You don’t need a fancy laser measuring tool or a degree in architecture to measure your kitchen, but you do need a few basic tools. Here’s what I recommend:
- A 25-foot tape measure: You’ll need something long enough to measure the entire space, not just the spot where the fridge will go. A retractable tape measure is ideal because it’s easy to use and store.
- A notepad or digital app: You’re going to be taking a lot of measurements, and you don’t want to rely on your memory. I like to use a grid notebook so I can sketch out the space and label everything. If you prefer digital, apps like MagicPlan or Floorplanner can help you create a basic layout.
- A level: This isn’t strictly necessary for measuring, but it’s helpful if you’re checking whether the floor is level (which can affect how the fridge sits). Most commercial fridges have adjustable legs, but if the floor is too uneven, you might need to shim it.
- A flashlight: Kitchens can be dark, especially in corners or under counters. A flashlight will help you see what you’re measuring and spot any potential obstructions (like pipes or wiring) that you might otherwise miss.
- A helper: This isn’t a tool, but it’s invaluable. Measuring a kitchen by yourself is doable, but it’s a lot easier (and more accurate) if you have someone to hold the tape measure or check your work.
I’ve tried measuring kitchens with just my phone’s measuring app, and let me tell you, it’s not worth the hassle. The measurements are never as accurate as they need to be, and you’ll end up second-guessing yourself. Invest in a good tape measure, it’s the cheapest insurance you can buy.
5. How to Measure Accurately (Without Driving Yourself Crazy)
Measuring a kitchen isn’t just about slapping a tape measure against the wall and calling it a day. There’s a method to the madness, and if you skip steps, you’ll regret it later. Here’s how to do it right:
- Start with a rough sketch: Before you measure anything, sketch out the space on your notepad. Include the location of doors, windows, electrical outlets, plumbing, and any other obstructions. This doesn’t have to be pretty, it just has to be clear enough that you can reference it later.
- Measure the overall space: Measure the width, depth, and height of the entire area where the fridge will go. Write these numbers down in your sketch. Don’t assume the space is perfectly square, measure each wall individually.
- Measure the floor: Check for any uneven spots, slopes, or obstructions on the floor. If the floor isn’t level, you might need to adjust the fridge’s legs or use shims to level it. This is especially important for under-counter units, which can wobble if they’re not level.
- Measure for clearance: Remember those clearance requirements we talked about earlier? Now’s the time to measure them. Add at least 2 to 4 inches to each side of the fridge’s dimensions to account for ventilation. If the fridge has a compressor on top, make sure there’s enough clearance above it (usually at least 6 inches).
- Measure the door swing: This is where things get tricky. Measure the width of the door when it’s fully open, and the depth of the swing. Make sure there’s enough space for the door to open without hitting anything. If you’re tight on space, consider a reversible door or a sliding door.
- Measure for utilities: Check the location of electrical outlets, water lines, and drainage. Most commercial fridges need a dedicated electrical circuit, so you’ll need to make sure there’s an outlet nearby. If the fridge has a drain pan, you’ll need to make sure it’s close to a drain or that you can run a drain line.
- Double-check everything: This is the step most people skip, and it’s the one that can save you the most headaches. Go back and measure everything again. Compare your measurements to the spec sheet for the fridge you’re considering. If anything doesn’t add up, measure a third time.
I can’t tell you how many times I’ve measured a space, ordered a fridge, and then realized I missed something. The last time this happened, I forgot to account for the hinge-side overlay on a reach-in cooler, and the door wouldn’t open all the way. It was a rookie mistake, and it cost me a week of downtime while we waited for a replacement. Learn from my mistakes, measure twice, order once.
Types of Commercial Refrigeration Units: What Fits Where?
6. Under-Counter Refrigerators: The Space-Saving Workhorse
If you’re working with a small kitchen or a tight space, an under-counter refrigerator is often the best choice. These units are designed to fit under a counter or worktable, which makes them ideal for bars, cafés, or food trucks. But don’t let their compact size fool you, they still need proper clearance and ventilation.
Here’s what to consider when measuring for an under-counter unit:
- Height: Most under-counter fridges are 34 to 36 inches tall, but you’ll need to make sure there’s enough clearance above the unit for the compressor (usually at least 6 inches). If you’re installing the fridge under a counter, measure the height of the counter and subtract the height of the fridge. You’ll need at least 1 to 2 inches of clearance for the compressor.
- Depth: Under-counter fridges are usually 24 to 30 inches deep, but you’ll need to account for the door swing and ventilation. If the fridge is going under a counter, make sure the door can open fully without hitting the counter or any other equipment.
- Width: These units typically come in 24-inch, 36-inch, or 48-inch widths. Measure the width of the space carefully, if you’re installing the fridge between two cabinets, make sure there’s enough room for the hinges and door swing.
- Ventilation: Even though these units are compact, they still need 2 to 4 inches of clearance on the sides and back for proper airflow. If the fridge is going under a counter, make sure the counter doesn’t block the ventilation.
One thing I’ve learned the hard way: Under-counter fridges are not one-size-fits-all. Just because a unit is labeled as “under-counter” doesn’t mean it will fit under your counter. Always check the spec sheet and measure your space carefully.
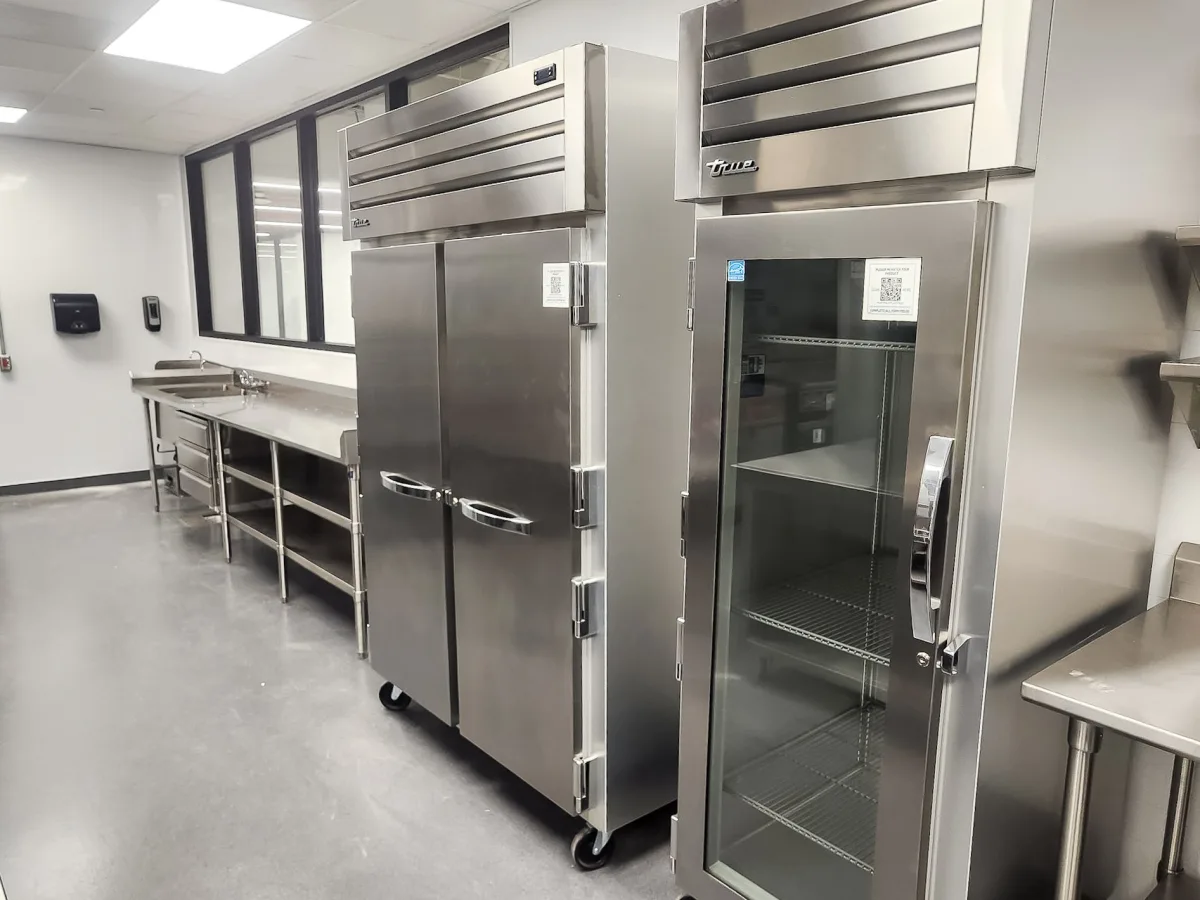
7. Reach-In Coolers and Freezers: The Backbone of Most Kitchens
Reach-in coolers and freezers are the workhorses of commercial kitchens. They’re versatile, easy to access, and come in a variety of sizes. But they’re also bulky, and if you don’t measure properly, they can quickly become a workflow nightmare.
Here’s what to keep in mind when measuring for a reach-in unit:
- Width: Reach-in units typically come in 27-inch, 36-inch, 48-inch, or 72-inch widths. The width you choose will depend on how much storage you need and how much space you have. If you’re tight on space, a 27-inch or 36-inch unit might be your best bet. If you need more storage, a 48-inch or 72-inch unit will give you more capacity, but you’ll need to make sure you have the room for it.
- Depth: Most reach-in units are 30 to 34 inches deep, but you’ll need to account for the door swing and ventilation. If the unit is going against a wall, make sure there’s enough clearance behind it (usually at least 2 to 4 inches).
- Height: Reach-in units are usually 78 to 84 inches tall, so you’ll need to make sure there’s enough clearance above them. If you’re installing the unit under a hood or shelf, measure the height carefully to avoid any obstructions.
- Door swing: This is where most people go wrong. Reach-in units have full-height doors, which means they swing out a long way. Measure the width of the door when it’s fully open, and make sure there’s enough space for it to open without hitting anything. If you’re tight on space, consider a reversible door or a sliding door.
- Ventilation: Reach-in units need 2 to 4 inches of clearance on all sides for proper airflow. If the unit is going against a wall, make sure there’s enough space behind it. If it’s going next to another piece of equipment, leave at least 2 inches of clearance between them.
I once worked with a restaurant that installed a 72-inch reach-in cooler in a space that was barely wide enough for it. The door couldn’t open fully, and the staff had to squeeze past it every time they needed to access the fridge. It was a disaster. Don’t make the same mistake, measure the door swing carefully, and make sure there’s enough space for the staff to move around.
8. Walk-In Coolers and Freezers: The Big Guns
If you’re running a large kitchen, a walk-in cooler or freezer is often the best choice. These units offer massive storage capacity and are designed to be walked into, which makes them ideal for restaurants, grocery stores, or catering businesses. But they’re also the most complex to install, and if you don’t measure properly, you could end up with a unit that doesn’t fit or doesn’t function properly.
Here’s what to consider when measuring for a walk-in unit:
- Overall dimensions: Walk-in units are custom-built, so you’ll need to measure the length, width, and height of the space carefully. Keep in mind that walk-ins are usually installed in modular panels, so the dimensions can vary slightly depending on how the panels are configured.
- Ceiling height: Walk-in units need a minimum ceiling height of 7 feet 6 inches, but this can vary depending on the unit. If your ceiling is lower than this, you might need to choose a low-profile unit or adjust the height of the space.
- Door clearance: The door of a walk-in unit is usually 36 inches wide, but you’ll need to make sure there’s enough space for it to open fully. Measure the width of the door swing and make sure there’s enough room for staff to enter and exit comfortably.
- Ventilation: Walk-in units need proper ventilation to function efficiently. If the unit is going indoors, you’ll need to make sure there’s enough airflow around it. If it’s going outdoors, you’ll need to account for weatherproofing and insulation.
- Floor space: Walk-in units are heavy, so you’ll need to make sure the floor can support the weight. Most walk-ins require a concrete slab or a reinforced floor. If you’re installing the unit on an upper floor, you’ll need to consult an engineer to make sure the floor can handle the load.
- Utilities: Walk-in units require electrical power, refrigerant lines, and sometimes drainage. Make sure there’s enough space for these utilities and that they’re easily accessible.
Walk-in units are a big investment, and they’re not something you can easily return or replace. If you’re considering a walk-in, I highly recommend working with a professional installer or refrigeration specialist. They can help you measure the space properly and choose a unit that fits your needs.
The Devil’s in the Details: Common Mistakes and How to Avoid Them
9. Overlooking Obstructions: Pipes, Wires, and Other Hidden Hazards
This is the mistake that haunts me the most. I can’t tell you how many times I’ve measured a space, ordered a fridge, and then realized there’s a pipe, wire, or duct in the way. These obstructions can turn a simple installation into a nightmare, and they’re often hidden behind walls or under counters.
Here’s how to spot them:
- Look for visible obstructions: Check the walls, floor, and ceiling for any pipes, wires, or ducts. If you see something, measure how much space it takes up and adjust your plans accordingly.
- Check behind walls: If you’re installing a fridge against a wall, use a stud finder or flashlight to check for hidden obstructions. If you’re not sure, cut a small hole in the drywall (or remove a panel) to get a better look.
- Consult the building plans: If you have access to the building’s blueprints or electrical plans, use them to identify any hidden obstructions. If you don’t have plans, ask the landlord or building manager, they might have them on file.
- Call a professional: If you’re not sure what you’re looking at, don’t guess. Call a plumber, electrician, or HVAC technician to inspect the space. It’s better to spend a little money upfront than to deal with a costly mistake later.
I once installed a reach-in cooler in a space that looked perfect, until we realized there was a water pipe running right where the fridge was supposed to go. We had to reroute the pipe, which cost us time and money. Don’t make the same mistake, check for obstructions before you order anything.
10. Ignoring Workflow: How the Fridge Affects Your Kitchen’s Efficiency
A commercial kitchen is like a well-oiled machine, and every piece of equipment plays a role in keeping it running smoothly. If you install a fridge in the wrong spot, it can disrupt the workflow and make it harder for your staff to do their jobs. This is something I see all the time, and it’s one of the biggest mistakes you can make.
Here’s how to avoid it:
- Map out your workflow: Before you install the fridge, think about how your staff moves through the kitchen. Where are the prep stations, cooking stations, and serving areas? Where do people need to access the fridge the most? The fridge should be in a spot that’s easy to reach but doesn’t block the main walkways.
- Consider the door swing: If the fridge is in a high-traffic area, make sure the door can open fully without blocking the walkway. If it can’t, consider a sliding door or a reversible door.
- Think about proximity: The fridge should be close to the areas where it’s needed most. For example, if you’re using it to store dairy products, it should be near the coffee station or dessert prep area. If it’s a walk-in freezer, it should be close to the storage area or receiving dock.
- Test it out: Before you finalize the installation, do a dry run. Have your staff walk through the kitchen and see how the fridge fits into their workflow. If something doesn’t feel right, adjust the placement.
I’ve seen kitchens where the fridge was installed in a corner that was technically the right size but was so far from the prep area that the staff had to walk across the kitchen every time they needed something. It was a waste of time and energy, and it made the kitchen less efficient. Don’t let this happen to you, think about workflow before you install anything.
Putting It All Together: Your Step-by-Step Measuring Checklist
Alright, let’s recap. By now, you should have a good idea of what it takes to measure your kitchen for a commercial refrigeration unit. But to make things easier, I’ve put together a step-by-step checklist that you can follow. Print this out, grab your tape measure, and get to work.
Step 1: Gather Your Tools
- A 25-foot tape measure
- A notepad or digital app for sketching
- A level (optional but helpful)
- A flashlight
- A helper (highly recommended)
Step 2: Sketch the Space
- Draw a rough sketch of the area where the fridge will go.
- Include the location of doors, windows, electrical outlets, plumbing, and any other obstructions.
- Label everything clearly.
Step 3: Measure the Overall Space
- Measure the width, depth, and height of the entire area.
- Write these numbers down in your sketch.
- Measure each wall individually, don’t assume the space is perfectly square.
Step 4: Measure the Floor
- Check for any uneven spots, slopes, or obstructions on the floor.
- If the floor isn’t level, note how much adjustment you’ll need.
Step 5: Measure for Clearance
- Add at least 2 to 4 inches to each side of the fridge’s dimensions for ventilation.
- If the fridge has a compressor on top, make sure there’s at least 6 inches of clearance above it.
- If the fridge is going against a wall, make sure there’s enough clearance behind it.
Step 6: Measure the Door Swing
- Measure the width of the door when it’s fully open.
- Measure the depth of the swing.
- Make sure there’s enough space for the door to open fully without hitting anything.
- If you’re tight on space, consider a reversible door or a sliding door.
Step 7: Measure for Utilities
- Check the location of electrical outlets, water lines, and drainage.
- Make sure there’s a dedicated electrical circuit nearby.
- If the fridge has a drain pan, make sure it’s close to a drain or that you can run a drain line.
Step 8: Check for Obstructions
- Look for pipes, wires, ducts, or other hidden obstructions.
- Use a stud finder or flashlight to check behind walls.
- Consult the building plans if you have them.
- If you’re not sure, call a professional.
Step 9: Double-Check Everything
- Go back and measure everything again.
- Compare your measurements to the spec sheet for the fridge you’re considering.
- If anything doesn’t add up, measure a third time.
Step 10: Finalize Your Plans
- Use your measurements to choose the right fridge for your space.
- If you’re still not sure, consult a refrigeration specialist or kitchen designer.
- Order your fridge and schedule the installation.
Final Thoughts: Measure Twice, Order Once (And Maybe Measure a Third Time)
Measuring your kitchen for a commercial refrigeration unit isn’t glamorous, but it’s one of the most important steps in setting up a functional, efficient kitchen. Get it right, and you’ll have a fridge that fits perfectly, works reliably, and keeps your food at the right temperature. Get it wrong, and you’ll be dealing with overheating compressors, blocked door swings, and costly returns.
I’ve made my fair share of mistakes over the years, and I’ve learned the hard way that it’s always better to measure twice (or three times) than to assume everything will fit. So grab your tape measure, follow this guide, and take your time. Your future self, and your kitchen staff, will thank you.
And if you’re still not sure? Don’t hesitate to call in a professional. A refrigeration specialist or kitchen designer can help you navigate the complexities of commercial kitchen design and make sure your fridge fits perfectly. It’s a small investment that can save you a lot of headaches down the road.
Now, go forth and measure. And remember: If Maria can learn from her mistakes, so can you.
FAQ: Your Burning Questions About Measuring for Commercial Refrigeration
Q: How much clearance do I really need around my commercial fridge?
A: Most commercial refrigeration units need at least 2 to 4 inches of clearance on all sides for proper ventilation. However, this can vary depending on the type of unit and how it’s cooled. Air-cooled units need the most clearance, while remote-cooled units need less. Always check the spec sheet for the unit you’re considering, and when in doubt, give it a little extra space. It’s better to have too much clearance than not enough.
Q: Can I install a commercial fridge against a wall, or does it need space on all sides?
A: You can install a commercial fridge against a wall, but you’ll still need to leave some clearance for ventilation. Most units need at least 2 to 4 inches of clearance behind them, even if they’re against a wall. If the fridge has a compressor on the back, you’ll need to make sure there’s enough airflow to prevent overheating. If you’re tight on space, consider a unit with a top-mounted compressor, which doesn’t need as much clearance behind it.
Q: What’s the best way to measure for a walk-in cooler or freezer?
A: Measuring for a walk-in cooler or freezer is more complex than measuring for a reach-in or under-counter unit. Here’s what you’ll need to do:
- Measure the length, width, and height of the space carefully. Walk-ins are usually installed in modular panels, so the dimensions can vary slightly.
- Check the ceiling height. Walk-ins need a minimum ceiling height of 7 feet 6 inches, but this can vary depending on the unit.
- Measure the door clearance. The door of a walk-in unit is usually 36 inches wide, so make sure there’s enough space for it to open fully.
- Check the floor space. Walk-ins are heavy, so you’ll need to make sure the floor can support the weight. Most walk-ins require a concrete slab or a reinforced floor.
- Plan for utilities. Walk-ins require electrical power, refrigerant lines, and sometimes drainage. Make sure there’s enough space for these utilities and that they’re easily accessible.
Because walk-ins are such a big investment, I highly recommend working with a professional installer or refrigeration specialist to make sure you get the measurements right.
Q: What should I do if my measurements don’t match the spec sheet for the fridge I want?
A: If your measurements don’t match the spec sheet, you have a few options:
- Adjust the space: If the fridge is slightly too big, you might be able to adjust the space by moving a wall, removing a cabinet, or relocating a pipe or wire. This isn’t always possible, but it’s worth considering if you’re really set on a particular unit.
- Choose a different fridge: If the space can’t be adjusted, you’ll need to choose a different fridge that fits your measurements. Most manufacturers offer a variety of sizes, so you should be able to find something that works.
- Consult a professional: If you’re not sure what to do, call a refrigeration specialist or kitchen designer. They can help you figure out your options and make the best decision for your space.
Whatever you do, don’t try to force a fridge into a space that’s too small. It’s not worth the risk of overheating, poor performance, or safety hazards.
@article{how-to-measure-your-kitchen-for-commercial-refrigeration-fit-a-step-by-step-guide-to-avoid-costly-mistakes,
    title   = {How to Measure Your Kitchen for Commercial Refrigeration Fit: A Step-by-Step Guide to Avoid Costly Mistakes},
    author  = {Chef's icon},
    year    = {2026},
    journal = {Chef's Icon},
    url     = {https://chefsicon.com/how-to-measure-your-kitchen-for-commercial-refrigeration-fit/}
}